spring 的 事件监听机制实现以及使用线程池异步处理监听事件
使用spring提供的事件监听机制:
为什么需要使用事件这种模式?
spring中实现事件有几种方式?
上述两个问题可以参考:
链接博客
本文主要是解释如何通过注解简便实现事件监听以及让事件监听支持异步。
1.使用注解实现事件监听
涉及三个对象:
1)监听的事件(提供事件处理时的元数据)
2)监听器(事件处理者)
3)事件发布者(调用者)
事件:
实现 ApplicationEvent 类
import lombok.Getter;
import org.springframework.context.ApplicationEvent;


public class MessageEvent extends ApplicationEvent {
    @Getter
    private String message;

    public MessageEvent(Object source, String message) {
        super(source);
        this.message = message;
    }
}
监听器:
使用 @EventListener注解标注事件被触发时执行的方法(默认是同步执行,异步需要额外配置),支持多个监听器监听一个事件
import lombok.RequiredArgsConstructor;
import lombok.extern.slf4j.Slf4j;
import org.springframework.context.event.EventListener;
import org.springframework.stereotype.Component;

@Slf4j
@Component
@RequiredArgsConstructor
public class MessageEventHandler {

    @EventListener
    public void handle(MessageEvent event) throws InterruptedException {
    	Thread.sleep(1000);
        log.info("-----------MessageEvent 被handle处理 message:{}----------", event.getMessage());
    }
    @EventListener
    public void handle2(MessageEvent event) throws InterruptedException {
    	Thread.sleep(1000);
        log.info("-----------MessageEvent 被handle2处理 message:{}----------", event.getMessage());
    }
}
事件发布者(调用者):
通过ApplicationEventPublisher 的publishEvent方法 发布事件。
import lombok.extern.slf4j.Slf4j;
import org.springframework.context.ApplicationEventPublisher;
import org.springframework.context.ApplicationEventPublisherAware;
import org.springframework.stereotype.Component;

@Component
@Slf4j
public class EventPublisher implements ApplicationEventPublisherAware {

    private ApplicationEventPublisher eventPublisher;

    public void publish(MessageEvent event) throws InterruptedException {
        eventPublisher.publishEvent(event);
        log.info("----------------触发完成-------------");
    }

    @Override
    public void setApplicationEventPublisher(ApplicationEventPublisher applicationEventPublisher) {
        this.eventPublisher = applicationEventPublisher;
    }

}
测试方法:
    @Test
    public void testEvent() throws InterruptedException {
        eventPublisher.publish(new MessageEvent(this, "testEvent"));
    }
执行结果:
从结果看即使handle方法sleep 1s ,里面的日志任然先于“触发完成”打印,验证了监听器是同步执行的。
![]()
2.配置监听器异步执行
2.1 配置异步执行有两种方式
2.1.1 自定义ApplicationEventMulticaster,并设置线程池。
监听器最终是通过ApplicationEventMulticaster内部的实现来调用的,所以我们关注的重点就是这个类,这个类默认有个实现类SimpleApplicationEventMulticaster,这个类是支持监听器异步调用的,里面有个字段:
private Executor taskExecutor;
SimpleApplicationEventMulticaster中事件监听器的调用,最终会执行下面这个方法
@Override
public void multicastEvent(final ApplicationEvent event, @Nullable ResolvableType eventType) {
    ResolvableType type = (eventType != null ? eventType : resolveDefaultEventType(event));
    Executor executor = getTaskExecutor();
    for (ApplicationListener listener : getApplicationListeners(event, type)) {
        if (executor != null) {
            executor.execute(() -> invokeListener(listener, event));
        }
        else {
            invokeListener(listener, event);
        }
    }
}
在 executor 不为空时会使用线程池去执行 invokeListener(自定义监听事件)
所以我们只要定义一个SimpleApplicationEventMulticaster 的bean并设置他的taskExecutor就可以异步了。
代码:
import org.springframework.context.annotation.Bean;
import org.springframework.context.annotation.Configuration;
import org.springframework.context.event.ApplicationEventMulticaster;
import org.springframework.context.event.SimpleApplicationEventMulticaster;
import org.springframework.scheduling.concurrent.ThreadPoolTaskExecutor;

import javax.annotation.Resource;

@Configuration
public class ApplicationEventAsyncConfig {

    @Resource
    private ThreadPoolTaskExecutor myExecutor;

    @Bean
    public ApplicationEventMulticaster applicationEventMulticaster() { //@1
        //创建一个事件广播器
        SimpleApplicationEventMulticaster result = new SimpleApplicationEventMulticaster();
        //设置异步执行器,来完成异步执行监听事件这样会导致所有的监听器都异步执行
        result.setTaskExecutor(myExecutor);
        return result;
    }
}
ThreadPoolTaskExecutor 配置类:
import org.springframework.context.annotation.Bean;
import org.springframework.context.annotation.Configuration;
import org.springframework.scheduling.concurrent.ThreadPoolTaskExecutor;

import java.util.concurrent.Executor;
import java.util.concurrent.ThreadPoolExecutor;

@Configuration
public class ThreadPoolConfig {

    @Bean("myExecutor")
    public Executor taskExecutor() {
        ThreadPoolTaskExecutor taskExecutor = new ThreadPoolTaskExecutor();
        //设置线程池参数信息
        taskExecutor.setCorePoolSize(8);
        taskExecutor.setMaxPoolSize(20);
        taskExecutor.setQueueCapacity(50);
        taskExecutor.setKeepAliveSeconds(60);
        taskExecutor.setThreadNamePrefix("myExecutor--");
        taskExecutor.setWaitForTasksToCompleteOnShutdown(true);
        // 设置线程池中任务的等待时间,如果超过这个时候还没有销毁就强制销毁,以确保应用最后能够被关闭,而不是阻塞住。
        taskExecutor.setAwaitTerminationSeconds(60);
        //修改拒绝策略为使用当前线程执行
        taskExecutor.setRejectedExecutionHandler(new ThreadPoolExecutor.CallerRunsPolicy());
        //初始化线程池
        taskExecutor.initialize();
        return taskExecutor;
    }
}
此时重新执行上面的测试方法:
此时已经是异步执行了,而且线程名字前缀也换成了 myExecutor

弊端:这样会使所有的监听器都异步执行
2.1.2 使用@Async 注解来达到部分监听器异步执行
1)@Async 需要在启动类上标注 @EnableAsync 来标识支持异步
2)配置线程池(@Async默认情况下用的是SimpleAsyncTaskExecutor线程池,该线程池不是真正意义上的线程池使用此线程池无法实现线程重用,每次调用都会新建一条线程。若系统中不断的创建线程,最终会导致系统占用内存过高,引发OutOfMemoryError错误)
也可以通过@Async("线程池bean名称“)来决定使用哪个线程池,如果有多个线程池,但是在@Async注解里面没有指定的话,会默认加载第一个配置的线程池
3)配置异常处理(子线程执行异常无法被主线程捕获)
定义SpringAsyncConfiguration 类实现AsyncConfigurer 接口去定义执行的线程池和异常处理类(只能处理无返回值的异常)。
import lombok.extern.slf4j.Slf4j;
import org.springframework.aop.interceptor.AsyncUncaughtExceptionHandler;
import org.springframework.context.annotation.Configuration;
import org.springframework.scheduling.annotation.AsyncConfigurer;
import org.springframework.scheduling.concurrent.ThreadPoolTaskExecutor;

import javax.annotation.Resource;
import java.lang.reflect.Method;
import java.util.concurrent.Executor;

@Configuration
@Slf4j
public class SpringAsyncConfiguration implements AsyncConfigurer {

    @Resource
    private ThreadPoolTaskExecutor myExecutor;

    @Override
    public Executor getAsyncExecutor() {
        return myExecutor;
    }

    @Override
    public AsyncUncaughtExceptionHandler getAsyncUncaughtExceptionHandler() {
        return new SpringAsyncExceptionHandler();
    }

    class SpringAsyncExceptionHandler implements AsyncUncaughtExceptionHandler {
        @Override
        public void handleUncaughtException(Throwable throwable, Method method, Object... obj) {
            log.error("Exception occurs in async method:{} ,err:{}",method.getName(), throwable.getMessage());
        }
    }
}
4)测试
MessageEventHandler:
import lombok.RequiredArgsConstructor;
import lombok.extern.slf4j.Slf4j;
import org.springframework.context.event.EventListener;
import org.springframework.scheduling.annotation.Async;
import org.springframework.stereotype.Component;

@Slf4j
@Component
@RequiredArgsConstructor
public class MessageEventHandler {


    //支持多个监听器监听一个事件
    @Async  //新启线程异步执行,EventListener原本是同步执行
    @EventListener
    public void handle(MessageEvent event) throws InterruptedException {
        log.info("-----------MessageEvent 被handle处理 message:{}----------", event.getMessage());
    }

    @Async
    @EventListener
    public void handle2(MessageEvent event) throws InterruptedException {
        log.info("-----------MessageEvent 被handle2处理 message:{}----------", event.getMessage());
    }


//    @EventListener
//    //通过自定义ApplicationEventMulticaster 设置线程池来达到异步执行监听方法
//    public void handle(MessageEvent event) throws InterruptedException {
//        Thread.sleep(1000);
//        log.info("-----------MessageEvent 被handle处理 message:{}----------", event.getMessage());
//    }
//
//    @EventListener
//    //通过自定义ApplicationEventMulticaster 设置线程池来达到异步执行监听方法
//    public void handle2(MessageEvent event) throws InterruptedException {
//        Thread.sleep(1000);
//        log.info("-----------MessageEvent 被handle2处理 message:{}----------", event.getMessage());
//    }
}
执行结果:
结果和之前一样![]()
3 监听器执行顺序
使用 @Order(int 类型的值value) 注解可以定义监听器的执行顺序,value越小优先级越高。
1)同步执行情况下
   @EventListener
    @Order(1)
    //通过自定义ApplicationEventMulticaster 设置线程池来达到异步执行监听方法
    public void handle(MessageEvent event) throws InterruptedException {
        Thread.sleep(2000);
        log.info("-----------MessageEvent 被handle处理 message:{}----------", event.getMessage());
    }

    @EventListener
    @Order(2)
    //通过自定义ApplicationEventMulticaster 设置线程池来达到异步执行监听方法
    public void handle2(MessageEvent event) throws InterruptedException {
//        Thread.sleep(1000);
        log.info("-----------MessageEvent 被handle2处理 message:{}----------", event.getMessage());
    }
执行结果:
多次执行结果一致,handle优先handle2执行

2)异步执行情况下:
MessageEventHandler:
  //支持多个监听器监听一个事件
    @Async  //新启线程异步执行,EventListener原本是同步执行
    @EventListener
    @Order(1)
    public void handle(MessageEvent event) throws InterruptedException {
        Thread.sleep(2000);
        log.info("-----------MessageEvent 被handle处理 message:{}----------", event.getMessage());
    }

    @Async  //新启线程异步执行,EventListener原本是同步执行
    @EventListener
    @Order(2)
    public void handle2(MessageEvent event) throws InterruptedException {
        log.info("-----------MessageEvent 被handle2处理 message:{}----------", event.getMessage());
    }
测试类
 @Test
    public void testEvent() throws InterruptedException {
        eventPublisher.publish(new MessageEvent(this, "testEvent"));
        //异步测试需要sleep 防止主线程执行完了,子线程未执行完导致中断。
        Thread.sleep(3000);
    }
执行结果:
多次执行handle2 先于handle 执行,所以异步情况下无法控制执行顺序。
![]()
@Async 带有返回值无异常:‘
 	@Async
    public Future returnResult(){
        log.info("---------异步请求被执行--------------");
        return  AsyncResult.forValue(12);
    }
测试:
@SpringBootTest
public class AsyncTest {
    @Resource
    private AsyncServer asyncServer;

    @Test
    public void testAsync(){
        final Future future = asyncServer.returnResult();
        System.out.println("已发起异步调用请求");
        try {
            System.out.println("异步返回值:"+future.get());
        } catch (InterruptedException e) {
            System.out.println("InterruptedException 异常:"+e.getMessage());
        } catch (ExecutionException e) {
            System.out.println("ExecutionException 异常:"+e.getMessage());
        }
    }
结果:

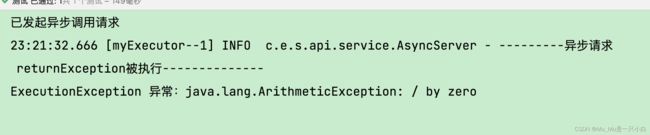
@Async 带有返回值抛出异常:‘
   @Async
    public Future returnException(){
        log.info("---------异步请求returnException被执行--------------");
        int i=1/0;
        return new AsyncResult<>(12);
    }
测试:
  public void testAsyncException(){
        final Future future = asyncServer.returnException();
        System.out.println("已发起异步调用请求");
        try {
            System.out.println("异步返回值:"+future.get());
        } catch (InterruptedException e) {
            System.out.println("InterruptedException 异常:"+e.getMessage());
        } catch (ExecutionException e) {
            System.out.println("ExecutionException 异常:"+e.getMessage());
        }
    }
结果:
异常在调用future.get()时被抛出。
4 线程池的基本使用
4.1 任务提交
submit和executor都可以提交任务
https://zhuanlan.zhihu.com/p/387038423
submit和executor区别:
execute和submit都属于线程池的方法,execute只能提交Runnable类型的任务,而submit既能提交Runnable类型任务也能提交Callable类型任务。
execute会直接抛出任务执行时的异常,submit会吃掉异常,可通过Future的get方法[会阻塞]将任务执行时的异常重新抛出。
execute所属顶层接口是Executor,submit所属顶层接口是ExecutorService,实现类ThreadPoolExecutor重写了execute方法,抽象类AbstractExecutorService重写了submit方法。
这种提交的方式会返回一个Future对象,这个Future对象代表这线程的执行结果
当主线程调用Future的get方法的时候会获取到从线程中返回的结果数据。
如果在线程的执行过程中发生了异常,get会获取到异常的信息。
 Future submit(Callable task);

当线程正常结束的时候调用Future的get方法会返回result对象,当线程抛出异常的时候会获取到对应的异常的信息。
 Future submit(Runnable task, T result);

提交一个Runable接口的对象,这样当调用get方法的时候,如果线程执行成功会直接返回null,如果线程执行异常会返回异常的信息
Future submit(Runnable task);

void execute(Runnable command);
1) 有返回值(submit 提交callable 带返回值)正常执行:
    @Resource()
    private ThreadPoolTaskExecutor executor;

    @Test
    public void testThreadPool() {
        Future future = executor.submit(() -> {
            log.info("线程池提交任务");
            return 1;
        });
        try {
            log.info("线程池执行结果:{}", future.get());
        } catch (InterruptedException e) {
            e.printStackTrace();
        } catch (ExecutionException e) {
            e.printStackTrace();
        }
    }
结果:
![]()
2)有返回值抛出异常
   @Test
    public void testThreadPoolException() {
        Future future = executor.submit(() -> {
            log.info("线程池提交出任务");
            int i = 1 / 0;
            return 1;
        });
        try {
            //future.get() 线程出现异常能被捕获
            log.info("线程池执行结果:{}", future.get());
        } catch (InterruptedException e) {
            log.info("线程池执行异常 InterruptedException:{}", e.getMessage());
        } catch (ExecutionException e) {
            log.info("线程池执行异常 ExecutionException :{} ", e.getMessage());
        }
    }
结果:
调用future.get()异常可以被捕获
![]()
3)无返回值(submit 提交方法Runnable 无返回值)出现异常
@Test
    public void testThreadPoolException2() {
        try {
            //submit 提交Runnable 子线程异常会被吃掉,不会被捕获
            executor.submit(() -> {
                log.info("线程池提交出任务");
                int i = 1 / 0;
            });
        } catch (RuntimeException e) {
            //有异常不会进入
            log.info("线程池执行异常 RuntimeException:{}", e.getMessage());
        }
    }
结果:
异常不能被捕获。

解决线程池Runnable任务异常捕获:
1)调用Future的get方法
    @Test
    public void testRunablelException() {
        try {
            //submit 提交Runnable 子线程异常会被吃掉,不会被捕获
            Future<?> future = executor.submit(() -> {
                log.info("线程池提交出任务");
                int i = 1 / 0;
            });
            future.get();
        } catch (RuntimeException | InterruptedException | ExecutionException e) {
            //有异常不会进入
            log.info("线程池执行异常 RuntimeException:{}", e.getMessage());
        }
    }
结果:
异常被捕获,但是对于Runable任务我们一般不希望等待它执行完毕。
![]()
2)run方法中try catch
@Test
public void testThreadPoolException2() {
        executor.submit(() -> {
          try {
            log.info("线程池提交出任务");
            int i = 1 / 0;
            } catch (RuntimeException e) {
        //有异常不会进入
        log.info("线程池执行异常 RuntimeException:{}", e.getMessage());
    }
        });

}
将 try catch 移入run方法里面即可,但是这样每次都要为run方法写try catch 太麻烦,可以自定义代理类代理Runnable 在执行run方法的时候捕获异常。
import lombok.extern.slf4j.Slf4j;

@Slf4j
public class RunnableTask implements  Runnable{
    private Runnable runnable;

    public RunnableTask(Runnable runnable) {
        this.runnable = runnable;
    }

    @Override
    public void run() {
        try {
            this.runnable.run();
        }catch (Exception e){
            log.error("线程{} 执行任务失败 err",Thread.currentThread().getName(),e);
        }
    }
}
使用:
@Test
    public void testThreadPoolException4() {
            executor.submit(new RunnableTask(() -> {
                log.info("线程池提交出任务");
                int i = 1 / 0;
            }));
    }
结果:
无论是submit还是 execute提交任务出现异常都成功被捕获。

4)之前监听器方法无返回值抛出异常
   //支持多个监听器监听一个事件
    @Async  //新启线程异步执行,EventListener原本是同步执行
    @EventListener
    public void handle(MessageEvent event) throws InterruptedException {
        int i=1/0;
        log.info("-----------MessageEvent 被handle处理 message:{}----------", event.getMessage());
    }
结果:
被自定义的异常处理类 SpringAsyncExceptionHandler捕获
![]()
线程池异常捕获总结:
1.对于 callable 有返回值的任务,推荐均使用Future 接收任务 ,在调用 future.get()时自己捕获异常。
    @Test
    public void testThreadPoolException() {
        Future future = executor.submit(() -> {
            log.info("线程池提交出任务");
            int i = 1 / 0;
            return 1;
        });
        try {
            //future.get() 线程出现异常能被捕获
            log.info("线程池执行结果:{}", future.get());
        } catch (InterruptedException e) {
            log.info("线程池执行异常 InterruptedException:", e);
        } catch (ExecutionException e) {
            log.info("线程池执行异常 ExecutionException : ", e);
        }
    }
2.对于 Runnable 任务推荐采用自定义 task包装Runnable提交,在task 实现的run方法中捕获异常。