Java 网络编程之 BIO、NIO、AIO
目录
- I/O 模型
- BIO
-
- 基本介绍
- 工作机制
- 编程实例
-
- 同步阻塞模型(一个客户端对应一个服务端)
- BIO模式下一个服务端接收多个客户端
- 伪异步I/O编程,使用线程池
- 基于BIO形式下的文件上传
- NIO
-
- Buffer缓冲区
-
- Buffer 类及其子类
- 缓冲区的基本属性
- Buffer常见方法
- 缓冲区的数据操作
- 案例代码
- 直接与非直接缓冲区
- 通道(Channel)
-
- 常用的Channel实现类
- FileChannel 类
- FileChannel的常用方法
- 案例代码
-
- 本地文件读、写数据
- 本地文件复制
- 分散 (Scatter) 和聚集 (Gather)
- 从目标通道中去复制原通道数据(transferFrom、transferTo)
- 选择器(Selector)
-
- 选择 器(Selector)的应用
- NIO非阻塞式网络通信入门案例
- AIO
- BIO,NIO,AIO 总结
-
- 适用场景分析
I/O 模型
I/O 模型:就是用什么样的通道或者说是通信模式和架构进行数据的传输和接收,很大程度上决定了程序通信的性能,Java 共支持 3 种网络编程的/IO 模型:BIO、NIO、AIO。实际通信需求下,要根据不同的业务场景和性能需求决定选择不同的I/O模型。
BIO
基本介绍
- Java BIO 就是传统的 java io 编程,其相关的类和接口在 java.io
- BIO(blocking I/O) : 同步阻塞,服务器实现模式为一个连接一个线程,即客户端有连接请求时服务器端就需要启动一个线程进行处理,如果这个连接不做任何事情会造成不必要的线程开销,可以通过线程池机制改善(实现多个客户连接服务器).

工作机制
- 服务器端 启动一个 ServerSocket,注册端口,调用accpet方法监听客户端的Socket连接。
- 客户端 启动 Socket 对服务器进行通信,默认情况下服务器端需要对每个客户 建立一个线程与之通讯
编程实例
网络编程的基本模型是 Client/Server 模型,也就是两个进程之间进行相互通信,其中服务端提供位置信(绑定IP地址和端口),客户端通过连接操作向服务端监听的端口地址发起连接请求,基于TCP协议下进行三次握手连接,连接成功后,双方通过网络套接字(Socket)进行通信。
同步阻塞模型(一个客户端对应一个服务端)
- 服务端 ServerSocket负责绑定IP地址,启动监听端口;
- 客户端 Socket负责发起连接操作。连接成功后,双方通过输入和输出流进行同步阻塞式通信。
- 基于BIO模式下的通信,客户端 - 服务端是完全同步,完全耦合的。
/**
 * 客户端,单次行发送
 */
public class Client {

    public static void main(String[] args) {
        try {
            System.out.println("客户端已启动");
            //1、创建一个Socket的通信管道,请求与服务端的端口连接。
            Socket socket = new Socket("127.0.0.1",8888);
            //2、从Socket通信管道中得到一个字节输出流。
            OutputStream ops = socket.getOutputStream();
            //3、把字节流改装成自己需要的流进行数据的发送
            PrintStream ps = new PrintStream(ops);
            //4、开始发送消息
            ps.println("我是客户端,我想约你吃小龙虾!!!");
            ps.flush();
        } catch (IOException e) {
            e.printStackTrace();
        }
    }
}
/**
 * 服务端,单次行接受
 */
public class Server {
    public static void main(String[] args) {
        System.out.println("服务端已启动。。。");
        try {
            //1、注册服务端口
            ServerSocket socket = new ServerSocket(8888);
            //2、开始在这里暂停等待接收客户端的连接,得到一个端到端的Socket管道
            Socket accept = socket.accept();
            //3、从Socket管道中得到一个字节输入流。
            InputStream is = accept.getInputStream();
            //4、把字节输入流包装成自己需要的流进行数据的读取。
            BufferedReader br = new BufferedReader(new InputStreamReader(is));
            //5、读取数据
            String line;
            if ((line=br.readLine())!=null){
                System.out.println(line);
            }
        } catch (IOException e) {
            e.printStackTrace();
        }
    }
}
BIO模式下一个服务端接收多个客户端
- 每个Socket接收到,都会创建一个线程,线程的竞争、切换上下文影响性能;
- 每个线程都会占用栈空间和CPU资源;
- 并不是每个socket都进行IO操作,无意义的线程处理;
- 客户端的并发访问增加时。服务端将呈现1:1的线程开销,访问量越大,系统将发生线程栈溢出,线程创建失败,最终导致进程宕机或者僵死,从而不能对外提供服务。
/**
 * 客户端
 */
public class Client {

    public static void main(String[] args) {
        try {
            System.out.println("客户端已启动");
            //1、创建一个Socket的通信管道,请求与服务端的端口连接。
            Socket socket = new Socket("127.0.0.1",8888);
            //2、从Socket通信管道中得到一个字节输出流。
            OutputStream ops = socket.getOutputStream();
            //3、把字节流改装成自己需要的流进行数据的发送
            PrintStream ps = new PrintStream(ops);
            //4、开始发送消息
            Scanner scanner = new Scanner(System.in);
            while(true){
                System.out.print("请输入:");
                String line=scanner.nextLine();
                ps.println(line);
                ps.flush();
            }
        } catch (IOException e) {
            e.printStackTrace();
        }
    }
}
/**
 * 服务端
 */
public class Server {
    public static void main(String[] args) {
        try {
            System.out.println("服务端已启动...");
            // (1)注册端口
            ServerSocket socket = new ServerSocket(8888);
            while (true){
                //(2)开始在这里暂停等待接收客户端的连接,得到一个端到端的Socket管道
                Socket accept = socket.accept();
                //(3)创建线程处理连接请求
                new ServerThreadReader(accept).start();
                System.out.println(accept.getRemoteSocketAddress()+"上线了!");
            }
        } catch (IOException e) {
            e.printStackTrace();
        }
    }
}
/**
 * 开启线程处理客户端连接请求
 */
public class ServerThreadReader extends Thread{

    private Socket socket;
    //传入Socket
    public ServerThreadReader(Socket socket){
        this.socket=socket;
    }

    @Override
    public void run() {
        try {
            InputStream is = socket.getInputStream();
            BufferedReader br = new BufferedReader(new InputStreamReader(is));
            String line;
            while ((line= br.readLine())!=null){
                System.out.println(line);
            }
        } catch (IOException e) {
            e.printStackTrace();
        }
    }
}
伪异步I/O编程,使用线程池
- 伪异步io采用了线程池实现,因此避免了为每个请求创建一个独立线程造成线程资源耗尽的问题,但由于底层依然是采用的同步阻塞模型,因此无法从根本上解决问题。
- 如果单个消息处理的缓慢,或者服务器线程池中的全部线程都被阻塞,那么后续socket的i/o消息都将在队列中排队。新的Socket请求将被拒绝,客户端会发生大量连接超时。
/**
 * 客户端
 */
public class Client {

    public static void main(String[] args) {
        try {
            System.out.println("客户端已启动");
            //1、创建一个Socket的通信管道,请求与服务端的端口连接。
            Socket socket = new Socket("127.0.0.1",8888);
            //2、从Socket通信管道中得到一个字节输出流。
            OutputStream ops = socket.getOutputStream();
            //3、把字节流改装成自己需要的流进行数据的发送
            PrintStream ps = new PrintStream(ops);
            //4、开始发送消息
            Scanner scanner = new Scanner(System.in);
            while(true){
                System.out.print("请输入:");
                String line=scanner.nextLine();
                ps.println(line);
                ps.flush();
            }
        } catch (IOException e) {
/**
 * 服务端
 */
public class Server {
    public static void main(String[] args) {
        try {
            System.out.println("服务端已启动...");
            ServerSocket socket = new ServerSocket(8888);
            HandlerSocketThreadPool pool = new HandlerSocketThreadPool(3);
            while (true){
                Socket accept = socket.accept();
                pool.execute(new ReaderClientRunnable(accept));
                System.out.println(accept.getRemoteSocketAddress()+"上线了!");
            }
        } catch (IOException e) {
            e.printStackTrace();
        }
    }
}
/**
 * 线程池类
 */
public class HandlerSocketThreadPool {

    private ExecutorService executorService;

    public HandlerSocketThreadPool(int coreNum){
        //创建固定线程数线程池,核心线程数==最大线程数
        this.executorService=Executors.newFixedThreadPool(coreNum);
    }

    /**
     * 执行线程任务
     * @param runnable
     */
    public void execute(Runnable runnable){
        this.executorService.execute(runnable);
    }

}
/**
 * 读取任务
 */
public class ReaderClientRunnable implements Runnable {
    private Socket socket ;

    public ReaderClientRunnable(Socket socket) {
        this.socket = socket;
    }
    @Override
    public void run() {
        try {
            // 读取一行数据
            InputStream is = socket.getInputStream() ;
            // 转成一个缓冲字符流
            Reader fr = new InputStreamReader(is);
            BufferedReader br = new BufferedReader(fr);
            // 一行一行的读取数据
            String line = null ;
            while((line = br.readLine())!=null){ // 阻塞式的!!
                System.out.println("服务端收到了数据:"+line);
            }
        } catch (Exception e) {
            System.out.println("有人下线了");
        }
    }
}
基于BIO形式下的文件上传
- 支持任意类型文件形式的上传。
- 客户端怎么发,服务端就怎么接收
**
 目标:实现客户端上传任意类型的文件数据给服务端保存起来。
 */
public class Client {
    public static void main(String[] args) {
        try(
                InputStream is = new FileInputStream("C:\\Users\\86178\\Desktop\\计算机程序设计\\资料\\Java面试专题-资料\\Java-IO模式\\文件\\java.png");
        ){
            //  1、请求与服务端的Socket链接
            Socket socket = new Socket("127.0.0.1" , 8888);
            //  2、把字节输出流包装成一个数据输出流
            DataOutputStream dos = new DataOutputStream(socket.getOutputStream());
            //  3、先发送上传文件的后缀给服务端
            dos.writeUTF(".png");
            //  4、把文件数据发送给服务端进行接收
            byte[] buffer = new byte[1024];
            int len;
            while((len = is.read(buffer)) > 0 ){
                dos.write(buffer , 0 , len);
            }
            dos.flush();
            dos.close();
        }catch (Exception e){
            e.printStackTrace();
        }
    }
}
/**
 * 服务端
 */
public class Server {
    public static void main(String[] args) {
        try {
            System.out.println("服务端已启动...");
            ServerSocket socket = new ServerSocket(8888);
            while (true){
                Socket accept = socket.accept();
                new ServerThreadReader(accept).start();
                System.out.println(accept.getRemoteSocketAddress()+"上线了!");
            }
        } catch (IOException e) {
            e.printStackTrace();
        }
    }
}
/**
 * 启动线程执行任务
 */
public class ServerThreadReader extends Thread{

    private Socket socket;
    public ServerThreadReader(Socket socket){
        this.socket=socket;
    }

    @Override
    public void run() {
        try{
            // 1、得到一个数据输入流读取客户端发送过来的数据
            DataInputStream dis = new DataInputStream(socket.getInputStream());
            // 2、读取客户端发送过来的文件类型
            String suffix = dis.readUTF();
            // 3、定义一个字节输出管道负责把客户端发来的文件数据写出去
            OutputStream os = new FileOutputStream("C:\\Users\\86178\\Desktop\\计算机程序设计\\资料\\Java面试专题-资料\\Java-IO模式\\文件\\server\\"+
                    UUID.randomUUID().toString()+suffix);
            // 4、从数据输入流中读取文件数据,写出到字节输出流中去
            byte[] buffer = new byte[1024];
            int len;
            while((len = dis.read(buffer)) > 0){
                os.write(buffer,0, len);
            }
            os.close();
            System.out.println("服务端接收文件保存成功!");
        }catch (Exception e){
            e.printStackTrace();
        }
    }
}
NIO
- Java NIO(New IO)也有人称之为 java non-blocking IO是从Java 1.4版本开始引入的一个新的IO API,可以替代标准的Java IO API。NIO与原来的IO有同样的作用和目的,但是使用的方式完全不同,NIO支持面向缓冲区的、基于通道的IO操作。NIO将以更加高效的方式进行文件的读写操作。NIO可以理解为非阻塞IO,传统的IO的read和write只能阻塞执行,线程在读写IO期间不能干其他事情,比如调用socket.read()时,如果服务器一直没有数据传输过来,线程就一直阻塞,而NIO中可以配置socket为非阻塞模式。
- NIO 相关类都被放在 java.nio 包及子包下,并且对原 java.io 包中的很多类进行改写。
- NIO 有三大核心部分:Channel( 通道) ,Buffer( 缓冲区), Selector( 选择器)

Buffer缓冲区
缓冲区本质上是一块可以写入数据,然后可以从中读取数据的内存。这块内存被包装成NIO Buffer对象,并提供了一组方法,用来方便的访问该块内存。相比较直接对数组的操作,Buffer API更加容易操作和管理。

Buffer 类及其子类
Buffer 就像一个数组,可以保存多个相同类型的数据。根 据数据类型不同 ,有以下 Buffer 常用子类:
- ByteBuffer
- CharBuffer
- ShortBuffer
- IntBuffer
- LongBuffer
- FloatBuffer
- DoubleBuffer
缓冲区的基本属性
-
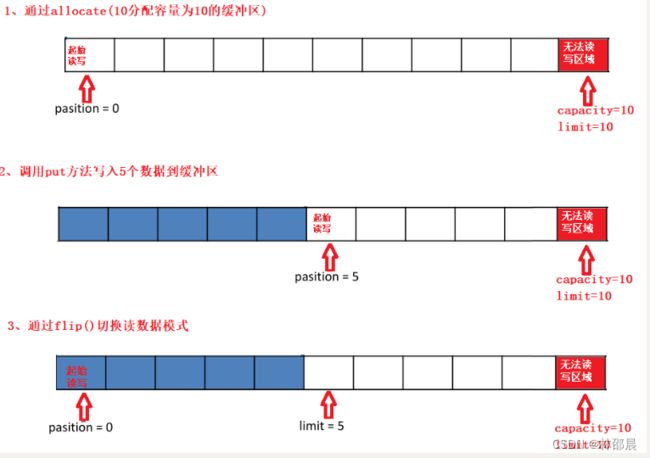
容量 (capacity) :作为一个内存块,Buffer具有一定的固定大小,也称为"容量",缓冲区容量不能为负,并且创建后不能更改。
-
限制 (limit):表示缓冲区中可以操作数据的大小(limit 后数据不能进行读写)。缓冲区的限制不能为负,并且不能大于其容量。 写入模式,限制等于buffer的容量。读取模式下,limit等于写入的数据量。
-
位置 (position):下一个要读取或写入的数据的索引。缓冲区的位置不能为 负,并且不能大于其限制
-
标记 (mark)与重置 (reset):标记是一个索引,通过 Buffer 中的 mark() 方法 指定 Buffer 中一个特定的 position,之后可以通过调用 reset() 方法恢复到这 个 position.
-
标记、位置、限制、容量遵守以下不变式: 0 <= mark <= position <= limit <= capacity

Buffer常见方法
Buffer clear() 清空缓冲区并返回对缓冲区的引用
Buffer flip() 为 将缓冲区的界限设置为当前位置,并将当前位置充值为 0
int capacity() 返回 Buffer 的 capacity 大小
boolean hasRemaining() 判断缓冲区中是否还有元素
int limit() 返回 Buffer 的界限(limit) 的位置
Buffer limit(int n) 将设置缓冲区界限为 n, 并返回一个具有新 limit 的缓冲区对象
Buffer mark() 对缓冲区设置标记
int position() 返回缓冲区的当前位置 position
Buffer position(int n) 将设置缓冲区的当前位置为 n , 并返回修改后的 Buffer 对象
int remaining() 返回 position 和 limit 之间的元素个数
Buffer reset() 将位置 position 转到以前设置的 mark 所在的位置
Buffer rewind() 将位置设为为 0, 取消设置的 mark
缓冲区的数据操作
Buffer 所有子类提供了两个用于数据操作的方法:get()put() 方法
取获取 Buffer中的数据
get() :读取单个字节
get(byte[] dst):批量读取多个字节到 dst 中
get(int index):读取指定索引位置的字节(不会移动 position)

放到 入数据到 Buffer 中 中
put(byte b):将给定单个字节写入缓冲区的当前位置
put(byte[] src):将 src 中的字节写入缓冲区的当前位置
put(int index, byte b):将指定字节写入缓冲区的索引位置(不会移动 position)
使用Buffer读写数据一般遵循以下四个步骤:
- 1.写入数据到Buffer
- 2.调用flip()方法,转换为读取模式
- 3.从Buffer中读取数据
- 4.调用buffer.clear()方法或者buffer.compact()方法清除缓冲区
案例代码
public class test {

    @Test
    public void test01(){
        //1. 分配一个指定大小的缓冲区
        ByteBuffer buffer = ByteBuffer.allocate(1024);
        System.out.println(buffer.position());//0
        System.out.println(buffer.limit());//1024
        System.out.println(buffer.capacity());//1024
        System.out.println("----------------");
        //2. 利用 put() 存入数据到缓冲区中
        String s="hello";
        buffer.put(s.getBytes());
        System.out.println(buffer.position());//5
        System.out.println(buffer.limit());//1024
        System.out.println(buffer.capacity());//1024
        System.out.println("-----------------");
        //3. 切换读取数据模式
        buffer.flip();
        System.out.println(buffer.position());//0
        System.out.println(buffer.limit());//5
        System.out.println(buffer.capacity());//1024
        System.out.println("-----------------");
        //4. 利用 get() 读取缓冲区中的数据
        byte[] b = new byte[buffer.limit()];
        buffer.get(b);
        System.out.println(new String(b,0,b.length));//hello
        System.out.println(buffer.position());//5
        System.out.println(buffer.limit());//5
        System.out.println(buffer.capacity());//1024
        System.out.println("-----------------");
        //5. rewind() : 可重复读
        buffer.rewind();
        System.out.println(buffer.position());//0
        System.out.println(buffer.limit());//5
        System.out.println(buffer.capacity());//1024
        System.out.println("-----------------");
        //6. clear() : 清空缓冲区. 但是缓冲区中的数据依然存在,但是处于“被遗忘”状态
        buffer.clear();
        System.out.println(buffer.position());//0
        System.out.println(buffer.limit());//1024
        System.out.println(buffer.capacity());//1024
        System.out.println((char)buffer.get());//h
    }
    @Test
    public void test02(){
        ByteBuffer buffer = ByteBuffer.allocate(1024);
        String s="hello";
        buffer.put(s.getBytes());
        buffer.flip();
        byte[] b = new byte[buffer.limit()];
        buffer.get(b,0,2);
        System.out.println(new String(b,0,2));//he
        System.out.println(buffer.position());//2
        //mark() : 标记
        buffer.mark();
        buffer.get(b,2,2);
        System.out.println(new String(b,2,2));//ll
        System.out.println(buffer.position());//4
        //reset() : 恢复到 mark 的位置
        buffer.reset();
        System.out.println(buffer.position());//2
        //判断缓冲区中是否还有剩余数据
        if(buffer.hasRemaining()){
            //获取缓冲区中可以操作的数量
            System.out.println(buffer.remaining());//3
        }
    }
    @Test
    public void test03(){
        //分配直接缓冲区
        ByteBuffer buffer = ByteBuffer.allocateDirect(1024);
        //判断是否为直接缓冲区
        System.out.println(buffer.isDirect());
    }

}
直接与非直接缓冲区
byte buffer可以是两种类型:
- 一种是基于直接内存(也就是非堆内存), 对于直接内存来说,JVM将会在IO操作上具有更高的性能,因为它直接作用于本地系统的IO操作。
- 另一种是非直接内存(也就是堆内存),也就是堆内存中的数据,如果要作IO操作,会先从本进程内存复制到直接内存,再利用本地IO处理。
通道(Channel)
通道(Channel):由 java.nio.channels 包定义 的。Channel 表示 IO 源与目标打开的连接。 既可以从通道中读取数据,又可以写数据到通道。但流的(input或output)读写通常是单向的。 通道可以非阻塞读取和写入通道,通道可以支持读取或写入缓冲区,也支持异步地读写。
常用的Channel实现类
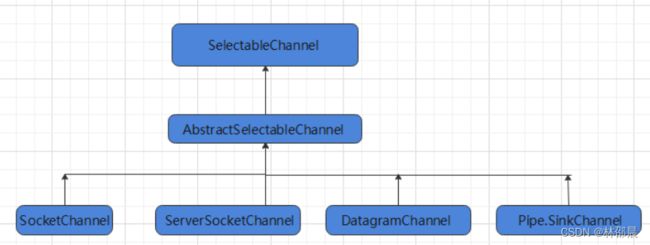
- FileChannel:用于读取、写入、映射和操作文件的通道。
- DatagramChannel:通过 UDP 读写网络中的数据通道。
- SocketChannel:通过 TCP 读写网络中的数据。
- ServerSocketChannel:可以监听新进来的 TCP 连接,对每一个新进来的连接都会创建一个 SocketChannel。 【ServerSocketChanne 类似 ServerSocket , SocketChannel 类似 Socket】
FileChannel 类
获取通道的一种方式是对支持通道的对象调用getChannel() 方法。支持通道的类如下:
- FileInputStream
- FileOutputStream
- RandomAccessFile
- DatagramSocket
- Socket
- ServerSocket
FileChannel的常用方法
int read(ByteBuffer dst) 从 从  Channel 到 中读取数据到  ByteBuffer
long  read(ByteBuffer[] dsts) 将 将  Channel 到 中的数据“分散”到  ByteBuffer[]
int  write(ByteBuffer src) 将 将  ByteBuffer 到 中的数据写入到  Channel
long write(ByteBuffer[] srcs) 将 将  ByteBuffer[] 到 中的数据“聚集”到  Channel
long position() 返回此通道的文件位置
FileChannel position(long p) 设置此通道的文件位置
long size() 返回此通道的文件的当前大小
FileChannel truncate(long s) 将此通道的文件截取为给定大小
void force(boolean metaData) 强制将所有对此通道的文件更新写入到存储设备中
案例代码
本地文件读、写数据
本地文件复制
分散 (Scatter) 和聚集 (Gather)
从目标通道中去复制原通道数据(transferFrom、transferTo)
public class test {
	/**
     * 本地文件写数据
     */
    @Test
    public void write(){
        try {
            // 1、字节输出流通向目标文件
            FileOutputStream fos = new FileOutputStream("data.txt");
            // 2、得到字节输出流对应的通道Channel
            FileChannel channel = fos.getChannel();
            // 3、分配缓冲区
            ByteBuffer buffer = ByteBuffer.allocate(1024);
            buffer.put("hello,你好世界!".getBytes());
            // 4、把缓冲区切换成写出模式
            buffer.flip();
            // 5、写数据到文件中
            channel.write(buffer);
            channel.close();
        } catch (Exception e) {
            e.printStackTrace();
        }
    }
	/**
     * 本地文件读数据
     */
    @Test
    public void read(){
        try {
            // 1、定义一个文件字节输入流与源文件接通
            FileInputStream fis = new FileInputStream("data.txt");
            // 2、需要得到文件字节输入流的文件通道
            FileChannel channel = fis.getChannel();
            // 3、定义一个缓冲区
            ByteBuffer buffer = ByteBuffer.allocate(1024);
            // 4、读取数据到缓冲区
            channel.read(buffer);
            // 5、切换为读模式
            buffer.flip();
            // 6、读取出缓冲区中的数据并输出即可
            String rs = new String(buffer.array(),0,buffer.remaining());
            System.out.println(rs);
        } catch (Exception e) {
            e.printStackTrace();
        }
    }

	/**
     * 使用 FileChannel(通道) ,完成文件的拷贝。
     * @throws Exception
     */
    @Test
    public void copy() throws Exception {
        // 源文件
        File srcFile = new File("C:\\Users\\86178\\Desktop\\计算机程序设计\\资料\\Java面试专题-资料\\Java-IO模式\\文件\\壁纸.jpg");
        // 目的文件
        File dstFile = new File("C:\\Users\\86178\\Desktop\\计算机程序设计\\资料\\Java面试专题-资料\\Java-IO模式\\文件\\壁纸2.jpg");
        // 得到一个字节字节输入流
        FileInputStream fis = new FileInputStream(srcFile);
        // 得到一个字节输出流
        FileOutputStream fos = new FileOutputStream(dstFile);
        // 得到的是文件通道
        FileChannel fisChannel = fis.getChannel();
        FileChannel fosChannel = fos.getChannel();
        // 分配缓冲区
        ByteBuffer buffer = ByteBuffer.allocate(1024);
        while (true){
            // 必须先清空缓冲然后再写入数据到缓冲区
            buffer.clear();
            // 开始读取一次数据
            int flag = fisChannel.read(buffer);
            if(flag == -1){
                break;
            }
            // 已经读取了数据 ,把缓冲区的模式切换成可读模式
            buffer.flip();
            // 把数据写出到
            fosChannel.write(buffer);
        }
        fisChannel.close();
        fosChannel.close();
        fis.close();
        fos.close();
    }
}
public class test02 {

    //分散 (Scatter) 和聚集 (Gather)
    @Test
    public void test01() throws Exception {
        RandomAccessFile raf1 = new RandomAccessFile("data.txt", "rw");
        //1. 获取通道
        FileChannel channel1 = raf1.getChannel();

        //2. 分配指定大小的缓冲区
        ByteBuffer buf1 = ByteBuffer.allocate(100);
        ByteBuffer buf2 = ByteBuffer.allocate(1024);

        //3. 分散读取
        ByteBuffer[] bufs = {buf1, buf2};
        channel1.read(bufs);

        for (ByteBuffer byteBuffer : bufs) {
            byteBuffer.flip();
        }

        System.out.println(new String(bufs[0].array(), 0, bufs[0].limit()));
        System.out.println("-----------------");
        System.out.println(new String(bufs[1].array(), 0, bufs[1].limit()));

        //4. 聚集写入
        RandomAccessFile raf2 = new RandomAccessFile("2.txt", "rw");
        FileChannel channel2 = raf2.getChannel();

        channel2.write(bufs);
    }
    /**
     * 从目标通道中去复制原通道数据
     * @throws Exception
     */
    @Test
    public void test02() throws Exception {
        // 1、字节输入管道
        FileInputStream is = new FileInputStream("data01.txt");
        FileChannel isChannel = is.getChannel();
        // 2、字节输出流管道
        FileOutputStream fos = new FileOutputStream("data03.txt");
        FileChannel osChannel = fos.getChannel();
        // 3、复制
        osChannel.transferFrom(isChannel,isChannel.position(),isChannel.size());
        //isChannel.transferTo(isChannel.position() , isChannel.size() , osChannel);
        isChannel.close();
        osChannel.close();
    }
}
选择器(Selector)
Selector是 一个Java NIO组件,可以能够检查一个或多个 NIO 通道,并确定哪些通道已经准备好进行读取或写入。这样,一个单独的线程可以管理多个channel,从而管理多个网络连接,提高效率。

- Java 的 NIO,用非阻塞的 IO 方式。可以用一个线程,处理多个的客户端连接,就会使用到 Selector(选择器)
- Selector 能够检测多个注册的通道上是否有事件发生(注意:多个 Channel 以事件的方式可以注册到同一个Selector),如果有事件发生,便获取事件然后针对每个事件进行相应的处理。这样就可以只用一个单线程去管 理多个通道,也就是管理多个连接和请求。
- 只有在 连接/通道 真正有读写事件发生时,才会进行读写,就大大地减少了系统开销,并且不必为每个连接都创建一个线程,不用去维护多个线程
- 避免了多线程之间的上下文切换导致的开销
选择 器(Selector)的应用
//1. 获取通道
ServerSocketChannel ssChannel = ServerSocketChannel.open();
//2. 切换非阻塞模式
ssChannel.configureBlocking(false);
//3. 绑定连接
ssChannel.bind(new InetSocketAddress(9898));
//4. 获取选择器
Selector selector = Selector.open();
//5. 将通道注册到选择器上, 并且指定“监听接收事件”
ssChannel.register(selector, SelectionKey.OP_ACCEPT);
当调用 register(Selector sel, int ops) 将通道注册选择器时,选择器对通道的监听事件,需要通过第二个参数 ops 指定。可以监听的事件类型(用 可使用 SelectionKey 的四个常量 表示):
- 读 : SelectionKey.OP_READ (1)
- 写 : SelectionKey.OP_WRITE (4)
- 连接 : SelectionKey.OP_CONNECT (8)
- 接收 : SelectionKey.OP_ACCEPT (16)
- 若注册时不止监听一个事件,则可以使用“位或”操作符连接。
int interestSet = SelectionKey.OP_READ | SelectionKey.OP_WRITE
NIO非阻塞式网络通信入门案例
/**
 * 客户端
 */
public class Client {
    public static void main(String[] args) throws Exception {
        //1. 获取通道
        SocketChannel sChannel = SocketChannel.open(new InetSocketAddress("127.0.0.1", 9999));
        //2. 切换非阻塞模式
        sChannel.configureBlocking(false);
        //3. 分配指定大小的缓冲区
        ByteBuffer buf = ByteBuffer.allocate(1024);
        //4. 发送数据给服务端
        Scanner scan = new Scanner(System.in);
        while(scan.hasNext()){
            String str = scan.nextLine();
            buf.put((new SimpleDateFormat("yyyy/MM/dd HH:mm:ss").format(System.currentTimeMillis())
                    + "\n" + str).getBytes());
            buf.flip();
            sChannel.write(buf);
            buf.clear();
        }
        //5. 关闭通道
        sChannel.close();
    }
}
/**
 * 服务器端
 */
public class Server {
    public static void main(String[] args) throws IOException {
        //1. 获取通道
        ServerSocketChannel ssChannel = ServerSocketChannel.open();
        //2. 切换非阻塞模式
        ssChannel.configureBlocking(false);
        //3. 绑定连接
        ssChannel.bind(new InetSocketAddress(9999));
        //4. 获取选择器
        Selector selector = Selector.open();
        //5. 将通道注册到选择器上, 并且指定“监听接收事件”
        ssChannel.register(selector, SelectionKey.OP_ACCEPT);
        //6. 轮询式的获取选择器上已经“准备就绪”的事件
        while (selector.select() > 0) {
            System.out.println("轮一轮");
            //7. 获取当前选择器中所有注册的“选择键(已就绪的监听事件)”
            Iterator<SelectionKey> it = selector.selectedKeys().iterator();
            while (it.hasNext()) {
                //8. 获取准备“就绪”的是事件
                SelectionKey sk = it.next();
                //9. 判断具体是什么事件准备就绪
                if (sk.isAcceptable()) {
                    //10. 若“接收就绪”,获取客户端连接
                    SocketChannel sChannel = ssChannel.accept();
                    //11. 切换非阻塞模式
                    sChannel.configureBlocking(false);
                    //12. 将该通道注册到选择器上
                    sChannel.register(selector, SelectionKey.OP_READ);
                } else if (sk.isReadable()) {
                    //13. 获取当前选择器上“读就绪”状态的通道
                    SocketChannel sChannel = (SocketChannel) sk.channel();
                    //14. 读取数据
                    ByteBuffer buf = ByteBuffer.allocate(1024);
                    int len = 0;
                    while ((len = sChannel.read(buf)) > 0) {
                        buf.flip();
                        System.out.println(new String(buf.array(), 0, len));
                        buf.clear();
                    }
                }
                //15. 取消选择键 SelectionKey
                it.remove();
            }
        }
    }
}
AIO
Java AIO(NIO.2) : 异步非阻塞,服务器实现模式为一个有效请求一个线程,客户端的I/O请求都是由OS先完成了再通知服务器应用去启动线程进行处理。
- 与NIO不同,当进行读写操作时,只须直接调用API的read或write方法即可, 这两种方法均为异步的,对于读操作而言,当有流可读取时,操作系统会将可读的流传入read方法的缓冲区,对于写操作而言,当操作系统将write方法传递的流写入完毕时,操作系统主动通知应用程序。
- 即可以理解为,read/write方法都是异步的,完成后会主动调用回调函数。在JDK1.7中,这部分内容被称作NIO.2,主要在Java.nio.channels包下增加了下面四个异步通道:
	AsynchronousSocketChannel
	AsynchronousServerSocketChannel
	AsynchronousFileChannel
	AsynchronousDatagramChannel
BIO,NIO,AIO 总结
- Java BIO : 同步并阻塞,服务器实现模式为一个连接一个线程,即客户端有连接请求时服务器端就需要启动一个线程进行处理,如果这个连接不做任何事情会造成不必要的线程开销,当然可以通过线程池机制改善。
- Java NIO : 同步非阻塞,服务器实现模式为一个请求一个线程,即客户端发送的连接请求都会注册到多路复用器上,多路复用器轮询到连接有I/O请求时才启动一个线程进行处理。
- Java AIO(NIO.2) : 异步非阻塞,服务器实现模式为一个有效请求一个线程,客户端的I/O请求都是由OS先完成了再通知服务器应用去启动线程进行处理。
适用场景分析
- BIO方式适用于连接数目比较小且固定的架构,这种方式对服务器资源要求比较高,并发局限于应用中,JDK1.4以前的唯一选择,但程序直观简单易理解。
- NIO方式适用于连接数目多且连接比较短(轻操作)的架构,比如聊天服务器,并发局限于应用中,编程比较复杂,JDK1.4开始支持。
- AIO方式使用于连接数目多且连接比较长(重操作)的架构,比如相册服务器,充分调用OS参与并发操作,编程比较复杂,JDK7开始支持。Netty!
学习内容来自黑马程序员
视频链接:https://www.bilibili.com/video/BV1gz4y1C7RK

