yolov5训练自己的VOC数据集
yolov5训练自己的VOC数据集
此笔记基于yolov5的3.1版本,其他版本修改对应文件即可
实测:6.1也适用
一、下载
1.下载yolov5源码
在github yolov5官方仓库下载yolov5源码
仓库地址:ultralytics/yolov5: YOLOv5 in PyTorch > ONNX > CoreML > TFLite (github.com)
git镜像下载指令:git clone https://hub.fastgit.xyz/ultralytics/yolov5.git
2.下载预训练模型
打开下载的yolov5文件夹里面的README.md文件,或者在仓库介绍文件里面,找到下面这个表格
并找到自己需要的模型,下载到yolov5文件夹下面的weights文件夹下面。
到此,文件下载完成
二、配置yolov5训练环境
在yolov5的文件夹下进入终端环境,或者在终端下进入yolov5的目录
1.使用anaconda创建虚拟环境
创建环境指令:conda create -n yolov5 python=3.8
该指令在创建一个名为yolov5的虚拟环境的同时在该环境里面预装python3.8
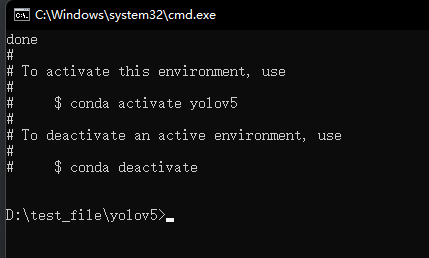
激活并进入创建的yolov5环境
指令:conda activate yolov5
成功进入环境之后在路径前面会显示环境名称
2.在创建的环境里面安装cuda工具包(cudatoolkit)和cudnn
安装指令:conda install cudatoolkit=11.3 cudnn
该指令在当前环境安装11.3版本的cuda工具包和最新版本的cudnn
也可以使用:conda install cudatoolkit=10.2 cudnn=7.6.5安装10.2的cuda工具包,和7.6.5的cudnn
3.在环境里面配置yolov5所需的python库
安装指令:pip install -r requirements.txt
使用清华源镜像安装指令:pip install -i https://pypi.tuna.tsinghua.edu.cn/simple -r requirements.txt
安装完成会有如下显示
4.测试环境
此测试主要为了测试环境里面安装的torch能否启动gpu进行训练
在终端里面进入python环境
测试指令:
import torch
torch.cuda.is_available()
依次输入,若返回结果为True则说明环境gpu可用,反之则不然
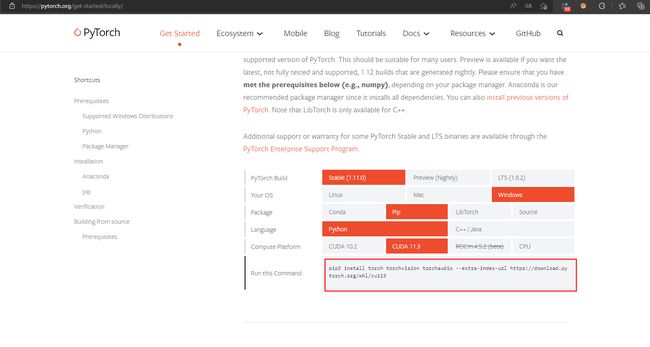
重新安装pytorch
卸载指令:pip uninstall torch
按照自己的环境配置选择,并复制下方指令,在其后面加入清华源链接安装
安装完成之后再次测试,结果如下即可
到此,环境配置完成
三、准备数据集
1.数据集格式
此教程使用voc数据集进行训练,下面以VOC2007为例
VOC2007
|—— Annotations #存放.xml标签文件,与图片一一对应
|…………|——000001.xml
|…………|——000002.xml
|…………|——……
|—— JPEGImages #存放.jpg图片文件
|…………|——000001.jpg
|…………|——000002.jpg
|…………|——……
|—— ImageSets #存放训练索引文件,txt文件里面每行对应一张图片名称
|…………|——Main
|…………|……|——train.txt
|…………|……|——val.txt
|…………|……|——trainval.txt
|…………|……|——test.txt
|…………|……|——text.txt
图片标记建议使用labelimg(请自行百度搜索使用方法)
2.数据集划分
ImageSets/Main里面的数据集划分可以使用下面代码
创建一个python文件,将下面代码复制过去
# 划分VOC数据集
import os
import random

datasets_path = r'D:\test_file\VOCdevkit\VOC2007/'  # 数据集路径

trainval_percent = 0.8
train_percent = 0.7
xml_path = datasets_path + 'Annotations'
txtsavepath = datasets_path + 'ImageSets/Main'
total_xml = os.listdir(xml_path)

num = len(total_xml)
list1 = range(num)
tmtp = int(num * trainval_percent)
trp = int(tmtp * train_percent)
trainval = random.sample(list1, tmtp)
train = random.sample(trainval, trp)

with open(datasets_path + 'ImageSets/Main/trainval.txt', 'w') as ftrainval, \
        open(datasets_path + 'ImageSets/Main/test.txt', 'w') as ftest, \
        open(datasets_path + 'ImageSets/Main/train.txt', 'w') as ftrain, \
        open(datasets_path + 'ImageSets/Main/val.txt', 'w') as fval:

    for i in list1:
        name = total_xml[i][:-4] + '\n'
        if i in trainval:
            ftrainval.write(name)
            if i in train:
                ftrain.write(name)
            else:
                fval.write(name)
        else:
            ftest.write(name)
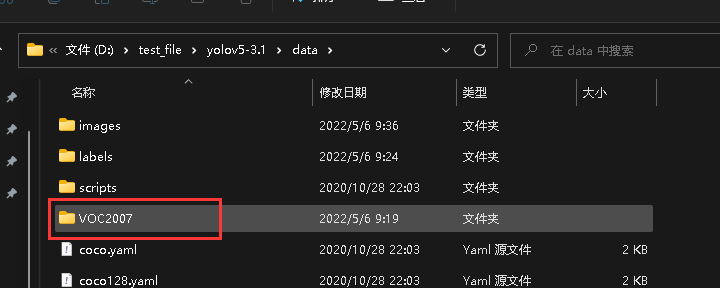
将准备好的数据集存放于yolov5目录下的data里面,如下
3.创建yolov5的训练数据
在yolov5/data下创建一个新文件,用于生成label以及复制文件
import xml.etree.ElementTree as ET
import os
from os import getcwd
import shutil

datasets_path = r"D:/test_file/yolov5/data/VOC2007"  # 数据集路径
sets = ['train', 'test', 'val']
classes = ['Besom', 'hagberry', 'hair', 'SayakaShell']  # 杂质类别


def convert(size, box):
    dw = 1. / size[0]
    dh = 1. / size[1]
    x = (box[0] + box[1]) / 2.0
    y = (box[2] + box[3]) / 2.0
    w = box[1] - box[0]
    h = box[3] - box[2]
    x = x * dw
    w = w * dw
    y = y * dh
    h = h * dh
    return x, y, w, h


def convert_annotation(image_id):
    in_file = open(datasets_path + '/Annotations/%s.xml' % image_id)
    out_file = open('labels/%s.txt' % image_id, 'w')
    tree = ET.parse(in_file)
    root = tree.getroot()
    size = root.find('size')
    w = int(size.find('width').text)
    h = int(size.find('height').text)
    for obj in root.iter('object'):
        difficult = obj.find('difficult').text
        cls = obj.find('name').text
        if cls not in classes or int(difficult) == 1:
            continue
        cls_id = classes.index(cls)
        xmlbox = obj.find('bndbox')
        b = (float(xmlbox.find('xmin').text), float(xmlbox.find('xmax').text), float(xmlbox.find('ymin').text),
             float(xmlbox.find('ymax').text))
        bb = convert((w, h), b)
        out_file.write(str(cls_id) + " " + " ".join([str(a) for a in bb]) + '\n')


for image_set in sets:
    if not os.path.exists('labels/'):
        os.makedirs('labels/')
    image_ids = open(datasets_path + '/ImageSets/Main/%s.txt' % image_set).read().strip().split()
    list_file = open('%s.txt' % image_set, 'w')
    for image_id in image_ids:
        list_file.write('images/%s.jpg\n' % image_id)
        convert_annotation(image_id)
    list_file.close()

path = getcwd()
if not os.path.exists(path + "/images"):
    os.mkdir(path + "/images")
if os.path.exists(path + "/images"):
    shutil.rmtree(path + "/images")
shutil.copytree(datasets_path + "/JPEGImages", path + "/images")
print("done")
四、修改代码
1.修改data/voc.yaml
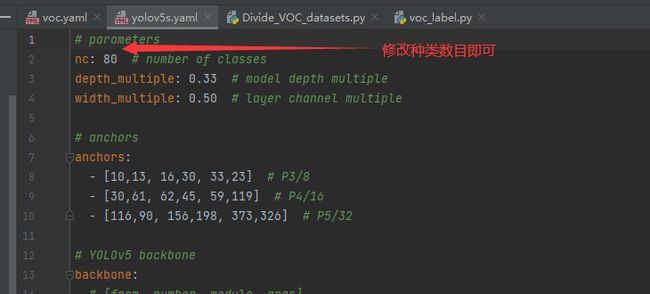
2.修改models/yolov5s.yaml
3.修改train.py
主要是上面标红的几个,按照自己修改的配置即可
五、训练
1.开始训练
按照以上修改之后可以直接运行train.py
2.报错
RuntimeError: a view of a leaf Variable that requires grad is being used in an in-place operation.
如果出现这个错误的话,修改models/yolo.py里面的
    def _initialize_biases(self, cf=None):  # initialize biases into Detect(), cf is class frequency
        # https://arxiv.org/abs/1708.02002 section 3.3
        # cf = torch.bincount(torch.tensor(np.concatenate(dataset.labels, 0)[:, 0]).long(), minlength=nc) + 1.
        m = self.model[-1]  # Detect() module
        for mi, s in zip(m.m, m.stride):  # from
            b = mi.bias.view(m.na, -1)  # conv.bias(255) to (3,85)
            b[:, 4] += math.log(8 / (640 / s) ** 2)  # obj (8 objects per 640 image)
            b[:, 5:] += math.log(0.6 / (m.nc - 0.99)) if cf is None else torch.log(cf / cf.sum())  # cls
            mi.bias = torch.nn.Parameter(b.view(-1), requires_grad=True)
修改为
    def _initialize_biases(self, cf=None):  # initialize biases into Detect(), cf is class frequency
        # cf = torch.bincount(torch.tensor(np.concatenate(dataset.labels, 0)[:, 0]).long(), minlength=nc) + 1.
        m = self.model[-1]  # Detect() module
        for mi, s in zip(m.m, m.stride):  # from
            b = mi.bias.view(m.na, -1)  # conv.bias(255) to (3,85)
            with torch.no_grad():
                b[:, 4] += math.log(8 / (640 / s) ** 2)  # obj (8 objects per 640 image)
                b[:, 5:] += math.log(0.6 / (m.nc - 0.99)) if cf is None else torch.log(cf / cf.sum())  # cls
            mi.bias = torch.nn.Parameter(b.view(-1), requires_grad=True)
如果提示页面文件太小无法训练的话,修改utils/datasets.py里面的num_workers=0,大概在68行左右,可以直接搜索


