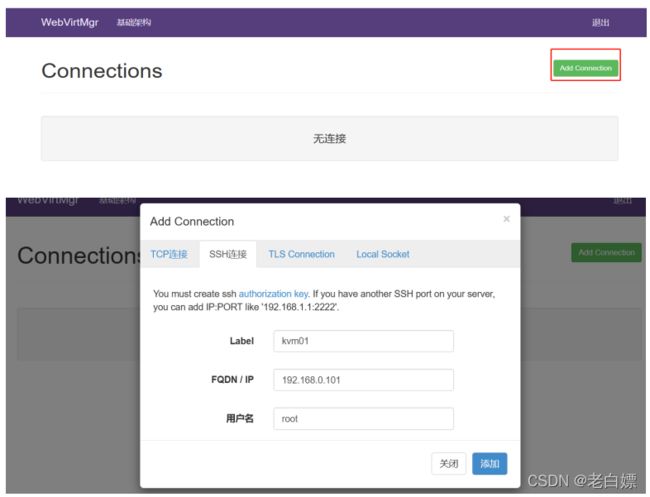
网页实现管理KVM-WebVirtMgr项目
网页实现管理KVM
1.名词释意:
使用开源的KVM虚拟化技术,对服务器进行虚拟化,小白入手还是比较困难的,而WebVirtMgr作为KVM虚拟化的Web管理工具,让人能更方便的查看kvm 宿主机的情况和操作,使用kvm+webvirtmgr便可满足当前场景的业务需求,虚拟化的同时,也能够进行便捷的管理。采用纯Python开发,其前端是基于Python的Django,后端是基于Libvirt的Python接口,将日常kvm的管理操作变的更加的可视化。
WebVirtMgr 是一个基于 libvirt 的 Web 界面,用于管理虚拟机。 它允许您创建和配置虚拟机,并调整虚拟机的资源分配。A VNC viewer为虚拟机提供了一个完整的图形控制台。
WebVirtMgr采用Python开发,前端是基于Python的Django,后端是基于Libvirt的Python接口,将日常kvm的管理操作变的更加的可视化。
2.安装过程
①安装包
①安装epel扩展源
[root@virsh1 ~]# yum install epel-release

②安装依赖包
[root@virsh1 ~]# yum -y install git python-pip libvirt-python libxml2-python3 python-websockify supervisor nginx

③安装GCC,python工具
[root@virsh1 ~]# yum -y install gcc python-devel

④安装NumPy(Numerical Python)是Python的一种开源的数值计算扩展。
[root@virsh1 ~]# pip install --upgrade pip
[root@virsh1 ~]# pip install numpy
Looking in indexes: http://pypi.douban.com/simple/
Collecting numpy
  Downloading http://pypi.doubanio.com/packages/3a/5f/47e578b3ae79e2624e205445ab77a1848acdaa2929a00eeef6b16eaaeb20/numpy-1.16.6-cp27-cp27mu-manylinux1_x86_64.whl (17.0 MB)
     |████████████████████████████████| 17.0 MB 243 kB/s
Installing collected packages: numpy
Successfully installed numpy-1.16.6
报错解决:
有些python2.7的环境的中pip不是最新的版本会导致numpy下载不了,更有甚者连升级pip都来不了,解决发放如下。
get-pip.py是一个引导脚本,使用户能够安装 pip, setuptools,并在没有它们的 Python 环境中使用wheel。
[root@virsh1 ~]# curl   https://bootstrap.pypa.io/pip/2.7/get-pip.py -o get-pip.py
  % Total    % Received % Xferd  Average Speed   Time    Time     Time  Current
                                 Dload  Upload   Total   Spent    Left  Speed
100 1863k  100 1863k    0     0  44264      0  0:00:43  0:00:43 --:--:-- 39268
[root@virsh1 ~]# python2 get-pip.py
Collecting pip<21.0
  Downloading pip-20.3.4-py2.py3-none-any.whl (1.5 MB)
     |████████████████████████████████| 1.5 MB 7.5 kB/s
Collecting wheel
  Downloading wheel-0.37.1-py2.py3-none-any.whl (35 kB)
Installing collected packages: pip, wheel
Successfully installed pip-20.3.4 wheel-0.37.1

[root@virsh1 ~]# pip -V
pip 20.3.4 from /usr/lib/python2.7/site-packages/pip (python 2.7)
见官方链接:https://github.com/pypa/get-pip
②克隆webvirtmgr项目
mkdir /var/www && cd /var/www/
git clone git://github.com/retspen/webvirtmgr.git
正克隆到 'webvirtmgr'...
remote: Enumerating objects: 5614, done.
remote: Total 5614 (delta 0), reused 0 (delta 0), pack-reused 5614
接收对象中: 100% (5614/5614), 2.97 MiB | 1.08 MiB/s, done.
处理 delta 中: 100% (3606/3606), done.
③安装django环境
[root@virsh1 www]# cd webvirtmgr
[root@virsh1 webvirtmgr]# python -m pip install -r requirements.txt pip -i  https://pypi.douban.com/simple
Looking in indexes: https://pypi.douban.com/simple
Requirement already satisfied: pip in /usr/lib/python2.7/site-packages (20.3.4)
Collecting django==1.5.5
  Downloading https://pypi.doubanio.com/packages/38/49/93511c5d3367b6b21fc2995a0e53399721afc15e4cd6eb57be879ae13ad4/Django-1.5.5.tar.gz (8.1 MB)
     |████████████████████████████████| 8.1 MB 1.3 MB/s
Collecting gunicorn==19.5.0
  Downloading https://pypi.doubanio.com/packages/f9/4e/f4076a1a57fc1e75edc0828db365cfa9005f9f6b4a51b489ae39a91eb4be/gunicorn-19.5.0-py2.py3-none-any.whl (113 kB)
     |████████████████████████████████| 113 kB 420 kB/s
Collecting lockfile>=0.9
  Downloading https://pypi.doubanio.com/packages/c8/22/9460e311f340cb62d26a38c419b1381b8593b0bb6b5d1f056938b086d362/lockfile-0.12.2-py2.py3-none-any.whl (13 kB)
Building wheels for collected packages: django
  Building wheel for django (setup.py) ... done
  Created wheel for django: filename=Django-1.5.5-py2.py3-none-any.whl size=8313239 sha256=c13e79494f29960707fb79cb5cba98240fc98b2d1161b9a95ad1add2a0fc0a4a
  Stored in directory: /root/.cache/pip/wheels/64/6d/7b/5f828cbf104756f7329a34a3fcaf649f6ff7234c8b66486c19
Successfully built django
Installing collected packages: django, gunicorn, lockfile
Successfully installed django-1.5.5 gunicorn-19.5.0 lockfile-0.12.2


[root@virsh1 webvirtmgr]# pip2 list
Package    Version
---------- -------
Django     1.5.5
gunicorn   19.5.0
lockfile   0.12.2
numpy      1.16.6
pip        20.3.4
④WebVirtMgr基础配置
(1)设置管理用户信息
[root@virsh1 webvirtmgr]# ./manage.py syncdb
WARNING:root:No local_settings file found.
Creating tables ...
Creating table auth_permission
Creating table auth_group_permissions
Creating table auth_group
Creating table auth_user_groups
Creating table auth_user_user_permissions
Creating table auth_user
Creating table django_content_type
Creating table django_session
Creating table django_site
Creating table servers_compute
Creating table instance_instance
Creating table create_flavor

You just installed Django's auth system, which means you don't have any superusers defined.
Would you like to create one now? (yes/no): yes
Username (leave blank to use 'root'):  	#默认root
Email address: 												#邮箱地址
Password: 															#输入密码
Password (again): 											#确认密码
Superuser created successfully.
Installing custom SQL ...
Installing indexes ...
Installed 6 object(s) from 1 fixture(s)
##################################################################
添加额外超级管理员的方法:
[root@centos7 webvirtmgr]# ./manage.py createsuperuser
(2)生成配置文件
[root@virsh1 webvirtmgr]#  ./manage.py collectstatic
WARNING:root:No local_settings file found.

You have requested to collect static files at the destination
location as specified in your settings.

This will overwrite existing files!
Are you sure you want to do this?

Type 'yes' to continue, or 'no' to cancel: yes		#确认覆盖
Copying '/root/webvirtmgr/webvirtmgr/static/css/bootstrap-multiselect.css'
Copying '/root/webvirtmgr/webvirtmgr/static/css/bootstrap.min.css'
...........
75 static files copied.
(3)前端测试页面
当然如果出现错误或未运行面板适用(但仅适用于 DEBUG 或 DEVELOP)
./manage.py runserver 0:8000
⑥配置Nginx
(1)拷贝web包到nginx站点目录并授,我这里直接将项目下载到工作目录了,略了就
[root@virsh1 webvirtmgr]# cd ..
[root@virsh1 ~]# mv webvirtmgr/ /var/www/
[root@virsh1 ~]# chown -R nginx:nginx /var/www/webvirtmgr
(2)添加文件 webvirtmgr.conf在 /etc/nginx/conf.d:
[root@centos7 ~]# cat /etc/nginx/conf.d/webvirtmgr.conf
server {
    listen 80;
    server_name www.webk.com;
    access_log /var/log/nginx/webvirtmgr_access_log;

    location /static/ {
        root /var/www/webvirtmgr/webvirtmgr; # or /srv instead of /var
        expires max;
    }

    location ~ .*\.(js|css)$ {
           proxy_pass http://127.0.0.1:8000;
    }
    location / {
        proxy_pass http://127.0.0.1:8000;
        proxy_set_header X-Real-IP $remote_addr;
        proxy_set_header X-Forwarded-for $proxy_add_x_forwarded_for;
        proxy_set_header Host $host:$server_port;
        proxy_set_header X-Forwarded-Proto $scheme;
        proxy_connect_timeout 600;
        proxy_read_timeout 600;
        proxy_send_timeout 600;
        client_max_body_size 1024M; # Set higher depending on your needs
    }
}
(3)将主配置文件/etc/nginx/nginx.conf中的server字段注释掉
#    server {
#        listen       80;
#        listen       [::]:80;
#        server_name  _;
#        root         /usr/share/nginx/html;

        # Load configuration files for the default server block.
#        include /etc/nginx/default.d/*.conf;

#        error_page 404 /404.html;
#        location = /404.html {
#        }

#        error_page 500 502 503 504 /50x.html;
#        location = /50x.html {
#        }
#    }
(4)检查nginx配置文件的语法格式
[root@virsh1 conf.d]# nginx -t
nginx: the configuration file /etc/nginx/nginx.conf syntax is ok
nginx: configuration file /etc/nginx/nginx.conf test is successful
(5)启动nginx并加入到开机自启动:
[root@virsh1 ~]# systemctl start nginx
[root@virsh1 ~]# systemctl enable nginx
⑦配置supervisord服务
supervisor 是由python语言编写、基于linux操作系统的一款服务器管理工具,用以监控服务器的运行,发现问题能立即自动预警及自动重启等功能。
(1)创建文件 /etc/supervisord.d/webvirtmgr.ini
cat >  /etc/supervisord.d/webvirtmgr.ini <<EOF
[program:webvirtmgr]
command=/usr/bin/python /var/www/webvirtmgr/manage.py run_gunicorn -c /var/www/webvirtmgr/conf/gunicorn.conf.py
directory=/var/www/webvirtmgr
autostart=true
autorestart=true
logfile=/var/log/supervisor/webvirtmgr.log
log_stderr=true
user=nginx

[program:webvirtmgr-console]
command=/usr/bin/python /var/www/webvirtmgr/console/webvirtmgr-console
directory=/var/www/webvirtmgr
autostart=true
autorestart=true
stdout_logfile=/var/log/supervisor/webvirtmgr-console.log
redirect_stderr=true
user=nginx
EOF
(2)启动supervisord并加入开机自启动
systemctl start supervisord.service
systemctl enable supervisord.service
(3)supervisord管理进程
查看webvirtmgr进程状态
#如果这里的状态不是running的,应该是没有给webvirtmgr工作目录的所属用户和组修改为nginx
[root@virsh1 ~]# supervisorctl status
webvirtmgr                       RUNNING   pid 5357, uptime 0:00:58
webvirtmgr-console               RUNNING   pid 5356, uptime 0:00:58
#重启进程
[root@virsh1 ~]# supervisorctl restart all
webvirtmgr-console: started
webvirtmgr: started
⑧配置SSH免密钥
创建 SSH 私钥和 ssh 配置选项(在安装了 WebVirtMgr 的系统上):
$ sudo su - nginx -s /bin/bash
(nginx default user might be different than "nginx", "www-data" might be used : check nginx.conf)
$ ssh-keygen
Generating public/private rsa key pair.
Enter file in which to save the key (path-to-id-rsa-in-nginx-home): 只需在此处按 Enter 键!
$ touch ~/.ssh/config && echo -e "StrictHostKeyChecking=no\nUserKnownHostsFile=/dev/null" >> ~/.ssh/config
$ chmod 0600 ~/.ssh/config
(1)说明
ssh和tcp设置一种即可,其实就是设置无密码登录,要注意的是从webvirtmgr的什么用户到宿主机的什么用户的无密码登录,比如我用nginx用户跑的django webvirtmgr,而宿主机是root跑的virsh,所以需要设置nginx到root的无密码登录,git官网推荐的是用nginx用户跑django webvirtmgr,webvirtmgr用户跑的virsh,所以设置的是nginx用户到宿主机webvirtmgr用户的无密码登录。
(2)发送认证公钥:
[root@virsh1 ~]# su - nginx -s /bin/bash
      -bash-4.2$ ssh-keygen
      -bash-4.2$ touch ~/.ssh/config
      -bash-4.2$ echo -e "StrictHostKeyChecking=no\nUserKnownHostsFile=/dev/null" >> ~/.ssh/config
	  -bash-4.2$ chmod 0600 ~/.ssh/config
      -bash-4.2$ ssh-copy-id root@localhost 	#将公钥复制到 qemu-kvm/libvirt 主机服务器
      -bash-4.2$ ssh-copy-id [email protected]

至此页面管理KVM已实现
官方:
Github项目:https://github.com/retspen/webvirtmgr
安装文档:https://github.com/retspen/webvirtmgr/wiki/Install-WebVirtMgr
SSH密钥:https://github.com/retspen/webvirtmgr/wiki/Setup-SSH-Authorization#documentation-below-is-slightly-outdated-as-webvirtmgr-uses-nginx-now
引用:
https://www.cnblogs.com/LiuChang-blog/p/12321105.html

