医学图像——数据读取和预处理(含代码)
目录
- 3D图像读取与存储
-
- 1、ITK-SNAP 软件
- 2、python包读取
-
- (1)nii数据——SimpleITK
- (2)nrrd数据
- 3、数据存储——h5py
- 图形预处理
-
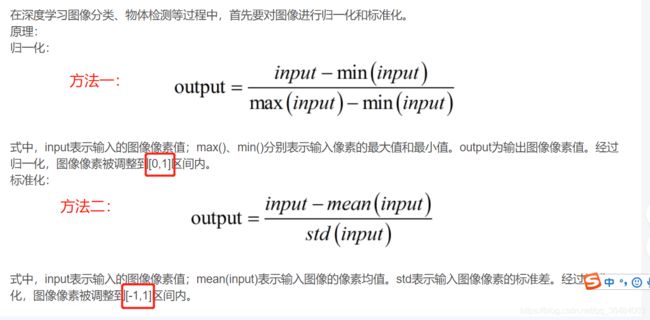
- 1、归一化处理
- 2、裁剪、旋转、翻转
3D图像读取与存储
1、ITK-SNAP 软件
2、python包读取
目的:获取array数据,转为tensor数据
(1)nii数据——SimpleITK
import numpy as np
import os
import glob
import SimpleITK as sitk
from scipy import ndimage
import matplotlib.pyplot as plt

# LiST数据集为例,data是volume,lable是segmementation,nii格式
# 加r,可以将路径转换为原始字符串,不用变为‘\\’
data_path = r'E:\project\Master-1\code\3DUNet-Pytorch\preprocess\fixed\data'
label_path = r'E:\project\Master-1\code\3DUNet-Pytorch\preprocess\fixed\label'

dataname_list = os.listdir(data_path)
dataname_list.sort()
ori_data = sitk.ReadImage(os.path.join(data_path, dataname_list[2]))  # 读取一个数据
data1 = sitk.GetArrayFromImage(ori_data)  # 获取数据的array
print(dataname_list[2], data1.shape, data1[38,255,255])  #打印数据name、shape、某一个位置的元素的值(z,y,x)

plt.imshow(data1[100,:,:]) # 对第100张slice可视化
plt.show()
volume-10.nii (221, 512, 512) 200
(2)nrrd数据
import nrrd
img , img_header = nrrd.read(img_path)
具体操作看这个博客:
https://blog.csdn.net/github_33934628/article/details/78897565
3、数据存储——h5py
数据nrrd形式,归一化后转为h5py形式封装起来,构造Dataset类,Dataloader加载。

# nnrd包读取后,预处理后转变为h5py文件
def covert_h5():
    listt = glob('E:/project/data/Training_Set/*/lgemri.nrrd')
    print(listt)

    for item in tqdm(listt):
        image, img_header = nrrd.read(item)
        label, gt_header = nrrd.read(item.replace('lgemri.nrrd', 'laendo.nrrd'))
        label = (label == 255).astype(np.uint8)
        w, h, d = label.shape

        tempL = np.nonzero(label)  # 得到数组array中非零元素的位置(下标)
        minx, maxx = np.min(tempL[0]), np.max(tempL[0])
        miny, maxy = np.min(tempL[1]), np.max(tempL[1])
        minz, maxz = np.min(tempL[2]), np.max(tempL[2])

        px = max(output_size[0] - (maxx - minx), 0) // 2
        py = max(output_size[1] - (maxy - miny), 0) // 2
        pz = max(output_size[2] - (maxz - minz), 0) // 2
        minx = max(minx - np.random.randint(10, 20) - px, 0)
        maxx = min(maxx + np.random.randint(10, 20) + px, w)
        miny = max(miny - np.random.randint(10, 20) - py, 0)
        maxy = min(maxy + np.random.randint(10, 20) + py, h)
        minz = max(minz - np.random.randint(5, 10) - pz, 0)
        maxz = min(maxz + np.random.randint(5, 10) + pz, d)

        image = (image - np.mean(image)) / np.std(image)  # 标准化/0均值化,将数据中心转移到原点处,np.std计算标准差
        image = image.astype(np.float32)
        image = image[minx:maxx, miny:maxy]
        label = label[minx:maxx, miny:maxy]
        print(label.shape)
        f = h5py.File(item.replace('lgemri.nrrd', 'mri_norm2.h5'), 'w')
        f.create_dataset('image', data=image, compression="gzip")
        f.create_dataset('label', data=label, compression="gzip")
        f.close()
图形预处理
1、归一化处理
方法二,公式为:(X-mean)/std 计算时对每个属性/每列分别进行
将数据按期属性(按列进行)减去其均值,并处以其方差。得到的结果是,对于每个属性/每列来说所有数据都聚集在0附近,方差为1。
# 方法一:sklearn.preprocessing.scale()函数
from sklearn import preprocessing
import numpy as np
X_scaled = preprocessing.scale(X)
# # image = (image - np.mean(image)) / np.std(image)

# 方式二
# 将属性缩放到一个指定的最大和最小值(通常是1-0)之间
img=(img-np.min(img))/(np.max(img)-np.min(img))
2、裁剪、旋转、翻转
# 随机裁剪
(w, h, d) = image.shape
w1 = np.random.randint(0, w - self.output_size[0])
h1 = np.random.randint(0, h - self.output_size[1])
d1 = np.random.randint(0, d - self.output_size[2])

label = label[w1:w1 + self.output_size[0], h1:h1 + self.output_size[1], d1:d1 + self.output_size[2]]
image = image[w1:w1 + self.output_size[0], h1:h1 + self.output_size[1], d1:d1 + self.output_size[2]]

# 中心裁剪
(w, h, d) = image.shape
w1 = int(round((w - self.output_size[0]) / 2.))
h1 = int(round((h - self.output_size[1]) / 2.))
d1 = int(round((d - self.output_size[2]) / 2.))

label = label[w1:w1 + self.output_size[0], h1:h1 + self.output_size[1], d1:d1 + self.output_size[2]]
image = image[w1:w1 + self.output_size[0], h1:h1 + self.output_size[1], d1:d1 + self.output_size[2]]
# 翻转
axis = np.random.randint(0, 2)  # 代表某个维度,x轴或y或z
image = np.flip(image, axis=axis)

# 旋转
k = np.random.randint(0, 4)
image = np.rot90(image, k)  # 随机旋转矩阵90、180、270
一个中心裁剪的demo:
import os
import h5py
import numpy as np
from glob import glob
from tqdm import tqdm
from torchvision import transforms

data_root_dir = 'E:/project/Master-1/code/'
patch_size = (112, 112, 80)  # 裁剪的大小
aug_num = 5  # 增广倍数

# 对图片进行中心裁剪
class CenterCrop(object):
    def __init__(self, output_size):
        self.output_size = output_size

    def __call__(self, sample):
        image, label = sample['image'], sample['label']

        # pad the sample if necessary
        if label.shape[0] <= self.output_size[0] or label.shape[1] <= self.output_size[1] or label.shape[2] <= \
                self.output_size[2]:
            pw = max((self.output_size[0] - label.shape[0]) // 2 + 3, 0)
            ph = max((self.output_size[1] - label.shape[1]) // 2 + 3, 0)
            pd = max((self.output_size[2] - label.shape[2]) // 2 + 3, 0)
            # 填充padding方法:ndarray = numpy.pad(array, pad_width, mode, **kwargs)
            image = np.pad(image, [(pw, pw), (ph, ph), (pd, pd)], mode='constant', constant_values=0)
            label = np.pad(label, [(pw, pw), (ph, ph), (pd, pd)], mode='constant', constant_values=0)

        (w, h, d) = image.shape

        w1 = int(round((w - self.output_size[0]) / 2.))  # round是四舍五入
        h1 = int(round((h - self.output_size[1]) / 2.))
        d1 = int(round((d - self.output_size[2]) / 2.))

        label = label[w1:w1 + self.output_size[0], h1:h1 + self.output_size[1], d1:d1 + self.output_size[2]]
        image = image[w1:w1 + self.output_size[0], h1:h1 + self.output_size[1], d1:d1 + self.output_size[2]]

        return {'image': image, 'label': label}

def data_aug():
    # 增广方法叠加使用
    augs = transforms.Compose([
        # RandomRotFlip(),
        CenterCrop(patch_size),
    ])

    listt = glob(data_root_dir + '/*/mri_norm2.h5')  # 遍历所有的文件夹,找到原来的h5py文
    # print(listt)
    for item in tqdm(listt):
        h5f = h5py.File(item, 'r')
        image = h5f['image'][:]
        label = h5f['label'][:]
        sample = {'image': image, 'label': label}
        # 进行多次图像增广,每增广一次保存一次数据
        for i in range(aug_num):
            # 数据增广
            augs(sample)
            # 保存为h5py
            image, label = sample['image'], sample['label']
            sample_aug_name = 'mri_norm2_' + str(i + 1) + '.h5'
            print(sample_aug_name)
            f = h5py.File(item.replace('mri_norm2.h5', sample_aug_name), 'w')
            f.create_dataset('image', data=image, compression="gzip")
            f.create_dataset('label', data=label, compression="gzip")
            f.close()
    print("Data augmentation has finished!")

if __name__ == '__main__':
    data_aug()


