Mybatis&MybatisPlus&Springboot之最全入门学习教程笔记
目录
- 1 Mybatis概述
-
- 1.1 Mybatis概念
-
- 1.1.1 JDBC 缺点
- 1.1.2 Mybatis优化
- 1.2 快速入门
-
- 1.2.1 创建数据库
- 1.2.2 IDEA2021创建项目
- 1.2.3 MyBatisX插件
- 2 MybatisPlus
-
- 2.1 Mybatis-Plus介绍
- 2.2 整合
-
- 2.2.1 项目准备
- 2.2.2 Mybatis+MP
- 2.2.3 Spring+Mybatis+MP
- 2.2.4 Spring Boot+Mybatis+MP
- 3 Springboot
-
- 3.1 Springboot 介绍
- 3.2 Springboot 整合
-
- 3.2.1 Springboot+MyBatis
- 3.2.2 Springboot+MybatisPlus
- 3.2.2 整合Druid
- 3.3 SSMP整合综合案例
-
- 3.3.1 模块创建
- 3.3.2 实体类开发
- 3.3.3 数据层开发
-
- 3.3.3.1 基础CRUD
- 3.3.3.2 分页功能制作
- 3.3.3.3 条件查询功能制作
- 3.3.4 业务层开发service
-
- 3.3.4.1 普通写法
- 3.3.4.2 快速开发
- 3.3.5 表现层开发controller
-
- 3.3.5.1 表现层BookController2
- 3.3.5.2 BookController
- 3.3.6 前后端联通性测试
-
- 3.3.6.1 列表功能
- 3.3.6.2 添加功能
- 3.3.6.3 删除功能
- 3.3.6.4 修改功能
- 3.3.6.5 业务消息一致性处理
- 3.3.6.6 分页功能
- 3.3.6.7 条件查询功能
1 Mybatis概述
1.1 Mybatis概念
- MyBatis 是一款优秀的持久层框架,用于简化 JDBC 开发,
(1)持久层:负责将数据到保存到数据库的那一层代码。Mybatis就是对jdbc代码进行了封装。
JavaEE三层架构:表现层、业务层、持久层
(2)框架:框架就是一个半成品软件,是一套可重用的、通用的、软件基础代码模型,在框架的基础之上构建软件编写更加高效、规范、通用、可扩展 - MyBatis 本是 Apache 的一个开源项目iBatis, 2010年这个项目由apache software foundation 迁移到了google
code,并且改名为MyBatis 。2013年11月迁移到Github - 官网:https://mybatis.org/mybatis-3/zh/index.html
1.1.1 JDBC 缺点
1.1.2 Mybatis优化
1.2 快速入门
1.2.1 创建数据库
创建user表,添加数据
create database mybatis;
use mybatis;
drop table if exists tb_user;
create table tb_user(
id int primary key auto_increment,
username varchar(20),
password varchar(20),
gender char(1),
addr varchar(30)
);
INSERT INTO tb_user VALUES (1, 'zhangsan', '123', '男', '北京');
INSERT INTO tb_user VALUES (2, '李四', '234', '女', '天津');
INSERT INTO tb_user VALUES (3, '王五', '11', '男', '西安');
1.2.2 IDEA2021创建项目
            org.mybatis
            mybatis
            3.5.5


            mysql
            mysql-connector-java
            5.1.46


            org.projectlombok
            lombok
            true
            1.18.4
(2)数据库相关信息:编写 MyBatis 核心配置文件 – > 替换连接信息,解决硬编码问题。在模块下的 resources 目录下创建mybatis的配置文件 mybatis-config.xml ,内容如下:
另一种写法:
Application.properties
db.url=jdbc:mysql://localhost:3306/mybatis?useSSL=false
db.user=root
db.password=root
db.driver=com.mysql.jdbc.Driver
mybatis-config.xml中
(3)实体类:在 com.liu.pojo 包下创建 User类
package com.liu.pojo;

import lombok.AllArgsConstructor;
import lombok.Data;
import lombok.NoArgsConstructor;

// lombok写法,替代getter、setter、tostring
@Data
@NoArgsConstructor
@AllArgsConstructor
public class User {
    private int id;
    private String username;
    private String password;
    private String gender;
    private String addr;
}
(4)数据层:
- 编写 SQL 映射文件 --> 统一管理sql语句,解决硬编码问题,使用Mapper代理,在模块的 resources 目录下创建映射配置文件UserMapper.xml ,如果不行的话,在 resources 下创建 com/liu/dao/UserMapper.xml,和Mapper接口相同包路径,一个在java里,一个在resources里。
tb_user爆红的话,Idea和数据库没有建立连接,不识别表信息,并不影响程序的执行。
解决方式:在Idea中配置MySQL数据库连接,点击IDEA右边框的 Database ,在展开的界面点击 + 选择 Data Source ,再选择 MySQL进行填写。
- 创建Mapper 接口,定义方法,方法名就是SQL映射文件中sql语句的id,并保持参数类型和返回值类型一致
package com.liu.dao;
import com.liu.pojo.User;
import java.util.List;

public interface UserMapper {
    List selectAll();
}
(5)测试:test里com.itheima 包下编写 TestMybatis
public class TestMybatis {
    @Test
    public void testUserList() throws Exception {
        //1. 加载mybatis的核心配置文件,获取 SqlSessionFactory
        String resource = "mybatis-config.xml";
        InputStream inputStream = Resources.getResourceAsStream(resource);
        SqlSessionFactory sqlSessionFactory = new
                SqlSessionFactoryBuilder().build(inputStream);

        //2. 获取SqlSession对象,用它来执行sql
        SqlSession sqlSession = sqlSessionFactory.openSession();
        //3. 获取接口代理对象
        UserMapper userMapper = sqlSession.getMapper(UserMapper.class);
        //4.执行方法,就是执行SQL语句
        List list = userMapper.selectAll();
        for (User user : list) {
            System.out.println(user);
        }
    }
}
1.2.3 MyBatisX插件
MybatisX 是一款基于 IDEA 的快速开发插件,为效率而生。
主要功能:XML映射配置文件 和 接口方法 间相互跳转;根据接口方法生成 statement
安装方式
(1)点击 file ,选择 settings ,就能看到如下图所示界面

(2)插件效果

红色头绳的表示映射配置文件,蓝色头绳的表示mapper接口。在mapper接口点击红色头绳的小鸟图标会自动跳转到对应的映射配置文件,在映射配置文件中点击蓝色头绳的小鸟图标会自动跳转到对应的mapper接口。
也可以在mapper接口中定义方法,自动生成映射配置文件中的 statement ,如图所示

2 MybatisPlus
2.1 Mybatis-Plus介绍
MyBatis-Plus(简称 MP)是一个 MyBatis 的增强工具,在 MyBatis 的基础上只做增强不做改变,为简化开发、提高效率而生。官网:https://mybatis.plus/ 或 https://mp.baomidou.com/
2.2 整合
对于Mybatis整合MP有常常有三种用法,分别是Mybatis+MP、Spring+Mybatis+MP、Spring Boot+Mybatis+MP。
2.2.1 项目准备
- 创建数据库:mp
-- 创建测试表
CREATE TABLE `tb_user` (
`id` bigint(20) NOT NULL AUTO_INCREMENT COMMENT '主键ID',
`user_name` varchar(20) NOT NULL COMMENT '用户名',
`password` varchar(20) NOT NULL COMMENT '密码',
`name` varchar(30) DEFAULT NULL COMMENT '姓名',
`age` int(11) DEFAULT NULL COMMENT '年龄',
`email` varchar(50) DEFAULT NULL COMMENT '邮箱',
PRIMARY KEY (`id`)
) ENGINE=InnoDB AUTO_INCREMENT=1 DEFAULT CHARSET=utf8;
-- 插入测试数据
INSERT INTO `tb_user` (`id`, `user_name`, `password`, `name`, `age`, `email`) VALUES
('1', 'zhangsan', '123456', '张三', '18', '[email protected]');
INSERT INTO `tb_user` (`id`, `user_name`, `password`, `name`, `age`, `email`) VALUES
('2', 'lisi', '123456', '李四', '20', '[email protected]');
INSERT INTO `tb_user` (`id`, `user_name`, `password`, `name`, `age`, `email`) VALUES
('3', 'wangwu', '123456', '王五', '28', '[email protected]');
INSERT INTO `tb_user` (`id`, `user_name`, `password`, `name`, `age`, `email`) VALUES
('4', 'zhaoliu', '123456', '赵六', '21', '[email protected]');
INSERT INTO `tb_user` (`id`, `user_name`, `password`, `name`, `age`, `email`) VALUES
('5', 'sunqi', '123456', '孙七', '24', '[email protected]');
- 创建空项目test-mp01
2.2.2 Mybatis+MP
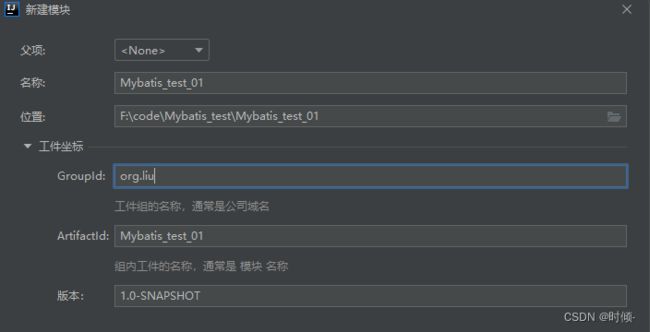
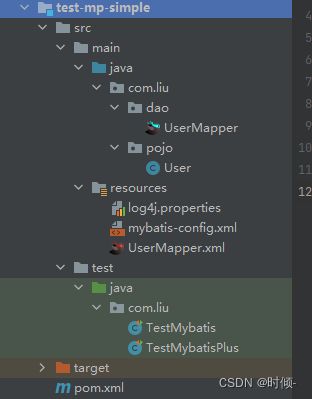
创建test-mp-simple模块Maven
- pom.xml导入依赖mybatis、mybatis-plus、mysql、druid、lombok、junit
            org.mybatis
            mybatis
            3.5.5


            com.baomidou
            mybatis-plus
            3.1.1


            mysql
            mysql-connector-java
            5.1.47


            com.alibaba
            druid
            1.0.11


            org.projectlombok
            lombok
            true
            1.18.4


            junit
            junit
            4.12


            org.slf4j
            slf4j-log4j12
            1.6.4
- resources下
(1)log4j.properties:
log4j.rootLogger=DEBUG,A1
log4j.appender.A1=org.apache.log4j.ConsoleAppender
log4j.appender.A1.layout=org.apache.log4j.PatternLayout
log4j.appender.A1.layout.ConversionPattern=[%t] [%c]-[%p] %m%n
(2)mybatis-config.xml文件
- 实体类pojo:编写User实体对象
package com.liu.pojo;

import com.baomidou.mybatisplus.annotation.TableName;
import lombok.AllArgsConstructor;
import lombok.Data;
import lombok.NoArgsConstructor;

@Data
@NoArgsConstructor
@AllArgsConstructor
@TableName("tb_user")//MP使用
public class User {
    private Long id;
    private String userName;
    private String password;
    private String name;
    private Integer age;
    private String email;
}
- 数据层dao包:
(1)编写UserMapper接口,,将UserMapper继承BaseMapper,将拥有了BaseMapper中的所有方法,还可以用mybatis的用法自己定义一个方法findAll
package com.liu.dao;

import com.liu.pojo.User;
import com.baomidou.mybatisplus.core.mapper.BaseMapper;

import java.util.List;

public interface UserMapper extends BaseMapper {
    List findAll();
}
(2)resources下编写UserMapper.xml文件(直接用BaseMapper的方法,可省略)
- 编写TestMybatisPlus 测试用例
package com.liu;

import com.liu.dao.UserMapper;
import com.liu.pojo.User;
import org.apache.ibatis.io.Resources;
import org.apache.ibatis.session.SqlSession;
import org.apache.ibatis.session.SqlSessionFactory;
import org.apache.ibatis.session.SqlSessionFactoryBuilder;
import org.junit.Test;

import java.io.InputStream;
import java.util.List;

public class TestMybatisPlus {
    @Test
    public void testUserList() throws Exception {
        //1. 加载mybatis的核心配置文件,获取 SqlSessionFactory
        String resource = "mybatis-config.xml";
        InputStream inputStream = Resources.getResourceAsStream(resource);
        // 这里使用的是MP中的MybatisSqlSessionFactoryBuilder
        SqlSessionFactory sqlSessionFactory = new
                MybatisSqlSessionFactoryBuilder().build(inputStream);

        //2. 获取SqlSession对象,用它来执行sql
        SqlSession sqlSession = sqlSessionFactory.openSession();
        //3. 获取接口代理对象
        UserMapper userMapper = sqlSession.getMapper(UserMapper.class);
        //4.可以调用BaseMapper中定义的方法,
        // List list = userMapper.findAll();
        List list = userMapper.selectList(null);
        for (User user : list) {
            System.out.println(user);
        }
    }
}
2.2.3 Spring+Mybatis+MP
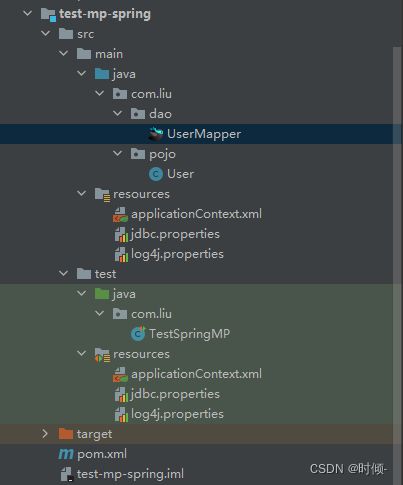
引入了Spring框架,数据源、构建等工作就交给了Spring管理。创建子模块,test-mp-spring
- 父pom.xml
    4.0.0

    org.example
    test-mp01
    pom
    1.0-SNAPSHOT

        test-mp-simple
        test-mp-spring


            com.baomidou
            mybatis-plus
            3.1.1


            mysql
            mysql-connector-java
            5.1.47


            com.alibaba
            druid
            1.0.11


            org.projectlombok
            lombok
            true
            1.18.4


            junit
            junit
            4.12


            org.slf4j
            slf4j-log4j12
            1.6.4


                org.apache.maven.plugins
                maven-compiler-plugin

                    1.8
                    1.8


        8
        8
子pom.xml
        test-mp01
        org.example
        1.0-SNAPSHOT

    4.0.0

    test-mp-spring


        8
        8
        5.1.6.RELEASE


            org.springframework
            spring-webmvc
            ${spring.version}


            org.springframework
            spring-jdbc
            ${spring.version}


            org.springframework
            spring-test
            ${spring.version}
- 在resources下
(1)编写jdbc.properties
jdbc.driver=com.mysql.jdbc.Driver
jdbc.url=jdbc:mysql://localhost:3306/mp?
useUnicode=true&characterEncoding=utf8&autoReconnect=true&allowMultiQueries=true&useSSL=false
jdbc.username=root
jdbc.password=root
(2)编写applicationContext.xml
- 实体类pojo:编写User对象
package com.liu.pojo;

import com.baomidou.mybatisplus.annotation.TableName;
import lombok.AllArgsConstructor;
import lombok.Data;
import lombok.NoArgsConstructor;

@Data
@NoArgsConstructor
@AllArgsConstructor
@TableName("tb_user")
public class User {
    private Long id;
    private String userName;
    private String password;
    private String name;
    private Integer age;
    private String email;
}
- 数据层dao:UserMapper接口:
package com.liu.dao;
import com.liu.pojo.User;
import com.baomidou.mybatisplus.core.mapper.BaseMapper;

public interface UserMapper extends BaseMapper {
}
- 编写测试用例:
package com.liu;

import com.liu.dao.UserMapper;
import com.liu.pojo.User;
import org.junit.Test;
import org.junit.runner.RunWith;
import org.springframework.beans.factory.annotation.Autowired;
import org.springframework.test.context.ContextConfiguration;
import org.springframework.test.context.junit4.SpringJUnit4ClassRunner;

import java.util.List;

@RunWith(SpringJUnit4ClassRunner.class)
@ContextConfiguration(locations = "classpath:applicationContext.xml")
public class TestSpringMP {
    @Autowired
    private UserMapper userMapper;

    @Test
    public void testSelectList() {
        List users = this.userMapper.selectList(null);
        for (User user : users) {
            System.out.println(user);
        }
    }
}
2.2.4 Spring Boot+Mybatis+MP
使用SpringBoot将进一步的简化MP的整合,需要注意的是,由于使用SpringBoot需要继承parent,所以需要重新创建工程,并不是创建子Module。
创建空项目,项目结构中创建新模块,选择Spring Initializr,并配置模块相关基础信息
默认https://start.spring.io,太卡的话可以换网址https://start.aliyun.com、https://start.springboot.io;包名记得去掉文件名;SDK:1.8。
- 导入依赖pom.xml
    4.0.0


        org.springframework.boot
        spring-boot-starter-parent
        2.1.4.RELEASE


    org.example
    test-mp-springboot
    1.0-SNAPSHOT


        8
        8


            org.springframework.boot
            spring-boot-starter


                    org.springframework.boot
                    spring-boot-starter-logging


            org.springframework.boot
            spring-boot-starter-test
            test


            org.projectlombok
            lombok
            true


            com.baomidou
            mybatis-plus-boot-starter
            3.1.1


            mysql
            mysql-connector-java
            5.1.47


            org.slf4j
            slf4j-log4j12


                org.springframework.boot
                spring-boot-maven-plugin
- resources下配置
(1)log4j.properties
log4j.rootLogger=DEBUG,A1
log4j.appender.A1=org.apache.log4j.ConsoleAppender
log4j.appender.A1.layout=org.apache.log4j.PatternLayout
log4j.appender.A1.layout.ConversionPattern=[%t] [%c]-[%p] %m%n
(2)application.properties
spring.application.name = test-mp-springboot
spring.datasource.driver-class-name=com.mysql.jdbc.Driver
spring.datasource.url=jdbc:mysql://127.0.0.1:3306/mp?
useUnicode=true&characterEncoding=utf8&autoReconnect=true&allowMultiQueries=true&useSSL=false
spring.datasource.username=root
spring.datasource.password=root
- 实体类pojo:User
@Data
@NoArgsConstructor
@AllArgsConstructor
@TableName("tb_user")
// mp会默认找User首字母小写对应的表名来映射
public class User extends Model {
    @TableId(type = IdType.AUTO) //自增
    private Long id;
    private String userName;
    @TableField(select = false)
    private String password;//查询时不会返回该字段值
    private String name;
    private Integer age;
    @TableField(exist = false)
    private String address;//该字段在数据库中不存在
    @TableField(value = "email")//指定数据库中的表段名
    private String mail;
}
- 数据层dao:编写mapper接口直接添加@Mapper
@Mapper
public interface UserMapper extends BaseMapper {
}
或者启动类添加@MapperScan
@MapperScan("com.liu.mapper") //设置mapper接口的扫描包
@SpringBootApplication
public class MyApplication {
    public static void main(String[] args) {
        SpringApplication.run(MyApplication.class, args);
    }
}
- 编写测试用例
@RunWith(SpringRunner.class)
//加载spring整合junit专用的类运行器
//@RunWith(SpringJUnit4ClassRunner.class)
//@ContextConfiguration(classes = SpringConfig.class)
@SpringBootTest
public class UserMapperTest {
    //注入你要测试的对象
    @Autowired
    private UserMapper userMapper;
    @Test
    public void testSelect() {
        List userList = userMapper.selectList(null);
        for (User user : userList) {
            System.out.println(user);
        }
    }
    @Test
    public void testInsert() {
        User user = new User();
        user.setAge(18);
        user.setMail("[email protected]");
        user.setName("刘1");
        user.setUserName("caocao");
        user.setPassword("123456");
        user.setAddress("河南");

        int result = this.userMapper.insert(user); //返回的result是受影响的行数,并不是自增后的id
        System.out.println("result = " + result);
        System.out.println("id => " + user.getId()); //自增后的id会回填到对象中
    }
   @Test
    public void testSelectById() {
        User user = this.userMapper.selectById(1L);
        System.out.println(user);
    }

    @Test
    public void testUpdateById() {
        User user = new User();
        user.setId(1L); //主键,条件,根据id更新
        user.setAge(21); //更新的字段 //根据id更新,更新不为null的字段
        user.setPassword("6666888");
        int result=this.userMapper.updateById(user);
        System.out.println("result => "+result);
    }

    @Test
    public void testUpdate() {
        User user = new User();
        user.setAge(32); //更新的字段
        //更新的条件
        QueryWrapper wrapper = new QueryWrapper<>();
        wrapper.eq("user_name", "zhangsan");
        //执行更新操作
        int result = this.userMapper.update(user, wrapper);
        System.out.println("result = " + result);

        //    //更新的条件以及字段
        //   UpdateWrapper wrapper = new UpdateWrapper<>();
        //   wrapper.eq("id", 6).set("age", 23);
        //    //执行更新操作
        //    int result = this.userMapper.update(null, wrapper);
        //    System.out.println("result = " + result);
    }

    @Test
    public void testDeleteByMap() {
        Map columnMap = new HashMap<>();
        columnMap.put("user_name","zhangsan");
        columnMap.put("password","6666888");
        //将columnMap中的元素设置为删除的条件,多个之间为and关系
        int result = this.userMapper.deleteByMap(columnMap);
        System.out.println("result = " + result);
    }

    @Test
    public void testDelete() {
        User user = new User();
        user.setAge(20);
        user.setName("李四");
        //将实体对象进行包装,包装为操作条件
        QueryWrapper wrapper = new QueryWrapper<>(user);

        // UpdateWrapper wrapper = new UpdateWrapper<>();
        // wrapper.eq("age", 20).eq("name","李四");
        int result = this.userMapper.delete(wrapper);
        System.out.println("result = " + result);
    }
}
3 Springboot
3.1 Springboot 介绍
3.2 Springboot 整合
创建空项目SpringBoot2
- 导入对应技术的starter坐标
- 根据对应技术的要求做配置
3.2.1 Springboot+MyBatis
- 创建模块,Spring Initializr,并配置模块相关基础信息
- 默认https://start.spring.io,太卡的话可以换网址https://start.aliyun.com、https://start.springboot.io;
- 包名记得去掉文件名
- 勾选要使用的技术:MyBatis,MySQL或者在pom.xml直接写坐标。
        org.mybatis.spring.boot
        mybatis-spring-boot-starter
        2.2.0


        mysql
        mysql-connector-java
        runtime


            com.alibaba
            druid-spring-boot-starter
            1.2.6
- 配置数据库信息,在resources下创建application.yml
#druid第一种配置方法  druid版本1.1.16
#spring:
#  datasource:
#    type: com.alibaba.druid.pool.DruidDataSource
#    driver-class-name: com.mysql.cj.jdbc.Driver
#    url: jdbc:mysql://localhost:3306/ssm_db?serverTimezone=UTC
#    username: root
#    password: root

#druid第二种配置方法 druid版本1.2.6
spring:
  datasource:
    druid:
      driver-class-name: com.mysql.cj.jdbc.Driver
      url: jdbc:mysql://localhost:3306/ssm_db?serverTimezone=UTC
      username: root
      password: root
- 实体类pojo包下创建Book类
public class Book {
    private Integer id;
    private String type;
    private String name;
    private String description;
}
- 数据层dao包下创建映射接口文件
// 数据库SQL映射需要添加@Mapper被容器识别到
@Mapper
public interface BookDao {
    @Select("select * from tb_book where id = #{id}")
    public Book getById(Integer id);
}
- 测试类
@SpringBootTest
class SpringbootMybatisApplicationTests {

    @Autowired
    private BookDao bookDao;

    @Test
    void contextLoads() {
        System.out.println(bookDao.getById(1));
    }
}
3.2.2 Springboot+MybatisPlus
创建子模块Spring Initializr,名字:Springboot_mp
- pom.xml导入对应的starter
    4.0.0

        org.springframework.boot
        spring-boot-starter-parent
        2.7.5


    com.liu
    Springboot_mp
    0.0.1-SNAPSHOT
    Springboot_mp
    Demo project for Spring Boot

        1.8


            org.springframework.boot
            spring-boot-starter


            com.mysql
            mysql-connector-j
            runtime


            com.baomidou
            mybatis-plus-boot-starter
            3.4.3


            org.springframework.boot
            spring-boot-starter-test
            test


            org.projectlombok
            lombok


                org.springframework.boot
                spring-boot-maven-plugin
简单记录一下starter
| starter所属 | 命名规则 | 示例 |
|---|---|---|
| 官方提供 | spring-boot-starter-技术名称 | spring-boot-starter-web spring-boot-starter-test |
| 第三方提供 | 第三方技术名称-spring-boot-starter | druid-spring-boot-starter |
| 第三方提供 | 第三方技术名称-boot-starter(第三方技术名称过长,简化命名) | mybatis-plus-boot-starter |
- resources下:配置数据源相关信息application.yml
spring:
  datasource:
#    type: com.alibaba.druid.pool.DruidDataSource
    driver-class-name: com.mysql.cj.jdbc.Driver
    url: jdbc:mysql://localhost:3306/ssm_db?serverTimezone=UTC
    username: root
    password: admin123

#可以代替在实体类里写表名
mybatis-plus:
  global-config:
    db-config:
      table-prefix: tb_
- 实体类pojo:Book.class
@Data
@NoArgsConstructor
@AllArgsConstructor
// @TableName("tb_book")  在application.yml配置了前缀,就可以省略不写
public class Book {
    private Integer id;
    private String type;
    private String name;
    private String description;
}
- 数据层dao:BookDao接口
核心在于Dao接口继承了一个BaseMapper的接口,这个接口中帮助开发者预定了若干个常用的API接口,简化了通用API接口的开发工作。
@Mapper
public interface BookDao extends BaseMapper {
}
3.2.2 整合Druid
Springboot默认选择HiKari,更换用Druid
步骤①:导入对应的坐标(注意,是坐标,此处不是starter)
        com.alibaba
        druid
        1.1.16
步骤②:修改配置,在数据源配置中有一个type属性,专用于指定数据源类型
spring:
  datasource:
    driver-class-name: com.mysql.cj.jdbc.Driver
    url: jdbc:mysql://localhost:3306/ssm_db?serverTimezone=UTC
    username: root
    password: root
    type: com.alibaba.druid.pool.DruidDataSource
这里其实要提出一个问题的,目前的数据源配置格式是一个通用格式,不管你换什么数据源都可以用这种形式进行配置。但是新的问题又来了,如果对数据源进行个性化的配置,例如配置数据源对应的连接数量,这个时候就有新的问题了。每个数据源技术对应的配置名称都一样吗?肯定不是啊,各个厂商不可能提前商量好都写一样的名字啊,怎么办?就要使用专用的配置格式了。这个时候上面这种通用格式就不能使用了,怎么办?还能怎么办?按照SpringBoot整合其他技术的通用规则来套啊,导入对应的starter,进行相应的配置即可。
步骤①:导入对应的starter
        com.alibaba
        druid-spring-boot-starter
        1.2.6
步骤②:修改配置
spring:
  datasource:
    druid:
      driver-class-name: com.mysql.cj.jdbc.Driver
      url: jdbc:mysql://localhost:3306/ssm_db?serverTimezone=UTC
      username: root
      password: root
3.3 SSMP整合综合案例
- 实体类开发————使用Lombok快速制作实体类
- Dao开发————整合MyBatisPlus,制作数据层测试
- Service开发————基于MyBatisPlus进行增量开发,制作业务层测试类
- Controller开发————基于Restful开发,使用PostMan测试接口功能
- Controller开发————前后端开发协议制作
- 页面开发————基于VUE+ElementUI制作,前后端联调,页面数据处理,页面消息处理
- 列表
- 新增
- 修改
- 删除
- 分页
- 查询
- 项目异常处理
- 按条件查询————页面功能调整、Controller修正功能、Service修正功能
3.3.1 模块创建
1 pom.xml
        org.springframework.boot
        spring-boot-starter-web


        org.springframework.boot
        spring-boot-starter-test
        test
2 application.yml
server:
  port: 80
3.3.2 实体类开发
本案例对应的模块表结构如下:
-- ----------------------------
-- Table structure for tbl_book
-- ----------------------------
DROP TABLE IF EXISTS `tbl_book`;
CREATE TABLE `tbl_book`  (
  `id` int(11) NOT NULL AUTO_INCREMENT,
  `type` varchar(20) CHARACTER SET utf8 COLLATE utf8_general_ci NULL DEFAULT NULL,
  `name` varchar(50) CHARACTER SET utf8 COLLATE utf8_general_ci NULL DEFAULT NULL,
  `description` varchar(255) CHARACTER SET utf8 COLLATE utf8_general_ci NULL DEFAULT NULL,
  PRIMARY KEY (`id`) USING BTREE
) ENGINE = InnoDB AUTO_INCREMENT = 51 CHARACTER SET = utf8 COLLATE = utf8_general_ci ROW_FORMAT = Dynamic;

-- ----------------------------
-- Records of tbl_book
-- ----------------------------
INSERT INTO `tbl_book` VALUES (1, '计算机理论', 'Spring实战 第5版', 'Spring入门经典教程,深入理解Spring原理技术内幕');
INSERT INTO `tbl_book` VALUES (2, '计算机理论', 'Spring 5核心原理与30个类手写实战', '十年沉淀之作,手写Spring精华思想');
INSERT INTO `tbl_book` VALUES (3, '计算机理论', 'Spring 5 设计模式', '深入Spring源码剖析Spring源码中蕴含的10大设计模式');
INSERT INTO `tbl_book` VALUES (4, '计算机理论', 'Spring MVC+MyBatis开发从入门到项目实战', '全方位解析面向Web应用的轻量级框架,带你成为Spring MVC开发高手');
INSERT INTO `tbl_book` VALUES (5, '计算机理论', '轻量级Java Web企业应用实战', '源码级剖析Spring框架,适合已掌握Java基础的读者');
INSERT INTO `tbl_book` VALUES (6, '计算机理论', 'Java核心技术 卷I 基础知识(原书第11版)', 'Core Java 第11版,Jolt大奖获奖作品,针对Java SE9、10、11全面更新');
INSERT INTO `tbl_book` VALUES (7, '计算机理论', '深入理解Java虚拟机', '5个维度全面剖析JVM,大厂面试知识点全覆盖');
INSERT INTO `tbl_book` VALUES (8, '计算机理论', 'Java编程思想(第4版)', 'Java学习必读经典,殿堂级著作!赢得了全球程序员的广泛赞誉');
INSERT INTO `tbl_book` VALUES (9, '计算机理论', '零基础学Java(全彩版)', '零基础自学编程的入门图书,由浅入深,详解Java语言的编程思想和核心技术');
INSERT INTO `tbl_book` VALUES (10, '市场营销', '直播就该这么做:主播高效沟通实战指南', '李子柒、李佳琦、薇娅成长为网红的秘密都在书中');
INSERT INTO `tbl_book` VALUES (11, '市场营销', '直播销讲实战一本通', '和秋叶一起学系列网络营销书籍');
INSERT INTO `tbl_book` VALUES (12, '市场营销', '直播带货:淘宝、天猫直播从新手到高手', '一本教你如何玩转直播的书,10堂课轻松实现带货月入3W+');
根据上述表结构,制作对应的实体类
实体类
public class Book {
    private Integer id;
    private String type;
    private String name;
    private String description;
}
实体类的开发可以自动通过工具手工生成get/set方法,然后覆盖toString()方法,方便调试,等等。不过这一套操作书写很繁琐,有对应的工具可以帮助我们简化开发,lombok。
Lombok,一个Java类库,提供了一组注解,简化POJO实体类开发,SpringBoot目前默认集成了lombok技术,并提供了对应的版本控制,所以只需要提供对应的坐标即可,在pom.xml中添加lombok的坐标。
        org.projectlombok
        lombok
使用lombok可以通过一个注解@Data完成一个实体类对应的getter,setter,toString,equals,hashCode等操作的快速添加
import lombok.Data;
@Data
public class Book {
    private Integer id;
    private String type;
    private String name;
    private String description;
}
3.3.3 数据层开发
3.3.3.1 基础CRUD
数据层开发本次使用MyBatisPlus技术,数据源使用前面学习的Druid
步骤①:导入MyBatisPlus与Druid对应的starter,当然mysql的驱动不能少
<dependencies>
    <dependency>
        <groupId>com.baomidougroupId>
        <artifactId>mybatis-plus-boot-starterartifactId>
        <version>3.4.3version>
    dependency>
    <dependency>
        <groupId>com.alibabagroupId>
        <artifactId>druid-spring-boot-starterartifactId>
        <version>1.2.6version>
    dependency>
    <dependency>
        <groupId>mysqlgroupId>
        <artifactId>mysql-connector-javaartifactId>
        <scope>runtimescope>
    dependency>
dependencies>
步骤②:配置数据库连接相关的数据源配置
server:
  port: 80

spring:
  datasource:
    druid:
      driver-class-name: com.mysql.cj.jdbc.Driver
      url: jdbc:mysql://localhost:3306/ssm_db?serverTimezone=UTC
      username: root
      password: root
步骤③:使用MP的标准通用接口BaseMapper加速开发,别忘了@Mapper和泛型的指定
@Mapper
public interface BookDao extends BaseMapper {
}
步骤④:制作测试类测试结果,这个测试类制作是个好习惯,不过在企业开发中往往都为加速开发跳过此步,且行且珍惜吧
package com.liu.dao;

import com.baomidou.mybatisplus.core.conditions.query.LambdaQueryWrapper;
import com.baomidou.mybatisplus.core.conditions.query.QueryWrapper;
import com.baomidou.mybatisplus.core.metadata.IPage;
import com.baomidou.mybatisplus.extension.plugins.pagination.Page;
import com.itheima.domain.Book;
import org.junit.jupiter.api.Test;
import org.springframework.beans.factory.annotation.Autowired;
import org.springframework.boot.test.context.SpringBootTest;

@SpringBootTest
public class BookDaoTestCase {

    @Autowired
    private BookDao bookDao;

    @Test
    void testGetById(){
        System.out.println(bookDao.selectById(1));
    }

    @Test
    void testSave(){
        Book book = new Book();
        book.setType("测试数据123");
        book.setName("测试数据123");
        book.setDescription("测试数据123");
        bookDao.insert(book);
    }

    @Test
    void testUpdate(){
        Book book = new Book();
        book.setId(17);
        book.setType("测试数据abcdefg");
        book.setName("测试数据123");
        book.setDescription("测试数据123");
        bookDao.updateById(book);
    }

    @Test
    void testDelete(){
        bookDao.deleteById(16);
    }

    @Test
    void testGetAll(){
        bookDao.selectList(null);
    }
}
MP技术默认的主键生成策略为雪花算法,生成的主键ID长度较大,和目前的数据库设定规则不相符,需要配置一下使MP使用数据库的主键生成策略,方式嘛还是老一套,做配置。在application.yml中添加对应配置即可,具体如下
server:
  port: 80

spring:
  datasource:
    druid:
      driver-class-name: com.mysql.cj.jdbc.Driver
      url: jdbc:mysql://localhost:3306/ssm_db?serverTimezone=UTC
      username: root
      password: root

mybatis-plus:
  global-config:
    db-config:
      table-prefix: tbl_		#设置表名通用前缀
      id-type: auto				#设置主键id字段的生成策略为参照数据库设定的策略,当前数据库设置id生成策略为自增
查看MP运行日志
在进行数据层测试的时候,因为基础的CRUD操作均由MP给我们提供了,所以就出现了一个局面,开发者不需要书写SQL语句了,这样程序运行的时候总有一种感觉,一切的一切都是黑盒的,作为开发者我们啥也不知道就完了。如果程序正常运行还好,如果报错了,这个时候就很崩溃,你甚至都不知道从何下手,因为传递参数、封装SQL语句这些操作完全不是你干预开发出来的,所以查看执行期运行的SQL语句就成为当务之急。
SpringBoot整合MP的时候充分考虑到了这点,通过配置的形式就可以查阅执行期SQL语句,配置如下
mybatis-plus:
  global-config:
    db-config:
      table-prefix: tbl_
      id-type: auto
  configuration:
    log-impl: org.apache.ibatis.logging.stdout.StdOutImpl
再来看运行结果,此时就显示了运行期执行SQL的情况。
Creating a new SqlSession
SqlSession [org.apache.ibatis.session.defaults.DefaultSqlSession@2c9a6717] was not registered for synchronization because synchronization is not active
JDBC Connection [com.mysql.cj.jdbc.ConnectionImpl@6ca30b8a] will not be managed by Spring
==>  Preparing: SELECT id,type,name,description FROM tbl_book
==> Parameters:
<==    Columns: id, type, name, description
<==        Row: 1, 计算机理论, Spring实战 第5版, Spring入门经典教程,深入理解Spring原理技术内幕
<==        Row: 2, 计算机理论, Spring 5核心原理与30个类手写实战, 十年沉淀之作,手写Spring精华思想
<==        Row: 3, 计算机理论, Spring 5 设计模式, 深入Spring源码剖析Spring源码中蕴含的10大设计模式
<==        Row: 4, 计算机理论, Spring MVC+MyBatis开发从入门到项目实战, 全方位解析面向Web应用的轻量级框架,带你成为Spring MVC开发高手
<==        Row: 5, 计算机理论, 轻量级Java Web企业应用实战, 源码级剖析Spring框架,适合已掌握Java基础的读者
<==        Row: 6, 计算机理论, Java核心技术 卷I 基础知识(原书第11版), Core Java 第11版,Jolt大奖获奖作品,针对Java SE9、10、11全面更新
<==        Row: 7, 计算机理论, 深入理解Java虚拟机, 5个维度全面剖析JVM,大厂面试知识点全覆盖
<==        Row: 8, 计算机理论, Java编程思想(第4版), Java学习必读经典,殿堂级著作!赢得了全球程序员的广泛赞誉
<==        Row: 9, 计算机理论, 零基础学Java(全彩版), 零基础自学编程的入门图书,由浅入深,详解Java语言的编程思想和核心技术
<==        Row: 10, 市场营销, 直播就该这么做:主播高效沟通实战指南, 李子柒、李佳琦、薇娅成长为网红的秘密都在书中
<==        Row: 11, 市场营销, 直播销讲实战一本通, 和秋叶一起学系列网络营销书籍
<==        Row: 12, 市场营销, 直播带货:淘宝、天猫直播从新手到高手, 一本教你如何玩转直播的书,10堂课轻松实现带货月入3W+
<==        Row: 13, 测试类型, 测试数据, 测试描述数据
<==        Row: 14, 测试数据update, 测试数据update, 测试数据update
<==        Row: 15, -----------------, 测试数据123, 测试数据123
<==      Total: 15
其中清晰的标注了当前执行的SQL语句是什么,携带了什么参数,对应的执行结果是什么,所有信息应有尽有。此处设置的是日志的显示形式,当前配置的是控制台输出,当然还可以由更多的选择,根据需求切换即可
3.3.3.2 分页功能制作
MP提供的分页操作API如下
  @Test
    void testGetPage(){
        //1 创建IPage分页对象,设置分页参数
        IPage page = new Page(2,5);   // 当前显示第几页,每页显示几条数据
        //2 执行分页查询
        bookDao.selectPage(page, null);
        //3 获取分页结果
        System.out.println(page.getCurrent());		//当前页码值
        System.out.println(page.getSize());			//每页显示数
        System.out.println(page.getTotal());		//数据总量
        System.out.println(page.getPages());		//总页数
        System.out.println(page.getRecords());		//详细数据
    }
到这里就知道这些数据如何获取了,但是当你去执行这个操作时,你会发现并不像我们分析的这样,实际上这个分页当前是无效的。为什么这样呢?这个要源于MP的内部机制。
对于MySQL的分页操作使用limit关键字进行,而并不是所有的数据库都使用limit关键字实现的,这个时候MP为了制作的兼容性强,将分页操作设置为基础查询操作的升级版,你可以理解为IPhone6与IPhone6S-PLUS的关系。
基础操作中有查询全部的功能,而在这个基础上只需要升级一下(PLUS)就可以得到分页操作。所以MP将分页操作做成了一个开关,你用分页功能就把开关开启,不用就不需要开启这个开关。而我们现在没有开启这个开关,所以分页操作是没有的。这个开关是通过MP的拦截器的形式存在的。具体设置方式如下
定义MP拦截器并将其设置为Spring管控的bean
创建config包
@Configuration
public class MPConfig {
    @Bean
    public MybatisPlusInterceptor mybatisPlusInterceptor(){
        MybatisPlusInterceptor interceptor = new MybatisPlusInterceptor();
        interceptor.addInnerInterceptor(new PaginationInnerInterceptor());
        return interceptor;
    }
}
上述代码第一行是创建MP的拦截器栈,这个时候拦截器栈中没有具体的拦截器,第二行是初始化了分页拦截器,并添加到拦截器栈中。如果后期开发其他功能,需要添加全新的拦截器,按照第二行的格式继续add进去新的拦截器就可以了。
3.3.3.3 条件查询功能制作
除了分页功能,MP还提供有强大的条件查询功能。以往我们写条件查询要自己动态拼写复杂的SQL语句,现在简单了,MP将这些操作都制作成API接口,调用一个又一个的方法就可以实现各种套件的拼装。这里给大家普及一下基本格式,详细的操作还是到MP的课程中查阅吧
下面的操作就是执行一个模糊匹配对应的操作,由like条件书写变为了like方法的调用
@Test
void testGetBy(){
    QueryWrapper qw = new QueryWrapper<>();
    qw.like("name","Spring");
    bookDao.selectList(qw);
}
其中第一句QueryWrapper对象是一个用于封装查询条件的对象,该对象可以动态使用API调用的方法添加条件,最终转化成对应的SQL语句。第二句就是一个条件了,需要什么条件,使用QueryWapper对象直接调用对应操作即可。比如做大于小于关系,就可以使用lt或gt方法,等于使用eq方法,等等,此处不做更多的解释了。
这组API使用还是比较简单的,但是关于属性字段名的书写存在着安全隐患,比如查询字段name,当前是以字符串的形态书写的,万一写错,编译器还没有办法发现,只能将问题抛到运行器通过异常堆栈告诉开发者,不太友好。
MP针对字段检查进行了功能升级,全面支持Lambda表达式,就有了下面这组API。由QueryWrapper对象升级为LambdaQueryWrapper对象,这下就变了上述问题的出现
@Test
void testGetBy2(){
    String name = "1";
    LambdaQueryWrapper lqw = new LambdaQueryWrapper();
    lqw.like(Book::getName,name);
    bookDao.selectList(lqw);
}
为了便于开发者动态拼写SQL,防止将null数据作为条件使用,MP还提供了动态拼装SQL的快捷书写方式
@Test
void testGetBy2(){
    String name = "1";
    LambdaQueryWrapper lqw = new LambdaQueryWrapper();
    //if(name != null) lqw.like(Book::getName,name);		//方式一:JAVA代码控制
    lqw.like(name != null,Book::getName,name);				//方式二:API接口提供控制开关
    bookDao.selectList(lqw);
}
3.3.4 业务层开发service
标准业务层开发很多初学者认为就是调用数据层,怎么说呢?这个理解是没有大问题的,更精准的说法应该是组织业务逻辑功能,并根据业务需求,对数据持久层发起调用。有什么差别呢?目标是为了组织出符合需求的业务逻辑功能,至于调不调用数据层还真不好说,有需求就调用,没有需求就不调用。
一个常识性的知识普及一下,业务层的方法名定义一定要与业务有关,例如登录操作
login(String username,String password);
而数据层的方法名定义一定与业务无关,是一定,不是可能,也不是有可能,例如根据用户名密码查询
selectByUserNameAndPassword(String username,String password);
我们在开发的时候是可以根据完成的工作不同划分成不同职能的开发团队的。比如一个哥们制作数据层,他就可以不知道业务是什么样子,拿到的需求文档要求可能是这样的
接口:传入用户名与密码字段,查询出对应结果,结果是单条数据
接口:传入ID字段,查询出对应结果,结果是单条数据
接口:传入离职字段,查询出对应结果,结果是多条数据
但是进行业务功能开发的哥们,拿到的需求文档要求差别就很大
接口:传入用户名与密码字段,对用户名字段做长度校验,4-15位,对密码字段做长度校验,8到24位,对喵喵喵字段做特殊字符校验,不允许存在空格,查询结果为对象。如果为null,返回BusinessException,封装消息码INFO_LOGON_USERNAME_PASSWORD_ERROR
你比较一下,能是一回事吗?差别太大了,所以说业务层方法定义与数据层方法定义差异化很大,只不过有些入门级的开发者手懒或者没有使用过公司相关的ISO标准化文档而已。
3.3.4.1 普通写法
步骤①:业务层接口BookService定义如下:
public interface BookService {
    Boolean save(Book book);
    Boolean update(Book book);
    Boolean delete(Integer id);
    Book getById(Integer id);
    List getAll();
    IPage getPage(int currentPage,int pageSize);
}
步骤②:业务层impl包下创建实现类BookServiceImpl2 ,转调数据层即可
@Service
public class BookServiceImpl2 implements BookService {

    @Autowired
    private BookDao bookDao;

    @Override
    public Boolean save(Book book) {
        return bookDao.insert(book) > 0;
    }

    @Override
    public Boolean update(Book book) {
        return bookDao.updateById(book) > 0;
    }

    @Override
    public Boolean delete(Integer id) {
        return bookDao.deleteById(id) > 0;
    }

    @Override
    public Book getById(Integer id) {
        return bookDao.selectById(id);
    }

    @Override
    public List getAll() {
        return bookDao.selectList(null);
    }

    @Override
    public IPage getPage(int currentPage, int pageSize) {
        IPage page = new Page(currentPage,pageSize);
        bookDao.selectPage(page,null);
        return page;
    }
}
步骤③:对业务层接口进行测试,测试类BookServiceTest如下
@SpringBootTest
public class BookServiceTest {
    @Autowired
    private BookService bookService;

    @Test
    void testGetById(){
        System.out.println(bookService.getById(4));
    }
    @Test
    void testSave(){
        Book book = new Book();
        book.setType("测试数据123");
        book.setName("测试数据123");
        book.setDescription("测试数据123");
        bookService.save(book);
    }

    @Test
    void testUpdate(){
        Book book = new Book();
        book.setId(17);
        book.setType("-----------------");
        book.setName("测试数据123");
        book.setDescription("测试数据123");
        bookService.update(book);
    }

    @Test
    void testDelete(){
        bookService.delete(18);
    }

    @Test
    void testGetAll(){
        bookService.getAll();
    }

    @Test
    void testGetPage(){
        IPage page = bookService.getPage(2,5);
        System.out.println(page.getCurrent());
        System.out.println(page.getSize());
        System.out.println(page.getTotal());
        System.out.println(page.getPages());
        System.out.println(page.getRecords());
    }

}
3.3.4.2 快速开发
MP技术不仅提供了数据层快速开发方案,业务层MP也给了一个通用接口,个人观点不推荐使用,凑合能用吧,其实就是一个封装+继承的思想,代码给出,实际开发慎用。
步骤①:业务层接口IBookService
public interface IBookService extends IService {
    //添加非通用操作API接口
    boolean modify(Book book);
    IPage getPage(int currentPage, int pageSize);
}
步骤②:业务层接口实现类BookServiceImpl ,关注继承的类需要传入两个泛型,一个是数据层接口,另一个是实体类
@Service
public class BookServiceImpl extends ServiceImpl implements IBookService {
    @Autowired
    private BookDao bookDao;
	//添加非通用操作API
	 @Override
    public boolean modify(Book book) {
        return bookDao.updateById(book) > 0;
    }

    @Override
    public IPage getPage(int currentPage, int pageSize) {
        IPage page = new Page(currentPage, pageSize);
        bookDao.selectPage(page, null);
        return page;
    }
}
如果感觉MP提供的功能不足以支撑你的使用需要,其实是一定不能支撑的,因为需求不可能是通用的,在原始接口基础上接着定义新的API接口就行了,此处不再说太多了,就是自定义自己的操作了,但是不要和已有的API接口名冲突即可。
步骤③:测试类BookServiceTestCase
@SpringBootTest
public class BookServiceTestCase {
    @Autowired
    private IBookService bookService;

    @Test
    void testGetById(){
        System.out.println(bookService.getById(4));
    }
    @Test
    void testSave(){
        Book book = new Book();
        book.setType("测试数据123");
        book.setName("测试数据123");
        book.setDescription("测试数据123");
        bookService.save(book);
    }

    @Test
    void testUpdate(){
        Book book = new Book();
        book.setId(17);
        book.setType("-----------------");
        book.setName("测试数据123");
        book.setDescription("测试数据123");
        bookService.updateById(book);
    }

    @Test
    void testDelete(){
        bookService.removeById(18);
    }

    @Test
    void testGetAll(){
        bookService.list();
    }

    @Test
    void testGetPage(){
        IPage page = new Page(2,5);
        bookService.page(page);
        System.out.println(page.getCurrent());
        System.out.println(page.getSize());
        System.out.println(page.getTotal());
        System.out.println(page.getPages());
        System.out.println(page.getRecords());
    }

}
3.3.5 表现层开发controller
表现层的开发使用基于Restful的表现层接口开发,功能测试通过Postman工具进行。
- 新增:POST
- 删除:DELETE
- 修改:PUT
- 查询:GET
3.3.5.1 表现层BookController2
package com.liu.controller;

import com.baomidou.mybatisplus.core.metadata.IPage;
import com.liu.domain.Book;
import com.liu.service.IBookService;
import org.springframework.beans.factory.annotation.Autowired;
import org.springframework.web.bind.annotation.*;

import java.util.List;

// 表现层
// 1.RestController注解
// @RestController
// 2.设置公共请求路径前缀
@RequestMapping("/books")
public class BookController2 {
    // 3.注入对应业务层接口
    @Autowired
    private IBookService bookService;
    // 4.一系列操作
    @GetMapping
    public List getAll(){
        return bookService.list();
    }
    // 5.- 实体json数据:@RequestBody,路径变量:@PathVariable
    @GetMapping("{id}")
    public Book getById(@PathVariable Integer id){
        return bookService.getById(id);
    }

    @PostMapping
    public Boolean save(@RequestBody Book book){
        return bookService.save(book);
    }

    @PutMapping
    public Boolean update(@RequestBody Book book){
        return bookService.update(book,null);
    }

    @DeleteMapping("{id}")
    public Boolean delete(@PathVariable Integer id){
        return bookService.removeById(id);
    }


    @GetMapping("{currentPage}/{pageSize}")
    public IPage getPage(@PathVariable int currentPage, @PathVariable int pageSize){
        return bookService.getPage(currentPage,pageSize);
    }
}
表现层消息一致性处理
目前我们通过Postman测试后业务层接口功能时通的,但是这样的结果给到前端开发者会出现一个小问题。不同的操作结果所展示的数据格式差异化严重
增删改操作结果
true
查询单个数据操作结果
{
    "id": 1,
    "type": "计算机理论",
    "name": "Spring实战 第5版",
    "description": "Spring入门经典教程"
}
查询全部数据操作结果
[
    {
        "id": 1,
        "type": "计算机理论",
        "name": "Spring实战 第5版",
        "description": "Spring入门经典教程"
    },
    {
        "id": 2,
        "type": "计算机理论",
        "name": "Spring 5核心原理与30个类手写实战",
        "description": "十年沉淀之作"
    }
]
每种不同操作返回的数据格式都不一样,而且还不知道以后还会有什么格式,这样的结果让前端人员看了是很容易让人崩溃的,必须将所有操作的操作结果数据格式统一起来,需要设计表现层返回结果的模型类,用于后端与前端进行数据格式统一,也称为前后端数据协议,controller下创建utils包,
package com.liu.controller.utils;

import lombok.Data;

@Data
public class R {
    private Boolean flag;
    private Object data;

    public R(){}

    public R(Boolean flag) {
        this.flag = flag;
    }

    public R(Boolean flag,Object data) {
        this.flag = flag;
        this.data = data;
    }
}
其中flag用于标识操作是否成功,data用于封装操作数据,现在的数据格式就变了
{
    "flag": true,
    "data":{
        "id": 1,
        "type": "计算机理论",
        "name": "Spring实战 第5版",
        "description": "Spring入门经典教程"
    }
}
3.3.5.2 BookController
表现层开发格式也需要转换一下
package com.liu.controller;

import com.baomidou.mybatisplus.core.metadata.IPage;
import com.liu.controller.utils.R;
import com.liu.domain.Book;
import com.liu.service.IBookService;
import org.springframework.beans.factory.annotation.Autowired;
import org.springframework.web.bind.annotation.*;

import java.util.List;

// 表现层
// 1.RestController
@RestController
// 2.设置公共请求路径前缀
@RequestMapping("/books")
public class BookController {
    // 3.注入对应业务层接口
    @Autowired
    private IBookService bookService;

    // 4.一系列操作
    @GetMapping
    public R getAll(){
        List bookList=bookService.list();
        return new R(true, bookList);
    }

    // 5.- 实体数据:@RequestBody 路径变量:@PathVariable
    @GetMapping("{id}")
    public R getById(@PathVariable Integer id) {
        Book book = bookService.getById(id);
        return new R(true, book);
    }

    @PostMapping
    public R save(@RequestBody Book book) {
        Boolean flag = bookService.save(book);
        return new R(flag);
    }

    @PutMapping
    public R update(@RequestBody Book book) {
        Boolean flag = bookService.modify(book);
        return new R(flag);
    }

    @DeleteMapping("{id}")
    public R delete(@PathVariable Integer id) {
        Boolean flag = bookService.removeById(id);
        return new R(flag);
    }


    @GetMapping("{currentPage}/{pageSize}")
    public R getPage(@PathVariable int currentPage, @PathVariable int pageSize) {
        IPage page = bookService.getPage(currentPage, pageSize);
        return new R(true,page);
    }
}
3.3.6 前后端联通性测试
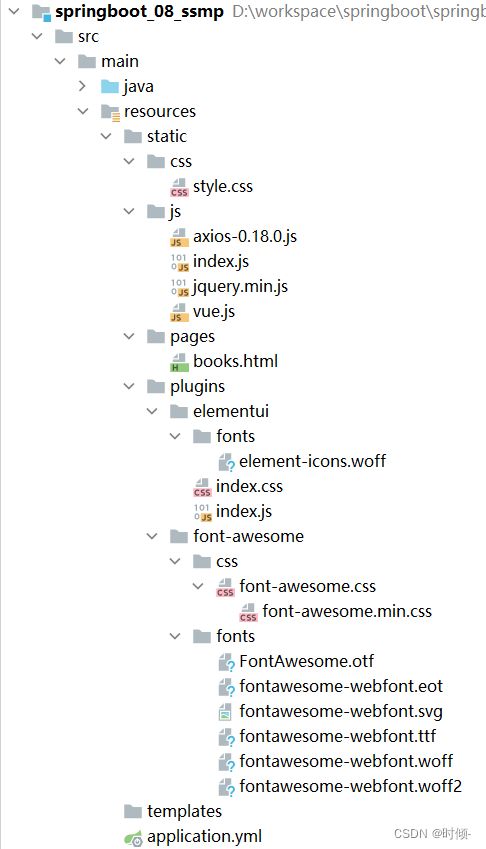
步骤①:将前端人员开发的页面保存到lresources目录下的static目录中,建议执行maven的clean生命周期,避免缓存的问题出现。访问http://localhost/pages/books.html
步骤②:在进行具体的功能开发之前,先做联通性的测试,created钩子函数用于初始化页面时发起调用,通过页面发送异步提交(axios),这一步调试通过后再进行进一步的功能开发
//列表
getAll() {
	axios.get("/books").then((res)=>{
		console.log(res.data);
	});
},
只要后台代码能够正常工作,前端能够在日志中接收到数据,就证明前后端是通的,也就可以进行下一步的功能开发了
3.3.6.1 列表功能
列表功能主要操作就是加载完数据,将数据展示到页面上,此处要利用VUE的数据模型绑定,发送请求得到数据,然后页面上读取指定数据即可.
- 请求方式使用POST调用后台对应操作
- 添加操作结束后动态刷新页面加载数据
- 根据操作结果不同,显示对应的提示信息
- 弹出添加Div时清除表单数据
页面数据模型定义
data:{
	dataList: [],//当前页要展示的列表数据
	...
},
异步请求获取数据
//列表
getAll() {
    axios.get("/books").then((res)=>{
        this.dataList = res.data.data;
    });
},
这样在页面加载时就可以获取到数据,并且由VUE将数据展示到页面上了
3.3.6.2 添加功能
添加功能用于收集数据的表单是通过一个弹窗展示的,因此在添加操作前首先要进行弹窗的展示,添加后隐藏弹窗即可。因为这个弹窗一直存在,因此当页面加载时首先设置这个弹窗为不可显示状态,需要展示,切换状态即可
默认状态
data:{
	dialogFormVisible: false,//添加表单是否可见
	...
},
切换为显示状态
//弹出添加窗口
handleCreate() {
	this.dialogFormVisible = true;
},
由于每次添加数据都是使用同一个弹窗录入数据,所以每次操作的痕迹将在下一次操作时展示出来,需要在每次操作之前清理掉上次操作的痕迹
定义清理数据操作
//重置表单
resetForm() {
    this.formData = {};
},
切换弹窗状态时清理数据
//弹出添加窗口
handleCreate() {
    this.dialogFormVisible = true;
    this.resetForm();
},
至此准备工作完成,下面就要调用后台完成添加操作了
添加操作
//添加
handleAdd () {
    //发送异步请求
    axios.post("/books",this.formData).then((res)=>{
        //如果操作成功,关闭弹层,显示数据
        if(res.data.flag){
            this.dialogFormVisible = false;
            this.$message.success("添加成功");
        }else {
            this.$message.error("添加失败");
        }
    }).finally(()=>{
        this.getAll();
    });
},
- 将要保存的数据传递到后台,通过post请求的第二个参数传递json数据到后台
- 根据返回的操作结果决定下一步操作
- 如何是true就关闭添加窗口,显示添加成功的消息
- 如果是false保留添加窗口,显示添加失败的消息
- 无论添加是否成功,页面均进行刷新,动态加载数据(对getAll操作发起调用)
取消添加操作
//取消
cancel(){
    this.dialogFormVisible = false;
    this.$message.info("操作取消");
},
3.3.6.3 删除功能
模仿添加操作制作删除功能,差别之处在于删除操作仅传递一个待删除的数据id到后台即可.
- 请求方式使用Delete调用后台对应操作
- 删除操作需要传递当前行数据对应的id值到后台
- 删除操作结束后动态刷新页面加载数据
- 根据操作结果不同,显示对应的提示信息
- 删除操作前弹出提示框避免误操作
删除操作
// 删除
handleDelete(row) {
    axios.delete("/books/"+row.id).then((res)=>{
        if(res.data.flag){
            this.$message.success("删除成功");
        }else{
            this.$message.error("删除失败");
        }
    }).finally(()=>{
        this.getAll();
    });
},
删除操作提示信息
// 删除
handleDelete(row) {
    //1.弹出提示框
    this.$confirm("此操作永久删除当前数据,是否继续?","提示",{
        type:'info'
    }).then(()=>{
        //2.做删除业务
        axios.delete("/books/"+row.id).then((res)=>{
       		if(res.data.flag){
            	this.$message.success("删除成功");
        	}else{
            	this.$message.error("删除失败");
        	}
        }).finally(()=>{
            this.getAll();
        });
    }).catch(()=>{
        //3.取消删除
        this.$message.info("取消删除操作");
    });
},
3.3.6.4 修改功能
修改功能可以说是列表功能、删除功能与添加功能的合体。几个相似点如下:
-
页面也需要有一个弹窗用来加载修改的数据,这一点与添加相同,都是要弹窗
-
弹出窗口中要加载待修改的数据,而数据需要通过查询得到,这一点与查询全部相同,都是要查数据
-
查询操作需要将要修改的数据id发送到后台,这一点与删除相同,都是传递id到后台
-
查询得到数据后需要展示到弹窗中,这一点与查询全部相同,都是要通过数据模型绑定展示数据
-
修改数据时需要将被修改的数据传递到后台,这一点与添加相同,都是要传递数据
所以整体上来看,修改功能就是前面几个功能的大合体。
- 加载要修改数据通过传递当前行数据对应的id值到后台查询数据(同删除与查询全部)
- 利用前端双向数据绑定将查询到的数据进行回显(同查询全部)
- 请求方式使用PUT调用后台对应操作(同新增传递数据)
- 修改操作结束后动态刷新页面加载数据(同新增)
- 根据操作结果不同,显示对应的提示信息(同新增)
查询并展示数据
//弹出编辑窗口
handleUpdate(row) {
    axios.get("/books/"+row.id).then((res)=>{
        if(res.data.flag){
            //展示弹层,加载数据
            this.formData = res.data.data;
            this.dialogFormVisible4Edit = true;
        }else{
            this.$message.error("数据同步失败,自动刷新");
        }
    });
},
修改操作
//修改
handleEdit() {
    axios.put("/books",this.formData).then((res)=>{
        //如果操作成功,关闭弹层并刷新页面
        if(res.data.flag){
            this.dialogFormVisible4Edit = false;
            this.$message.success("修改成功");
        }else {
            this.$message.error("修改失败,请重试");
        }
    }).finally(()=>{
        this.getAll();
    });
},
弹窗的取消按钮
  cancel() {
                this.dialogFormVisible = false; //添加弹窗
                this.dialogFormVisible4Edit = false; //修改弹窗
                this.$message.info("操作取消");
            },
3.3.6.5 业务消息一致性处理
目前的功能制作基本上达成了正常使用的情况,什么叫正常使用呢?也就是这个程序不出BUG,如果我们搞一个BUG出来,你会发现程序马上崩溃掉。比如后台手工抛出一个异常,看看前端接收到的数据什么样子
{
    "timestamp": "2021-09-15T03:27:31.038+00:00",
    "status": 500,
    "error": "Internal Server Error",
    "path": "/books"
}
面对这种情况,前端的同学又不会了,这又是什么格式?怎么和之前的格式不一样?
{
    "flag": true,
    "data":{
        "id": 1,
        "type": "计算机理论",
        "name": "Spring实战 第5版",
        "description": "Spring入门经典教程"
    }
}
看来不仅要对正确的操作数据格式做处理,还要对错误的操作数据格式做同样的格式处理。
- 使用注解@RestControllerAdvice定义SpringMVC异常处理器用来处理异常的
- 异常处理器必须被扫描加载,否则无法生效
- 表现层返回结果的模型类中添加消息属性用来传递消息到页面
首先在当前的数据结果中添加消息字段,用来兼容后台出现的操作消息,在controller/utils包下的R类:
@Data
public class R{
    private Boolean flag;
    private Object data;
    private String msg;		//用于封装消息
}
后台代码BookController类中也要根据情况做处理,当前是模拟的错误
  @PostMapping
    public R save(@RequestBody Book book) throws IOException {
        //测试异常
        if(book.getName().equals("123")) throw new IOException();
        Boolean flag = bookService.save(book);
        // return new R(flag);
        return new R(flag , flag ? "添加成功^_^" : "添加失败-_-!");
    }
然后在表现层做统一的异常处理,使用SpringMVC提供的异常处理器做统一的异常处理,在controller/utils包下创建ProjectExceptionAdvice 类:
@RestControllerAdvice
public class ProjectExceptionAdvice {
    @ExceptionHandler(Exception.class)
    public R doOtherException(Exception ex){
        //记录日志
        //发送消息给运维
        //发送邮件给开发人员,ex对象发送给开发人员
        ex.printStackTrace();
        return new R("系统错误,请稍后再试!");
    }
}
页面上得到数据后,先判定是否有后台传递过来的消息,标志就是当前操作是否成功,如果返回操作结果false,就读取后台传递的消息
//添加
handleAdd () {
	//发送ajax请求
    axios.post("/books",this.formData).then((res)=>{
        //如果操作成功,关闭弹层,显示数据
        if(res.data.flag){
            this.dialogFormVisible = false;
            this.$message.success(res.data.msg);
        }else {
            this.$message.error(res.data.msg);			//消息来自于后台传递过来,而非固定内容
        }
    }).finally(()=>{
        this.getAll();
    });
},
3.3.6.6 分页功能
分页功能的制作用于替换前面的查询全部,其中要使用到elementUI提供的分页组件
- 使用el分页组件
- 定义分页组件绑定的数据模型
- 异步调用获取分页数据
- 分页数据页面回显
<!--分页组件-->
<div class="pagination-container">
    <el-pagination
		class="pagiantion"
		@current-change="handleCurrentChange"
		:current-page="pagination.currentPage"
		:page-size="pagination.pageSize"
		layout="total, prev, pager, next, jumper"
		:total="pagination.total">
    </el-pagination>
</div>
为了配合分页组件,封装分页对应的数据模型
data:{
	pagination: {
		//分页相关模型数据
		currentPage: 1,	//当前页码
		pageSize:10,	//每页显示的记录数
		total:0,		//总记录数
	}
},
修改查询全部功能为分页查询,通过路径变量传递页码信息参数
getAll() {
    axios.get("/books/"+this.pagination.currentPage+"/"+this.pagination.pageSize).then((res) => {
    });
},
页面根据分页操作结果读取对应数据,并进行数据模型绑定
getAll() {
    axios.get("/books/"+this.pagination.currentPage+"/"+this.pagination.pageSize).then((res) => {
        this.pagination.total = res.data.data.total;
        this.pagination.currentPage = res.data.data.current;
        this.pagination.pagesize = res.data.data.size;
        this.dataList = res.data.data.records;
    });
},
对切换页码操作设置调用当前分页操作
//切换页码
handleCurrentChange(currentPage) {
    this.pagination.currentPage = currentPage;
    this.getAll();
},
删除功能维护
由于使用了分页功能,当最后一页只有一条数据时,删除操作就会出现BUG,最后一页无数据但是独立展示,对分页查询功能进行后台功能维护,如果当前页码值大于最大页码值,重新执行查询。其实这个问题解决方案很多,这里给出比较简单的一种处理方案
@GetMapping("{currentPage}/{pageSize}")
public R getPage(@PathVariable int currentPage,@PathVariable int pageSize){
    IPage page = bookService.getPage(currentPage, pageSize);
    //如果当前页码值大于了总页码值,那么重新执行查询操作,使用最大页码值作为当前页码值
    if( currentPage > page.getPages()){
        page = bookService.getPage((int)page.getPages(), pageSize);
    }
    return new R(true, page);
}
3.3.6.7 条件查询功能
最后一个功能来做条件查询,其实条件查询可以理解为分页查询的时候除了携带分页数据再多带几个数据的查询。这些多带的数据就是查询条件。比较一下不带条件的分页查询与带条件的分页查询差别之处,这个功能就好做了
-
页面封装的数据:带不带条件影响的仅仅是一次性传递到后台的数据总量,由传递2个分页相关的数据转换成2个分页数据加若干个条件
-
后台查询功能:查询时由不带条件,转换成带条件,反正不带条件的时候查询条件对象使用的是null,现在换成具体条件,差别不大
-
查询结果:不管带不带条件,出来的数据只是有数量上的差别,其他都差别,这个可以忽略
经过上述分析,看来需要在页面发送请求的格式方面做一定的修改,后台的调用数据层操作时发送修改,其他没有区别
页面发送请求时,两个分页数据仍然使用路径变量,其他条件采用动态拼装url参数的形式传递
页面封装查询条件字段
pagination: {
//分页相关模型数据
	currentPage: 1,		//当前页码
	pageSize:10,		//每页显示的记录数
	total:0,			//总记录数
	name: "",
	type: "",
	description: ""
},
页面添加查询条件字段对应的数据模型绑定名称
               查询
               新建
将查询条件组织成url参数,添加到请求url地址中,这里可以借助其他类库快速开发,当前使用手工形式拼接,降低学习要求
getAll() {
              // 组织成url参数,添加到请求url地址中,/books/1/10?type=???&name=???&description=???
              //1.获取查询条件,拼接查询条件
              param = "?name="+this.pagination.name;
              param += "&type="+this.pagination.type;
              param += "&description="+this.pagination.description;
              console.log("-----------------"+ param);

              axios.get("/books/"+this.pagination.currentPage+"/"+this.pagination.pageSize+param).then((res) => {
                  this.dataList = res.data.data.records;
              });
          },
后台代码BookController中定义实体类查询条件,添加参数book
@GetMapping("{currentPage}/{pageSize}")
  public R getPage(@PathVariable int currentPage, @PathVariable int pageSize,Book book) {
      System.out.println("参数=====>"+book);
      IPage page = bookService.getPage(currentPage, pageSize,book);
      //如果当前页码值大于了总页码值,那么重新执行查询操作,使用最大页码值作为当前页码值
      if( currentPage > page.getPages()){
          page = bookService.getPage((int)page.getPages(), pageSize,book);
      }
      return new R(true,page);
  }
对应业务层接口IBookService与实现类BookServiceImpl进行修正
public interface IBookService extends IService {
  //添加非通用操作API接口
  boolean modify(Book book);
  IPage getPage(int currentPage, int pageSize);

  IPage getPage(int currentPage, int pageSize,Book book);
}
  @Override
  public IPage getPage(int currentPage, int pageSize, Book book) {
      IPage page = new Page(currentPage,pageSize);
      // 动态条件的拼接
      LambdaQueryWrapper lqw = new LambdaQueryWrapper();
      lqw.like(Strings.isNotEmpty(book.getName()),Book::getName,book.getName());
      lqw.like(Strings.isNotEmpty(book.getType()),Book::getType,book.getType());
      lqw.like(Strings.isNotEmpty(book.getDescription()),Book::getDescription,book.getDescription());
      return bookDao.selectPage(page,lqw);
  }
页面回显数据,添加param
getAll() {
    //1.获取查询条件,拼接查询条件
    param = "?name="+this.pagination.name;
    param += "&type="+this.pagination.type;
    param += "&description="+this.pagination.description;
    console.log("-----------------"+ param);
    axios.get("/books/"+this.pagination.currentPage+"/"+this.pagination.pageSize+param).then((res) => {
        this.pagination.total = res.data.data.total;
        this.pagination.currentPage = res.data.data.current;
        this.pagination.pagesize = res.data.data.size;
        this.dataList = res.data.data.records;
    });
},


