卷积神经网络——MNIST手写数字识别
卷积(Convolutional)
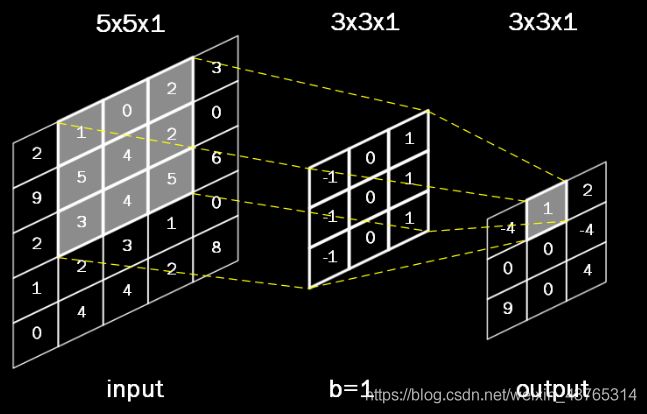
卷积是一种有效提取图片特征的方法。一般定义一个正方形卷积核,用它的平面中心遍历图片每个像素点,当卷积核和图片完全重合时,图片与卷积核重合区域内对应的每个像素点和卷积核内对应的权重相乘,再求和,再加上偏置后,得到输出图片中的一个像素值。
上图的输入是一个5×5×1的灰度图片,1表示单通道,5×5表示分辨率,用一个3×3×1的卷积核对输入进行卷积,偏置项b=1,则求卷积的计算=(-1)×1+0×0+1×2+(-1)×5+0×4+1×2+(-1)×3+0×4+1×5+b=1
输出图片的边长=(输入图片的边长-卷积核边长+1)/步长(padding='VALID',不能整除向上取整)
此图为:(5-3+1)/1=3,输出是3×3的分辨率,用了一个卷积核,输出深度是1,最后输出的是3×3×1的图片。
全零填充Padding
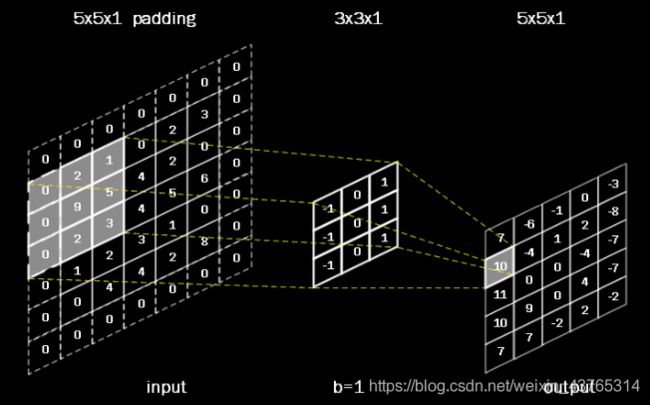
有时为了保证输出图片的尺寸和输入图片的尺寸一致,会在输入图片周围进行全零填充
输出图片的边长=输入图片的边长/步长(padding='SAME',不能整除向上取整)
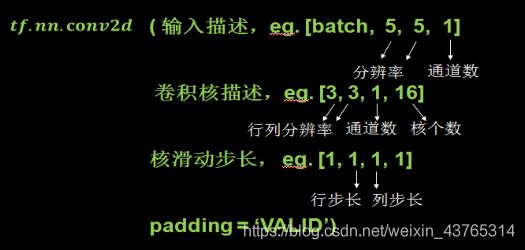
Tensorflow计算卷积:
池化(Pooling)
池化用于减少特征数量,最大池化(tf.nn.max_pool)可提取图片纹理值,均值池化(tf.nn.avg_pool)可保留背景特征。
最大池化提取与卷积核重合区域中最大的像素值,均值池化提取均值。
注意:卷积改变图片的深度,池化不改变图片的深度。
舍弃(Dropout)
在神经网络训练过程中,为了减少过多参数常使用dropout的方法,将一部分神经元以一定概率从神经网络中舍弃(仅在训练时舍弃),在使用神经网络中会把所有的神经元恢复到神经网络中,可以有效减少过拟合。
使用方法:tf.nn.dropout(上层输出,暂时舍弃的概率),常在全连接网络的前向传播中使用。
卷积神经网络实现MNIST手写数字识别
上篇文章介绍了MNIST数据集和全连接网络实现手写数字识别(博文链接),全连接网络参数较多,泛化能力不如卷积神经网络,下面用卷积神经网络实现。
下面是处理的结构图
1、卷积、对输入为28×28×1的图片用32个尺寸为5×5×1的卷积核进行全零填充的卷积,步长为1,第一层卷积得到的是28/1=28的图片,并将输出过激活函数,卷积核有32个,输出图片的深度变为32,输出的尺寸为28×28×32。
2、池化、池化大小为2×2,步长为2,全零填充模式,输出为14×14×32,池化不影响图片的深度,不过激活函数。
3、卷积,卷积核大小为5×5×32,个数为64,步长为1,全零填充模式,输出为14×14×64的尺寸,过激活函数。
4、池化,池化大小为2×2,步长为2,全零填充模式,输出为7×7×64的尺寸。
5、喂入全连接神经网络,进行10分类。
前向传播mnist_lenet5_forward.py:
#coding:utf-8
import tensorflow as tf
IMAGE_SIZE = 28 #输入图片分辨率是28×28
NUM_CHANNELS = 1#输入图片为灰度图,通道数为1
CONV1_SIZE = 5  #第一层卷积核大小
CONV1_KERNEL_NUM = 32#第一层卷积核个数
CONV2_SIZE = 5       #第二层卷积核大小
CONV2_KERNEL_NUM = 64#第二层卷积核个数
FC_SIZE = 512        #第一层全连接网络神经元数
OUTPUT_NODE = 10     #10分类

#定义参数
def get_weight(shape, regularizer):
	w = tf.Variable(tf.truncated_normal(shape,stddev=0.1))#生成去掉过大偏离点的正态分布随机数,标准差为0.1
	if regularizer != None: tf.add_to_collection('losses', tf.contrib.layers.l2_regularizer(regularizer)(w))#如果有正则化系数,对参数实施L2正则化(参数绝对值的平方和)。
	return w
#函数返回的w是该层网络的参数列表

#定义偏置
def get_bias(shape):
	b = tf.Variable(tf.zeros(shape))#生成全0数组
	return b
#函数返回的b是该层的偏置列表

#搭建计算图
def conv2d(x,w):  #求卷积,要给出输入图片x(4阶)和卷积核w(4阶)
	return tf.nn.conv2d(x, w, strides=[1, 1, 1, 1], padding='SAME')

def max_pool_2x2(x):  #最大池化,要给出输入图片x(4阶)
	return tf.nn.max_pool(x, ksize=[1, 2, 2, 1], strides=[1, 2, 2, 1], padding='SAME')

def forward(x, train, regularizer):
    conv1_w = get_weight([CONV1_SIZE, CONV1_SIZE, NUM_CHANNELS, CONV1_KERNEL_NUM], regularizer) #初始化第一层卷积核
    conv1_b = get_bias([CONV1_KERNEL_NUM]) #初始化第一层偏置
    conv1 = conv2d(x, conv1_w) #执行卷积计算,输入为x,卷积核为conv1_w
    relu1 = tf.nn.relu(tf.nn.bias_add(conv1, conv1_b)) #添加偏置,过激活函数
    pool1 = max_pool_2x2(relu1) #池化

    conv2_w = get_weight([CONV2_SIZE, CONV2_SIZE, CONV1_KERNEL_NUM, CONV2_KERNEL_NUM],regularizer) #初始化第二层卷积核
    conv2_b = get_bias([CONV2_KERNEL_NUM])#初始化第二层偏置
    conv2 = conv2d(pool1, conv2_w) #执行卷积计算,输入为第一层的池化,输出为
    relu2 = tf.nn.relu(tf.nn.bias_add(conv2, conv2_b))#加上偏置,过激活函数
    pool2 = max_pool_2x2(relu2)#池化

    pool_shape = pool2.get_shape().as_list()#存入列表
    nodes = pool_shape[1] * pool_shape[2] * pool_shape[3]#
    reshaped = tf.reshape(pool2, [pool_shape[0], nodes])

    fc1_w = get_weight([nodes, FC_SIZE], regularizer) #第一层全连接网络
    fc1_b = get_bias([FC_SIZE])
    fc1 = tf.nn.relu(tf.matmul(reshaped, fc1_w) + fc1_b)
    if train: fc1 = tf.nn.dropout(fc1, 0.5)#如果是训练阶段,使用dropout,随机舍弃一些神经元

    fc2_w = get_weight([FC_SIZE, OUTPUT_NODE], regularizer)#第二层全连接网络
    fc2_b = get_bias([OUTPUT_NODE])
    y = tf.matmul(fc1, fc2_w) + fc2_b
    return y
反向传播mnist_lenet5_backward.py:
#coding:utf-8
import tensorflow as tf
from tensorflow.examples.tutorials.mnist import input_data
import mnist_lenet5_forward
import os
import numpy as np

BATCH_SIZE = 100
LEARNING_RATE_BASE =  0.005 #学习率基数
LEARNING_RATE_DECAY = 0.99 #学习率衰减率
REGULARIZER = 0.0001 #正则化系数
STEPS = 50000 #训练总轮数
MOVING_AVERAGE_DECAY = 0.99 #滑动平均衰减率
MODEL_SAVE_PATH="./model/" #模型保存路径
MODEL_NAME="mnist_model" #模型保存文件名

def backward(mnist):
    x = tf.placeholder(tf.float32,[
	BATCH_SIZE,
	mnist_lenet5_forward.IMAGE_SIZE,#输入的尺寸
	mnist_lenet5_forward.IMAGE_SIZE,
	mnist_lenet5_forward.NUM_CHANNELS]) #输入的通道数
    y_ = tf.placeholder(tf.float32, [None, mnist_lenet5_forward.OUTPUT_NODE])
    y = mnist_lenet5_forward.forward(x,True, REGULARIZER) #true表示使用dropout
    global_step = tf.Variable(0, trainable=False) #训练的轮数,设定为不可训练

#求交叉熵、定义损失函数
    ce = tf.nn.sparse_softmax_cross_entropy_with_logits(logits=y, labels=tf.argmax(y_, 1))#让输出经过softmax函数,求得输出分类的概率分布,#再与标准答案对比,求出交叉熵
    cem = tf.reduce_mean(ce)
    loss = cem + tf.add_n(tf.get_collection('losses')) #损失函数等于交叉熵与正则化参数后的和

#定义指数衰减学习率
    learning_rate = tf.train.exponential_decay(
        LEARNING_RATE_BASE,#学习率基数
        global_step,#当前训练的轮数
        mnist.train.num_examples / BATCH_SIZE, #mnist.train.num_examples为训练集总样本数,共55000,(mnist.train.num_examples/BATCH_SIZE)轮batch_size后更新一次学习率
		LEARNING_RATE_DECAY,#学习率衰减率
        staircase=True)

#定义训练过程
    train_step = tf.train.GradientDescentOptimizer(learning_rate).minimize(loss, global_step=global_step)###训练过程使用梯度下降优化器

#定义滑动平均
    ema = tf.train.ExponentialMovingAverage(MOVING_AVERAGE_DECAY, global_step)#求滑动平均
    ema_op = ema.apply(tf.trainable_variables())#tf.trainable_variables()把所有待训练参数汇总为列表
    with tf.control_dependencies([train_step, ema_op]): #将滑动平均和训练过程同步进行
        train_op = tf.no_op(name='train')

    saver = tf.train.Saver() #实例化saver,保存模型

    with tf.Session() as sess:
        init_op = tf.global_variables_initializer()
        sess.run(init_op)

        ckpt = tf.train.get_checkpoint_state(MODEL_SAVE_PATH) #加载保存的模型,实现断点续训
        if ckpt and ckpt.model_checkpoint_path:
        	saver.restore(sess, ckpt.model_checkpoint_path)

        for i in range(STEPS):
            xs, ys = mnist.train.next_batch(BATCH_SIZE) #将batch_size组样本的像素值和标签分别赋值给xs和ys
            reshaped_xs = np.reshape(xs,(
		    BATCH_SIZE,
        	mnist_lenet5_forward.IMAGE_SIZE,
        	mnist_lenet5_forward.IMAGE_SIZE,
        	mnist_lenet5_forward.NUM_CHANNELS))
            _, loss_value, step = sess.run([train_op, loss, global_step], feed_dict={x: reshaped_xs, y_: ys})
            if i % 100 == 0:
                print("After %d training step(s), loss on training batch is %g." % (step, loss_value))
                saver.save(sess, os.path.join(MODEL_SAVE_PATH, MODEL_NAME), global_step=global_step)

def main():
    mnist = input_data.read_data_sets("./data/", one_hot=True)#以读热码形式读入数据集,并将mnist分为训练集train,验证集validation,测试集test存放。
    backward(mnist)

if __name__ == '__main__':
    main()
测试模块mnist_lenet5_test.py:
#coding:utf-8
import time
import tensorflow as tf
from tensorflow.examples.tutorials.mnist import input_data
import mnist_lenet5_forward
import mnist_lenet5_backward
import numpy as np

TEST_INTERVAL_SECS = 5

def test(mnist):
    with tf.Graph().as_default() as g: #复现计算图
        x = tf.placeholder(tf.float32,[#给x,y_占位
            mnist.test.num_examples,
            mnist_lenet5_forward.IMAGE_SIZE,
            mnist_lenet5_forward.IMAGE_SIZE,
            mnist_lenet5_forward.NUM_CHANNELS])
        y_ = tf.placeholder(tf.float32, [None, mnist_lenet5_forward.OUTPUT_NODE])
        y = mnist_lenet5_forward.forward(x,False,None)#前向传播得到y

        ema = tf.train.ExponentialMovingAverage(mnist_lenet5_backward.MOVING_AVERAGE_DECAY)#实例化可还原滑动平均的saver,加载模型中参数的滑动平均值
        ema_restore = ema.variables_to_restore()
        saver = tf.train.Saver(ema_restore)

        correct_prediction = tf.equal(tf.argmax(y, 1), tf.argmax(y_, 1)) #计算模型识别准确率
        accuracy = tf.reduce_mean(tf.cast(correct_prediction, tf.float32))

        while True:
            with tf.Session() as sess:
                ckpt = tf.train.get_checkpoint_state(mnist_lenet5_backward.MODEL_SAVE_PATH)#把滑动平均值赋给各个参数
                if ckpt and ckpt.model_checkpoint_path:
                    saver.restore(sess, ckpt.model_checkpoint_path)#不再初始化所有参数,加载训练好的模型

                    global_step = ckpt.model_checkpoint_path.split('/')[-1].split('-')[-1] #恢复训练的轮数
                    reshaped_x = np.reshape(mnist.test.images,(
                    mnist.test.num_examples,
        	        mnist_lenet5_forward.IMAGE_SIZE,
        	        mnist_lenet5_forward.IMAGE_SIZE,
        	        mnist_lenet5_forward.NUM_CHANNELS))
                    accuracy_score = sess.run(accuracy, feed_dict={x:reshaped_x,y_:mnist.test.labels}) #计算准确率,x:测试数据,y_:测试数据标签
                    print("After %s training step(s), test accuracy = %g" % (global_step, accuracy_score))
                else:
                    print('No checkpoint file found')
                    return
            time.sleep(TEST_INTERVAL_SECS)

def main():
    mnist = input_data.read_data_sets("./data/", one_hot=True)
    test(mnist)

if __name__ == '__main__':
    main()
应用模块mnist_lenet5_app.py:
#coding:utf-8

import tensorflow as tf
import numpy as np
from PIL import Image
import mnist_lenet5_backward
import mnist_lenet5_forward

def restore_model(testPicArr):
	with tf.Graph().as_default() as tg:

		x = tf.placeholder(tf.float32,[#给x占位
            	1,
            	mnist_lenet5_forward.IMAGE_SIZE,
            	mnist_lenet5_forward.IMAGE_SIZE,
           	mnist_lenet5_forward.NUM_CHANNELS])

		y = mnist_lenet5_forward.forward(x,False,None)#前向传播得到y
		preValue = tf.argmax(y, 1)                                      #预测结果

		variable_averages = tf.train.ExponentialMovingAverage(mnist_lenet5_backward.MOVING_AVERAGE_DECAY)
		variables_to_restore = variable_averages.variables_to_restore()
		saver = tf.train.Saver(variables_to_restore)                    #实例化带有滑动平均值的saver

		with tf.Session() as sess:
			ckpt = tf.train.get_checkpoint_state(mnist_lenet5_backward.MODEL_SAVE_PATH)#加载模型
			if ckpt and ckpt.model_checkpoint_path:
				saver.restore(sess, ckpt.model_checkpoint_path)             #恢复w等信息到当前会话

				testPicArr = np.reshape(testPicArr,(  #testPicArr是一个1行784列的数组,把它整理成符合神经网络输入的、可进行卷积计算的数组
		    		1,
        			mnist_lenet5_forward.IMAGE_SIZE,
        			mnist_lenet5_forward.IMAGE_SIZE,
        			mnist_lenet5_forward.NUM_CHANNELS))

				preValue = sess.run(preValue, feed_dict={x:testPicArr})     #喂入
				return preValue
			else:
				print("No checkpoint file found")
				return -1

def pre_pic(picName):
	img = Image.open(picName)                            #打开图片
	reIm = img.resize((28,28), Image.ANTIALIAS)          #变成28×28像素点,用Image.ANTIALIAS消除锯齿
	im_arr = np.array(reIm.convert('L'))                 #用reIm.convert()变成灰度图,用np.array()转成矩阵
	threshold = 50                                       #阈值是50,50以下的认为是0,大于阈值的认为是255
	for i in range(28):                                  #输入的是白底黑字,需要反色
		for j in range(28):
			im_arr[i][j] = 255 - im_arr[i][j]
			if (im_arr[i][j] < threshold):
				im_arr[i][j] = 0
			else: im_arr[i][j] = 255

	nm_arr = im_arr.reshape([1, 784])                  #整理为1行784列
	nm_arr = nm_arr.astype(np.float32)                 #变为浮点型像素点
	img_ready = np.multiply(nm_arr, 1.0/255.0)         #从0~255之间的数变为1.0~255.0之间的浮点数

	return img_ready                                   #待识别图片

def application():
	testNum = input("input the number of test pictures:")  #输入要识别几张图片
	for i in range(int(testNum)):
		testPic = input("the path of test picture:")   #给出识别图片的路径和名称
		testPicArr = pre_pic(testPic)                  #对图片预处理
		preValue = restore_model(testPicArr)           #喂入
		print ("The prediction number is:", preValue)

def main():
	application()

if __name__ == '__main__':
	main()
结果:
mnist_lenet5_backward.py(部分)

After 49601 training step(s), loss on training batch is 0.666916.
After 49701 training step(s), loss on training batch is 0.726236.
After 49801 training step(s), loss on training batch is 0.64329.
After 49901 training step(s), loss on training batch is 0.635884.


mnist_lenet5_test.py(部分)

After 49901 training step(s), test accuracy = 0.99
After 49901 training step(s), test accuracy = 0.99
After 49901 training step(s), test accuracy = 0.99


mnist_lenet5_app.py

input the number of test pictures:10
the path of test picture:pic/0.png
The prediction number is: [0]
the path of test picture:pic/1.png
The prediction number is: [1]
the path of test picture:pic/2.png
The prediction number is: [2]
the path of test picture:pic/3.png
The prediction number is: [3]
the path of test picture:pic/4.png
The prediction number is: [4]
the path of test picture:pic/5.png
The prediction number is: [5]
the path of test picture:pic/6.png
The prediction number is: [6]
the path of test picture:pic/7.png
The prediction number is: [7]
the path of test picture:pic/8.png
The prediction number is: [8]
the path of test picture:pic/9.png
The prediction number is: [9]
可以看到,正确率达到了99%,效果优于全连接神经网络。


