pytorch笔记
想要在tensorboard上显示图片,要把图片给transforms.ToTensor()成tensor类型。
当你测试时候,记得在测试文件里的网络和图片都变成.cuda(),或者都.cpu()

        self.model = nn.Sequential(
            nn.Conv2d(3, 32, 5, 1, 2),
            nn.MaxPool2d(2),
            省略。。。
        )
sequential 用于网络结构的容器
train_data = torchvision.datasets.CIFAR10(
root='CIFAR10',train=True,transform = transforms.Compose([
     transforms.CenterCrop(10),
     transforms.PILToTensor(),
     transforms.ConvertImageDtype(torch.float)]),
download=True)
compose用于对图形或tensor进行一些列操作的容器
尺寸不对时:

在网络中全部注释掉,一行一行的展开,然后运行进行查看尺寸。

PIL :PIL.Jpeg(Png不固定,看你是啥)ImageFile类型 Image.open(img_path)
tensor :tensor类型 transforms.ToTensor(img)
narrays :numpy.ndarry类型 cv2.imread(img_path) 或者 np.array(img)
import torch
from torchvision import transforms
from PIL import Image

train_data = torchvision.datasets.CIFAR10(root='CIFAR10',train=True,transform=torchvision.transforms.ToTensor(),download=True)
#此时已经变成了tensor量
print(train_data[0][0]) #一大堆的三维tensor(3,32,32)
# train_data[0][0].show() #tensor量是不可以直接用于展示成图片
bbb = transforms.ToPILImage() #先经过transforms中的ToPILmage函数 将tensor变成图片
bbb(train_data[0][0]).show()
关于Softmax:
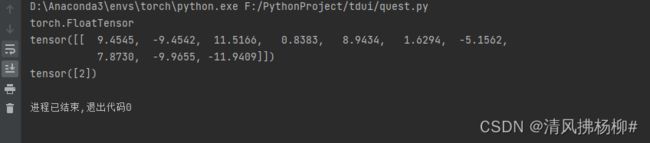
m = nn.Softmax(dim=1)
input = torch.randn(2,3)
print(input)
output = m(input)
print(output)

输出为:
input tensor([[-2.1922,  1.5888, -0.8482],
        [ 0.8750,  1.2335,  2.2822]])

output tensor([[0.0205, 0.9007, 0.0787],
        [0.1535, 0.2197, 0.6269]])
作用:将值取为0-1之间,小的更小,大的更大。(dim=1上)求和为1。
举个栗子:
1、实例化transforms中的ToTensor时
ToTensor源码如下:

因其没有初始化init函数(或者有的函数其init函数为空的括号),所以实例化时就是
aaa = transforms.ToTensor(),并且它call的是一个picture
调用该函数操作图片img时,就是 aaa(img)
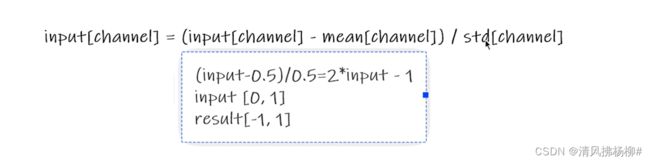
2、实例化transforms中的Normalize时
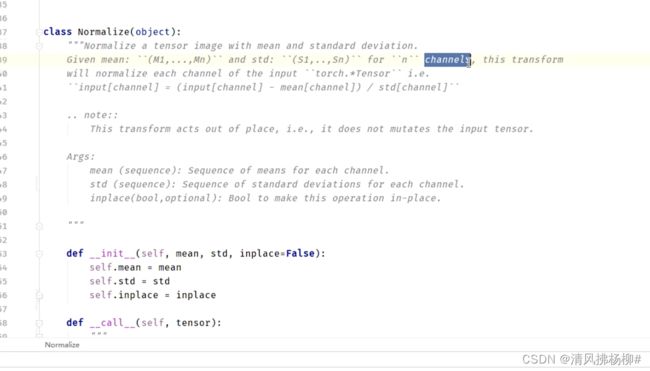
因其初始化init函数内有参数,所以实例化时就是
bbb = transforms.Normalize([x,y,z],[aa,bb,cc]),,并且它call的是一个tensor
调用该函数操作tensor时,就是 bbb(tensor) ,也就是bbb(aaa(img))
上图是normalize的一个例子,假设均值方差为1.
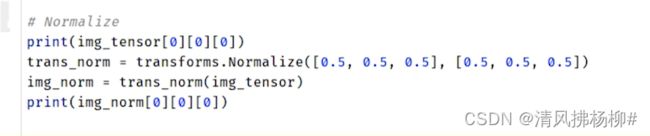
输出
tensor(0.8275)
tensor(0.6549)
第一张是归一化后的图片,第二张是原图。
class ABC(nn.Module):

    def __init__(self):
        super(ABC, self).__init__()

······其中,super().__init__()函数的作用就是调用其父类的初始化函数。在这里就是class ABC用该函数调用它的父类nn.module的初始化函数。
最大池化Maxpool的作用(想象一下1080P的视频和720P的视频,画质稍差,量变小,方便训练)

参数inplace
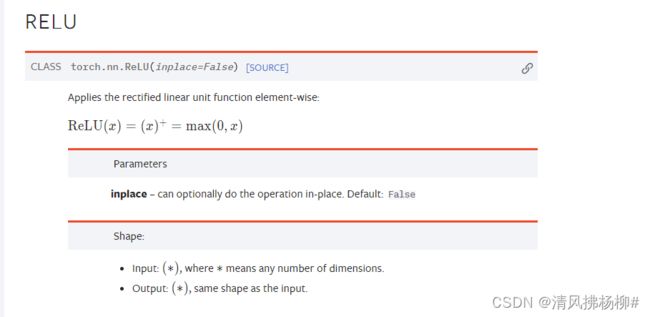
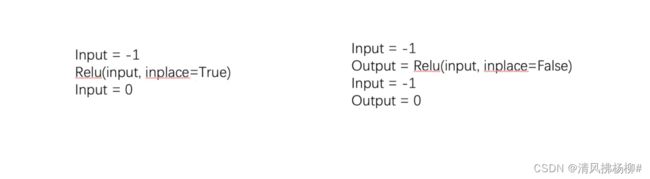
如果为True,则在原来的基础上进行处理。理解为替换
如果Flase,则需要指定一个新的变量,在原变量上处理后赋值给新变量。
默认是Flase,这样做可以防止原来数据的丢失。
input = torch.tensor([1,-0.5],
                     [-1,3])

mm = torch.nn.Relu() #默认False

output = mm(input)

print(output)

#结果为output = tensor([1.,0.]
                       [0.,3.])
图像经过sigmoid前后对比如下图所示

总结:非线性变换(relu、sigmoid。。。)主要目的就是给网络引入一些非线性特征,如果你非线性越多,才能训练出符合各种曲线各种特征的模型,增加泛化能力。
交叉熵损失CrossEntropyLoss
官网CrossEntropyLoss — PyTorch 1.11.0 documentation
输入输出要求:

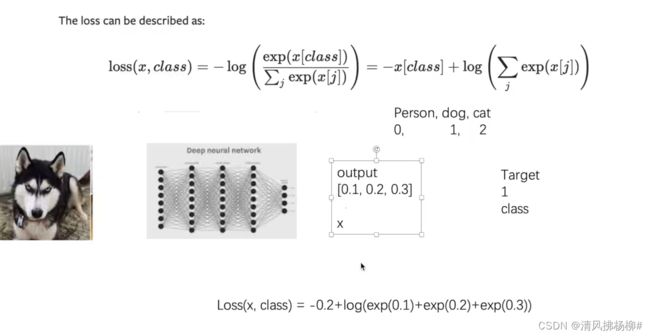
不是log ,是ln
#对于三分类 输入x 目标y
x = torch.tensor([0.1,0.2,0.3])
#printi(x.shape)
y = torch.tensor([1])
#将x reshape成(1,3)
x = torch.reshape(x,(1,3))

loss_cross = nn.CrossEntropyLoss()

result_cross = loss_cross(x,y)

print(result_cross)

#输出结果为 tensor(1.1019)
注意目标y的值是对应的三分类的索引,(试一下将y值改成5、6、7会怎么样)
(b,10) ~~> (b) 其中,b表示batchsize值,二维张量(b,10)表示b张图片,每张图片10个通道;
一维张量(b)表示长度为b,里面的值是索引值: 代表b张图片中各图片的索引值(10分类的话就是0-9)
pytorch内置网络模型的使用和修改
内置VGG16用于1000分类的ImageNet数据集上,

另外,其内置网络结构如下torchvision.models.vgg — Torchvision 0.12 documentation
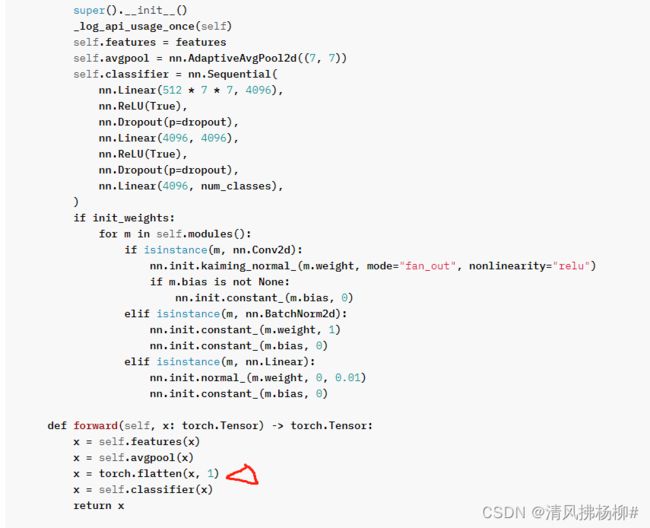
其打平flatten操作在forward函数中,所以:
若用于10分类的CIFAR10数据集上,只需要在网络再接入一个全连接层 即可。

上图中是将该全连接层接入到VGG16级别下的网络当中,就是和features、avgpool、classifier同一级别。
当然,也可以使用如下代码将该全连接层加到classifier级别下。
vgg16_true.classifier.add_module('add_linear',nn.Linear(1000,10))
print试试。
我的疑问:是不是必须且只能加到classifier级别下?因为人家源码的forward函数里就写明白了走那几步。。。
法2°:除了加一层全连接层外,还可以直接对源码当中最后一层进行直接修改。
vgg16_true.classifier[6] = nn.Linear(4096,10)
网络模型的保存与读取
vgg16_true = torchvision.models.vgg16(pretrained=True)
print(vgg16_true)

#保存方式1 模型结构+模型参数
torch.save(vgg16_true, 'vgg16_save.pth')  # 会在同级目录下生成一个.pth文件,注意保存的是整个的网路结构以及参数

#对应的加载方式1
new_nn = torch.load('vgg16_save.pth') #生成一个新网络和加载的一模一样,无需写之前网络结构(class Tudui(nn.Module))


#保存方式2 模型参数(官方推荐的保存方式,占用空间小),这是一个字典
torch.save(vgg16_true.state_dict(),'vgg16_save_dict.pth')    #同样在同一级别目录下生成一个.pth文件。把VGG16网络模型的参数保存成字典形式,不保存结构,只保存参数

#对应的加载方式2
new_nn2 = torch.load('vgg16_save_dict.pth')
#################################################################
并且,print(new_nn2)#显示的是一大堆字典形式的tensor,都是一些参数,没有网络结构

若要把该参数字典应用于网络模型当中,首先新建一个网络模型结构
new_nn2 = torch.load('vgg16_save_dict.pth')# 这只是一个字典
print(new_nn2)

vgg16_new = torchvision.models.vgg16(pretrained=False)

vgg16_new.load_state_dict(torch.load('vgg16_save_dict.pth'))
笔记:场景:在文件b中使用方式1进行加载模型时候,记得在该文件import你创建该网络模型的文件a 即from a import *
比如说你换了一台电脑。U盘中有字典(.pth)、知道初始化的网络结构(现写也成,不过得对应哦。python文件)------------------》那么可以在一个新的文件中import该文件,new一个实例化网络,加载该字典。生成之前已经训练好的网络。
import torch
a = torch.tensor(5)

print(a)
print(a.item())

輸出:tensor(5)
     5
使用GPU方式1:

tudui = Tudui()
tudui.cuda()

loss_fn = nn.CrossEntropyLoss()
loss_fn.cuda()

for data in train_dataloader:    #以及test集的
    imgs,targets = data

    imgs = imgs.cuda()
    targets = targets.cuda()
使用GPU方式2:
device = torch.device("cuda") #cuda:012 表示你有多个显卡,指定用哪一张
device = torch.device("cuda" if torch.cuda.is_available() else "cpu")常用写法

tudui = Tudui()
tudui.to(device)

loss_fn = nn.CrossEntropyLoss()
loss_fn.to(device)


for data in train_dataloader:    #以及test集的
    imgs,targets = data

    imgs = imgs.to(device)
    targets = targets.to(device)
tudui.train()
#训练
。。。。。


tudui.eval()
#测试
。。。。。

当你的网络中有Drouout、Batchnorm结构时,上述俩代码起作用,负责加不加都行,建议加一下。
This has any effect only on certain modules. See documentations of particular modules for details of their behaviors in training/evaluation mode, if they are affected, e.g. Dropout, BatchNorm, etc.
#https://pytorch.org/docs/stable/generated/torch.nn.Module.html#torch.nn.Module
DDP
在分布式模式下,需要在每个 epoch 开始时调用 set_epoch() 方法,然后再创建 DataLoader 迭代器,以使 shuffle 操作能够在多个 epoch 中正常工作。 否则,dataloader迭代器产生的数据将始终使用相同的顺序。
sampler = DistributedSampler(dataset) if is_distributed else None
loader = DataLoader(dataset, shuffle=(sampler is None),
                    sampler=sampler)
for epoch in range(start_epoch, n_epochs):
    if is_distributed:
        sampler.set_epoch(epoch)
    train(loader)