vue3(setup语法糖+TS)
只有身在更高处的你才能体验风不一样的感觉, 看不一样的风景
vue-cli
- 创建项目:
vue create [project-name] - 运行项目:
npm run serve
vite
- 创建项目:
npm init vite@latest - 运行项目:
npm run dev
Composition API(组合API)
ref与reactive
ref
- 定义一个响应式的数据
- 语法
<script setup lang="ts">
	// 按需导入API
	import { ref } from 'vue'
	const refDc = ref('dc')
</script>
-
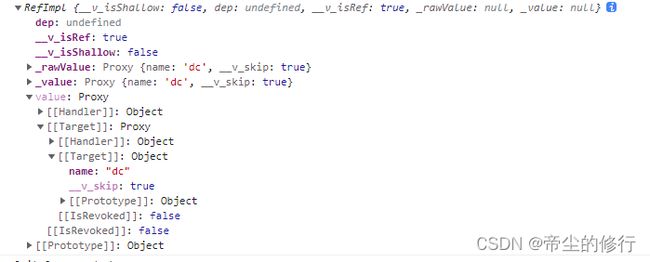
使用需要通过
.value方式,但是模板中是不需要这样的,自动会解包{{ refDc }}就可使用 -
如果被套在
reactive中会自动解包不用.value -
基本类型的数据:响应式依然是靠
Object.defineProperty()的get与set方式完成 -
对象类型的数据:内部是通过
reactive函数完成(下面会有介绍)
shallowRef()
ref()的浅层作用形式
import { shallowRef } from "vue"

const obj = shallowRef({ name: "dc", age: 21 })
obj.value.name = "dcdc"  /* 并不会触发响应式 */
// obj.value  ===> { name: "dc", age: 21 }
// 即
obj.value = {name: '帝尘'}  /* 这样才会触发响应式 */
obj.value = '帝尘'  /* 这样才会触发响应式 */
- 因为
ref对象使用要.value只有.value这一项改变才会触发响应式, 即shallowRef({ name: "dc", age: 21 })传入的参数本身改变才会触发响应式 - 不能跟
ref一起去写会影响视图的更新(shallowRef也会去触发更新)
triggerRef()
- 强制触发依赖于一个浅层
ref的副作用, 也就是shallowRef()的副作用
import { shallowRef, triggerRef } from "vue"

const obj = shallowRef({ name: "dc", age: 21 })
obj.value.name = "dcdc"  /* 并不会触发响应式 去更新视图 */
triggerRef(obj)  /* 调用之后 会强制触发依赖于所传的ref对象 的副作用 */
customRef()
- 创建一个自定义的
ref,显式声明对其依赖追踪和更新触发的控制方式(创建一个我们可控的ref) - 接受一个回调, 两个参数
track和trigger, 并返回一个带有get和set方法的对象。 - 一般:
track()应该在get()方法中调用,而trigger()应该在set()中调用
创建防抖的
ref
import { customRef } from "vue"

const myRef = (value: any) => {
  let time: number
  return customRef((track, trigger) => {
    return {
      get() {
        /* 跟踪依赖 */
        track()
        return value
      },
      set(newVal) {
        clearTimeout(time)
        time = setTimeout(() => {
          value = newVal
          /* 触发依赖 */
          trigger()
        }, 500);

      }
    }
  })
}
const my = myRef(1)
const change = () => {
  my.value++
}
reactive:
- 定义一个响应式的数据
- 语法
<script setup lang="ts">
// 按需导入API
import { reactive} from 'vue'
const reactionDc = reactive({
  name: 'dc',
  age: '21'
})
</script>
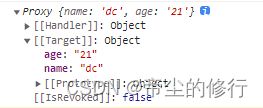
- 打印
reactionDc

reactive对象是用来对复杂数据类型进行响应式,并且内部是通过Proxy(代理): 拦截对象中任意属性的变化, 包括:属性值的读写、属性的添加、属性的删除等- 仅对对象类型(引用类型)有效(对象、数组和 Map、Set 这样的集合类型),而对 string、number 和 boolean 这样的 原始类型 无效。
- 原因: Vue 的响应式系统是通过属性访问进行追踪的, 如果更改了原始的引用就会导致响应式连接丢失
- 通过解构例如
let name = reactionDc.name这种是不可取会丢失响应式 可以使用toRef | toRefs去解构
shallowReactive()
reactive()的浅层作用形式- 和 reactive() 不同,这里没有深层级的转换:一个浅层响应式对象里只有根级别的属性是响应式的。属性的值会被原样存储和暴露,这也意味着值为
ref的属性不会被自动解包了
<template>
  <div>{{ shallowObj.c.d.e }}</div>
  <button @click="change">改变</button>
</template>

<script setup lang="ts">
import { isReactive, shallowReactive } from "vue";
const shallowObj = shallowReactive({
  a: 1,
  b: 2,
  c: {
    d: {
      e: 10,
    },
  },
})

const change = () => {
  // shallowObj.a++ 不能一起写
  shallowObj.c.d.e++; /* 不会触发更新 */
  console.log(
    isReactive(shallowObj) /* true */,
    isReactive(shallowObj.c.d.e) /* false */
  )
}
不能跟
reactive一起写会向ref和shallowRef一样影响视图更新
readonly()
- 属性只读, 不可修改
import { readonly } from "vue";
const obj = readonly({ a: 123, b: 456 });
obj.a++; /* 会提示: 无法分配到 "a" ,因为它是只读属性。 */
shallowReadonly()
readonly()的浅层作用形式
import { shallowReadonly } from "vue";
const obj = shallowReadonly({ a: 123, b: { c: 200 } });
// obj.a++   /* 会提示: 无法分配到 "a" ,因为它是只读属性。 */
obj.b.c++  /* 深层次可以修改 */
toRaw()
- 可以返回由
reactive()、readonly()、shallowReactive()或者shallowReadonly()创建的代理对应的原始对象
import { shallowReadonly, toRaw } from "vue";
const obj = shallowReadonly({ a: 123, b: { c: 200 } });
console.log(toRaw(obj)); /* 返回原始对象 { a: 123, b: { c: 200 } } */
markRaw()
- 与
shallowReactive()和shallowReadonly(),shallowRef这种类似都是浅层作用形式, 作用为: 将一个对象标记为不可被转为代理。返回该对象本身
import { markRaw, reactive} from "vue";

const markRawObj = markRaw({ a: 123, b: { c: 200 } })
console.log(markRawObj);  /* 添加标记属性 __v_skip: true */

const reactiveObj = reactive(markRawObj)
console.log(reactiveObj);  /* 返回的还是原对象 */
计算属性与监听器
计算属性(computed)
- 用法(与Vue2一致)
import {computed, reactive} from 'vue'
const reactionDc = reactive({
  name: 'dc',
  age: '21'
})
// 简单用法
let computedAge = computed(() => {
  return reactionDc.age
})
// 完整用法
let computedName = computed({
	// 获取computedName 触发的函数
  get() {
    return reactionDc.name + '!'
  },
  // 设置computedName 所触发的函数 value 修改的值
  set(value: string) {
    return reactionDc.name = value
  }
})
</script>
watch函数
- 监听器
<script setup lang="ts">
import { reactive, ref} from 'vue'
const reactionDc = reactive({
  name: 'dc',
  age: '21'
})
const refDc = ref('dc')
const refDcAge = ref(21)
//情况一:监视ref定义的响应式数据
watch(refDc ,(newValue,oldValue)=>{
	console.log('refDc ',newValue,oldValue)
	// immediate:true 配置项,代表首次执行监听一次
},{immediate:true})

//情况二:监视多个ref定义的响应式数据,用数组
watch([refDcName, refDcAge ],(newValue,oldValue)=>{
	console.log('sum或msg变化了',newValue,oldValue)
})

/* 情况三:监视reactive定义的响应式数据
			若watch监视的是reactive定义的响应式数据,则无法正确获得oldValue!!
			若watch监视的是reactive定义的响应式数据,则强制开启了深度监视 (deep)
*/
watch(reactionDc ,(newValue,oldValue)=>{
	console.log('person变化了',newValue,oldValue)
},{immediate:true,deep:false}) //此处的deep配置不再奏效

//情况四:监视reactive定义的响应式数据中的某个属性
watch(()=>reactionDc.age,(newValue,oldValue)=>{
	console.log('reactionDc的age变化了',newValue,oldValue)
},{immediate:true,deep:true})

//情况五:监视reactive定义的响应式数据中的某些属性
watch([()=>reactionDc.name,()=>reactionDc.age],(newValue,oldValue)=>{
	console.log('reactionDc的name | age 变化了',newValue,oldValue)
},{immediate:true,deep:true})

//特殊情况
watch(()=>reactionDc.name,(newValue,oldValue)=>{
    console.log('reactionDc的name变化了',newValue,oldValue)
},{deep:true}) //此处由于监视的是reactive素定义的对象中的某个属性,所以deep配置有效
watchEffect函数
- watch的是:既要指明监视的属性,也要指明监视的回调
- watchEffect的是:不用指明监视哪个属性,监视的回调中用到哪个属性,那就监视哪个属性
- 跟计算属性有点像:而
watchEffect函数没返回值注重过程,计算属性注重结果,有返回值 - 是非惰性的,会帮我们自动执行一次
- 默认执行在Vue实例创建之前, 如果要在创建之后让它调用可以添加第二个配置为
{ flush: 'post'}或者引入别名为watchPostEffect的监听器
import { reactive, watchEffect} from 'vue'
const reactionDc = reactive({
  name: 'dc',
  age: '21'
})
watchEffect(() => {
	// 用到的数据只要发生变化(即 reactionDc .age发生变化),则直接重新执行回调。
	const nawValue = reactionDc .age
	console.log('我执行了!')
})
- 停止监听需要接受
watch或者watchEffect的返回的函数, 执行就会停止监听
import { reactive, watchEffect} from 'vue'
const reactionDc = reactive({
  name: 'dc',
  age: '21'
})
const stop = watchEffect(() => {
	// 用到的数据只要发生变化(即 reactionDc .age发生变化),则直接重新执行回调。
	const nawValue = reactionDc .age
	console.log('我执行了!')
})
stop()  /* 执行表示终止监听 */
生命周期
- 与vue2中发生了点变化
- Composition API 形式的生命周期钩子,与Vue2.x中钩子对应关系如下:
beforeCreate===>setup()created=======>setup()beforeMount===>onBeforeMountmounted=======>onMountedbeforeUpdate===>onBeforeUpdateupdated=======>onUpdatedbeforeUnmount==>onBeforeUnmountunmounted=====>onUnmounted
<script setup lang="ts">
	// 引入
	import { onBeforeMount } from 'vue'
	// 使用
	onBeforeMount (() =>{
		....
	})
</script>
组件间通信
父传子props
defineProps()- 父组件
<template>
  <Hello-world msg="Hello dc" />
</template>
- 子组件
<template>
  <h1>{{ msg }}</h1>
</template>
<script setup lang="ts">
	interface Props {
	  msg: string
	}
	// 可在模板中直接使用
	defineProps<Props>()
</script>
- 也可以这样使用
<template>
  <h1>{{ msg }}</h1>
</template>
<script setup lang="ts">
// interface Props {
//   msg: string
// }
defineProps({
  msg: String
})
</script>
- 但是这两种方式无法设置默认值,如果要是只默认值就要使用
withDefaults(defineProps()) - 如果给引用数据传递默认值, 只能通过
() =>函数返回值形式, 防止引用
<template>
  <h1>{{ msg }}</h1>
</template>
<script setup lang="ts">
	import { withDefaults } from 'vue';
	interface Props {
	  msg?: string
	  data?: number[]
	}
	// 第一个参数指定defineProps并传入泛型, 第二个参数则是配置对应的默认值
	withDefaults(defineProps<Props>(), {
	  msg: 'dc!!!',
	  data: ()=> [1, 2, 3]
	})
</script>
但是这种方式只能在
template标签中使用,所以如果要在script标签中用的话要使用常量或变量去接收
祖与后代组件通信
provide与inject- 父组件有一个
provide选项来提供数据,后代组件有一个inject选项来开始使用这些数据

- 格式:
provide(key, value),inject(key)
// 子组件
import { provide } from 'vue'
provide('name', ‘dc’)
// 子组件
import { inject} from 'vue'
const data = inject('name')
console.log(data) // dc
可以将依赖注入看作是“长距离的 prop”
如果需要响应式,则可以在provide传响应式数据,如ref,reactive或者计算属性
子传父(自定义事件)
defineEmits('自定义事件')
// 子组件内
let arr: number[] = reactive<number[]>([1, 2, 3])
// 可以是多个自定义是事件
  const emit =  defineEmits(['on-click'])
  const getProps = () => {
    // 第一个参数为 触发的自定义事件,第二个往后都是传递数据
    emit('on-click', arr)
  }
// 父组件
 // 绑定自定义事件   getList 去接收
 <Hello @on-click="getList"></Hello>
 // list 就是传递的值可以为多个参数
  const getList = (list: number[]) => {
    console.log(list, '子组件传递的');
  }
父组件得到子组件的实例
defineExpose()- 获取实例时只能访问到暴露出去的属性, 而不能直接修改组件实例
// 父组件
<Hello ref='hello '></Hello >

const hello = ref(null)
// hello  就是子组件愿意暴露出来的值
// 子组件
defineExpose({
  name: 'dc'
})
任意组建通信(全局事件总线)
- 第三方库
mitt - 安装:
npm i mitt - 使用
// 引入
import mitt from 'mitt';
// 使用
const emitter = mitt()
- 注册并监听自定义事件:
emitter.on(eventType,callback) - 触发自定义事件:
emitter.emit(eventType,value) - 取消所有的mitt事件:
emitter.all.clear() - 取消单个的mitt事件:
emitter.off(eventType,callback)
v-model
- 给组件双向绑定数据
// 父组件
<template>
  <hello-world  v-model="dc"/>
</template>
<script setup lang="ts">
import HelloWorld from './components/HelloWorld.vue';
import { ref } from 'vue'

const dc = ref('')
// 子组件
<template>
  <h1>{{ modelValue }}</h1>
  <button @click="hander">点我更新数据</button>
</template>
<script setup lang="ts">
import { withDefaults, inject } from 'vue';
interface Props {
  modelValue: string
}
defineProps<Props>()
const emits = defineEmits(['update:modelValue'])
const hander = () => {
  emits('update:modelValue', '更新数据了')
}
</script>
// 父组件
<template>
	<!-- 传入props 和 自定义事件 -->
  <hello-world  :modelValue="dc" @update:modelValue="hander"/>
</template>


<script setup lang="ts">
import HelloWorld from './components/HelloWorld.vue';
import { ref } from 'vue'

const dc = ref('')
const hander = (newVnalue: string) => {
  // 通过自定义事件去修改dc 的值
  dc.value = newVnalue
}
</script>
<template>
  <h1>{{ modelValue }}</h1>
  <button @click="hander">点我更新数据</button>
</template>
<script setup lang="ts">
interface Props {
  modelValue: string
}
defineProps<Props>()
const emits = defineEmits(['update:modelValue'])
const hander = () => {
  // 触发自定义事件
  emits('update:modelValue', '更新数据了')
}
</script>
update:modelValue自定义事件名可以是任意
- 多个数据绑定
// 父组件
<template>
  <hello-world  v-model="dc" v-model:age="age"/>
</template>
<script setup lang="ts">
import HelloWorld from './components/HelloWorld.vue';
import { ref } from 'vue'

const dc = ref('dc')
const age = ref(21)
</script>
// 子组件
<template>
  <h1>name:{{ modelValue }}年龄{{age}}</h1>
  <button @click="hander">点我更新数据</button>
</template>
<script setup lang="ts">
interface Props {
  modelValue: string
  age: number
}
defineProps<Props>()
const emits = defineEmits(['update:modelValue', 'update:age'])
const hander = () => {
  emits('update:modelValue', '更新数据了')
  emits('update:age', 18)
}
</script>
组件
全局组件
- 在
main.ts中通过实例的component()属性注册
import { createApp } from "vue"
import App from "./App.vue"
import Card from "./components/Card.vue";

createApp(App).component("Card", Card).mount("#app")
注意
createApp(App)返回的是实例, 可以链式调用, 但是mount("#app")返回的并不是实例, 不可以在后面调用
动态组件
- 通过
component组件的is属性切换组件
<template>
  <component :is="A"></component>
</template>

<script setup lang="ts">
import A from "./components/A.vue";

</script>
这里的
:is不能是字符串, 与vue2不同, vue2通过实例的component的属性去注册, 有媒介的关系可以用字符串, 但vue3的setup语法糖内不行
局部组件
- 在当前组件内导入, 直接使用
<template>
  <A />
</template>

<script setup lang="ts">
import A from "./components/A.vue";

</script>
插槽
默认插槽
/* 父组件 */
<template>
  <Content>
    <div>我是默认插槽</div>
  </Content>
</template>

<script setup lang="ts">
import Content from "./components/Content.vue";
</script>
/* 子组件 */
<template>
  <div>
    <slot>
	   如果没有插槽进来,在这里插入代码片我是默认内容
	</slot>
  </div>
</template>
具名插槽
v-slot简写为#
/* 父组件 */
<template>
  <Content>
    <template v-slot:header>
      我是插槽进来的header
    </template>
    <template #main>
      我是插槽进来的main
    </template>
  </Content>
</template>

<script setup lang="ts">
import Content from "./components/Content.vue";
</script>
/* 子组件 */
<template>
  <div>
    <div>
      <slot name="header">
        我是header默认内容
      </slot>
    </div>
    <div>
      <slot name="main">
        我是main默认内容
      </slot>
    </div>
  </div>
</template>
作用域插槽
- 把数据通过
v-bind绑定到slot的传送上外层,template标签上的v-slot:main="props"去接收, 可以解构, 简写为#main=""{info}实现数据交互
/* 父组件 */
<template>
  <Content :data="data">
    <template #main="{info}">
      <div>{{info}}</div>
    </template>
  </Content>
</template>

<script setup lang="ts">
import { reactive } from "vue";
import Content from "./components/Content.vue";

const data = reactive({
  name: '帝尘',
  age: 21
})
</script>
/* 子组件 */
<template>
  <div>
      <slot name="main" :info="data">
        <div>
          {{`name: ${data.name}--age: ${data.age}`}}
        </div>
      </slot>
  </div>
</template>


<script setup lang="ts">
type Props = {
  data: {
    name: string
    age: number
  }
}
defineProps<Props>()
</script>
异步组件, 分包, Suspense组件
- 同步组件打包之后会生成一个
.js文件, 文件过大会出现白屏情况, 这时就需要异步组件,进行分包, 进行性能优化
/* 异步组件 A */
<template>
  <div>{{result}}</div>
</template>

/* setup 语法糖会有一个顶层的 async 所以可以直接使用 await */
<script setup lang="ts">


const request = () => {
  return new Promise((resolve)=>{
    setTimeout(() => {
      resolve({name: '帝尘'})
    }, 2000);
  })
}
const result = await request()
</script>
- 需要使用
defineAsyncComponent()进行导入异步组件, 要配合内置的Suspense组件 Suspense组件接收两个插槽#default: 表示要渲染真正的组件,#fallback: 表示异步组件渲染之前的的内容
/* 父组件 */
<template>
  <Suspense>
    <template #default>
      <A></A>
    </template>
    <template #fallback>
      加载中
    </template>
  </Suspense>
</template>

<script setup lang="ts">
import { defineAsyncComponent } from 'vue';


const A = defineAsyncComponent(() => import("./components/A.vue"))
</script>
打包之后异步组件会生成独立的
.js文件, 渲染顺序是先渲染同步.js之后渲染异步的
自定义指令
- 自定义的
v-ifv-for这种指令 - 自定义拖拽
<template>
  <A v-move></A>
</template>

<script setup lang="ts">
/* 导入类型 */
import type { Directive, DirectiveBinding } from 'vue';
import A from './components/A.vue'

const vMove: Directive = (el: HTMLElement, binding: DirectiveBinding): void => {
  console.log(binding);

  const down = (e: MouseEvent) => {
    // 获取点击坐标到元素的距离
    let X = e.clientX - el.offsetLeft
    let Y = e.clientY - el.offsetTop

    const move = (e: MouseEvent) => {
      // 限制移动范围               点击坐标 减去 距离元素的坐标
      let _x =Math.min( Math.max(0, e.pageX - X), window.innerWidth - el.offsetWidth)
      let _y = Math.min( Math.max(0, e.pageY - Y), window.innerHeight - el.offsetHeight)
      el.style.top = _y + 'px'
      el.style.left = _x + 'px'
    }
    document.addEventListener('mousemove', move, false)
    document.addEventListener('mouseup', () => {
      document.removeEventListener('mousemove', move)
    })
  }

  // 绑定 mousedown 事件
  el.addEventListener('mousedown', down, false)
}
</script>

<style>
html,
body {
  height: 100%;
}

* {
  padding: 0;
  margin: 0;
}
</style>
自定义插件
- 需要导出一个对象, 里面包含
install方法,use时会调用这个方法, 回传一个主要参数: .app(实例), 还有use的第一个之后的参数 - 或者直接导出一个参数,
use时会直接调用
封装的load 插件
/* 使用时 */
<template>
  <button @click="show">点击</button>
</template>

<script setup lang="ts">
import { getCurrentInstance } from 'vue';

// 获取当前组件实例
let instance = getCurrentInstance()
const show = () => {
  //  instance?.proxy 获取 全局变量
  instance?.proxy?.$load.trigger()
}
</script>
/* load 配置文件 */
// 导入实例的类型
import { createVNode, render, type App, type VNode } from "vue";
import A from './A.vue'

// export default {
//   // app.use() 时会调用 install 方法, 并且回传app 实例
//   install(app:App){
//     // 创建一个 vNode 节点
//     let vNode:VNode = createVNode(A)
//     // render 渲染方法 => 参数: vNode, 渲染到的节点上
//     render(vNode, document.body )
//     /* exposed 是 组件 defineExpose() 暴露出来的数据 */

//     // 往全局挂载属性
//     app.config.globalProperties.$load = {
//       ...vNode.component?.exposed
//     }
//   }
// }

// app.use() 时会调用 install 方法, 并且回传app 实例
export default (app: App) => {
  // 创建一个 vNode 节点
  let vNode: VNode = createVNode(A)
  // render 渲染方法 => 参数: vNode, 渲染到的节点上
  render(vNode, document.body)
  /* exposed 是 组件 defineExpose() 暴露出来的数据 */

  // 往全局挂载属性
  app.config.globalProperties.$load = {
    ...vNode.component?.exposed
  }
}
/* main.ts */
import { createApp, } from "vue"
import App from "./App.vue"
import load from './components/A'

// 声明全局变量类型
declare module 'vue' {
  export interface ComponentCustomProperties {
    $load: { trigger: Function }
  }

}

createApp(App)
  .use(load)
  .mount("#app")
/* load.vue */
<template>
  <div v-if="isShow" class="load-wrap">
    loading........
  </div>
</template>


<script setup lang="ts">
import { ref } from 'vue';
const isShow = ref(true)
const trigger = () => {
  isShow.value = !isShow.value
}
// 需要暴露出去
defineExpose({
  trigger
})
</script>
待更新!!!!


