使用 vite 构建 vue3 +TS + vant + pinia + axios + ESlint 的H5模板
记录自己搭建的一个H5模板的过程和遇到的问题:
一、开始
1.使用vite搭建vue3.x项目
- npm init vite v3-template-mobile // 初始化项目( v3-template-mobile 项目名),选择vue 和 vue-ts
2.切换到对应的目录,安装依赖
- npm install
3.安装路由
- npm install vue-router@next 安装最新版路由
要注意? 千万不要指定路由版本!会报解决不了的错误
// src/router/index.ts
import { createRouter, createWebHistory } from 'vue-router';
import Nprogress from 'nprogress';
import routes from './routes';

const router = createRouter({
  // '/mobileclient/'
  history: createWebHistory(),
  // history: createWebHashHistory(),
  routes,
});

router.beforeEach((to, from, next) => {
  // 权限等判断...
  Nprogress.start();
  // 路由不存在跳转home
  if (!to.matched.length) {
    next('/home');
  }
  next();
});

router.afterEach(() => {
  Nprogress.done();
});

export default router;
routes详细配置在同级的另一个文件 src/touter/route.ts 。
配置404页面时报错: Catch all routes ("*") must now be defined using a param with a custom regexp. 意思是捕获所有路由(“”)现在必须使用带有自定义正则表达式的参数来定义。参考文档
代码为:
const errorRoutes: Array = [
  {
    name: "404",
    path: "/404",
    component: () => import("../views/404.vue"),
  },
  {
    path: "*", // 此处需特别注意置于最底部
    redirect: "/404",
  },
];
要改为:
const errorRoutes: Array = [
  {
    name: "404",
    path: "/404",
    component: () => import("../views/404.vue"),
  },
  {
    path: "/:catchAll(.*)", // 此处需特别注意置于最底部
    redirect: "/404",
  },
];
4.安装其他插件
- @types/nprogress NProgress 是前端轻量级 web 进度条插件
npm i nprogress 再 npm i @types/nprogress -D
-
@types/node -save-dev 配置模块路径别名时,要首先安装类型声明文件,否则会报错找不到path。 没有安装此依赖的话,配置文件使用 require 等会报错。如果项目中使用了 TS,则还需要告诉 TS 别名的路径,否则 TS 会报错。详细见第8点。
// vite.config.ts

import { defineConfig } from 'vite'
import vue from '@vitejs/plugin-vue'
// 注意:在 ts 模块中加载 node 核心模块需要安装 node 的类型补充模块:npm i -D @types/node
import path from 'path'

// https://vitejs.dev/config/
export default defineConfig({
  ...
  resolve: {
    alias: {
      '@': path.join(__dirname, 'src')
    }
  }
// tsconfig.json
{
"compilerOptions": {
...
"baseUrl": ".",
"paths": {
"@/*": ["src/*"]
}
},
...-
vant ui组件库
5.安装vant按需加载的插件
使用vant 官网推荐的unplugin-vue-components

再引入组件
遇到问题:见问题第12点。
6.vite有组件动态引入:vite 使用import.meta.glob动态添加vue页面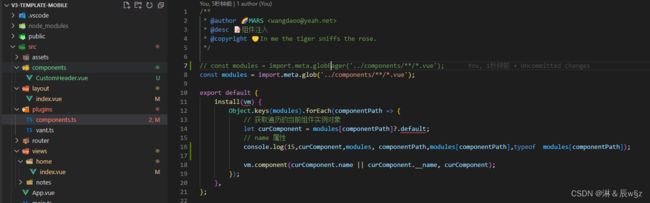
使用const modules = import.meta.globEager('../components/**/*.vue');则modules是一个元素是Module的数组
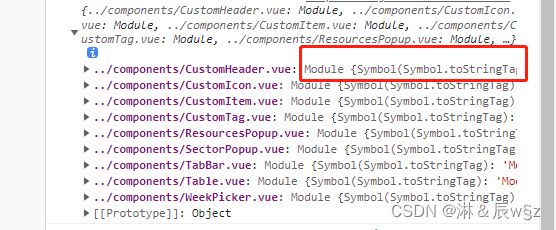
使用const modules = import.meta.glob('../components/**/*.vue'); 则modules是一个元素是promise异步函数的数组

所以上三张图的使用方法要调整,调整为vite官网的使用方法

项目中为
7.使用rem作为单位。本项目是直接全局样式html的css为font-size: 62.5%;
html {
    font-size: 62.5%;
}
8.配置模块路径别名
- pnpm install --save-dev @types/node
- 配置模块路径别名时,要首先安装类型声明文件,否则会报错找不到path。没有安装此依赖的话,配置文件使用 require 等会报错。 如果项目中使用了 TS,则还需要告诉 TS 别名的路径,否则 TS 会报错。
// vite.config.ts

import { defineConfig } from 'vite'
import vue from '@vitejs/plugin-vue'
// 注意:在 ts 模块中加载 node 核心模块需要安装 node 的类型补充模块:npm i -D @types/node
import path from 'path'

// https://vitejs.dev/config/
export default defineConfig({
  ...
  resolve: {
    alias: {
      '@': path.join(__dirname, 'src')
    }
  }
// tsconfig.json
{
"compilerOptions": {
...
"baseUrl": ".",
"paths": {
"@/*": ["src/*"]
}
},
...9.引入vuex 。 ----- 弃用。改成使用pinia。见第17点
- pnpm install vuex@next
遇到问题 :script setup中的mapstate 或者vue3-setup中使用mapState
src下创建store文件夹,写index.ts
// src/store/index.ts
import { createStore } from 'vuex'

export default createStore({
  state: {
    mmd:'vuex成功'
  },
  mutations: {
  },
  actions: {
  },
  modules: {
  }
})
为解决script setup中的mapstate的问题,src下新建utils文件夹存放公共方法。文章中的把mapState封装成一个hooks,方便页面中调用,它是公有方法,放在utils中。
// utils/mapFun.ts

import { computed } from 'vue'
// 相关辅助函数导入
import { mapActions, mapGetters, mapMutations, mapState, useStore } from 'vuex'

// object是setupMapGetters的参数类型
type Keys = Array

function mapAll(keys: Keys, mapFn: any): any {
    // 导入仓库对象
    const $store = useStore()
    // 根据传入的辅助函数和其他参数进行映射
    const stateFn = mapFn(...keys)

    // 记录映射结果
    const res: any = {}
    // 如果映射的是state或getters需要使用computed组合式API包裹,因此做了这样一个判断
    const isMapData = [mapState, mapGetters].includes(mapFn)
    for (const key in stateFn) {
        if (Object.hasOwnProperty.call(stateFn, key)) {
            // 修改映射函数内部this指向
            const fn = stateFn[key].bind({ $store })
            // 记录:state或getters使用computed进行包裹,其他的直接记录
            res[key] = isMapData ? computed(fn) : fn
        }
    }
    // 返回结果
    return res
}

// 导出对应的setup映射函数
export function setupMapState(...keys: Keys): any {
    return mapAll(keys, mapState)
}
export function setupMapMutations(...keys: Keys): any {
    return mapAll(keys, mapMutations)
}
export function setupMapGetters(...keys: Keys): any {
    return mapAll(keys, mapGetters)
}
export function setupMapActions(...keys: Keys): any {
    return mapAll(keys, mapActions)
}
问题:怎么创建store的modules
10.开发和生产环境配置
在根目录下新建 .env .env.development 和 .env.production三个文件
// in  .env  文件
# Base Configuration
VITE_PORT = 8090

VITE_BASE_URL = /


// in  .env.development  文件
VITE_MODE_ENV=development

// in  .env.production   文件
VITE_MODE_ENV=production
待完成...
11.想要vue组件中可以直接使用composition api:
安装unplugin-auto-import 参考文档
npm i -D unplugin-auto-import 自动导入composition api 和 生成全局typescript说明
需要在vite.config配置:
import AutoImport from "unplugin-auto-import/vite"
export default defineConfig({
  plugins: [
    ...
     AutoImport({
        include: [
          /\.[tj]sx?$/, // .ts, .tsx, .js, .jsx
          /\.vue$/,
          /\.vue\?vue/, // .vue
          /\.md$/, // .md
        ],
        dts: false,
        imports: ['vue', 'vue-router', {
          './src/utils/env': ['apiBase'],
        }],
      }),
  ]
})
声明全局后会自动生成全局变量文件
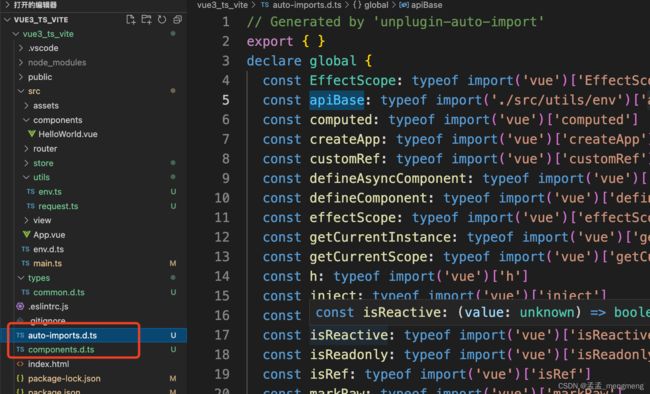
现在vue组件中可以直接使用composition api:
//before
//after
12.加入eslint 、prettier -------- 未完成,见第18点
尝试1:参考文档1 或 参考文档2
npm install eslint prettier eslint-config-prettier eslint-plugin-prettier eslint-plugin-vue vue-eslint-parser eslint-define-config eslint-plugin-import eslint-config-airbnb-base eslint-plugin-vue-scoped-css @typescript-eslint/parser @typescript-eslint/eslint-plugin -D详见参考文档。
----------------------------start 此内容不用看,请看第18点
- 根据参考文档2配置 .eslintrc.ts。和 .eslintignore。其中 .eslintrc.ts中的rules中quotes改为:
rules: {
    quotes: [
      0,
      "single",
      {
        avoidEscape: true,
        allowTemplateLiterals: true,
      },
    ],
},- 根据参考文档2配置 prettier.config.ts。和 .prettierignore
- 在 npm scripts 中添加验证脚本: "lint": "eslint src/**/*.{js,jsx,vue,ts,tsx} --fix"
疑问:src/**/*.路径是对的吗?
或者用 "lint": "eslint --ext .js,.jsx,.vue,.ts,.tsx src --fix" ???
----------------------------end 此内容不用看,请看第18点
在vscode编辑器扩展中禁用 Vetur(vue2的识别vue文件的插件)
在vscode编辑器扩展中安装 eslint 插件
在vscode编辑器扩展中安装Vue Language Features (Volar) (vue3的识别vue文件的插件)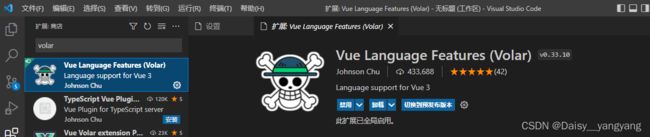
要在vscode中的setting.json中启用eslint校验。

进入 vscode 首选项---设置中---扩展---Eslint,勾选Format格式化如下图:
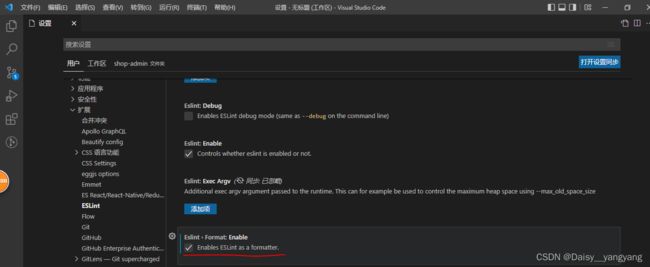
可以搜索扩展 Prettier-Code formatter 并安装, 是 prettier 的格式化扩展插件。
尝试2:公司的eslint。
结果:不行。有需要很多webpack的依赖,所以不用。
TODO:
加入stylelint和commitlint commitlint见 参考文档1 。参考文档2也有。 ------- 均见第18点。
13.修改index.html的meta标签的content属性为
content="width=device-width, user-scalable=no, initial-scale=1.0, maximum-scale=1.0, minimum-scale=1.0,viewport-fit=cover" 。详见问题第11点。
14.安装axios 安装@vueuse/integrations ----- 弃用。改成使用http,也是封装axios。原因见第16点
pnpm i axios @vueuse/integrationsutils/axios下配置:
import { useAxios } from '@vueuse/integrations/useAxios';
import router from '../router';
import axios from 'axios';
import { Toast } from 'vant';

const instance = axios.create({
    baseURL: '/api',
    timeout: 30000,
    headers: {
        'Content-Type': 'application/json;charset=UTF-8',
    },
    // baseURL: import.meta.env.VITE_API_BASEURL  // 开发模式下加载的环境变量
});

// request interceptor
instance.interceptors.request.use(
    (config) => {
        // do something before request is sent
        return config;
    },
    (error) => {
        // do something with request error
        console.log(error); // for debug
        return Promise.reject(error);
    },
);

// response interceptor
instance.interceptors.response.use(
    (response) => {
        const res = response.data;
        if (res.code !== 200) {
            Toast(res.msg);
            switch (res.code) {
                case 401:
                    window.localStorage.clear();
                    router.replace('/login');
                    break;
                default:
                    break;
            }
            return Promise.reject(res.msg || 'Error');
        } else {
            return res;
        }
    },
    (error) => {
        console.log('err' + error);
        Toast(error.message);
        return Promise.reject(error.message);
    },
);

/**
 * reactive useFetchApi
 */

export default function useAxiosApi(url: string, config?: any): any {
    console.log(66, url, config, instance);

    return useAxios(url, config, instance);
}
文件中引入useAxiosApi : import useAxiosApi from '@/utils/axios';
使用其调接口:const { data } = await useAxiosApi('/chiefdataofficer/cdoProject/homePageData');
在此之前请配置好 proxy:
// vite.config.ts

// https://vitejs.dev/config/
server: {
        host: '0.0.0.0',
        port: 8089,
        open: true,
        // #region
        proxy: {
            '/api': {
                // target 目标地址
                target: 'http://10.20.251.40:8080/',
                // changeOrigin 是否跨域
                changeOrigin: true,
                rewrite(path) {
                    return path.replace('/api', '');
                },
            },
        },
        // #endregion
 },
15.打包配置
安装rollup、rollup-plugin-visualizer
pnpm i rollup rollup-plugin-visualizer -D在vite.config.ts 配置build和visualizer
// vite.config.ts

import visualizer from 'rollup-plugin-visualizer';

plugins: [
        ...
        visualizer(),
],
build: {
        rollupOptions: {
            // https://rollupjs.org/guide/en/#big-list-of-options
            output: {
                manualChunks: {
                    vue: ['vue'],
                    router: ['vue-router'],
                    vant: ['vant'],
                },
                chunkFileNames: 'assets/js/[name]-[hash].js',
                entryFileNames: 'assets/js/[name]-[hash].js',
                assetFileNames: 'assets/[ext]/[name]-[hash].[ext]',
            },
        },
},
出现报错: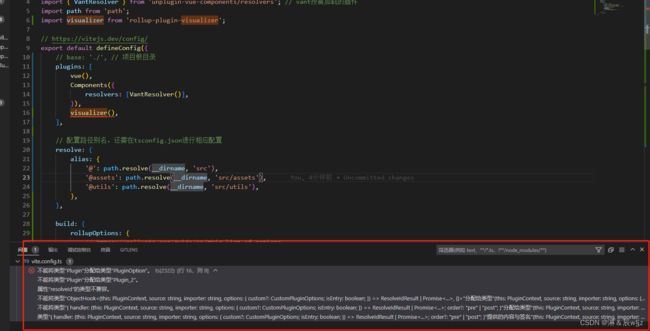
pnpm run dev 运行后:
待解决。暂不影响使用
16:不再使用@vueuse/integrations/useAxios的 useAxios 了,有bug:在 Promise.reject 后依然能继续之后的代码。改成公司封装的http。
① pnpm i @fl/http 之后,在utils文件夹下新建request文件夹,也可以是request.ts文件,主要是进行请求的配置、请求拦截器、相应拦截器等。
- 遇到问题:
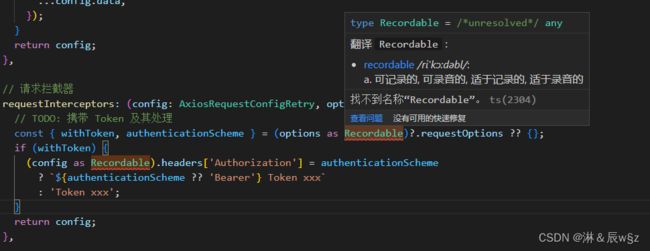
识别不了 ts 的 Recordable 类型。
解决方法:参考文档 未解决。后来把global.d.ts文件直接放在src下面而不是src/types下面就可以了:
// src\global.d.ts

// TS2304: Cannot find name 'Recordable'.
declare type Recordable = Record;
17.不再使用vuex,体量太大。改成使用 pinia。较简单
使用后vite.config.ts 中 output 打包要修改?

18.重新配置适合vue3的ESlint、prettier 、stylelint 。
①安装ESlint相关依赖
npm install eslint prettier eslint-config-prettier eslint-plugin-prettier eslint-plugin-vue vue-eslint-parser eslint-define-config eslint-plugin-import eslint-config-airbnb-base eslint-plugin-vue-scoped-css @typescript-eslint/parser @typescript-eslint/eslint-plugin -D②配置 .eslintrc .eslintignore prettierrc.js .prettierignore文件
npx eslint --init 命令是在项目根目录下创建一个 .eslintrc.js 的配置文件用的,本次不用这个,自行配置这些文件:
// .eslintrc
{
    "extends": [ // 在此处添加更多通用规则集
        "plugin:@typescript-eslint/recommended",
        "eslint-config-airbnb-base",
        "plugin:vue/vue3-recommended",
        // "plugin:vue/vue3-strongly-recommended",
        "plugin:vue-scoped-css/base",
        "plugin:prettier/recommended" // 一定要放在最后。因为 extends 中后引入的规则会覆盖前面的规则。
    ],
    "env": { // 配置编译器宏环境
        "browser": true,
        "node": true,
        "es6": true
    },
    "globals": { // 在配置文件中配置全局变量
        "defineProps": "readonly",
        "defineEmits": "readonly"
    },
    "plugins": [
        "vue",
        "@typescript-eslint"
    ],
    // "parser": "vue-eslint-parser", // eslint-plugin-vue 依赖包规定了 parser 项的设定
    "parserOptions": { // 若使用 @typescript-eslint/parser 依赖包作为自定义的解析器,需要配置 parserOptions 属性来设置解析器选项。
        "parser": "@typescript-eslint/parser",
        // "ecmaVersion": "latest",
        "sourceType": "module",
        "allowImportExportEverywhere": true, // 不限制eslint对import使用位置
        "ecmaFeatures": {
            "jsx": true
        }
    },
    "settings": {
        "import/extensions": [
            ".js",
            ".jsx",
            ".ts",
            ".tsx"
        ]
    },
    "ignorePatterns": ["scripts/**", "dist/**", "node_modules/**", "build/**", "*.d.ts"],
    "rules": { // http://eslint.cn/docs/rules/
        "no-console": "off",
        "no-continue": "off",
        "no-restricted-syntax": "off",
        "no-plusplus": "off",
        "no-param-reassign": "off",
        "no-shadow": "off",
        "guard-for-in": "off",
        "import/extensions": "off",
        "import/no-unresolved": "off",
        "import/no-extraneous-dependencies": "off",
        "import/prefer-default-export": "off",
        "import/first": "off", // https://github.com/vuejs/vue-eslint-parser/issues/58
        "@typescript-eslint/no-explicit-any": "off",
        "@typescript-eslint/explicit-module-boundary-types": "off",
        "vue/first-attribute-linebreak": 0,
        "@typescript-eslint/no-unused-vars": [
            "error",
            {
                "argsIgnorePattern": "^_",
                "varsIgnorePattern": "^_"
            }
        ],
        "no-unused-vars": [
            "error",
            {
                "argsIgnorePattern": "^_",
                "varsIgnorePattern": "^_"
            }
        ],
        "no-use-before-define": "off",
        "@typescript-eslint/no-use-before-define": "off",
        "@typescript-eslint/ban-ts-comment": "off",
        "@typescript-eslint/ban-types": "off",
        "class-methods-use-this": "off"
    },
    "overrides": [ // 若要开启组件命名规则校验,建议选这种方式(为特定类型的文件指定规则或处理器)
        {
            "files": [
                "*.vue" // 匹配以 .vue 结尾的文件
            ],
            "rules": { // 给上面匹配的文件指定规则
                // "vue/component-name-in-template-casing": [2, "kebab-case"],
                "vue/require-default-prop": 0,
                "vue/multi-word-component-names": 0,
                "vue/no-reserved-props": 0,
                "vue/no-v-html": 0,
                "vue-scoped-css/enforce-style-type": [
                    "error",
                    {
                        "allows": [
                            "scoped"
                        ]
                    }
                ]
            }
        },
        {
            "files": [
                "*.ts",
                "*.tsx"
            ], // https://github.com/typescript-eslint eslint-recommended
            "rules": {
                "constructor-super": "off", // ts(2335) & ts(2377)
                "getter-return": "off", // ts(2378)
                "no-const-assign": "off", // ts(2588)
                "no-dupe-args": "off", // ts(2300)
                "no-dupe-class-members": "off", // ts(2393) & ts(2300)
                "no-dupe-keys": "off", // ts(1117)
                "no-func-assign": "off", // ts(2539)
                "no-import-assign": "off", // ts(2539) & ts(2540)
                "no-new-symbol": "off", // ts(2588)
                "no-obj-calls": "off", // ts(2349)
                "no-redeclare": "off", // ts(2451)
                "no-setter-return": "off", // ts(2408)
                "no-this-before-super": "off", // ts(2376)
                "no-undef": "off", // ts(2304)
                "no-unreachable": "off", // ts(7027)
                "no-unsafe-negation": "off", // ts(2365) & ts(2360) & ts(2358)
                "no-var": "error", // ts transpiles let/const to var, so no need for vars any more
                "prefer-const": "error", // ts provides better types with const
                "prefer-rest-params": "error", // ts provides better types with rest args over arguments
                "prefer-spread": "error", // ts transpiles spread to apply, so no need for manual apply
                "valid-typeof": "off" // ts(2367)
            }
        }
    ]
}
.eslintignore :
snapshot*
dist
lib
es
esm
node_modules
src/assets
static
cypress
_site
temp*
static/
!.prettierrc.js
!.eslintrc
!.stylelintrc.js
!.gitignore
!.gitattributes
!.editorconfig
其他的如eslint的配置见第12点的参考文档2。 prettier官方文档
.prettierrc.js:
module.exports = {
  // 一行最多 120 字符..
  printWidth: 120,
  // 使用 2 个空格缩进
  tabWidth: 2,
  // 不使用缩进符,而使用空格
  useTabs: false,
  // 行尾需要有分号
  semi: true,
  // 使用单引号
  singleQuote: true,
  // 对象的 key 仅在必要时用引号
  quoteProps: 'as-needed',
  // jsx 不使用单引号,而使用双引号
  jsxSingleQuote: false,
  // 末尾需要有逗号
  trailingComma: 'all',
  // 大括号内的首尾需要空格
  bracketSpacing: true,
  // jsx 标签的反尖括号需要换行
  jsxBracketSameLine: false,
  // 箭头函数,只有一个参数的时候,也需要括号
  arrowParens: 'always',
  // 每个文件格式化的范围是文件的全部内容
  rangeStart: 0,
  rangeEnd: Infinity,
  // 不需要写文件开头的 @prettier
  requirePragma: false,
  // 不需要自动在文件开头插入 @prettier
  insertPragma: false,
  // 使用默认的折行标准
  proseWrap: 'preserve',
  // 根据显示样式决定 html 要不要折行
  htmlWhitespaceSensitivity: 'css',
  // vue 文件中的 script 和 style 内不用缩进
  vueIndentScriptAndStyle: false,
  // 换行符使用 lf
  endOfLine: 'lf',
};
关于endOfLine 遇到的问题:见问题第15点。
.prettierignore (*.d.ts是后面要加上的,因为这个类型的文件每次运行时都会重新生成,即便按规则格式化了也没有作用,每次运行之后还是要再改一次,所以忽略prettier规则校验):
/dist/*
/public/*
/node_modules/**
.local
.output.js
**/*.svg
**/*.sh
*.d.ts
在 npm scripts 中添加验证脚本:
// package.json
"scripts": {
    ...
    "lint": "eslint --ext .vue,.js,.jsx,.ts,.tsx ./ --max-warnings 0",
    "lint:fix": "eslint --ext .vue,.js,jsx,.ts,.tsx ./ --max-warnings 0 --fix",
},
接下来在vscode编辑器扩展中禁用 Vetur、安装 eslint 插件、安装Vue Language Features (Volar) 、 在vscode中的setting.json中启用eslint校验。、进入 vscode 首选项---设置中---扩展---Eslint,勾选Format格式化等见第12点。
③配置 stylelint,安装 stylelint 相关依赖
npm i stylelint stylelint-config-prettier stylelint-less stylelint-order -D新增stylelint.config.js文件 和 .stylelintignore 文件 官方文档
// stylelint.config.js
module.exports = {
    defaultSeverity: 'error',
    extends: ['stylelint-config-prettier'],
    plugins: ['stylelint-less'],
    customSyntax: 'postcss-less',
};
// .stylelintignore
# .stylelintignore
# 旧的不需打包的样式库
public
dist
*.min.css

# 其他类型文件
*.js
*.jpg
*.woffpackage.json加入stylelint相关配置
 // package.json
"scripts": {
    ...
    "stylelint": "stylelint src/**/*.{html,vue,sass,less} --custom-syntax postcss-less",
    "stylelint:fix": "stylelint --fix src/**/*.{html,vue,css,sass,less} --custom-syntax postcss-less",
  },
19. husky + lint-staged 配置提交代码规范
① husky是Git Hook 工具,可以设置在 git 各个阶段触发我们的命令,关联git的钩子函数,在执行相关git hooks时进行自定义操作,比如在提交前执行eslint校验,提交时校验commit message等等
- 安装 husky 依赖并初始化:
husky-init 是使用 husky 快速初始化项目的一次性命令。参考文档1 参考文档2 官方文档 github仓库
# npm
npx husky-init && npm install

# yarn
npx husky-init && yarn

# pnpm
pnpm dlx husky-init && pnpm install
npx husky-init 就是自动帮我们做了 安装 husky 到开发依赖中、在 package.json 中添加一个脚本"prepare": "husky install" 、 在项目根目录下创建 .husky 目录并新建pre-commit文件等三件事。详见参考文档。如果手动进行这些操作,安装依赖并写入命令"prepare": "husky install"之后需要运行一次 npm run prepare,来创建.husky文件,再创建之下的hook文件:npx husky add .husky/pre-commit "npm test"。
- 因为之前在 package.json 中添加过 eslint 检查命令,所以完成后可以把 .husky\pre-commit 文件中修改触发命令为 pnpm lint 然后git commit提交一次进行测试
#!/usr/bin/env sh
. "$(dirname -- "$0")/_/husky.sh"

pnpm lint
说明提交前运行了脚本![]()
② lint-staged
提交代码的时候,我们希望只对要提交的部分代码进行 eslint 检查,而不影响其他的代码,就需要借助 lint-staged 这个工具。lint-staged 这个工具一般结合 husky 来使用,它可以让 husky 的 hook 触发的命令只作用于 git add 那些文件(即 git 暂存区的文件)
- 安装 lint-staged:
npm i lint-staged -D需要全局安装lint-staged??
- 修改 package.json 文件:
在 package.json 中添加 lint-staged 配置项,这里我们要结合 Prettier 代码格式化,所以配置如下:
// package.json
{
  ...
  "lint-staged": {
    "*.{js,jsx,vue,ts,tsx}": [
      "prettier --write",
      "pnpm run lint:fix",
      "git add ."
    ],
    "*.{vue,css,less}": [
      "pnpm run stylelint:fix",
      "git add ."
    ]
  }
}
上述命令表示:1.只对 git 暂存区的 .js、.jsx、.vue、.ts、.tsx 文件执行相应的命令( prettier 代码格式化和 eslint 检查,并在自动修复后将改变的文件添加到暂存区)。2.只对 git 暂存区的 vue,css,less 文件执行相应的命令( 样式 stylelint 检查,并在自动修复后将改变的文件添加到暂存区)。
③ husky 和 lint-staged 配合使用
- 修改 .husky/pre-commit 文件
修改 .husky\pre-commit hook 文件中触发命令为 npx lint-staged。
#!/usr/bin/env sh
. "$(dirname -- "$0")/_/husky.sh"

npx lint-staged
以上,husky 和 lint-staged 组合配置完成。
提交代码运行到 prettier --write 出现问题:
✖ prettier --write:
// [error] Invalid configuration file `.prettierrc.js`: require() of ES Module C:\Users\quanwz\Desktop\fline-project\v3-template-mobile\.prettierrc.js from C:\Users\quanwz\Desktop\fline-project\v3-template-mobile\node_modules\.pnpm\[email protected]\node_modules\prettier\third-party.js not supported.
// [error] .prettierrc.js is treated as an ES module file as it is a .js file whose nearest parent package.json contains "type": "module" which declares all .js files in that package scope as ES modules.
// [error] Instead rename .prettierrc.js to end in .cjs, change the requiring code to use dynamic import() which is available in all CommonJS modules, or change "type": "module" to "type": "commonjs" in C:\Users\quanwz\Desktop\fline-project\v3-template-mobile\package.json to treat all .js files as CommonJS (using .mjs for all ES modules instead).
// [error]
运行 pnpm run lint:fix 也是一样的问题 。看来是prettier有问题。见问题第13点。
④ 代码提交规范
- 使用 husky 生成 commit-msg 文件,验证提交信息
npx husky add .husky/commit-msg "npx --no-install commitlint --edit $1"- 触发命令改为 npx node ./scripts/verify-commit.ts "$1" 。 后面以mjs结尾了不然会报错:verify-commit.mjs
#!/usr/bin/env sh
. "$(dirname -- "$0")/_/husky.sh"

npx node ./scripts/verify-commit.mjs "$1"- 在根目录下新建scripts文件夹,再新建verify-commit.ts文件(后面以mjs结尾了不然会报错:verify-commit.mjs),这个是自己写的脚本,在提交时运行来限制提交规范:
要安装chalk(能让我们的控制台输出语句有各种颜色区分)和fs-extra(继承fs模块,该模块提供对本地文件的读写能力):
// scripts/verify-commit.mjs
import fs from 'fs-extra';
import chalk from 'chalk';
const COMMIT_REGEX = /^(revert: )?(feat|fix|docs|style|refactor|perf|build|chore|test)(\(.+\))?: .{1,72}/;
const GIT_COMMIT_FILE = process.env.HUSKY_GIT_PARAMS || '.git/COMMIT_EDITMSG';
const COMMIT_MSG = fs.readFileSync(GIT_COMMIT_FILE, 'utf-8').trim();
console.log(chalk.blue(`Verifying commit message: ${COMMIT_MSG}`));
if (!COMMIT_REGEX.test(COMMIT_MSG)) {
// console.log(chalk.bgRed.white('FL_ERROR:') + ' Commit message does not match the commit format.');
console.log(
chalk.red(
`
▄████████ ▄████████ ▄█ ▄█
███ ███ ███ ███ ███ ███
███ █▀ ███ ███ ███▌ ███
▄███▄▄▄ ███ ███ ███▌ ███
▀▀███▀▀▀ ▀███████████ ███▌ ███
███ ███ ███ ███ ███
███ ███ ███ ███ ███▌ ▄
███ ███ █▀ █▀ █████▄▄██
▀
`,
),
);
console.log(
chalk.yellow(
'\n' +
'- Use `feat():` to create a new feature.\n' +
'- Use `fix():` to fix a bug.\n' +
'- Use `docs():` to update docs.\n' +
'- Use `style(