基于C++的ITK图像分割与配准学习笔记1(图像数据表达-图像)
ITK学习参考资料整理汇总(包含 ItkSoftwareGuide.PDF英文版、ItkSoftwareGuide-2.4.0-中文版、医学图像分割与配准(1ITK初步分册) (1)PDF、 医学图像分割与配准(ITK实现分册2)PDF、ITK介绍与开发 WORD中文版)
本文章全部源码和用到的素材整理汇总
ITK系列目录:
1 ITK图像数据表达之图像
2 ITK图像处理之图像滤波
3 ITK图像处理之图像分割
目录:
实例1 ITK环境测试
实例2 创建图像(手动创建一个itk::Image类)
实例3 从文件读取PNG图像
实例4 访问像素数据
实例5 定义图像原点和间距
实例6 RGB图像像素色彩成分的访问
实例7 向量图像(将一个向量存储到一个图像像素中)
实例8 从缓冲器中输入图像数据
实例1 ITK环境测试
#include "itkImage.h"//包含图像类的头文件
#include

int main()
{
    //创建一个三维、像素是无符号短字符数据类型的图像
    typedef itk::Image< unsigned short, 3 > ImageType;
    //调用 New( )操作创建图像并将结果分配到 itk::SmartPointer
    ImageType::Pointer image = ImageType::New();
    //输出字符
    std::cout << "ITK Hello World !" << std::endl;

    return EXIT_SUCCESS;
}
实例2 创建图像(手动创建一个itk::Image类)
#include "itkImage.h"//图像类的头文件

//这个例子阐述了如何人为地创建一个 itk::Image 类,下面是对图像类进行实例化、声明
//和创建的最简单程序代码。

int main(int, char *[])
{
  //创建 一个三维、像素是无符号短字符数据类型的图像
  typedef itk::Image< unsigned short, 3 > ImageType;
  //调用 New( )操作创建图像image,并将结果分配到 itk::SmartPointer
  ImageType::Pointer image = ImageType::New();
  //图像的起始点是由一个Index类定义的,这个类中存放了一个n维数列
  //表示图像中各维上最初的像素值
  ImageType::IndexType start;

  start[0] =   0;  // first index on X 图像X维最初的像素值
  start[1] =   0;  // first index on Y 图像Y维最初的像素值
  start[2] =   0;  // first index on Z 图像Z维最初的像素值

  //区域大小是用一个相同大小的图像数列来表示的(使用 Size 类),数列中的元素是无符号
  //整数,表示图像像素在各个方向上的延伸。
  ImageType::SizeType  size;

  size[0]  = 200;  // size along X   图像像素在X方向上的大小
  size[1]  = 200;  // size along Y   图像像素在Y方向上的大小
  size[2]  = 200;  // size along Z   图像像素在Z方向上的大小

  //创建一个 ImageRegion 对象,这个region区域是用图像的起始地址和大小来初始化的
  ImageType::RegionType region;

  region.SetSize( size );//初始化图像大小
  region.SetIndex( start );//初始化图像起始地址
  //这个区域传递给图像对象来定义其延伸和初始地址
  image->SetRegions( region );
  //调用 Allocate( )来进行分配内存
  image->Allocate();

  return EXIT_SUCCESS;
}
实例3 从文件读取PNG图像
#include "itkImage.h"//图像类的头文件
#include "itkImageFileReader.h"//图像读取类的头文件
#include // PNG对应

int main( int , char * argv[])
{
  //指定表示图像的像素和维数的值来定义图像的类型
  typedef unsigned char          PixelType;//图像的像素类型
  const unsigned int             Dimension = 3;//图像的维数
  //定义图像的类型ImageType
  typedef itk::Image< PixelType, Dimension >   ImageType;
  //使用图像类型把图像读取 Reader 类实例化
  typedef itk::ImageFileReader< ImageType >  ReaderType;
  //使用ReaderType类型来创建一个对象reader
  ReaderType::Pointer reader = ReaderType::New();
  //图像的文件名通过 SetFileName( )方法来实现

 //const char * filename = argv[0];
  reader->SetFileName("123.png");
  reader->Update();

  // Reader 使用 GetOutput( )方法来访问新读取的图像
  ImageType::Pointer image = reader->GetOutput();

  return EXIT_SUCCESS;
}
实例4 访问像素数据
#include "itkImage.h"
//这个例子阐述了 SetPixel( )和 GetPixel( )方法的用法
//可以直接访问图像中包含的像素数据
int main(int, char *[])
{
  typedef itk::Image< unsigned short, 3 > ImageType;

  ImageType::Pointer image = ImageType::New();

  const ImageType::SizeType  size  = {{ 200, 200, 200}}; //Size along {X,Y,Z}
  const ImageType::IndexType start = {{ 0, 0, 0 }}; // First index on {X,Y,Z}

  ImageType::RegionType region;
  region.SetSize( size );
  region.SetIndex( start );

  // Pixel data is allocated
  image->SetRegions( region );
  image->Allocate(true); // initialize buffer to zero
  //对 index 类型实例的声明并进行初始化
  const ImageType::IndexType pixelIndex = {{27,29,37}}; // Position of {X,Y,Z}
  //GetPixel(pixelIndex)方法将可得到pixelIndex处的像素值pixelValue
  ImageType::PixelType   pixelValue = image->GetPixel( pixelIndex );

  std::cout << "pixelIndex处的像素值:"<SetPixel(   pixelIndex,   pixelValue+12  );

  ImageType::PixelType   pixelValue1 = image->GetPixel(pixelIndex);//获取更改后的像素值
  std::cout << "更改后pixelIndex处的像素值:" << pixelValue1 << std::endl;//输出pixelIndex索引处的像素值

  return EXIT_SUCCESS;
}
图像基础:
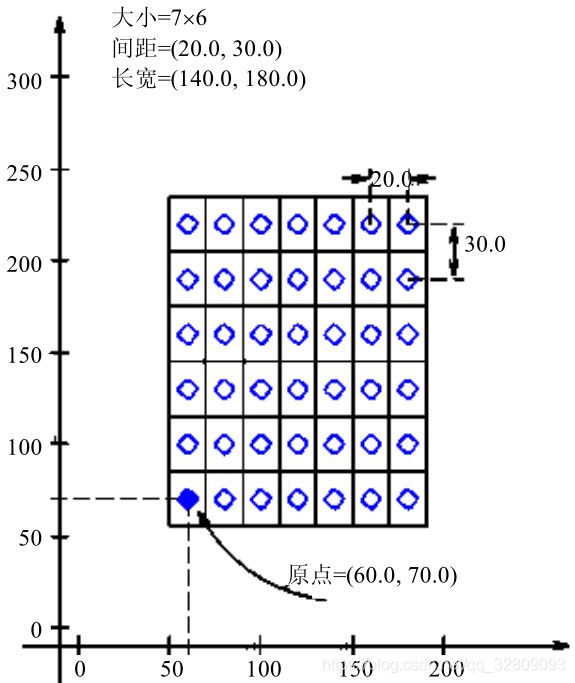
在这个图表中,圆卷表示像素的中心;
像素间距是像素中心之间的距离;如本图表中,X方向像素间距为20,Y方向上像素间距为30;
图像原点是图像中第一个像素的坐标;如图中原点坐标(60,70);
一个像素就是含有数据值的像素中心周围的矩形区域;
图像大小指的是图像长宽方向像素个数相乘;如图中图像大小为7*6=42(像素);
实例5 定义图像原点和间距
#include "itkImage.h"

// Function to simulate getting mouse click from an image
static itk::Image< unsigned short, 3 >::IndexType GetIndexFromMouseClick()
{
  itk::Image< unsigned short, 3 >::IndexType LeftEyeIndex;
  LeftEyeIndex[0]=60;
  LeftEyeIndex[1]=127;
  LeftEyeIndex[2]=93;
  return LeftEyeIndex;
}
int main(int, char *[])
{
  const unsigned int Dimension=3;
  typedef itk::Image< unsigned short, Dimension > ImageType;
  ImageType::Pointer image = ImageType::New();

  const ImageType::SizeType  size  = {{ 200, 200, 200}}; //Size along {X,Y,Z}
  const ImageType::IndexType start = {{ 0, 0, 0 }}; // First index on {X,Y,Z}

  ImageType::RegionType region;
  region.SetSize( size );
  region.SetIndex( start );

  image->SetRegions( region );
  image->Allocate(true); // initialize buffer to zero

  //图像类中处理原点和间距的方法
  //创建一个和图像数据类型相一致的数列spacing
  ImageType::SpacingType spacing;
  //设定X、Y、Z方向间距
  spacing[0] = 0.33; // spacing along X X方向上相邻两像素中心的间距
  spacing[1] = 0.33; // spacing along Y Y方向上相邻两像素中心的间距
  spacing[2] = 1.20; // spacing along Z Z方向上相邻两像素中心的间距
  //使用 SetSpacing( ) 方法指向数列spacing
  image->SetSpacing( spacing );
  //使用 GetSpacing( ) 方法可以从图像中得到间距信息, const 表示数列是不可修改的
  const ImageType::SpacingType& sp = image->GetSpacing();
  //输出读取到的图像X、Y、Z方向的间距信息
  std::cout << "Spacing = ";
  std::cout << sp[0] << ", " << sp[1] << ", " << sp[2] << std::endl;

  //初始化图像原点的变量newOrigin的创建和分配
  ImageType::PointType newOrigin;
  newOrigin.Fill(0.0);
  image->SetOrigin( newOrigin );
  // GetOrigin( ) 方法可以从图像中读取原点
  const ImageType::PointType & origin = image->GetOrigin();
  //输出读取到图像的原点坐标
  std::cout << "Origin = ";
  std::cout << origin[0] << ", "
            << origin[1] << ", "
            << origin[2] << std::endl;


  ImageType::DirectionType direction;
  direction.SetIdentity();
  image->SetDirection( direction );

  const ImageType::DirectionType& direct = image->GetDirection();

  std::cout << "Direction = " << std::endl;
  std::cout << direct << std::endl;
  //将物理空间映射到读取最近像素内容的图像index中
  //声明一个 itk::Point 类型。这个 Point 类型在用来表示坐标的类型和空间大小之上模块化
  typedef itk::Point< double, ImageType::ImageDimension > PointType;

  PointType point;
  point[0] = 1.45;    // x coordinate
  point[1] = 7.21;    // y coordinate
  point[2] = 9.28;    // z coordinate
  //图像类型中定义的 IndexType 来对 index 对象进行实例化
  ImageType::IndexType pixelIndex;

  // Point 到 index 的映射和访问图像像素数据的像素 index 的用法
  const bool isInside =
    image->TransformPhysicalPointToIndex( point, pixelIndex );
  if ( isInside )
    {
    ImageType::PixelType pixelValue = image->GetPixel( pixelIndex );
    pixelValue += 5;
    image->SetPixel( pixelIndex, pixelValue );
    }

  const ImageType::IndexType LeftEyeIndex = GetIndexFromMouseClick();
  ImageType::PointType LeftEyePoint;
  image->TransformIndexToPhysicalPoint(LeftEyeIndex,LeftEyePoint);

  std::cout << "===========================================" << std::endl;
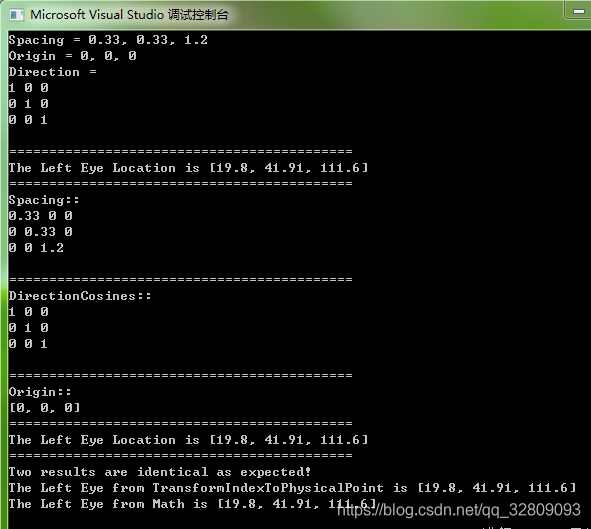
  std::cout << "The Left Eye Location is " << LeftEyePoint << std::endl;


  typedef itk::Matrix MatrixType;
  MatrixType SpacingMatrix;
  SpacingMatrix.Fill( 0.0F );

  const ImageType::SpacingType & ImageSpacing = image->GetSpacing();
  SpacingMatrix( 0,0 ) = ImageSpacing[0];
  SpacingMatrix( 1,1 ) = ImageSpacing[1];
  SpacingMatrix( 2,2 ) = ImageSpacing[2];

  const ImageType::DirectionType & ImageDirectionCosines =
    image->GetDirection();
  const ImageType::PointType &ImageOrigin = image->GetOrigin();

  typedef itk::Vector< double, Dimension > VectorType;
  VectorType LeftEyeIndexVector;
  LeftEyeIndexVector[0]= LeftEyeIndex[0];
  LeftEyeIndexVector[1]= LeftEyeIndex[1];
  LeftEyeIndexVector[2]= LeftEyeIndex[2];

  ImageType::PointType LeftEyePointByHand =
     ImageOrigin + ImageDirectionCosines * SpacingMatrix * LeftEyeIndexVector;
  // Software Guide : EndCodeSnippet

  std::cout << "===========================================" << std::endl;
  std::cout << "Spacing:: " << std::endl << SpacingMatrix << std::endl;
  std::cout << "===========================================" << std::endl;
  std::cout << "DirectionCosines:: " << std::endl << ImageDirectionCosines << std::endl;
  std::cout << "===========================================" << std::endl;
  std::cout << "Origin:: " << std::endl << ImageOrigin << std::endl;
  std::cout << "===========================================" << std::endl;
  std::cout << "The Left Eye Location is " << LeftEyePointByHand << std::endl;

  if ( (LeftEyePointByHand - LeftEyePoint).GetNorm() < 0.01F )
  {
    std::cout << "===========================================" << std::endl;
    std::cout << "Two results are identical as expected!" << std::endl;
    std::cout << "The Left Eye from TransformIndexToPhysicalPoint is " << LeftEyePoint << std::endl;
    std::cout << "The Left Eye from Math is " << LeftEyePointByHand << std::endl;
  }

  return EXIT_SUCCESS;
}
实例6 RGB图像像素色彩成分的访问
#include "itkImage.h"
#include "itkImageFileReader.h"
//为了使用 itk::RGBPixel 类,包含头文件
#include "itkRGBPixel.h"
//在 ITK 中如何表示 RGB 图像。
int main( int , char * argv[] )
{
  //RGBPixeld 类的使用是基于用来代表红、绿和蓝的像素成分的类型之上的
  //定义RGBPixel类型的PixelType对象
  typedef itk::RGBPixel< unsigned char >    PixelType;
  //然后将这个类型PixelType对象作为图像中的像素模板参数,得到ImageType对象
  typedef itk::Image< PixelType, 3 >   ImageType;
  //使用itk::ImageFileReader 对象从文件中读取图像
  typedef itk::ImageFileReader< ImageType >  ReaderType;
  //实例化ReaderType的读取对象reader
  ReaderType::Pointer reader = ReaderType::New();
  //设置RGB图像索引
  const char * const filename = "789.jpg";
  //图像读取
  reader->SetFileName( filename );
  reader->Update();
  //reader读取到的图像数据输出到image
  ImageType::Pointer image = reader->GetOutput();
  const ImageType::IndexType pixelIndex = {{25,35,0}};

  //使用 RGBPixel 类提供的方法来执行对像素色彩成分的访问
  PixelType onePixel = image->GetPixel( pixelIndex );
  PixelType::ValueType red   = onePixel.GetRed();//提取红色部分
  PixelType::ValueType green = onePixel.GetGreen();//提取绿色部分
  PixelType::ValueType blue  = onePixel.GetBlue();//提取蓝色部分
  // Software Guide : EndCodeSnippet
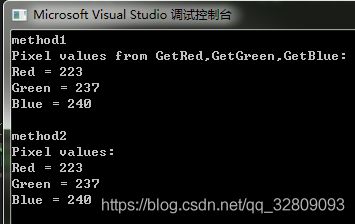
  std::cout << "method1" << std::endl;
  std::cout << "Pixel values from GetRed,GetGreen,GetBlue:" << std::endl;
  std::cout << "Red = "
            << itk::NumericTraits::PrintType(red)
            << std::endl;
  std::cout << "Green = "
            << itk::NumericTraits::PrintType(green)
            << std::endl;
  std::cout << "Blue = "
      << itk::NumericTraits::PrintType(blue)
      << std::endl << std::endl;


  //由于 itk::RGBPixel 从 itk::FixedArray 类继承了 [ ] 操作
  //以下方法也可执行对像素色彩成分的访问
  red   = onePixel[0];  // extract Red   component
  green = onePixel[1];  // extract Green component
  blue  = onePixel[2];  // extract Blue  component

  std::cout <<  "method2" << std::endl;
  std::cout << "Pixel values:" << std::endl;
  std::cout << "Red = "
            << itk::NumericTraits::PrintType(red)
            << std::endl;
  std::cout << "Green = "
            << itk::NumericTraits::PrintType(green)
            << std::endl;
  std::cout << "Blue = "
            << itk::NumericTraits::PrintType(blue)
            << std::endl;
  return EXIT_SUCCESS;
}
实例7 向量图像(将一个向量存储到一个图像像素中)
#include "itkVector.h"//向量类的头文件
#include "itkImage.h"

int main(int, char *[])
{
  /*向量类的使用是在基于空间中代表坐标和维数的类型之上进行模板化的。在此例中,向
  量的长度和图像长度相匹配,但是并不是完全相同。我们可以用一个三维的向量作为像素来
  定义一个四维的图像*/
  typedef itk::Vector< float, 3 >       PixelType;
  typedef itk::Image< PixelType, 3 >    ImageType;

  ImageType::Pointer image = ImageType::New();

  const ImageType::IndexType start = {{0,0,0}}; //First index at {X,Y,Z}
  const ImageType::SizeType  size = {{200,200,200}}; //Size of {X,Y,Z}

  ImageType::RegionType region;
  region.SetSize( size );
  region.SetIndex( start );

  image->SetRegions( region );
  image->Allocate();

  ImageType::PixelType  initialValue;
  initialValue.Fill( 0.0 );
  image->FillBuffer( initialValue );
  const ImageType::IndexType pixelIndex = {{27,29,37}}; //{X,Y,Z}对应像素索引位置
  //由于向量类从 itk::FixedArray 类继承了[] 操作,所以也可以使用 index 符号来访问向量成员
  ImageType::PixelType   pixelValue;
  pixelValue[0] =  1.345;   // x component
  pixelValue[1] =  6.841;   // y component
  pixelValue[2] =  3.295;   // x component

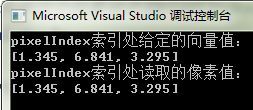
  std::cout << "pixelIndex索引处给定的向量值:" << std::endl;
  std::cout << pixelValue << std::endl;
  //通过定义一个标识并调用 SetPixel( ) 方法来将这个向量储存到pixelIndex索引像素中
  image->SetPixel(   pixelIndex,   pixelValue  );
  //获取pixelIndex处像素值value
  ImageType::PixelType value = image->GetPixel( pixelIndex );
  //打印像素值value
  std::cout << "pixelIndex索引处读取的像素值:" << std::endl;
  std::cout << value << std::endl;

  return EXIT_SUCCESS;
}
实例8 从缓冲器中输入图像数据
#include "itkImage.h"
#include "itkImportImageFilter.h"//包含 ImportImageFilter(图像像素数据导入缓冲器) 类的头文件
#include "itkImageFileWriter.h"
//这个例子阐述了如何将数据输入到 itk::Image 类中。这在同其他软件系统相连时更加有
//用。许多系统都使用内存的一个邻近内存块作为图像像素数据的缓冲器。当前样例就是假定
//这种情况并在缓冲器中插入一个 itk::ImportImageFilter ,从而产生一个图像作为输出。
//我们调用内存中心块创建一个同步的图像并将这个内存块传给 ImportImageFilter 。这个
//例子是基于运行上而设定的,用户必须提供一个输出文件名作为一个命令行变量。
int main(int argc, char * argv[])
{
  /*if( argc < 2 )
    {
    std::cerr << "Usage: " << std::endl;
    std::cerr << argv[0] << "  outputImageFile" << std::endl;
    return EXIT_FAILURE;
    }*/
  /*选择数据类型来表示图像像素。我们假设内存的外部内存块使用同样的数据类
    型来表示像素*/
  typedef unsigned char   PixelType;
  const unsigned int Dimension = 3;

  typedef itk::Image< PixelType, Dimension > ImageType;
  //ImportImageFilter 类型的实例化
  typedef itk::ImportImageFilter< PixelType, Dimension >   ImportFilterType;
  //使用 New( ) 方法创建一个滤镜对象importFilter然后指向一个智能指针
  ImportFilterType::Pointer importFilter = ImportFilterType::New();
  /*滤镜要求用户指定图像的大小来作为输出,使用 SetRgion() 方法即可做到。图像大小必
   须和当前调用的缓冲器的像素变量的数字相匹配*/
  ImportFilterType::SizeType  size;
  size[0]  = 200;  // size along X
  size[1]  = 200;  // size along Y
  size[2]  = 200;  // size along Z
  ImportFilterType::IndexType start;
  start.Fill(0);

  ImportFilterType::RegionType region;
  region.SetIndex( start );
  region.SetSize(  size  );
  importFilter->SetRegion( region );
  //使用 SetOrigin() 方法来指定输出图像的原点
  const itk::SpacePrecisionType origin[ Dimension ] = { 0.0, 0.0, 0.0 };
  importFilter->SetOrigin( origin );
  //使用 SetSpacing( ) 方法来传递输出图像的间距
  const itk::SpacePrecisionType  spacing[ Dimension ] =  { 1.0, 1.0, 1.0 };
  importFilter->SetSpacing( spacing );
  /*现在我们分配包含像素数据的内存块传递信息到 ImportImageFilter 。注意:我们使用与
  SetRegion() 方法指定的大小完全相同的尺寸。在实际应用中,你可以使用一个代表图像的
  不同的数据结构从一些其他的类库中得到这个缓冲器。*/
  const unsigned int numberOfPixels =  size[0] * size[1] * size[2];
  PixelType * localBuffer = new PixelType[ numberOfPixels ];

  const double radius = 80.0;
  /*这里可以用一个 binary sphere 来填充这个缓冲器。这里我们像 C 或 FOTTRAN 编程语
  言一样使用简单的 for () 循环。注意: ITK 在其访问像素的内部编码中不能使用 for () 循环。
  使用支持处理 n 维图像的 itk::ImageIterators 来代替执行所以的像素访问任务。*/
  const double radius2 = radius * radius;
  PixelType * it = localBuffer;

  for(unsigned int z=0; z < size[2]; z++)
    {
    const double dz = static_cast( z )
      - static_cast(size[2])/2.0;
    for(unsigned int y=0; y < size[1]; y++)
      {
      const double dy = static_cast( y )
        - static_cast(size[1])/2.0;
      for(unsigned int x=0; x < size[0]; x++)
        {
        const double dx = static_cast( x )
          - static_cast(size[0])/2.0;
        const double d2 = dx*dx + dy*dy + dz*dz;
        *it++ = ( d2 < radius2 ) ? 255 : 0;
        }
      }
    }
 /* 缓冲器在 SetImportPointer() 作用下传递到 ImportImageFilter 。注意这种方法的最后一个
 问题是当内存不再使用时指定谁来释放内存。当返回值为假时,表示当调用析构时
 ImportImageFilter 并没有释放缓冲器;另一方面,当返回值是真时,表示允许释放析构的输
 入滤镜上的内存块。
 由于 ImportImageFilter 释放了适当的内存块, C++ new() 操作就可以调用这些内存。用
 其他分配内存机制分配的内存,比如 C 中的 malloc 和 calloc ,将不会由 ImportImageFilter
 来释放适当的内存。换句话说,编程应用者就需要确保仅仅给 ImportImageFilter 命令来释放
 C++ 新操作分配内存。*/
  const bool importImageFilterWillOwnTheBuffer = true;
  importFilter->SetImportPointer( localBuffer, numberOfPixels,
                                  importImageFilterWillOwnTheBuffer );
  typedef itk::ImageFileWriter< ImageType > WriterType;
  WriterType::Pointer writer = WriterType::New();

  writer->SetFileName(argv[1]);
  writer->SetFileName("123.png");
  /*最后,我们将这个滤镜的输出连到一个管道上。为简便起见,我们在这里只使用一个
  writer ,当然其他任何滤镜都可以:*/
  writer->SetInput(  importFilter->GetOutput()  );

  try
    {
    writer->Update();
    }
  catch( itk::ExceptionObject & exp )
    {
    std::cerr << "Exception caught !" << std::endl;
    std::cerr << exp << std::endl;
    return EXIT_FAILURE;
    }
  return EXIT_SUCCESS;
}
//注意:我们传递 true 作为 SetImportPointer() 的最后问题就不需要对缓冲器调用释放操
//作。现在缓冲器归 ImportImageFilter 所有
输入图像123.png 写入数据后的图像123.png


