Pytorch3d学习记录
Cameras照相机
Camera Coordinate Systems 相机坐标系统
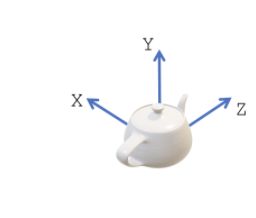
- 世界坐标 (Y指向上方,X指向左方,Z指向里面)
- 相机视图坐标(相机坐标) Camera view coordinate system
坐标系原点在向平面上。z轴垂直于图像平面。
在PyTorch3D中,我们假设+X点向左,+Y点向上,+Z点指向图像平面。在应用旋转®和平移(T)之后,从世界坐标变成了相机坐标。 - NDC坐标(也叫view volume)NDC coordinate system
这是将物体/场景的渲染部分限定在一个体积内的标准化坐标系统。

- 屏幕坐标 Screen coordinate system
这是view volume的另一种表示,XY坐标定义在像素空间而不是标准化空间。
在PyTorch3D中定义相机
PyTorch3D中的相机将对象从世界坐标转换为NDC坐标:首先将对象的世界坐标转换为相机视图坐标(通过变换R和T),然后将3D对象投影到NDC(通过投影矩阵P,也称为相机矩阵)。
PyTorch3D中的摄像机类型
所有摄像机都继承自CamerasBase,它是所有摄像机的父类。PyTorch3D提供了四种不同的相机类型(FoVPerspectiveCameras, FoVOrthographicCameras, PerspectiveCameras, OrthographicCameras)。CamerasBase定义了所有相机模型都通用的方法:
- get_camera_center:返回世界坐标下的相机的视觉中心
- get_world_to_view_transform:返回从世界坐标到相机视图坐标的转换参数(R, T)
- get_full_projection_transform:由投影变换§和全局变换(R, T)组成
- transform_points:将世界坐标下的输入点投影为NDC坐标,范围从[-1,-1,znear]到[+1,+1,zfar]。
- transform_points_screen:将世界坐标中的一组输入点投影到从[0,0,znear]到[W-1, H-1, zfar]的屏幕坐标中。
对于每个新摄像机,用户应该实现get_projection_transform例程,它返回映射P(P完成从相机视图坐标到NDC坐标)。
FoVPerspectiveCameras, FoVOrthographicCameras
这两个相机分别遵循OpenGL的透视相机和正投影相机的惯例。
用户提供近znear和远zfar,这将在Z轴上限制视图体积。
在XY平面上的视图体积,对于FoVPerspectiveCameras,是由视场角(field of view angle:fov)定义的。对于FoVOrthographicCameras,是由min_x, min_y, max_x, max_y定义。
PerspectiveCameras, OrthographicCameras
这两个摄像机遵循相机的多视图几何约定。用户提供焦距(fx, fy)和中心点(px, py)。例如,camera = PerspectiveCameras (focal_length=((fx, fy),), principal_point=((px, py),))
焦距和中心点用于将一个点(X, Y, Z)从视图坐标转换为NDC坐标
# for perspective
x_ndc = fx * X / Z + px
y_ndc = fy * Y / Z + py
z_ndc = 1 / Z  #将z变到[0-1]的范围中

# for orthographic
x_ndc = fx * X + px
y_ndc = fy * Y + py
z_ndc = Z
摄像机参数由screen转换为NDC如下:
fx = fx_screen * 2.0 / image_width
fy = fy_screen * 2.0 / image_height

px = - (px_screen - image_width / 2.0) * 2.0 / image_width
py = - (py_screen - image_height / 2.0) * 2.0/ image_height
3D人脸渲染成图片的代码
def render_img(face_shape, face_color, facemodel, image_size=224, fx=1015.0, fy=1015.0, px=112.0, py=112.0, device='cuda:0'):
    '''
        ref: https://github.com/facebookresearch/pytorch3d/issues/184
        The rendering function (just for test)
        Input:
            face_shape:  Tensor[1, 35709, 3]
            face_color: Tensor[1, 35709, 3] in [0, 1]
            facemodel: contains `tri` (triangles[70789, 3], index start from 1)
    '''
    from pytorch3d.structures import Meshes
    from pytorch3d.renderer.mesh.textures import TexturesVertex
    from pytorch3d.renderer import (
        PerspectiveCameras,
        PointLights,
        RasterizationSettings,
        MeshRenderer,
        MeshRasterizer,
        SoftPhongShader,
        BlendParams
    )

    face_color = TexturesVertex(verts_features=face_color.to(device))

    face_buf = torch.from_numpy(facemodel.tri - 1)  # index start from 1
    face_idx = face_buf.unsqueeze(0)

    mesh = Meshes(face_shape.to(device), face_idx.to(device), face_color)

    R = torch.eye(3).view(1, 3, 3).to(device)
    R[0, 0, 0] *= -1.0
    T = torch.zeros([1, 3]).to(device)

    half_size = (image_size - 1.0) / 2
    focal_length = torch.tensor([fx / half_size, fy / half_size], dtype=torch.float32).reshape(1, 2).to(device)
    principal_point = torch.tensor([(half_size - px) / half_size, (py - half_size) / half_size], dtype=torch.float32).reshape(1, 2).to(device)

    #相机选取透视相机
    #这里rotation (R) and translation (T)没有变,证明是坐标系对得上,照相机位置不用移动(照相机是对着人脸前方的)
    #否则就要用:R, T = look_at_view_transform(2.7, 0, 180)
    cameras = PerspectiveCameras(
        device=device,
        R=R,
        T=T,
        focal_length=focal_length,
        principal_point=principal_point
    )

    #栅格化和阴影的设置
    raster_settings = RasterizationSettings(
        image_size=image_size,  #设置输出图像的大小
        blur_radius=0.0, #由于只是为了可视化目的而渲染图像
        faces_per_pixel=1 #所以设置faces_per_pixel=1和blur_radius=0.0
    )
    #在物体前面放置点光源
    lights = PointLights(
        device=device,
        ambient_color=((1.0, 1.0, 1.0),),
        diffuse_color=((0.0, 0.0, 0.0),),
        specular_color=((0.0, 0.0, 0.0),),
        location=((0.0, 0.0, 1e5),) #这里将光摆在物体面前,就会形成高光
    )

    blend_params = BlendParams(background_color=(0.0, 0.0, 0.0))

    #创建一个phong渲染器,由栅格化器rasterizer和着色器shader组成。
    #纹理的phong着色器将为每个顶点插入纹理uv坐标,从纹理图像中取样并应用phong光照模型
    renderer = MeshRenderer(
        rasterizer=MeshRasterizer(
            cameras=cameras,
            raster_settings=raster_settings
        ),
        shader=SoftPhongShader(
            device=device,
            cameras=cameras,
            lights=lights,
            blend_params=blend_params
        )
    )

    #Render the mesh
    images = renderer(mesh)
    images = torch.clamp(images, 0.0, 1.0)
    return images