【OpenCV入门学习--python】Image Segmentation with Distance Transform and Watershed Algorithm图像分割
例子源于OpenCV官网–基于距离变换和分水岭算法的图像分割
(https://docs.opencv.org/4.x/d2/dbd/tutorial_distance_transform.html)
使用OpenCV函数cv::filter2D来执行一些拉普拉斯滤波来进行图像锐化
使用OpenCV函数cv::distanceTransform来获得二值图像的派生(derived)表示,其中每个像素的值被其到最近的背景像素的距离所替换
使用OpenCV函数 cv::watershed将图像中的物体从背景中分离出来
代码:
#基于距离变换和分水岭算法的图像分割
from __future__ import print_function
import cv2 as cv
import numpy as np
import argparse
import random as rng
rng.seed(12345)
#加载源图像,并检查它是否加载没有任何问题,然后显示它
parser = argparse.ArgumentParser(description='Code for Image Segmentation with Distance Transform and Watershed Algorithm.\
    Sample code showing how to segment overlapping objects using Laplacian filtering, \
    in addition to Watershed and Distance Transformation')
parser.add_argument('--input', help='Path to input image.', default='cards.png')
args = parser.parse_args()

src = cv.imread(cv.samples.findFile(args.input))
if src is None:
    print('Could not open or find the image:', args.input)
    exit(0)

# Show source image
cv.imshow('Source Image', src)


"""
然后,如果我们有一个白色背景的图像,
最好将其转换为黑色。当我们应用距离变换时,
这将帮助我们更容易地区分前景对象:
"""
src[np.all(src == 255, axis=2)] = 0
# Show output image
cv.imshow('Black Background Image', src)


"""
然后,我们将锐化我们的图像,(锐化处理的主要目的是突出灰度的过度部分。)
以锐化前景对象的边缘。
我们将应用一个拉普拉斯滤波器和一个相当强的滤波器(二阶导数的近似):
"""
kernel = np.array([[1, 1, 1], [1, -8, 1], [1, 1, 1]], dtype=np.float32)
#kernel 是一个3x3的边缘特征提取器,可以提取各个方向上的边缘
# do the laplacian filtering as it is
# well, we need to convert everything in something more deeper then CV_8U
# because the kernel has some negative values,
# and we can expect in general to have a Laplacian image with negative values
# BUT a 8bits unsigned int (the one we are working with) can contain values from 0 to 255
# so the possible negative number will be truncated
imgLaplacian = cv.filter2D(src, cv.CV_32F, kernel)#执行一些拉普拉斯滤波来进行图像锐化
sharp = np.float32(src)
imgResult = sharp - imgLaplacian
"""
imgResult = sharp - imgLaplacian
由于拉普拉斯是一种微分算子,如果所使用的定义具有负的中心系数,
那么必须将原图像减去经拉普拉斯变换后的图像,从而得到锐化结果。
"""
# convert back to 8bits gray scale 转换回8位灰度
imgResult = np.clip(imgResult, 0, 255)
"""
np.clip是一个截取函数,
用于截取数组中小于或者大于某值的部分,
并使得被截取部分等于固定值。
此处规定的最小值为0,最大值为255
"""
imgResult = imgResult.astype('uint8')#作用:就是转换numpy数组的数据类型
imgLaplacian = np.clip(imgLaplacian, 0, 255)
imgLaplacian = np.uint8(imgLaplacian)
#cv.imshow('Laplace Filtered Image', imgLaplacian)
cv.imshow('New Sharped Image', imgResult)


#现在我们将新的锐化源图像分别转换为灰度和二值图像:
bw = cv.cvtColor(imgResult, cv.COLOR_BGR2GRAY)
_, bw = cv.threshold(bw, 40, 255, cv.THRESH_BINARY | cv.THRESH_OTSU)
cv.imshow('Binary Image', bw)


"""
1.现在我们准备对二值图像应用距离变换。
2.此外,我们对输出图像进行了归一化,以便能够对结果进行可视化和阈值处理:
"""
dist = cv.distanceTransform(bw, cv.DIST_L2, 3)
"""
1:Opencv中distanceTransform方法用于计算图像中每一个非零点
距离离自己最近的零点的距离,
distanceTransform的第二个Mat矩阵参数dst保存了每一个点与最近的零点的距离信息,
图像上越亮的点,代表了离零点的距离越远。
"""
#2. Normalize the distance image for range = {0.0, 1.0}
# so we can visualize and threshold it
#2.对range ={0.0, 1.0}的距离图像进行归一化
#,这样我们就可以可视化并设定阈值
cv.normalize(dist, dist, 0, 1.0, cv.NORM_MINMAX)
cv.imshow('Distance Transform Image', dist)


"""
我们对dist图像进行阈值,然后进行一些形态学操作(即膨胀),
以便从上述图像中提取峰值:
"""
_, dist = cv.threshold(dist, 0.4, 1.0, cv.THRESH_BINARY)#阈值函数
# Dilate a bit the dist image 膨胀
kernel1 = np.ones((3,3), dtype=np.uint8)
dist = cv.dilate(dist, kernel1)#膨胀函数
cv.imshow('Peaks', dist)


"""
从每个blob中,
然后我们在cv::findContours函数(找轮廓)的帮助下
为分水岭算法创建一个种子/标记:
"""
dist_8u = dist.astype('uint8')#转换数组的数据类型
# Find total markers  发现总标记
contours, _ = cv.findContours(dist_8u, cv.RETR_EXTERNAL, cv.CHAIN_APPROX_SIMPLE)
# Create the marker image for the watershed algorithm
#为分水岭算法创建标记图像
markers = np.zeros(dist.shape, dtype=np.int32)
# Draw the foreground markers  绘制前景标记
for i in range(len(contours)):
    cv.drawContours(markers, contours, i, (i+1), -1)
# Draw the background marker 背景标记
cv.circle(markers, (5,5), 3, (255,255,255), -1)
markers_8u = (markers * 10).astype('uint8')
cv.imshow('Markers', markers_8u)


"""
最后,我们可以应用分水岭算法,并将结果可视化:
(分水岭算法是一种图像区域分割算法,
它把位置接近,灰度值也接近的像素点
连接起来形成一个封闭的区域。)
"""
cv.watershed(imgResult, markers)
#mark = np.zeros(markers.shape, dtype=np.uint8)
mark = markers.astype('uint8')#转换数组的数据类型
mark = cv.bitwise_not(mark)
"""
bitwise_not是对二进制数据进行“非”操作,
即对图像(灰度图像或彩色图像均可)每个像素值进行二进制“非”操作,
~1=0,~0=1
"""
# uncomment this if you want to see how the mark
# image looks like at that point
#cv.imshow('Markers_v2', mark)
# Generate random colors
colors = []
for contour in contours:
    colors.append((rng.randint(0,256), rng.randint(0,256), rng.randint(0,256)))
# Create the result image
dst = np.zeros((markers.shape[0], markers.shape[1], 3), dtype=np.uint8)
# Fill labeled objects with random colors
#用随机的颜色填充已标记的物体
for i in range(markers.shape[0]):
    for j in range(markers.shape[1]):
        index = markers[i,j]
        if index > 0 and index <= len(contours):
            dst[i,j,:] = colors[index-1]
# Visualize the final image 可视化最终的图像
cv.imshow('Final Result', dst)
cv.waitKey()
运行结果:
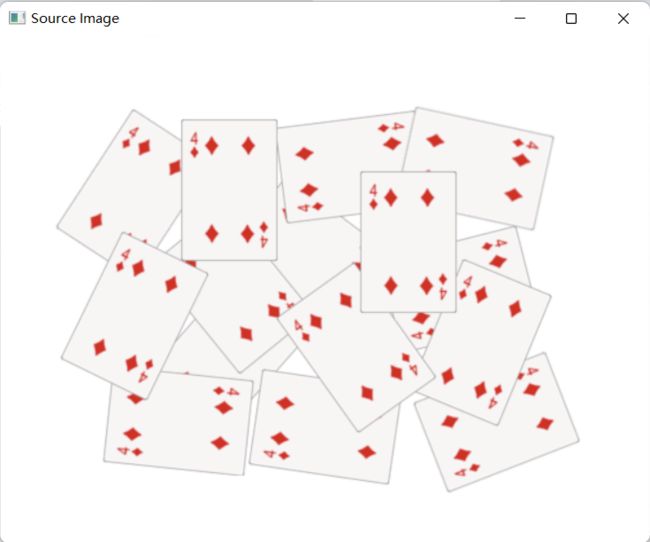
1. 原图:
#加载源图像,并检查它是否加载没有任何问题,然后显示它
parser = argparse.ArgumentParser(description='Code for Image Segmentation with Distance Transform and Watershed Algorithm.\
    Sample code showing how to segment overlapping objects using Laplacian filtering, \
    in addition to Watershed and Distance Transformation')
parser.add_argument('--input', help='Path to input image.', default='cards.png')
args = parser.parse_args()

src = cv.imread(cv.samples.findFile(args.input))
if src is None:
    print('Could not open or find the image:', args.input)
    exit(0)

# Show source image
cv.imshow('Source Image', src)
2.将原图转换为黑色背景:
"""
然后,如果我们有一个白色背景的图像,
最好将其转换为黑色。当我们应用距离变换时,
这将帮助我们更容易地区分前景对象:
"""
src[np.all(src == 255, axis=2)] = 0
# Show output image
cv.imshow('Black Background Image', src)

3.锐化后的图像:
"""
然后,我们将锐化我们的图像,(锐化处理的主要目的是突出灰度的过度部分。)
以锐化前景对象的边缘。
我们将应用一个拉普拉斯滤波器和一个相当强的滤波器(二阶导数的近似):
"""
kernel = np.array([[1, 1, 1], [1, -8, 1], [1, 1, 1]], dtype=np.float32)
#kernel 是一个3x3的边缘特征提取器,可以提取各个方向上的边缘
# do the laplacian filtering as it is
# well, we need to convert everything in something more deeper then CV_8U
# because the kernel has some negative values,
# and we can expect in general to have a Laplacian image with negative values
# BUT a 8bits unsigned int (the one we are working with) can contain values from 0 to 255
# so the possible negative number will be truncated
imgLaplacian = cv.filter2D(src, cv.CV_32F, kernel)#执行一些拉普拉斯滤波来进行图像锐化
sharp = np.float32(src)
imgResult = sharp - imgLaplacian
"""
imgResult = sharp - imgLaplacian
由于拉普拉斯是一种微分算子,如果所使用的定义具有负的中心系数,
那么必须将原图像减去经拉普拉斯变换后的图像,从而得到锐化结果。
"""
# convert back to 8bits gray scale 转换回8位灰度
imgResult = np.clip(imgResult, 0, 255)
"""
np.clip是一个截取函数,
用于截取数组中小于或者大于某值的部分,
并使得被截取部分等于固定值。
此处规定的最小值为0,最大值为255
"""
imgResult = imgResult.astype('uint8')#作用:就是转换numpy数组的数据类型
imgLaplacian = np.clip(imgLaplacian, 0, 255)
imgLaplacian = np.uint8(imgLaplacian)
#cv.imshow('Laplace Filtered Image', imgLaplacian)
cv.imshow('New Sharped Image', imgResult)

4.二值图像:
#现在我们将新的锐化源图像分别转换为灰度和二值图像:
bw = cv.cvtColor(imgResult, cv.COLOR_BGR2GRAY)
_, bw = cv.threshold(bw, 40, 255, cv.THRESH_BINARY | cv.THRESH_OTSU)
cv.imshow('Binary Image', bw)

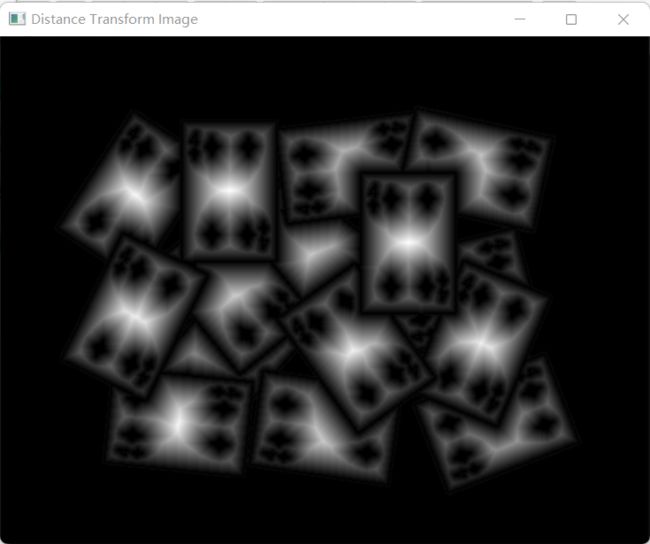
5.做距离变换 且 归一化的图像:
"""
1.现在我们准备对二值图像应用距离变换。
2.此外,我们对输出图像进行了归一化,以便能够对结果进行可视化和阈值处理:
"""
dist = cv.distanceTransform(bw, cv.DIST_L2, 3)
"""
1:Opencv中distanceTransform方法用于计算图像中每一个非零点
距离离自己最近的零点的距离,
distanceTransform的第二个Mat矩阵参数dst保存了每一个点与最近的零点的距离信息,
图像上越亮的点,代表了离零点的距离越远。
"""
#2. Normalize the distance image for range = {0.0, 1.0}
# so we can visualize and threshold it
#2.对range ={0.0, 1.0}的距离图像进行归一化
#,这样我们就可以可视化并设定阈值
cv.normalize(dist, dist, 0, 1.0, cv.NORM_MINMAX)
cv.imshow('Distance Transform Image', dist)
6.膨胀图像:
"""
我们对dist图像进行阈值,然后进行一些形态学操作(即膨胀),
以便从上述图像中提取峰值:
"""
_, dist = cv.threshold(dist, 0.4, 1.0, cv.THRESH_BINARY)#阈值函数
# Dilate a bit the dist image 膨胀
kernel1 = np.ones((3,3), dtype=np.uint8)
dist = cv.dilate(dist, kernel1)#膨胀函数
cv.imshow('Peaks', dist)

7.标记图像:
"""
从每个blob中,
然后我们在cv::findContours函数(找轮廓)的帮助下
为分水岭算法创建一个种子/标记:
"""
dist_8u = dist.astype('uint8')#转换数组的数据类型
# Find total markers  发现总标记
contours, _ = cv.findContours(dist_8u, cv.RETR_EXTERNAL, cv.CHAIN_APPROX_SIMPLE)
# Create the marker image for the watershed algorithm
#为分水岭算法创建标记图像
markers = np.zeros(dist.shape, dtype=np.int32)
# Draw the foreground markers  绘制前景标记
for i in range(len(contours)):
    cv.drawContours(markers, contours, i, (i+1), -1)
# Draw the background marker 背景标记
cv.circle(markers, (5,5), 3, (255,255,255), -1)
markers_8u = (markers * 10).astype('uint8')
cv.imshow('Markers', markers_8u)

8.最终可视化图像:
"""
最后,我们可以应用分水岭算法,并将结果可视化:
(分水岭算法是一种图像区域分割算法,
它把位置接近,灰度值也接近的像素点
连接起来形成一个封闭的区域。)
"""
cv.watershed(imgResult, markers)
#mark = np.zeros(markers.shape, dtype=np.uint8)
mark = markers.astype('uint8')#转换数组的数据类型
mark = cv.bitwise_not(mark)
"""
bitwise_not是对二进制数据进行“非”操作,
即对图像(灰度图像或彩色图像均可)每个像素值进行二进制“非”操作,
~1=0,~0=1
"""
# uncomment this if you want to see how the mark
# image looks like at that point
#cv.imshow('Markers_v2', mark)
# Generate random colors
colors = []
for contour in contours:
    colors.append((rng.randint(0,256), rng.randint(0,256), rng.randint(0,256)))
# Create the result image
dst = np.zeros((markers.shape[0], markers.shape[1], 3), dtype=np.uint8)
# Fill labeled objects with random colors
#用随机的颜色填充已标记的物体
for i in range(markers.shape[0]):
    for j in range(markers.shape[1]):
        index = markers[i,j]
        if index > 0 and index <= len(contours):
            dst[i,j,:] = colors[index-1]
# Visualize the final image 可视化最终的图像
cv.imshow('Final Result', dst)
cv.waitKey()
