Mybatis-Plus+SpringBoot框架详解
一、SpringBoot 概述
1、SpringBoot 简介
SpringBoot 提供了一种快速使用 Spring 的方式,基于约定优于配置的思想,可以让开发人员不必在配置与逻辑业务之间进行思维的切换,全身心的投入到逻辑业务的代码编写中,从而大大提高了开发的效率,一定程度上缩短了项目周期。
2014 年 4 月,Spring Boot 1.0.0 发布,并作为 Spring 的顶级项目之一。
2、Spring 缺点
1. 配置繁琐
- 虽然 Spring 的组件代码是轻量级的,但它的配置却是重量级的。一开始,Spring 用 XML 配置,而且是很多 XML 配置。Spring 2.5 引入了基于注解的组件扫描,这消除了大量针对应用程序自身组件的显式 XML 配置。Spring 3.0 引入了基于 Java 的配置,这是一种类型安全的可重构配置方式,可以代替 XML。
- 所有这些配置都代表了开发时的损耗。因为在思考 Spring 特性配置和解决业务问题之间需要进行思维切换,所以编写配置挤占了编写应用程序逻辑的时间。
- 和所有框架一样,Spring 实用,但它要求的回报也不少。
2. 依赖繁琐
- 项目的依赖管理也是一件耗时耗力的事情。在环境搭建时,需要分析要导入哪些库的坐标,而且还需要分析导入与之有依赖关系的其他库的坐标,一旦选错了依赖的版本,随之而来的不兼容问题就会严重阻碍项目的开发进度。
3、SpringBoot 功能
1. 自动配置
- SpringBoot 的自动配置是一个运行时(更准确地说,是应用程序启动时)的过程,考虑了众多因素,才决定 Spring 配置应该用哪个,不该用哪个。该过程是 SpringBoot 自动完成的。
2. 起步依赖(依赖传递)
- 起步依赖本质上是一个 Maven 项目对象模型(Project Object Model,POM),定义了对其他库的传递依赖,这些东西加在一起即支持某项功能。
- 简单的说,起步依赖就是将具备某种功能的坐标打包到一起,并提供一些默认的功能。
3. 辅助功能
- 提供了一些大型项目中常见的非功能性特性,如嵌入式服务器、安全、指标,健康检测、外部配置等。
总结:
Spring Boot 并不是对 Spring 功能上的增强,而是提供了一种快速使用 Spring 的方式。
4、SpringBoot 快速入门
需求:
- 搭建 SpringBoot 工程,定义 HelloController.hello() 方法,返回“Hello SpringBoot!”。
步骤:
- 创建 Maven 项目;
- 导入 SpringBoot 起步依赖:
        org.springframework.boot
        spring-boot-starter-parent
        2.1.8.RELEASE


            org.springframework.boot
            spring-boot-starter-web
- 定义 Controller:
import org.springframework.web.bind.annotation.RequestMapping;
import org.springframework.web.bind.annotation.RestController;

@RestController
public class HelloController {

    @RequestMapping("/hello")
    public String sayHello() {
        return "Hello SpringBoot!";
    }
}- 编写引导类:
controller 类必须是 Application 的所在包的类或者子包的类。
官网:程序只加载 Application.java 所在包及其子包下的内容。
import org.springframework.boot.SpringApplication;
import org.springframework.boot.autoconfigure.SpringBootApplication;

@SpringBootApplication
public class SpringbootQuickDemoApplication {

    public static void main(String[] args) {
        SpringApplication.run(SpringbootQuickDemoApplication.class, args);
    }

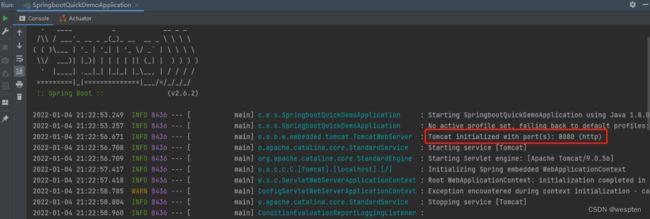
}- 执行 main 方法,启动测试:
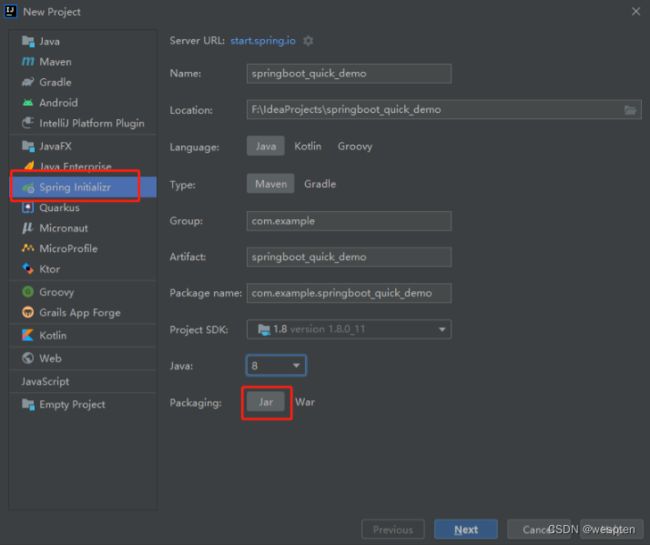
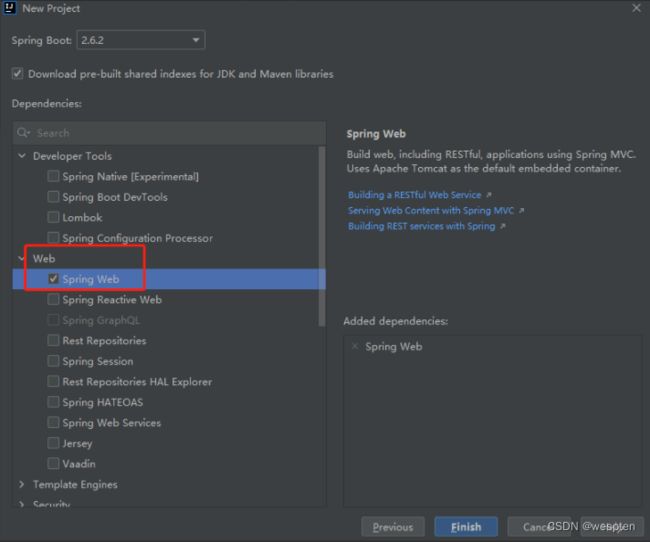
- IDEA 快速构建 SpringBoot 工程:
总结:
-
SpringBoot 在创建项目时,使用 jar 的打包方式。
-
SpringBoot 的引导类,是项目入口,运行 main 方法就可以启动项目。
-
使用 SpringBoot 和 Spring 构建的项目,业务代码编写方式完全一样。
二、SpringBoot 核心
1、SpringBoot 原理
在 spring-boot-starter-parent 中定义了各种技术的版本信息,组合了一套最优搭配的技术版本。
在各种 starter 中,定义了完成该功能需要的坐标合集,其中大部分版本信息来自于父工程。
我们的工程继承 parent,引入 starter 后,通过依赖传递,就可以简单方便获得需要的 jar 包,并且不会存在版本冲突等问题。
        org.springframework.boot
        spring-boot-starter-parent
        2.1.8.RELEASE


            org.springframework.boot
            spring-boot-starter-web
2、SpringBoot 核心注解
| 注解 | 说明 |
|---|---|
| Component | 声明为 SpringBoot 的 bean |
| Repository | 用于 dao 层的 bean |
| Autowired | 用于向一个 bean 中注入其他 bean |
| Service | 用于 service 层的 bean |
| Configuration | 用于声明 SpringBoot 的配置文件类 |
| Value("${key)") | 获取 SpringBoot 配置文件中的值 |
| Bean | 声明其为 bean 实例,常和 Configuration 配合使用 |
3、SpringBoot Restful 接口实现
| 注解 | 说明 |
|---|---|
| SpringBootApplication | SpringBoot 主类,用来加载 SpringBoot 各种特性 |
| RestController | SpringBoot 会转换返回值并自动将其写入 HTTP 响应 |
| RequestMapping | 用于类和方法,在方法级别时,用于处理 HTTP 的各种方法 |
| RequestBody | 将请求 Body 中的 json/xml 对象解析成该参数类型的 JavaBean 对象 |
| PathVariable | 处理动态 URI,即 URI 的值可以作为控制器中处理方法的入参 |
| Post/Put/Get/DeleteMapping | 在方法的级别上使用,在方法级别时,用于处理 HTTP 的各种方法 |
| RequestParam | 处理 get 请求的参数 |
代码示例:
package com.example.apitestplatform.controller;

import com.example.apitestplatform.entity.User;
import org.springframework.web.bind.annotation.*;

@RestController
@RequestMapping(value="demo")  // 类中所有接口地址的前缀
public class DemoController {

    // @RequestMapping(value="loginGet", method= RequestMethod.GET)
    @GetMapping("loginGet")
    public String loginGet() {
        return "登录成功";
    }

    // @RequestMapping(value="loginPost", method= RequestMethod.POST)
    @PostMapping("loginPost")  // 简便写法
    public String loginPost(@RequestBody User user) {  // 如果没用 @RequestBody,则获取结果为 null
        System.out.println("username : "+user.getUsername());
        System.out.println("password : "+user.getPassword());
        return "登录成功:"+user.getUsername();
    }

    // 访问:http://localhost:8080/demo/userId/1/2
    // @RequestMapping(value="userId/{userId}/{id}", method=RequestMethod.GET)
    @GetMapping("getUser/{userid}/{id}")
    public String loginUser1(@PathVariable("userid") Integer userid, @PathVariable("id") Integer id) {
        System.out.println("userid : "+userid);
        System.out.println("id : "+id);
        return "userid: "+userid+"  id: "+id;
    }

    // 访问:http://localhost:8080/demo/getUser?userid=1&id=2
    // 访问:http://localhost:8080/demo/getUser?user=1&id=2,则 userid 值为 null
    @GetMapping("getUser")
    public String loginUser2(@RequestParam(value="userid", required=false) Integer userid,  // required=false:参数非必须传
                             @RequestParam("id") Integer id) {
        System.out.println("userid : "+userid);
        System.out.println("id : "+id);
        return "userid: "+userid+"  id: "+id;
    }
}
4、数据封装
响应对象类:
package com.example.apitestplatform.common;

import lombok.Builder;
import lombok.Data;

@Data
@Builder  // 作用:调用时使用链式写法
public class ResultResponse {

    private String code;
    private String message;
    private Object data;

}
接口类:
    @GetMapping("loginSuccess")
    public ResponseEntity loginSuccess() {
        User user = new User();
        user.setUsername("xiaoming");
        user.setPassword("admin123");
        ResultResponse resultResponse = ResultResponse.builder().code("00").message("登录成功").data(user).build();
        return ResponseEntity.status(HttpStatus.OK).body(resultResponse);
    }

    @GetMapping("loginFail")
    public ResponseEntity loginFail() {
        User user = new User();
        user.setUsername("xiaoming");
        user.setPassword("admin123");
        ResultResponse resultResponse = ResultResponse.builder().code("02").message("登录失败").data(user).build();
        return ResponseEntity.status(HttpStatus.INTERNAL_SERVER_ERROR).body(resultResponse);
    }
请求结果:
{"code":"00","message":"登录成功","data":{"username":"xiaoming","password":"admin123"}}

{"code":"00","message":"登录失败","data":{"username":"xiaoming","password":"admin123"}}
三、SpringBoot 配置
1、配置文件类型
SpringBoot 是基于约定的,所以很多配置都有默认值,但如果想使用自己的配置替换默认配置的话,就可以使用 application.properties 或者 application.yml(application.yaml)进行配置。
# properties
server.port=8080

# yml
server:
  port: 8080
常见配置:
spring:
  application:
    name: demo

server:
  port: 8093
  connection-timeout: 18000000
    servlet:
    session:
timeout: 30m # m(分钟),s(秒),h(小时),不写单位默认毫秒-
SpringBoot 提供了两种配置文件类型:properteis 和 yml/yaml
-
默认配置文件名称:application.properties(application 名称固定)
-
在同一级目录下优先级为:properties > yml > yaml
2、读取配置内容
- 方式一:@Value
- 方式二:Environment
- 方式三:@ConfigurationProperties
代码示例:
- application.yml 配置文件内容
name: outer_name

person:
  name: xiaoming
  age: 18
  address:
    - shenzhen
    - shanghai
    - beijing

# 配置tomcat启动端口
server:
port: 8082- @ConfigurationProperties(对象注入)
import org.springframework.boot.context.properties.ConfigurationProperties;
import org.springframework.stereotype.Component;

@Component
@ConfigurationProperties(prefix = "person")
public class Person {

    private String name;
    private int age;
    private String[] address;

    public String getName() {
        return name;
    }

    public void setName(String name) {
        this.name = name;
    }

    public int getAge() {
        return age;
    }

    public void setAge(int age) {
        this.age = age;
    }

    public String[] getAddress() {
        return address;
    }

    public void setAddress(String[] address) {
        this.address = address;
    }

}
- Controller
import org.springframework.beans.factory.annotation.Autowired;
import org.springframework.beans.factory.annotation.Value;
import org.springframework.core.env.Environment;
import org.springframework.web.bind.annotation.RequestMapping;
import org.springframework.web.bind.annotation.RestController;

@RestController
public class HelloController {

    // 方式一:@Value 注入
    @Value("${name}")
    private String name;

    @Value("${person.name}")
    private String personName;

    @Value("${person.address[0]}")
    private String personFirstAddress;

    // 方式二:Environment 对象
    @Autowired
    private Environment env;

    // 方式三:@ConfigurationProperties 对象注入
    @Autowired
    private Person person;

    @RequestMapping("/hello")
    public String sayHello() {
        System.out.println(personName);  // xiaoming
        System.out.println(personFirstAddress);  // shenzhen

        System.out.println(env.getProperty("person.name"));  // xiaoming
        System.out.println(env.getProperty("person.address[0]"));  // shenzhen

        String[] address = person.getAddress();
        for (String add: address) {
            System.out.println(add);
        }
        /*
            shenzhen
            shanghai
            beijing
         */
        return "Get successfully!";
    }
}
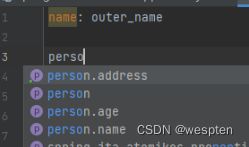
注意:以下提示不影响运行,在加了以下依赖后边不再有此提示,且在编写配置文件时会有友好提示。
![]()
    org.springframework.boot
    spring-boot-configuration-processor
    true
3、profile
我们在开发 SpringBoot 应用时,通常同一套程序会被安装到不同环境,比如:开发、测试、生产等。其中数据库地址、服务器端口等等配置都不同,如果每次打包时,都要修改配置文件的话,会非常麻烦。为此,profile 功能就是来进行动态配置切换的。
profile 的 2 种配置方式:
- 多 profile 文件方式:提供多个配置文件,每个代表一种环境
- application-dev.properties/yml (代表开发环境)
- application-test.properties/yml (代表测试环境)
- application-pro.properties/yml (代表生产环境)
- yml 多文档方式:
- 在 yml 中使用“---”(必须三个横杆)分隔不同配置
profile 的 3 种激活方式:
- 配置文件:在配置文件中配置 spring.profiles.active=dev
- 虚拟机参数:在 VM options 指定 -Dspring.profiles.active=dev
- 命令行参数:java –jar xxx.jar --spring.profiles.active=dev
代码示例:
-
多 profile 文件方式:
- application.yml 多文档方式配置&激活:
# 配置开发环境
server:
  port: 8081

spring:
  profiles: dev
---
# 配置测试环境
server:
  port: 8082

spring:
  profiles: test
---
# 配置生产环境
server:
  port: 8083

spring:
  profiles: pro
---
# 使用配置文件激活profile
spring:
  profiles:
    active: pro
4、内部配置文件加载顺序
Springboot 程序启动时,会从以下位置加载配置文件:
- 当前项目下的 /config 目录下(不会打进 jar 包)
- 当前项目的根目录(不会打进 jar 包)
- classpath 的 /config 目录下(classpath 即 resources 编译后的目录)
- classpath 的根目录
注意:
- 以上的优先级从高到低,相同的配置项,高优会覆盖低优。
- 若不同的配置项,则会互补而不会覆盖。
5、外部配置加载顺序
通过官网查看外部属性加载顺序:
Core Features
四、SpringBoot 整合其他框架
1、整合 Junit
实现步骤:
- 搭建 SpringBoot 工程
- 引入 starter-test 起步依赖( IDEA 构建 SpringBoot 时自带)
    org.springframework.boot
    spring-boot-starter-test
    test
- 编写测试类
- 添加测试相关注解
- Junit4
- @RunWith(SpringRunner.class)
- @SpringBootTest(classes=main方法的启动类.class)
- Junit5
- @SpringBootTest(classes=main方法的启动类.class)
- Junit4
- 编写测试方法进行测试
2、整合 Redis
实现步骤:
- 搭建 SpringBoot 工程
- 引入 Redis 起步依赖(可使用 IDEA 快捷搭建与引入)
    org.springframework.boot
    spring-boot-starter-data-redis
- 配置 Redis 相关属性(可选)
- 注入 RedisTemplate 模板
- 编写测试方法进行测试
代码示例:
- 测试类
import org.junit.jupiter.api.Test;
import org.springframework.beans.factory.annotation.Autowired;
import org.springframework.boot.test.context.SpringBootTest;
import org.springframework.data.redis.core.RedisTemplate;

@SpringBootTest
class DemoApplicationTest {

    @Autowired
    private RedisTemplate redisTemplate;  // 无配置情况下,默认连接本地redis(localhost:6379)

    @Test
    void testSet() {
        // 存入数据
        redisTemplate.boundValueOps("name").set("xiaoming");
    }

    @Test
    void testGet() {
        // 取数据
        Object name = redisTemplate.boundValueOps("name").get();
        System.out.println(name);
    }

}
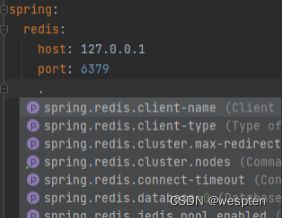
- (application)添加 Redis 配置
3、整合 Mybatis
实现步骤:
- 搭建 SpringBoot 工程
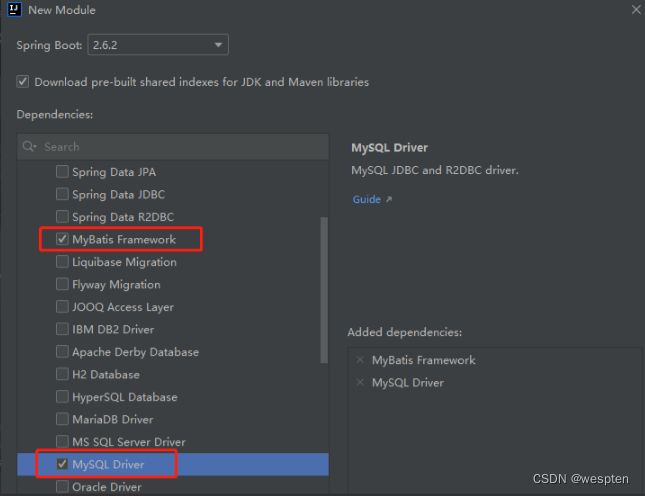
- 引入 Mybatis 起步依赖、添加 Mysql 驱动
    org.mybatis.spring.boot
    mybatis-spring-boot-starter
    2.2.1


    mysql
    mysql-connector-java
- 编写 DataSource 和 MyBatis 相关配置
- 定义表和实体类
DROP TABLE IF EXISTS `t_user`;

CREATE TABLE `t_user` (
  `id` int(11) NOT NULL AUTO_INCREMENT,
  `username` varchar(32) COLLATE utf8mb4_unicode_ci DEFAULT NULL,
  `password` varchar(32) COLLATE utf8mb4_unicode_ci DEFAULT NULL,
  PRIMARY KEY (`id`)
) ENGINE=InnoDB AUTO_INCREMENT=3 DEFAULT CHARSET=utf8mb4 COLLATE=utf8mb4_unicode_ci;

insert  into `t_user`(`id`,`username`,`password`) values (1,'zhangsan','123'),(2,'lisi','234');
- 编写 dao 和 mapper 文件/纯注解开发
- 测试
注解版:
- application.yml
spring:
  datasource:
    driver-class-name: com.mysql.cj.jdbc.Driver
    url: jdbc:mysql:///world?serverTimeZone=UTC  # 默认连接本地3306
    username: root
password: admin- UserMapper
package com.example.mybatis_demo.mapper;

import com.example.mybatis_demo.domain.User;
import org.apache.ibatis.annotations.Mapper;
import org.apache.ibatis.annotations.Select;
import org.springframework.stereotype.Repository;

import java.util.List;

@Mapper
@Repository
public interface UserMapper {

    @Select("select * from t_user")
    public List findAll();
} - 测试类
import com.example.mybatis_demo.mapper.UserMapper;
import org.junit.jupiter.api.Test;
import org.springframework.beans.factory.annotation.Autowired;
import org.springframework.boot.test.context.SpringBootTest;

@SpringBootTest
class MybatisDemoApplicationTests {

    @Autowired
    UserMapper userMapper;

    @Test
    void testFindAll() {
        userMapper.findAll().forEach(
                user -> System.out.println(user)
        );
    }
}
配置版:
- UserXmlMapper
package com.example.mybatis_demo.mapper;

import com.example.mybatis_demo.domain.User;
import org.apache.ibatis.annotations.Mapper;
import org.springframework.stereotype.Repository;

import java.util.List;

@Mapper
@Repository
public interface UserXmlMapper {

    public List findAll();
} - application.yml
# datasource
spring:
  datasource:
    url: jdbc:mysql:///springboot?serverTimezone=UTC
    username: root
    password: root
    driver-class-name: com.mysql.cj.jdbc.Driver

# mybatis
mybatis:
  mapper-locations: classpath:mapper/*Mapper.xml # mapper映射文件路径
  type-aliases-package: com.itheima.springbootmybatis.domain
# config-location: # 指定mybatis的核心配置文件- UserMapper.xml
-
测试类
import com.example.mybatis_demo.mapper.UserXmlMapper;
import org.junit.jupiter.api.Test;
import org.springframework.beans.factory.annotation.Autowired;
import org.springframework.boot.test.context.SpringBootTest;

@SpringBootTest
class MybatisDemoApplicationTests {

    @Autowired
    UserXmlMapper userMapper;

    @Test
    void testFindAll() {
        userMapper.findAll().forEach(
                user -> System.out.println(user)
        );
    }
}
五、SpringBoot 项目部署与监控
1、SpringBoot 监控
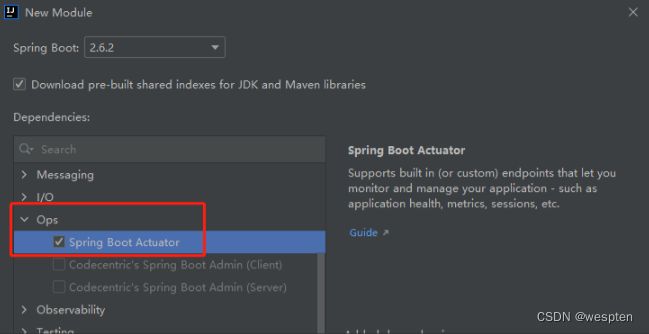
SpringBoot 自带监控功能 Actuator,可以帮助实现对程序内部运行情况监控,比如监控状况、Bean 加载情况、配置属性、日志信息等。
使用步骤:
- 导入依赖坐标
    org.springframework.boot
    spring-boot-starter-actuator
- 访问 http://localhost:8080/acruator
- URI 详解
| 路径 | 描述 |
|---|---|
| /beans | 描述应用程序上下文里全部的 Bean,以及它们的关系 |
| /env | 获取全部环境属性 |
| /env/{name} | 根据名称获取特定的环境属性值 |
| /health | 报告应用程序的健康指标,这些值由 HealthIndicator 的实现类提供 |
| /info | 获取应用程序的定制信息,这些信息由 info 打头的属性提供 |
| /mappings | 描述全部的 URI 路径,以及它们和控制器(包含 Actuator 端点)的映射关系 |
| /metrics | 报告各种应用程序度量信息,比如内存用量和 HTTP 请求计数 |
| /metrics/{name} | 报告指定名称的应用程序度量值 |
| /trace | 提供基本的 HTTP 请求跟踪信息(时间戳、HTTP 头等) |
- 添加基础监控信息
# 添加 info 信息
info.name=zhangsan
info.age=23

# 开启健康检查的完整信息
management.endpoint.health.show-details=always- 添加完整监控信息
# 将所有的监控 endpoint 暴露出来
management.endpoints.web.exposure.include=*
// 如下定义的 RequestMapping,就可通过 /mappings 进行在线监控
@RestController
public class HelloController {
@RequestMapping("/hello")
public String sayHello() {
return "Hello Hello SpringBoot!";
}
}- 同时,IDEA 也提供了 Actuator 的查看功能
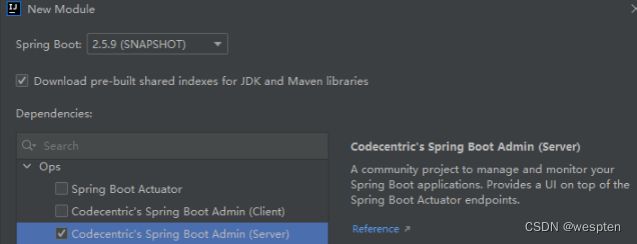
2、SpringBoot Admin
1. SpringBoot Admin 简介
SpringBoot Admin 是一个开源社区项目,用于管理和监控 SpringBoot 应用程序。
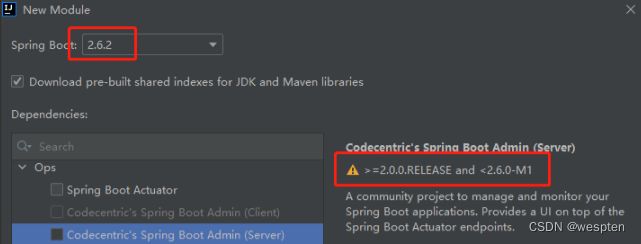
SpringBoot Admin 有两个角色:客户端(Client)和服务端(Server)。
应用程序作为 SpringBoot Admin Client 向为 Spring Boot Admin Server 注册。
SpringBoot Admin Server 的 UI 界面包含了 SpringBoot Admin Client 的 Actuator Endpoint 上的一些监控信息。
2. 使用步骤
-
admin-server:
- 创建 admin-server 模块
- 导入依赖坐标 admin-starter-server
- 在引导类上启用监控功能 @EnableAdminServer
-
admin-client:
- 创建 admin-client 模块
- 导入依赖坐标 admin-starter-client
- 配置相关信息:server 地址等
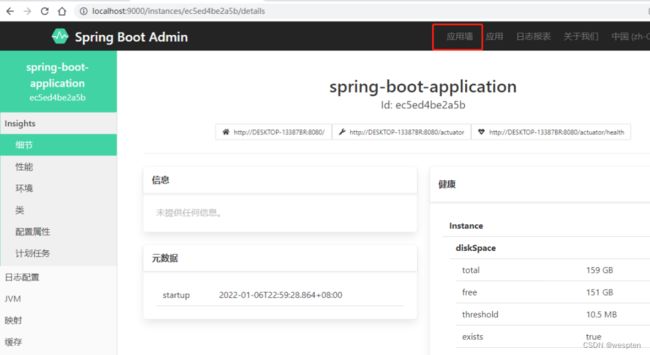
- 启动 server 和 client 服务,访问 server
-
界面使用:
3、SpringBoot 项目部署
SpringBoot 项目开发完毕后,支持两种方式部署到服务器。
官方推荐方式:jar 包部署.
步骤一:将项目打成 jar 包
- 构建命令:
mvn clean install -U -DskipTests
# clean:清理历史 target 数据
# -U:拉起最新依赖
# -DskipTests:跳过测试- 执行结果:
[INFO] Installing F:\IdeaProjects\ApiTestPlatform\target\ApiTestPlatform-0.0.1-SNAPSHOT.jar to G:\software\apache-maven-3.8.1\repos\com\example\ApiTestPlatform\0.0
.1-SNAPSHOT\ApiTestPlatform-0.0.1-SNAPSHOT.jar
步骤二:使用 java -jar 命令启动内置 Tomcat 进行部署。
java -jar F:\IdeaProjects\ApiTestPlatform\target\ApiTestPlatform-0.0.1-SNAPSHOT.jarwar 包部署
- 在项目 pom 中配置
war ; - 启动类进行以下修改;
- 将构建后的 war 包部署到外置 Tomcat 即可;
import org.springframework.boot.SpringApplication;
import org.springframework.boot.autoconfigure.SpringBootApplication;
import org.springframework.boot.builder.SpringApplicationBuilder;
import org.springframework.boot.web.servlet.support.SpringBootServletInitializer;

// 继承 SpringBootServletInitializer
@SpringBootApplication
public class SpringbootDeployApplication extends SpringBootServletInitializer {

    public static void main(String[] args) {
        SpringApplication.run(SpringbootDeployApplication.class, args);
    }

    // 重写以下方法
    @Override
    protected SpringApplicationBuilder configure(SpringApplicationBuilder builder) {
        return builder.sources(SpringbootDeployApplication.class);
    }
}
六、SpringBoot 集成第三方组件
和Spring相比,使用Spring Boot通过自动配置来集成第三方组件通常来说更简单。
我们将详细介绍如何通过Spring Boot集成常用的第三方组件,包括:
- Open API
- Redis
- Artemis
- RabbitMQ
- Kafka
1、集成Open API
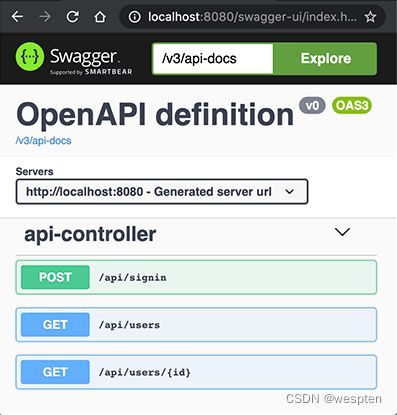
使用springdoc让其自动创建API文档非常容易,引入依赖后无需任何配置即可访问交互式API文档,可以对API添加注解以便生成更详细的描述。
Open API是一个标准,它的主要作用是描述REST API,既可以作为文档给开发者阅读,又可以让机器根据这个文档自动生成客户端代码等。
在Spring Boot应用中,假设我们编写了一堆REST API,如何添加Open API的支持?
我们只需要在pom.xml中加入以下依赖:
org.springdoc:springdoc-openapi-ui:1.4.0
然后呢?没有然后了,直接启动应用,打开浏览器输入http://localhost:8080/swagger-ui.html:
@RestController
@RequestMapping("/api")
public class ApiController {
    ...
    @Operation(summary = "Get specific user object by it's id.")
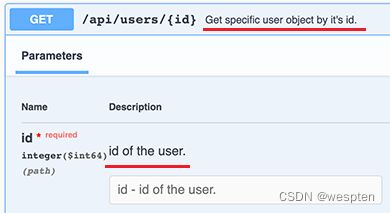
	@GetMapping("/users/{id}")
	public User user(@Parameter(description = "id of the user.") @PathVariable("id") long id) {
		return userService.getUserById(id);
	}
    ...
}
@Operation可以对API进行描述,@Parameter可以对参数进行描述,它们的目的是用于生成API文档的描述信息。添加了描述的API文档如下:
大多数情况下,不需要任何配置,我们就直接得到了一个运行时动态生成的可交互的API文档,该API文档总是和代码保持同步,大大简化了文档的编写工作。
要自定义文档的样式、控制某些API显示等,请参考springdoc文档。
配置反向代理
如果在服务器上,用户访问的域名是https://example.com,但内部是通过类似Nginx这样的反向代理访问实际的Spring Boot应用,比如http://localhost:8080,这个时候,在页面https://example.com/swagger-ui.html上,显示的URL仍然是http://localhost:8080,这样一来,就无法直接在页面执行API,非常不方便。
这是因为Spring Boot内置的Tomcat默认获取的服务器名称是localhost,端口是实际监听端口,而不是对外暴露的域名和80或443端口。要让Tomcat获取到对外暴露的域名等信息,必须在Nginx配置中传入必要的HTTP Header,常用的配置如下:
# Nginx配置
server {
    ...
    location / {
        proxy_pass http://localhost:8080;
        proxy_set_header Host $host;
        proxy_set_header X-Real-IP $remote_addr;
        proxy_set_header X-Forwarded-Proto $scheme;
        proxy_set_header X-Forwarded-For $proxy_add_x_forwarded_for;
    }
    ...
}
然后,在Spring Boot的application.yml中,加入如下配置:
server:
  # 实际监听端口:
  port: 8080
  # 从反向代理读取相关的HTTP Header:
  forward-headers-strategy: native
重启Spring Boot应用,即可在Swagger中显示正确的URL。
2、访问Redis
Spring Boot默认使用Lettuce作为Redis客户端,同步使用时,应通过连接池提高效率。
在Spring Boot中,要访问Redis,可以直接引入spring-boot-starter-data-redis依赖,它实际上是Spring Data的一个子项目——Spring Data Redis,主要用到了这几个组件:
- Lettuce:一个基于Netty的高性能Redis客户端;
- RedisTemplate:一个类似于JdbcTemplate的接口,用于简化Redis的操作。
因为Spring Data Redis引入的依赖项很多,如果只是为了使用Redis,完全可以只引入Lettuce,剩下的操作都自己来完成。
这里我们稍微深入一下Redis的客户端,看看怎么一步一步把一个第三方组件引入到Spring Boot中。
首先,我们添加必要的几个依赖项:
- io.lettuce:lettuce-core
- org.apache.commons:commons-pool2
注意我们并未指定版本号,因为在spring-boot-starter-parent中已经把常用组件的版本号确定下来了。
第一步是在配置文件application.yml中添加Redis的相关配置:
spring:
  redis:
    host: ${REDIS_HOST:localhost}
    port: ${REDIS_PORT:6379}
    password: ${REDIS_PASSWORD:}
    ssl: ${REDIS_SSL:false}
    database: ${REDIS_DATABASE:0}
然后,通过RedisConfiguration来加载它:
@ConfigurationProperties("spring.redis")
public class RedisConfiguration {
	private String host;
	private int port;
	private String password;
	private int database;

    // getters and setters...
}
再编写一个@Bean方法来创建RedisClient,可以直接放在RedisConfiguration中:
@ConfigurationProperties("spring.redis")
public class RedisConfiguration {
    ...

    @Bean
    RedisClient redisClient() {
        RedisURI uri = RedisURI.Builder.redis(this.host, this.port)
                .withPassword(this.password)
                .withDatabase(this.database)
                .build();
        return RedisClient.create(uri);
    }
}
在启动入口引入该配置:
@SpringBootApplication
@Import(RedisConfiguration.class) // 加载Redis配置
public class Application {
    ...
}
注意:如果在RedisConfiguration中标注@Configuration,则可通过Spring Boot的自动扫描机制自动加载,否则,使用@Import手动加载。
紧接着,我们用一个RedisService来封装所有的Redis操作。
基础代码如下:
@Component
public class RedisService {
    @Autowired
    RedisClient redisClient;

    GenericObjectPool> redisConnectionPool;

    @PostConstruct
    public void init() {
        GenericObjectPoolConfig> poolConfig = new GenericObjectPoolConfig<>();
        poolConfig.setMaxTotal(20);
        poolConfig.setMaxIdle(5);
        poolConfig.setTestOnReturn(true);
        poolConfig.setTestWhileIdle(true);
        this.redisConnectionPool = ConnectionPoolSupport.createGenericObjectPool(() -> redisClient.connect(), poolConfig);
    }

    @PreDestroy
    public void shutdown() {
        this.redisConnectionPool.close();
        this.redisClient.shutdown();
    }
}
注意到上述代码引入了Commons Pool的一个对象池,用于缓存Redis连接。因为Lettuce本身是基于Netty的异步驱动,在异步访问时并不需要创建连接池,但基于Servlet模型的同步访问时,连接池是有必要的。连接池在@PostConstruct方法中初始化,在@PreDestroy方法中关闭。
下一步,是在RedisService中添加Redis访问方法。为了简化代码,我们仿照JdbcTemplate.execute(ConnectionCallback)方法,传入回调函数,可大幅减少样板代码。
首先定义回调函数接口SyncCommandCallback:
@FunctionalInterface
public interface SyncCommandCallback {
    // 在此操作Redis:
    T doInConnection(RedisCommands commands);
}
编写executeSync方法,在该方法中,获取Redis连接,利用callback操作Redis,最后释放连接,并返回操作结果:
public  T executeSync(SyncCommandCallback callback) {
    try (StatefulRedisConnection connection = redisConnectionPool.borrowObject()) {
        connection.setAutoFlushCommands(true);
        RedisCommands commands = connection.sync();
        return callback.doInConnection(commands);
    } catch (Exception e) {
        logger.warn("executeSync redis failed.", e);
        throw new RuntimeException(e);
    }
}
有的童鞋觉得这样访问Redis的代码太复杂了,实际上我们可以针对常用操作把它封装一下,例如set和get命令:
public String set(String key, String value) {
    return executeSync(commands -> commands.set(key, value));
}

public String get(String key) {
    return executeSync(commands -> commands.get(key));
}
类似的,hget和hset操作如下:
public boolean hset(String key, String field, String value) {
    return executeSync(commands -> commands.hset(key, field, value));
}

public String hget(String key, String field) {
    return executeSync(commands -> commands.hget(key, field));
}

public Map hgetall(String key) {
    return executeSync(commands -> commands.hgetall(key));
}
常用命令可以提供方法接口,如果要执行任意复杂的操作,就可以通过executeSync(SyncCommandCallback
完成了RedisService后,我们就可以使用Redis了。例如,在UserController中,我们在Session中只存放登录用户的ID,用户信息存放到Redis,提供两个方法用于读写:
@Controller
public class UserController {
    public static final String KEY_USER_ID = "__userid__";
    public static final String KEY_USERS = "__users__";

    @Autowired ObjectMapper objectMapper;
    @Autowired RedisService redisService;

    // 把User写入Redis:
    private void putUserIntoRedis(User user) throws Exception {
        redisService.hset(KEY_USERS, user.getId().toString(), objectMapper.writeValueAsString(user));
    }

    // 从Redis读取User:
    private User getUserFromRedis(HttpSession session) throws Exception {
        Long id = (Long) session.getAttribute(KEY_USER_ID);
        if (id != null) {
            String s = redisService.hget(KEY_USERS, id.toString());
            if (s != null) {
                return objectMapper.readValue(s, User.class);
            }
        }
        return null;
    }
    ...
}
用户登录成功后,把ID放入Session,把User实例放入Redis:
@PostMapping("/signin")
public ModelAndView doSignin(@RequestParam("email") String email, @RequestParam("password") String password, HttpSession session) throws Exception {
    try {
        User user = userService.signin(email, password);
        session.setAttribute(KEY_USER_ID, user.getId());
        putUserIntoRedis(user);
    } catch (RuntimeException e) {
        return new ModelAndView("signin.html", Map.of("email", email, "error", "Signin failed"));
    }
    return new ModelAndView("redirect:/profile");
}
需要获取User时,从Redis取出:
@GetMapping("/profile")
public ModelAndView profile(HttpSession session) throws Exception {
    User user = getUserFromRedis(session);
    if (user == null) {
        return new ModelAndView("redirect:/signin");
    }
    return new ModelAndView("profile.html", Map.of("user", user));
}
从Redis读写Java对象时,序列化和反序列化是应用程序的工作,上述代码使用JSON作为序列化方案,简单可靠。也可将相关序列化操作封装到RedisService中,这样可以提供更加通用的方法:
public  T get(String key, Class clazz) {
    ...
}

public  T set(String key, T value) {
    ...
}
3、集成Artemis
ActiveMQ Artemis是一个JMS服务器,在Spring Boot中使用Artemis作为JMS服务时,只需引入spring-boot-starter-artemis依赖,即可直接使用JMS。
我们还是以实际工程为例,创建一个springboot-jms工程,引入的依赖除了spring-boot-starter-web,spring-boot-starter-jdbc等以外,新增spring-boot-starter-artemis:
    org.springframework.boot
    spring-boot-starter-artemis
同样无需指定版本号。
创建Artemis服务器后,我们在application.yml中加入相关配置:
spring:
  artemis:
    # 指定连接外部Artemis服务器,而不是启动嵌入式服务:
    mode: native
    # 服务器地址和端口号:
    host: 127.0.0.1
    port: 61616
    # 连接用户名和口令由创建Artemis服务器时指定:
    user: admin
    password: password
和Spring版本的JMS代码相比,使用Spring Boot集成JMS时,只要引入了spring-boot-starter-artemis,Spring Boot会自动创建JMS相关的ConnectionFactory、JmsListenerContainerFactory、JmsTemplate等,无需我们再手动配置了。
发送消息时只需要引入JmsTemplate:
@Component
public class MessagingService {
    @Autowired
    JmsTemplate jmsTemplate;

    public void sendMailMessage() throws Exception {
        String text = "...";
        jmsTemplate.send("jms/queue/mail", new MessageCreator() {
            public Message createMessage(Session session) throws JMSException {
                return session.createTextMessage(text);
            }
        });
    }
}
接收消息时只需要标注@JmsListener:
@Component
public class MailMessageListener {
    final Logger logger = LoggerFactory.getLogger(getClass());

    @JmsListener(destination = "jms/queue/mail", concurrency = "10")
    public void onMailMessageReceived(Message message) throws Exception {
        logger.info("received message: " + message);
    }
}
可见,应用程序收发消息的逻辑和Spring中使用JMS完全相同,只是通过Spring Boot,我们把工程简化到只需要设定Artemis相关配置。
4、集成RabbitMQ
JMS是JavaEE的消息服务标准接口,但是,如果Java程序要和另一种语言编写的程序通过消息服务器进行通信,那么JMS就不太适合了。
AMQP是一种使用广泛的独立于语言的消息协议,它的全称是Advanced Message Queuing Protocol,即高级消息队列协议,它定义了一种二进制格式的消息流,任何编程语言都可以实现该协议。实际上,Artemis也支持AMQP,但实际应用最广泛的AMQP服务器是使用Erlang编写的RabbitMQ。
1. 安装RabbitMQ
我们先从RabbitMQ的官网下载并安装RabbitMQ,安装和启动RabbitMQ请参考官方文档。要验证启动是否成功,可以访问RabbitMQ的管理后台http://localhost:15672,如能看到登录界面表示RabbitMQ启动成功:
RabbitMQ后台管理的默认用户名和口令均为guest。
2. AMQP协议
AMQP协议和前面我们介绍的JMS协议有所不同。在JMS中,有两种类型的消息通道:
- 点对点的Queue,即Producer发送消息到指定的Queue,接收方从Queue收取消息;
- 一对多的Topic,即Producer发送消息到指定的Topic,任意多个在线的接收方均可从Topic获得一份完整的消息副本。
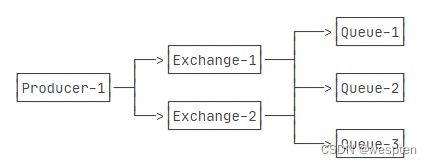
但是AMQP协议比JMS要复杂一点,它只有Queue,没有Topic,并且引入了Exchange的概念。当Producer想要发送消息的时候,它将消息发送给Exchange,由Exchange将消息根据各种规则投递到一个或多个Queue:
如果某个Exchange总是把消息发送到固定的Queue,那么这个消息通道就相当于JMS的Queue。如果某个Exchange把消息发送到多个Queue,那么这个消息通道就相当于JMS的Topic。和JMS的Topic相比,Exchange的投递规则更灵活,比如一个“登录成功”的消息被投递到Queue-1和Queue-2,而“登录失败”的消息则被投递到Queue-3。
这些路由规则称之为Binding,通常都在RabbitMQ的管理后台设置。
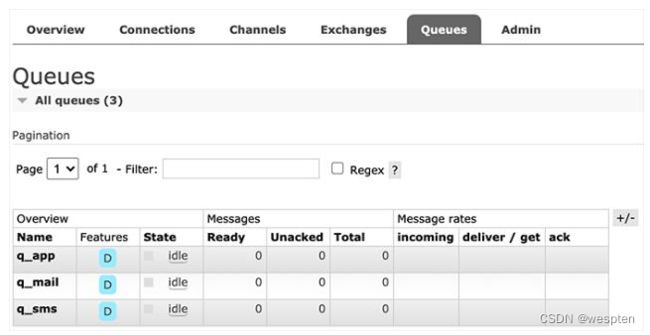
我们以具体的业务为例子,在RabbitMQ中,首先创建3个Queue,分别用于发送邮件、短信和App通知:
创建Queue时注意到可配置为持久化(Durable)和非持久化(Transient),当Consumer不在线时,持久化的Queue会暂存消息,非持久化的Queue会丢弃消息。
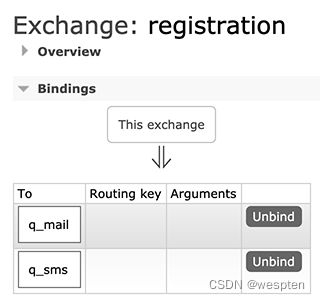
紧接着,我们在Exchanges中创建一个Direct类型的Exchange,命名为registration,并添加如下两个Binding:
上述Binding的规则就是:凡是发送到registration这个Exchange的消息,均被发送到q_mail和q_sms这两个Queue。
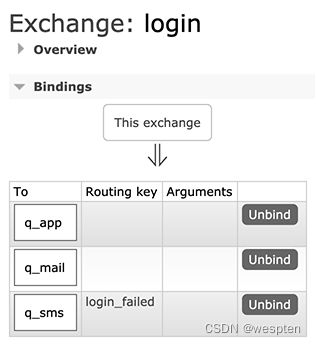
我们再创建一个Direct类型的Exchange,命名为login,并添加如下Binding:
上述Binding的规则稍微复杂一点,当发送消息给login这个Exchange时,如果消息没有指定Routing Key,则被投递到q_app和q_mail,如果消息指定了Routing Key="login_failed",那么消息被投递到q_sms。
配置好RabbitMQ后,我们就可以基于Spring Boot开发AMQP程序。
3. 使用RabbitMQ
我们首先创建Spring Boot工程springboot-rabbitmq,并添加如下依赖引入RabbitMQ:
    org.springframework.boot
    spring-boot-starter-amqp
然后在application.yml中添加RabbitMQ相关配置:
spring:
  rabbitmq:
    host: localhost
    port: 5672
    username: guest
    password: guest
我们还需要在Application中添加一个MessageConverter:
import org.springframework.amqp.support.converter.MessageConverter;

@SpringBootApplication
public class Application {
    ...

    @Bean
    MessageConverter createMessageConverter() {
        return new Jackson2JsonMessageConverter();
    }
}
MessageConverter用于将Java对象转换为RabbitMQ的消息。默认情况下,Spring Boot使用SimpleMessageConverter,只能发送String和byte[]类型的消息,不太方便。使用Jackson2JsonMessageConverter,我们就可以发送JavaBean对象,由Spring Boot自动序列化为JSON并以文本消息传递。
因为引入了starter,所有RabbitMQ相关的Bean均自动装配,我们需要在Producer注入的是RabbitTemplate:
@Component
public class MessagingService {
    @Autowired
    RabbitTemplate rabbitTemplate;

    public void sendRegistrationMessage(RegistrationMessage msg) {
        rabbitTemplate.convertAndSend("registration", "", msg);
    }

    public void sendLoginMessage(LoginMessage msg) {
        String routingKey = msg.success ? "" : "login_failed";
        rabbitTemplate.convertAndSend("login", routingKey, msg);
    }
}
发送消息时,使用convertAndSend(exchange, routingKey, message)可以指定Exchange、Routing Key以及消息本身。这里传入JavaBean后会自动序列化为JSON文本。上述代码将RegistrationMessage发送到registration,将LoginMessage发送到login,并根据登录是否成功来指定Routing Key。
接收消息时,需要在消息处理的方法上标注@RabbitListener:
@Component
public class QueueMessageListener {
    final Logger logger = LoggerFactory.getLogger(getClass());

    static final String QUEUE_MAIL = "q_mail";
    static final String QUEUE_SMS = "q_sms";
    static final String QUEUE_APP = "q_app";

    @RabbitListener(queues = QUEUE_MAIL)
    public void onRegistrationMessageFromMailQueue(RegistrationMessage message) throws Exception {
        logger.info("queue {} received registration message: {}", QUEUE_MAIL, message);
    }

    @RabbitListener(queues = QUEUE_SMS)
    public void onRegistrationMessageFromSmsQueue(RegistrationMessage message) throws Exception {
        logger.info("queue {} received registration message: {}", QUEUE_SMS, message);
    }

    @RabbitListener(queues = QUEUE_MAIL)
    public void onLoginMessageFromMailQueue(LoginMessage message) throws Exception {
        logger.info("queue {} received message: {}", QUEUE_MAIL, message);
    }

    @RabbitListener(queues = QUEUE_SMS)
    public void onLoginMessageFromSmsQueue(LoginMessage message) throws Exception {
        logger.info("queue {} received message: {}", QUEUE_SMS, message);
    }

    @RabbitListener(queues = QUEUE_APP)
    public void onLoginMessageFromAppQueue(LoginMessage message) throws Exception {
        logger.info("queue {} received message: {}", QUEUE_APP, message);
    }
}
上述代码一共定义了5个Consumer,监听3个Queue。
启动应用程序,我们注册一个新用户,然后发送一条RegistrationMessage消息。此时,根据registration这个Exchange的设定,我们会在两个Queue收到消息:
... c.i.learnjava.service.UserService        : try register by [email protected]...
... c.i.learnjava.web.UserController         : user registered: [email protected]
... c.i.l.service.QueueMessageListener       : queue q_mail received registration message: [RegistrationMessage: [email protected], name=Bob, timestamp=1594559871495]
... c.i.l.service.QueueMessageListener       : queue q_sms received registration message: [RegistrationMessage: [email protected], name=Bob, timestamp=1594559871495]
当我们登录失败时,发送LoginMessage并设定Routing Key为login_failed,此时,只有q_sms会收到消息:
... c.i.learnjava.service.UserService        : try login by [email protected]...
... c.i.l.service.QueueMessageListener       : queue q_sms received message: [LoginMessage: [email protected], name=(unknown), success=false, timestamp=1594559886722]
登录成功后,发送LoginMessage,此时,q_mail和q_app将收到消息:
... c.i.learnjava.service.UserService        : try login by [email protected]...
... c.i.l.service.QueueMessageListener       : queue q_mail received message: [LoginMessage: [email protected], name=Bob, success=true, timestamp=1594559895251]
... c.i.l.service.QueueMessageListener       : queue q_app received message: [LoginMessage: [email protected], name=Bob, success=true, timestamp=1594559895251]
RabbitMQ还提供了使用Topic的Exchange(此Topic指消息的标签,并非JMS的Topic概念),可以使用*进行匹配并路由。可见,掌握RabbitMQ的核心是理解其消息的路由规则。
直接指定一个Queue并投递消息也是可以的,此时指定Routing Key为Queue的名称即可,因为RabbitMQ提供了一个default exchange用于根据Routing Key查找Queue并直接投递消息到指定的Queue。但是要实现一对多的投递就必须自己配置Exchange。
5、集成Kafka
JMS是JavaEE的标准消息接口,Artemis是一个JMS实现产品,AMQP是跨语言的一个标准消息接口,RabbitMQ是一个AMQP实现产品。
Kafka也是一个消息服务器,它的特点一是快,二是有巨大的吞吐量,那么Kafka实现了什么标准消息接口呢?
Kafka没有实现任何标准的消息接口,它自己提供的API就是Kafka的接口。
Kafka本身是Scala编写的,运行在JVM之上。Producer和Consumer都通过Kafka的客户端使用网络来与之通信。
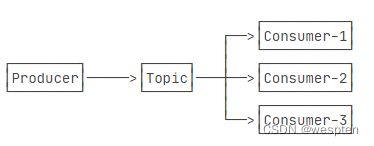
从逻辑上讲,Kafka设计非常简单,它只有一种类似JMS的Topic的消息通道:
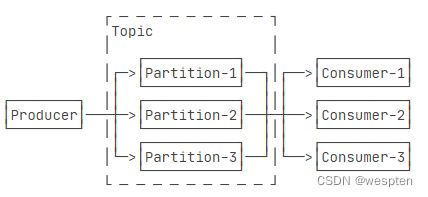
那么Kafka如何支持十万甚至百万的并发呢?答案是分区。Kafka的一个Topic可以有一个至多个Partition,并且可以分布到多台机器上:
Kafka只保证在一个Partition内部,消息是有序的,但是,存在多个Partition的情况下,Producer发送的3个消息会依次发送到Partition-1、Partition-2和Partition-3,Consumer从3个Partition接收的消息并不一定是Producer发送的顺序,因此,多个Partition只能保证接收消息大概率按发送时间有序,并不能保证完全按Producer发送的顺序。这一点在使用Kafka作为消息服务器时要特别注意,对发送顺序有严格要求的Topic只能有一个Partition。
Kafka的另一个特点是消息发送和接收都尽量使用批处理,一次处理几十甚至上百条消息,比一次一条效率要高很多。
最后要注意的是消息的持久性。Kafka总是将消息写入Partition对应的文件,消息保存多久取决于服务器的配置,可以按照时间删除(默认3天),也可以按照文件大小删除,因此,只要Consumer在离线期内的消息还没有被删除,再次上线仍然可以接收到完整的消息流。这一功能实际上是客户端自己实现的,客户端会存储它接收到的最后一个消息的offsetId,再次上线后按上次的offsetId查询。offsetId是Kafka标识某个Partion的每一条消息的递增整数,客户端通常将它存储在ZooKeeper中。
有了Kafka消息设计的基本概念,我们来看看如何在Spring Boot中使用Kafka。
1. 安装Kafka
首先从Kafka官网下载最新版Kafaka,解压后在bin目录找到两个文件:
zookeeper-server-start.sh:启动ZooKeeper(已内置在Kafka中);kafka-server-start.sh:启动Kafka。
先启动ZooKeeper:
$ ./zookeeper-server-start.sh ../config/zookeeper.properties
再启动Kafka:
./kafka-server-start.sh ../config/server.properties
看到如下输出表示启动成功:
... INFO [KafkaServer id=0] started (kafka.server.KafkaServer)
如果要关闭Kafka和ZooKeeper,依次按Ctrl-C退出即可。注意这是在本地开发时使用Kafka的方式,线上Kafka服务推荐使用云服务厂商托管模式(AWS的MSK,阿里云的消息队列Kafka版)。
2. 使用Kafka
在Spring Boot中使用Kafka,首先要引入依赖:
    org.springframework.kafka
    spring-kafka
注意这个依赖是spring-kafka项目提供的。
然后,在application.yml中添加Kafka配置:
spring:
  kafka:
    bootstrap-servers: localhost:9092
    consumer:
      auto-offset-reset: latest
      max-poll-records: 100
      max-partition-fetch-bytes: 1000000
除了bootstrap-servers必须指定外,consumer相关的配置项均为调优选项。例如,max-poll-records表示一次最多抓取100条消息。配置名称去哪里看?IDE里定义一个KafkaProperties.Consumer的变量:
KafkaProperties.Consumer c = null;
然后按住Ctrl查看源码即可。
3. 发送消息
Spring Boot自动为我们创建一个KafkaTemplate用于发送消息。注意到这是一个泛型类,而默认配置总是使用String作为Kafka消息的类型,所以注入KafkaTemplate
@Component
public class MessagingService {
    @Autowired ObjectMapper objectMapper;

    @Autowired KafkaTemplate kafkaTemplate;

    public void sendRegistrationMessage(RegistrationMessage msg) throws IOException {
        send("topic_registration", msg);
    }

    public void sendLoginMessage(LoginMessage msg) throws IOException {
        send("topic_login", msg);
    }

    private void send(String topic, Object msg) throws IOException {
        ProducerRecord pr = new ProducerRecord<>(topic, objectMapper.writeValueAsString(msg));
        pr.headers().add("type", msg.getClass().getName().getBytes(StandardCharsets.UTF_8));
        kafkaTemplate.send(pr);
    }
}
发送消息时,需指定Topic名称,消息正文。为了发送一个JavaBean,这里我们没有使用MessageConverter来转换JavaBean,而是直接把消息类型作为Header添加到消息中,Header名称为type,值为Class全名。消息正文是序列化的JSON。
4. 接收消息
接收消息可以使用@KafkaListener注解:
@Component
public class TopicMessageListener {
    private final Logger logger = LoggerFactory.getLogger(getClass());

    @Autowired
    ObjectMapper objectMapper;

    @KafkaListener(topics = "topic_registration", groupId = "group1")
    public void onRegistrationMessage(@Payload String message, @Header("type") String type) throws Exception {
        RegistrationMessage msg = objectMapper.readValue(message, getType(type));
        logger.info("received registration message: {}", msg);
    }

    @KafkaListener(topics = "topic_login", groupId = "group1")
    public void onLoginMessage(@Payload String message, @Header("type") String type) throws Exception {
        LoginMessage msg = objectMapper.readValue(message, getType(type));
        logger.info("received login message: {}", msg);
    }

    @KafkaListener(topics = "topic_login", groupId = "group2")
    public void processLoginMessage(@Payload String message, @Header("type") String type) throws Exception {
        LoginMessage msg = objectMapper.readValue(message, getType(type));
        logger.info("process login message: {}", msg);
    }

    @SuppressWarnings("unchecked")
    private static  Class getType(String type) {
        // TODO: use cache:
        try {
            return (Class) Class.forName(type);
        } catch (ClassNotFoundException e) {
            throw new RuntimeException(e);
        }
    }
}
在接收消息的方法中,使用@Payload表示传入的是消息正文,使用@Header可传入消息的指定Header,这里传入@Header("type"),就是我们发送消息时指定的Class全名。接收消息时,我们需要根据Class全名来反序列化获得JavaBean。
上述代码一共定义了3个Listener,其中有两个方法监听的是同一个Topic,但它们的Group ID不同。假设Producer发送的消息流是A、B、C、D,Group ID不同表示这是两个不同的Consumer,它们将分别收取完整的消息流,即各自均收到A、B、C、D。Group ID相同的多个Consumer实际上被视作一个Consumer,即如果有两个Group ID相同的Consumer,那么它们各自收到的很可能是A、C和B、D。
运行应用程序,注册新用户后,观察日志输出:
... c.i.learnjava.service.UserService        : try register by [email protected]...
... c.i.learnjava.web.UserController         : user registered: [email protected]
... c.i.l.service.TopicMessageListener       : received registration message: [RegistrationMessage: [email protected], name=Bob, timestamp=1594637517458]
用户登录后,观察日志输出:
... c.i.learnjava.service.UserService        : try login by [email protected]...
... c.i.l.service.TopicMessageListener       : received login message: [LoginMessage: [email protected], name=Bob, success=true, timestamp=1594637523470]
... c.i.l.service.TopicMessageListener       : process login message: [LoginMessage: [email protected], name=Bob, success=true, timestamp=1594637523470]
因为Group ID不同,同一个消息被两个Consumer分别独立接收。如果把Group ID改为相同,那么同一个消息只会被两者之一接收。
有细心的童鞋可能会问,在Kafka中是如何创建Topic的?又如何指定某个Topic的分区数量?
实际上开发使用的Kafka默认允许自动创建Topic,创建Topic时默认的分区数量是2,可以通过server.properties修改默认分区数量。
在生产环境中通常会关闭自动创建功能,Topic需要由运维人员先创建好。和RabbitMQ相比,Kafka并不提供网页版管理后台,管理Topic需要使用命令行,比较繁琐,只有云服务商通常会提供更友好的管理后台。
注意:
Spring Boot通过KafkaTemplate发送消息,通过@KafkaListener接收消息;
配置Consumer时,指定Group ID非常重要。
七 、SpringBoot 开发实战
Spring Boot是一个基于Spring提供了开箱即用的一组套件,有着非常强大的AutoConfiguration功能,它是通过自动扫描+条件装配实现的,可以让我们基于很少的配置和代码快速搭建出一个完整的应用程序。
1、Spring Boot 应用搭建
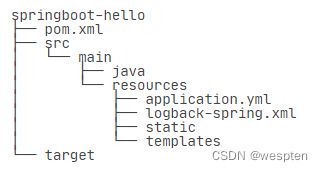
我们新建一个springboot-hello的工程,创建标准的Maven目录结构如下:
其中,在src/main/resources目录下,注意到几个文件:
1. application.yml
这是Spring Boot默认的配置文件,它采用YAML格式而不是.properties格式,文件名必须是application.yml而不是其他名称。
YAML格式比key=value格式的.properties文件更易读。比较一下两者的写法:
使用.properties格式:
# application.properties

spring.application.name=${APP_NAME:unnamed}

spring.datasource.url=jdbc:hsqldb:file:testdb
spring.datasource.username=sa
spring.datasource.password=
spring.datasource.dirver-class-name=org.hsqldb.jdbc.JDBCDriver

spring.datasource.hikari.auto-commit=false
spring.datasource.hikari.connection-timeout=3000
spring.datasource.hikari.validation-timeout=3000
spring.datasource.hikari.max-lifetime=60000
spring.datasource.hikari.maximum-pool-size=20
spring.datasource.hikari.minimum-idle=1
使用YAML格式:
# application.yml

spring:
  application:
    name: ${APP_NAME:unnamed}
  datasource:
    url: jdbc:hsqldb:file:testdb
    username: sa
    password:
    driver-class-name: org.hsqldb.jdbc.JDBCDriver
    hikari:
      auto-commit: false
      connection-timeout: 3000
      validation-timeout: 3000
      max-lifetime: 60000
      maximum-pool-size: 20
      minimum-idle: 1
可见,YAML是一种层级格式,它和.properties很容易互相转换,它的优点是去掉了大量重复的前缀,并且更加易读。
也可以使用application.properties作为配置文件,但不如YAML格式简单。
2. 使用环境变量
在配置文件中,我们经常使用如下的格式对某个key进行配置:
app:
  db:
    host: ${DB_HOST:localhost}
    user: ${DB_USER:root}
    password: ${DB_PASSWORD:password}
这种${DB_HOST:localhost}意思是,首先从环境变量查找DB_HOST,如果环境变量定义了,那么使用环境变量的值,否则,使用默认值localhost。
这使得我们在开发和部署时更加方便,因为开发时无需设定任何环境变量,直接使用默认值即本地数据库,而实际线上运行的时候,只需要传入环境变量即可:
$ DB_HOST=10.0.1.123 DB_USER=prod DB_PASSWORD=xxxx java -jar xxx.jar
3. logback-spring.xml
这是Spring Boot的logback配置文件名称(也可以使用logback.xml),一个标准的写法如下:
            ${CONSOLE_LOG_PATTERN}
            utf8


            ${FILE_LOG_PATTERN}
            utf8

          app.log

            1
            app.log.%i


            1MB
它主要通过
static是静态文件目录,templates是模板文件目录,注意它们不再存放在src/main/webapp下,而是直接放到src/main/resources这个classpath目录,因为在Spring Boot中已经不需要专门的webapp目录了。
以上就是Spring Boot的标准目录结构,它完全是一个基于Java应用的普通Maven项目。
我们再来看源码目录结构:
src/main/java
└── com
    └── itranswarp
        └── learnjava
            ├── Application.java
            ├── entity
            │   └── User.java
            ├── service
            │   └── UserService.java
            └── web
                └── UserController.java
在存放源码的src/main/java目录中,Spring Boot对Java包的层级结构有一个要求。注意到我们的根package是com.itranswarp.learnjava,下面还有entity、service、web等子package。Spring Boot要求main()方法所在的启动类必须放到根package下,命名不做要求,这里我们以Application.java命名,它的内容如下:
@SpringBootApplication
public class Application {
    public static void main(String[] args) throws Exception {
        SpringApplication.run(Application.class, args);
    }
}
启动Spring Boot应用程序只需要一行代码加上一个注解@SpringBootApplication,该注解实际上又包含了:
- @SpringBootConfiguration
- @Configuration
- @EnableAutoConfiguration
- @AutoConfigurationPackage
- @ComponentScan
这样一个注解就相当于启动了自动配置和自动扫描。
我们再观察pom.xml,它的内容如下:
        org.springframework.boot
        spring-boot-starter-parent
        2.3.0.RELEASE


    4.0.0
    com.itranswarp.learnjava
    springboot-hello
    1.0-SNAPSHOT


        11
        11
        11
        3.1.2


            org.springframework.boot
            spring-boot-starter-web


            org.springframework.boot
            spring-boot-starter-jdbc


            io.pebbletemplates
            pebble-spring-boot-starter
            ${pebble.version}


            org.hsqldb
            hsqldb
使用Spring Boot时,强烈推荐从spring-boot-starter-parent继承,因为这样就可以引入Spring Boot的预置配置。
紧接着,我们引入了依赖spring-boot-starter-web和spring-boot-starter-jdbc,它们分别引入了Spring MVC相关依赖和Spring JDBC相关依赖,无需指定版本号,因为引入的
根据pebble-spring-boot-starter的文档,加入如下配置到application.yml:
pebble:
  # 默认为".pebble",改为"":
  suffix:
  # 开发阶段禁用模板缓存:
  cache: false
对Application稍作改动,添加WebMvcConfigurer这个Bean:
@SpringBootApplication
public class Application {
    ...

    @Bean
    WebMvcConfigurer createWebMvcConfigurer(@Autowired HandlerInterceptor[] interceptors) {
        return new WebMvcConfigurer() {
            @Override
            public void addResourceHandlers(ResourceHandlerRegistry registry) {
                // 映射路径`/static/`到classpath路径:
                registry.addResourceHandler("/static/**")
                        .addResourceLocations("classpath:/static/");
            }
        };
    }
}
现在就可以直接运行Application,启动后观察Spring Boot的日志:
  .   ____          _            __ _ _
 /\\ / ___'_ __ _ _(_)_ __  __ _ \ \ \ \
( ( )\___ | '_ | '_| | '_ \/ _` | \ \ \ \
 \\/  ___)| |_)| | | | | || (_| |  ) ) ) )
  '  |____| .__|_| |_|_| |_\__, | / / / /
 =========|_|==============|___/=/_/_/_/
 :: Spring Boot ::        (v2.3.0.RELEASE)

2020-06-08 08:47:23.152  INFO 32585 --- [           main] com.itranswarp.learnjava.Application     : Starting Application on xxx with PID 32585 (...)
2020-06-08 08:47:23.154  INFO 32585 --- [           main] com.itranswarp.learnjava.Application     : No active profile set, falling back to default profiles: default
2020-06-08 08:47:24.224  INFO 32585 --- [           main] o.s.b.w.embedded.tomcat.TomcatWebServer  : Tomcat initialized with port(s): 8080 (http)
2020-06-08 08:47:24.235  INFO 32585 --- [           main] o.apache.catalina.core.StandardService   : Starting service [Tomcat]
2020-06-08 08:47:24.235  INFO 32585 --- [           main] org.apache.catalina.core.StandardEngine  : Starting Servlet engine: [Apache Tomcat/9.0.35]
2020-06-08 08:47:24.309  INFO 32585 --- [           main] o.a.c.c.C.[Tomcat].[localhost].[/]       : Initializing Spring embedded WebApplicationContext
2020-06-08 08:47:24.309  INFO 32585 --- [           main] o.s.web.context.ContextLoader            : Root WebApplicationContext: initialization completed in 1110 ms
2020-06-08 08:47:24.446  WARN 32585 --- [           main] com.zaxxer.hikari.HikariConfig           : HikariPool-1 - idleTimeout is close to or more than maxLifetime, disabling it.
2020-06-08 08:47:24.448  INFO 32585 --- [           main] com.zaxxer.hikari.HikariDataSource       : HikariPool-1 - Starting...
2020-06-08 08:47:24.753  INFO 32585 --- [           main] hsqldb.db.HSQLDB729157DF9B.ENGINE        : checkpointClose start
2020-06-08 08:47:24.754  INFO 32585 --- [           main] hsqldb.db.HSQLDB729157DF9B.ENGINE        : checkpointClose synched
2020-06-08 08:47:24.759  INFO 32585 --- [           main] hsqldb.db.HSQLDB729157DF9B.ENGINE        : checkpointClose script done
2020-06-08 08:47:24.763  INFO 32585 --- [           main] hsqldb.db.HSQLDB729157DF9B.ENGINE        : checkpointClose end
2020-06-08 08:47:24.767  INFO 32585 --- [           main] com.zaxxer.hikari.pool.PoolBase          : HikariPool-1 - Driver does not support get/set network timeout for connections. (feature not supported)
2020-06-08 08:47:24.770  INFO 32585 --- [           main] com.zaxxer.hikari.HikariDataSource       : HikariPool-1 - Start completed.
2020-06-08 08:47:24.971  INFO 32585 --- [           main] o.s.s.concurrent.ThreadPoolTaskExecutor  : Initializing ExecutorService 'applicationTaskExecutor'
2020-06-08 08:47:25.130  INFO 32585 --- [           main] o.s.b.w.embedded.tomcat.TomcatWebServer  : Tomcat started on port(s): 8080 (http) with context path ''
2020-06-08 08:47:25.138  INFO 32585 --- [           main] com.itranswarp.learnjava.Application     : Started Application in 2.68 seconds (JVM running for 3.097)
Spring Boot自动启动了嵌入式Tomcat,当看到Started Application in xxx seconds时,Spring Boot应用启动成功。
现在,我们在浏览器输入localhost:8080就可以直接访问页面。那么问题来了:
前面我们定义的数据源、声明式事务、JdbcTemplate在哪创建的?怎么就可以直接注入到自己编写的UserService中呢?
这些自动创建的Bean就是Spring Boot的特色:AutoConfiguration。
当我们引入spring-boot-starter-jdbc时,启动时会自动扫描所有的XxxAutoConfiguration:
DataSourceAutoConfiguration:自动创建一个DataSource,其中配置项从application.yml的spring.datasource读取;DataSourceTransactionManagerAutoConfiguration:自动创建了一个基于JDBC的事务管理器;JdbcTemplateAutoConfiguration:自动创建了一个JdbcTemplate。
因此,我们自动得到了一个DataSource、一个DataSourceTransactionManager和一个JdbcTemplate。
类似的,当我们引入spring-boot-starter-web时,自动创建了:
ServletWebServerFactoryAutoConfiguration:自动创建一个嵌入式Web服务器,默认是Tomcat;DispatcherServletAutoConfiguration:自动创建一个DispatcherServlet;HttpEncodingAutoConfiguration:自动创建一个CharacterEncodingFilter;WebMvcAutoConfiguration:自动创建若干与MVC相关的Bean。- ...
引入第三方pebble-spring-boot-starter时,自动创建了:
PebbleAutoConfiguration:自动创建了一个PebbleViewResolver。
Spring Boot大量使用XxxAutoConfiguration来使得许多组件被自动化配置并创建,而这些创建过程又大量使用了Spring的Conditional功能。例如,我们观察JdbcTemplateAutoConfiguration,它的代码如下:
@Configuration(proxyBeanMethods = false)
@ConditionalOnClass({ DataSource.class, JdbcTemplate.class })
@ConditionalOnSingleCandidate(DataSource.class)
@AutoConfigureAfter(DataSourceAutoConfiguration.class)
@EnableConfigurationProperties(JdbcProperties.class)
@Import({ JdbcTemplateConfiguration.class, NamedParameterJdbcTemplateConfiguration.class })
public class JdbcTemplateAutoConfiguration {
}
当满足条件:
@ConditionalOnClass:在classpath中能找到DataSource和JdbcTemplate;@ConditionalOnSingleCandidate(DataSource.class):在当前Bean的定义中能找到唯一的DataSource;
该JdbcTemplateAutoConfiguration就会起作用。实际创建由导入的JdbcTemplateConfiguration完成:
@Configuration(proxyBeanMethods = false)
@ConditionalOnMissingBean(JdbcOperations.class)
class JdbcTemplateConfiguration {
    @Bean
    @Primary
    JdbcTemplate jdbcTemplate(DataSource dataSource, JdbcProperties properties) {
        JdbcTemplate jdbcTemplate = new JdbcTemplate(dataSource);
        JdbcProperties.Template template = properties.getTemplate();
        jdbcTemplate.setFetchSize(template.getFetchSize());
        jdbcTemplate.setMaxRows(template.getMaxRows());
        if (template.getQueryTimeout() != null) {
            jdbcTemplate.setQueryTimeout((int) template.getQueryTimeout().getSeconds());
        }
        return jdbcTemplate;
    }
}
创建JdbcTemplate之前,要满足@ConditionalOnMissingBean(JdbcOperations.class),即不存在JdbcOperations的Bean。
如果我们自己创建了一个JdbcTemplate,例如,在Application中自己写个方法:
@SpringBootApplication
public class Application {
    ...
    @Bean
    JdbcTemplate createJdbcTemplate(@Autowired DataSource dataSource) {
        return new JdbcTemplate(dataSource);
    }
}
那么根据条件@ConditionalOnMissingBean(JdbcOperations.class),Spring Boot就不会再创建一个重复的JdbcTemplate(因为JdbcOperations是JdbcTemplate的父类)。
可见,Spring Boot自动装配功能是通过自动扫描+条件装配实现的,这一套机制在默认情况下工作得很好,但是,如果我们要手动控制某个Bean的创建,就需要详细地了解Spring Boot自动创建的原理,很多时候还要跟踪XxxAutoConfiguration,以便设定条件使得某个Bean不会被自动创建。
2、使用开发者工具
在开发阶段,我们经常要修改代码,然后重启Spring Boot应用。经常手动停止再启动,比较麻烦。
Spring Boot提供了一个开发者工具,可以监控classpath路径上的文件。只要源码或配置文件发生修改,Spring Boot应用可以自动重启。在开发阶段,这个功能比较有用。
要使用这一开发者功能,我们只需添加如下依赖到pom.xml:
    org.springframework.boot
    spring-boot-devtools
然后,没有然后了。直接启动应用程序,然后试着修改源码,保存,观察日志输出,Spring Boot会自动重新加载。
默认配置下,针对/static、/public和/templates目录中的文件修改,不会自动重启,因为禁用缓存后,这些文件的修改可以实时更新。
3、打包Spring Boot应用
Spring Boot提供了一个spring-boot-maven-plugin插件用于打包所有依赖到单一jar文件,此插件十分易用,无需配置。
我们只需要在pom.xml中加入以下配置:
    ...


                org.springframework.boot
                spring-boot-maven-plugin
无需任何配置,Spring Boot的这款插件会自动定位应用程序的入口Class,我们执行以下Maven命令即可打包:
$ mvn clean package
以springboot-exec-jar项目为例,打包后我们在target目录下可以看到两个jar文件:
$ ls
classes
generated-sources
maven-archiver
maven-status
springboot-exec-jar-1.0-SNAPSHOT.jar
springboot-exec-jar-1.0-SNAPSHOT.jar.original
其中,springboot-exec-jar-1.0-SNAPSHOT.jar.original是Maven标准打包插件打的jar包,它只包含我们自己的Class,不包含依赖,而springboot-exec-jar-1.0-SNAPSHOT.jar是Spring Boot打包插件创建的包含依赖的jar,可以直接运行:
$ java -jar springboot-exec-jar-1.0-SNAPSHOT.jar
这样,部署一个Spring Boot应用就非常简单,无需预装任何服务器,只需要上传jar包即可。
在打包的时候,因为打包后的Spring Boot应用不会被修改,因此,默认情况下,spring-boot-devtools这个依赖不会被打包进去。但是要注意,使用早期的Spring Boot版本时,需要配置一下才能排除spring-boot-devtools这个依赖:
    org.springframework.boot
    spring-boot-maven-plugin

        true
如果不喜欢默认的项目名+版本号作为文件名,可以加一个配置指定文件名:
    ...

        awesome-app
        ...
这样打包后的文件名就是awesome-app.jar。
4、瘦身Spring Boot应用
我们使用Spring Boot提供的spring-boot-maven-plugin打包Spring Boot应用,可以直接获得一个完整的可运行的jar包,把它上传到服务器上再运行就极其方便。
但是这种方式也不是没有缺点。最大的缺点就是包太大了,动不动几十MB,在网速不给力的情况下,上传服务器非常耗时。并且,其中我们引用到的Tomcat、Spring和其他第三方组件,只要版本号不变,这些jar就相当于每次都重复打进去,再重复上传了一遍。
真正经常改动的代码其实是我们自己编写的代码。如果只打包我们自己编写的代码,通常jar包也就几百KB。但是,运行的时候,classpath中没有依赖的jar包,肯定会报错。
所以问题来了:如何只打包我们自己编写的代码,同时又自动把依赖包下载到某处,并自动引入到classpath中。解决方案就是使用spring-boot-thin-launcher。
利用spring-boot-thin-launcher可以给Spring Boot应用瘦身。其原理是记录app依赖的jar包,在首次运行时先下载依赖项并缓存到本地。
1. 使用spring-boot-thin-launcher
我们先演示如何使用spring-boot-thin-launcher,再详细讨论它的工作原理。
首先复制一份上一节的Maven项目,并重命名为springboot-thin-jar:
    ...
    com.itranswarp.learnjava
    springboot-thin-jar
    1.0-SNAPSHOT
    ...
然后,修改
    ...

        awesome-app


                org.springframework.boot
                spring-boot-maven-plugin


                        org.springframework.boot.experimental
                        spring-boot-thin-layout
                        1.0.27.RELEASE
不需要任何其他改动了,我们直接按正常的流程打包,执行mvn clean package,观察target目录最终生成的可执行awesome-app.jar,只有79KB左右。
直接运行java -jar awesome-app.jar,效果和上一节完全一样。显然,79KB的jar肯定无法放下Tomcat和Spring这样的大块头。那么,运行时这个awesome-app.jar又是怎么找到它自己依赖的jar包呢?
实际上spring-boot-thin-launcher这个插件改变了spring-boot-maven-plugin的默认行为。它输出的jar包只包含我们自己代码编译后的class,一个很小的ThinJarWrapper,以及解析pom.xml后得到的所有依赖jar的列表。
运行的时候,入口实际上是ThinJarWrapper,它会先在指定目录搜索看看依赖的jar包是否都存在,如果不存在,先从Maven中央仓库下载到本地,然后,再执行我们自己编写的main()入口方法。这种方式有点类似很多在线安装程序:用户下载后得到的是一个很小的exe安装程序,执行安装程序时,会首先在线下载所需的若干巨大的文件,再进行真正的安装。
这个spring-boot-thin-launcher在启动时搜索的默认目录是用户主目录的.m2,我们也可以指定下载目录,例如,将下载目录指定为当前目录:
$ java -Dthin.root=. -jar awesome-app.jar
上述命令通过环境变量thin.root传入当前目录,执行后发现当前目录下自动生成了一个repository目录,这和Maven的默认下载目录~/.m2/repository的结构是完全一样的,只是它仅包含awesome-app.jar所需的运行期依赖项。
注意:只有首次运行时会自动下载依赖项,再次运行时由于无需下载,所以启动速度会大大加快。如果删除了repository目录,再次运行时就会再次触发下载。
2. 预热
把79KB大小的awesome-app.jar直接扔到服务器执行,上传过程就非常快。但是,第一次在服务器上运行awesome-app.jar时,仍需要从Maven中央仓库下载大量的jar包,所以,spring-boot-thin-launcher还提供了一个dryrun选项,专门用来下载依赖项而不执行实际代码:
java -Dthin.dryrun=true -Dthin.root=. -jar awesome-app.jar
执行上述代码会在当前目录创建repository目录,并下载所有依赖项,但并不会运行我们编写的main()方法。此过程称之为“预热”(warm up)。
如果服务器由于安全限制不允许从外网下载文件,那么可以在本地预热,然后把awesome-app.jar和repository目录上传到服务器。只要依赖项没有变化,后续改动只需要上传awesome-app.jar即可。
5、使用Actuator
在生产环境中,需要对应用程序的状态进行监控。前面我们已经介绍了使用JMX对Java应用程序包括JVM进行监控,使用JMX需要把一些监控信息以MBean的形式暴露给JMX Server,而Spring Boot已经内置了一个监控功能,它叫Actuator。
使用Actuator非常简单,只需添加如下依赖:
    org.springframework.boot
    spring-boot-starter-actuator
然后正常启动应用程序,Actuator会把它能收集到的所有信息都暴露给JMX。此外,Actuator还可以通过URL/actuator/挂载一些监控点,例如,输入http://localhost:8080/actuator/health,我们可以查看应用程序当前状态:
{
    "status": "UP"
}
许多网关作为反向代理需要一个URL来探测后端集群应用是否存活,这个URL就可以提供给网关使用。
Actuator默认把所有访问点暴露给JMX,但处于安全原因,只有health和info会暴露给Web。Actuator提供的所有访问点均在官方文档列出,要暴露更多的访问点给Web,需要在application.yml中加上配置:
management:
  endpoints:
    web:
      exposure:
        include: info, health, beans, env, metrics
要特别注意暴露的URL的安全性,例如,/actuator/env可以获取当前机器的所有环境变量,不可暴露给公网。
6、使用Profiles
Profile本身是Spring提供的功能,我们在使用条件装配中已经讲到了,Profile表示一个环境的概念,如开发、测试和生产这3个环境:
- native
- test
- production
或者按git分支定义master、dev这些环境:
- master
- dev
在启动一个Spring应用程序的时候,可以传入一个或多个环境,例如:
-Dspring.profiles.active=test,master
大多数情况下,使用一个环境就足够了。
Spring Boot对Profiles的支持在于,可以在application.yml中为每个环境进行配置。
下面是一个示例配置:
spring:
  application:
    name: ${APP_NAME:unnamed}
  datasource:
    url: jdbc:hsqldb:file:testdb
    username: sa
    password:
    dirver-class-name: org.hsqldb.jdbc.JDBCDriver
    hikari:
      auto-commit: false
      connection-timeout: 3000
      validation-timeout: 3000
      max-lifetime: 60000
      maximum-pool-size: 20
      minimum-idle: 1

pebble:
  suffix:
  cache: false

server:
  port: ${APP_PORT:8080}

---

spring:
  profiles: test

server:
  port: 8000

---

spring:
  profiles: production

server:
  port: 80

pebble:
  cache: true
注意到分隔符---,最前面的配置是默认配置,不需要指定Profile,后面的每段配置都必须以spring.profiles: xxx开头,表示一个Profile。上述配置默认使用8080端口,但是在test环境下,使用8000端口,在production环境下,使用80端口,并且启用Pebble的缓存。
如果我们不指定任何Profile,直接启动应用程序,那么Profile实际上就是default,可以从Spring Boot启动日志看出:
2020-06-13 11:20:58.141  INFO 73265 --- [  restartedMain] com.itranswarp.learnjava.Application     : Starting Application on ... with PID 73265 ...
2020-06-13 11:20:58.144  INFO 73265 --- [  restartedMain] com.itranswarp.learnjava.Application     : No active profile set, falling back to default profiles: default
要以test环境启动,可输入如下命令:
$ java -Dspring.profiles.active=test -jar springboot-profiles-1.0-SNAPSHOT.jar

  .   ____          _            __ _ _
 /\\ / ___'_ __ _ _(_)_ __  __ _ \ \ \ \
( ( )\___ | '_ | '_| | '_ \/ _` | \ \ \ \
 \\/  ___)| |_)| | | | | || (_| |  ) ) ) )
  '  |____| .__|_| |_|_| |_\__, | / / / /
 =========|_|==============|___/=/_/_/_/
 :: Spring Boot ::        (v2.3.0.RELEASE)

2020-06-13 11:24:45.020  INFO 73987 --- [           main] com.itranswarp.learnjava.Application     : Starting Application v1.0-SNAPSHOT on ... with PID 73987 ...
2020-06-13 11:24:45.022  INFO 73987 --- [           main] com.itranswarp.learnjava.Application     : The following profiles are active: test
...
2020-06-13 11:24:47.533  INFO 73987 --- [           main] o.s.b.w.embedded.tomcat.TomcatWebServer  : Tomcat started on port(s): 8000 (http) with context path ''
...
从日志看到活动的Profile是test,Tomcat的监听端口是8000。
通过Profile可以实现一套代码在不同环境启用不同的配置和功能。假设我们需要一个存储服务,在本地开发时,直接使用文件存储即可,但是,在测试和生产环境,需要存储到云端如S3上,如何通过Profile实现该功能?
首先,我们要定义存储接口StorageService:
public interface StorageService {

    // 根据URI打开InputStream:
    InputStream openInputStream(String uri) throws IOException;

    // 根据扩展名+InputStream保存并返回URI:
    String store(String extName, InputStream input) throws IOException;
}
本地存储可通过LocalStorageService实现:
@Component
@Profile("default")
public class LocalStorageService implements StorageService {
    @Value("${storage.local:/var/static}")
    String localStorageRootDir;

    final Logger logger = LoggerFactory.getLogger(getClass());

    private File localStorageRoot;

    @PostConstruct
    public void init() {
        logger.info("Intializing local storage with root dir: {}", this.localStorageRootDir);
        this.localStorageRoot = new File(this.localStorageRootDir);
    }

    @Override
    public InputStream openInputStream(String uri) throws IOException {
        File targetFile = new File(this.localStorageRoot, uri);
        return new BufferedInputStream(new FileInputStream(targetFile));
    }

    @Override
    public String store(String extName, InputStream input) throws IOException {
        String fileName = UUID.randomUUID().toString() + "." + extName;
        File targetFile = new File(this.localStorageRoot, fileName);
        try (OutputStream output = new BufferedOutputStream(new FileOutputStream(targetFile))) {
            input.transferTo(output);
        }
        return fileName;
    }
}
而云端存储可通过CloudStorageService实现:
@Component
@Profile("!default")
public class CloudStorageService implements StorageService {
    @Value("${storage.cloud.bucket:}")
    String bucket;

    @Value("${storage.cloud.access-key:}")
    String accessKey;

    @Value("${storage.cloud.access-secret:}")
    String accessSecret;

    final Logger logger = LoggerFactory.getLogger(getClass());

    @PostConstruct
    public void init() {
        // TODO:
        logger.info("Initializing cloud storage...");
    }

    @Override
    public InputStream openInputStream(String uri) throws IOException {
        // TODO:
        throw new IOException("File not found: " + uri);
    }

    @Override
    public String store(String extName, InputStream input) throws IOException {
        // TODO:
        throw new IOException("Unable to access cloud storage.");
    }
}
注意到LocalStorageService使用了条件装配@Profile("default"),即默认启用LocalStorageService,而CloudStorageService使用了条件装配@Profile("!default"),即非default环境时,自动启用CloudStorageService。这样,一套代码,就实现了不同环境启用不同的配置。
7、使用Conditional
Spring Boot提供了几个非常有用的条件装配注解,可实现灵活的条件装配。
使用Profile能根据不同的Profile进行条件装配,但是Profile控制比较糙,如果想要精细控制,例如,配置本地存储,AWS存储和阿里云存储,将来很可能会增加Azure存储等,用Profile就很难实现。
Spring本身提供了条件装配@Conditional,但是要自己编写比较复杂的Condition来做判断,比较麻烦。Spring Boot则为我们准备好了几个非常有用的条件:
- @ConditionalOnProperty:如果有指定的配置,条件生效;
- @ConditionalOnBean:如果有指定的Bean,条件生效;
- @ConditionalOnMissingBean:如果没有指定的Bean,条件生效;
- @ConditionalOnMissingClass:如果没有指定的Class,条件生效;
- @ConditionalOnWebApplication:在Web环境中条件生效;
- @ConditionalOnExpression:根据表达式判断条件是否生效。
我们以最常用的@ConditionalOnProperty为例,把上一节的StorageService改写如下。首先,定义配置storage.type=xxx,用来判断条件,默认为local:
storage:
  type: ${STORAGE_TYPE:local}
设定为local时,启用LocalStorageService:
@Component
@ConditionalOnProperty(value = "storage.type", havingValue = "local", matchIfMissing = true)
public class LocalStorageService implements StorageService {
    ...
}
设定为aws时,启用AwsStorageService:
@Component
@ConditionalOnProperty(value = "storage.type", havingValue = "aws")
public class AwsStorageService implements StorageService {
    ...
}
设定为aliyun时,启用AliyunStorageService:
@Component
@ConditionalOnProperty(value = "storage.type", havingValue = "aliyun")
public class AliyunStorageService implements StorageService {
    ...
}
注意到LocalStorageService的注解,当指定配置为local,或者配置不存在,均启用LocalStorageService。
可见,Spring Boot提供的条件装配使得应用程序更加具有灵活性。
8、加载配置文件
Spring Boot提供了@ConfigurationProperties注解,可以非常方便地把一段配置加载到一个Bean中。
加载配置文件可以直接使用注解@Value,例如,我们定义了一个最大允许上传的文件大小配置:
storage:
  local:
    max-size: 102400
在某个FileUploader里,需要获取该配置,可使用@Value注入:
@Component
public class FileUploader {
    @Value("${storage.local.max-size:102400}")
    int maxSize;

    ...
}
在另一个UploadFilter中,因为要检查文件的MD5,同时也要检查输入流的大小,因此,也需要该配置:
@Component
public class UploadFilter implements Filter {
    @Value("${storage.local.max-size:100000}")
    int maxSize;

    ...
}
多次引用同一个@Value不但麻烦,而且@Value使用字符串,缺少编译器检查,容易造成多处引用不一致(例如,UploadFilter把缺省值误写为100000)。
为了更好地管理配置,Spring Boot允许创建一个Bean,持有一组配置,并由Spring Boot自动注入。
假设我们在application.yml中添加了如下配置:
storage:
  local:
    # 文件存储根目录:
    root-dir: ${STORAGE_LOCAL_ROOT:/var/storage}
    # 最大文件大小,默认100K:
    max-size: ${STORAGE_LOCAL_MAX_SIZE:102400}
    # 是否允许空文件:
    allow-empty: false
    # 允许的文件类型:
    allow-types: jpg, png, gif
可以首先定义一个Java Bean,持有该组配置:
public class StorageConfiguration {

    private String rootDir;
    private int maxSize;
    private boolean allowEmpty;
    private List allowTypes;

    // TODO: getters and setters
}
保证Java Bean的属性名称与配置一致即可。然后,我们添加两个注解:
@Configuration
@ConfigurationProperties("storage.local")
public class StorageConfiguration {
    ...
}
注意到@ConfigurationProperties("storage.local")表示将从配置项storage.local读取该项的所有子项配置,并且,@Configuration表示StorageConfiguration也是一个Spring管理的Bean,可直接注入到其他Bean中:
@Component
public class StorageService {
    final Logger logger = LoggerFactory.getLogger(getClass());

    @Autowired
    StorageConfiguration storageConfig;

    @PostConstruct
    public void init() {
        logger.info("Load configuration: root-dir = {}", storageConfig.getRootDir());
        logger.info("Load configuration: max-size = {}", storageConfig.getMaxSize());
        logger.info("Load configuration: allowed-types = {}", storageConfig.getAllowTypes());
    }
}
这样一来,引入storage.local的相关配置就很容易了,因为只需要注入StorageConfiguration这个Bean,这样可以由编译器检查类型,无需编写重复的@Value注解。
9、禁用自动配置
可以通过@EnableAutoConfiguration(exclude = {...})指定禁用的自动配置,可以通过@Import({...})导入自定义配置。
Spring Boot大量使用自动配置和默认配置,极大地减少了代码,通常只需要加上几个注解,并按照默认规则设定一下必要的配置即可。例如,配置JDBC,默认情况下,只需要配置一个spring.datasource:
spring:
  datasource:
    url: jdbc:hsqldb:file:testdb
    username: sa
    password:
    dirver-class-name: org.hsqldb.jdbc.JDBCDriver
Spring Boot就会自动创建出DataSource、JdbcTemplate、DataSourceTransactionManager,非常方便。
但是,有时候,我们又必须要禁用某些自动配置。例如,系统有主从两个数据库,而Spring Boot的自动配置只能配一个,怎么办?
这个时候,针对DataSource相关的自动配置,就必须关掉。我们需要用exclude指定需要关掉的自动配置:
@SpringBootApplication
// 启动自动配置,但排除指定的自动配置:
@EnableAutoConfiguration(exclude = DataSourceAutoConfiguration.class)
public class Application {
    ...
}
现在,Spring Boot不再给我们自动创建DataSource、JdbcTemplate和DataSourceTransactionManager了,要实现主从数据库支持,怎么办?
让我们一步一步开始编写支持主从数据库的功能。首先,我们需要把主从数据库配置写到application.yml中,仍然按照Spring Boot默认的格式写,但datasource改为datasource-master和datasource-slave:
spring:
  datasource-master:
    url: jdbc:hsqldb:file:testdb
    username: sa
    password:
    dirver-class-name: org.hsqldb.jdbc.JDBCDriver
  datasource-slave:
    url: jdbc:hsqldb:file:testdb
    username: sa
    password:
    dirver-class-name: org.hsqldb.jdbc.JDBCDriver
注意到两个数据库实际上是同一个库。如果使用MySQL,可以创建一个只读用户,作为datasource-slave的用户来模拟一个从库。
下一步,我们分别创建两个HikariCP的DataSource:
public class MasterDataSourceConfiguration {
    @Bean("masterDataSourceProperties")
    @ConfigurationProperties("spring.datasource-master")
    DataSourceProperties dataSourceProperties() {
        return new DataSourceProperties();
    }

    @Bean("masterDataSource")
    DataSource dataSource(@Autowired @Qualifier("masterDataSourceProperties") DataSourceProperties props) {
        return props.initializeDataSourceBuilder().build();
    }
}

public class SlaveDataSourceConfiguration {
    @Bean("slaveDataSourceProperties")
    @ConfigurationProperties("spring.datasource-slave")
    DataSourceProperties dataSourceProperties() {
        return new DataSourceProperties();
    }

    @Bean("slaveDataSource")
    DataSource dataSource(@Autowired @Qualifier("slaveDataSourceProperties") DataSourceProperties props) {
        return props.initializeDataSourceBuilder().build();
    }
}
注意到上述class并未添加@Configuration和@Component,要使之生效,可以使用@Import导入:
@SpringBootApplication
@EnableAutoConfiguration(exclude = DataSourceAutoConfiguration.class)
@Import({ MasterDataSourceConfiguration.class, SlaveDataSourceConfiguration.class})
public class Application {
    ...
}
此外,上述两个DataSource的Bean名称分别为masterDataSource和slaveDataSource,我们还需要一个最终的@Primary标注的DataSource,它采用Spring提供的AbstractRoutingDataSource,代码实现如下:
class RoutingDataSource extends AbstractRoutingDataSource {
    @Override
    protected Object determineCurrentLookupKey() {
        // 从ThreadLocal中取出key:
        return RoutingDataSourceContext.getDataSourceRoutingKey();
    }
}
RoutingDataSource本身并不是真正的DataSource,它通过Map关联一组DataSource,下面的代码创建了包含两个DataSource的RoutingDataSource,关联的key分别为masterDataSource和slaveDataSource:
public class RoutingDataSourceConfiguration {
    @Primary
    @Bean
    DataSource dataSource(
            @Autowired @Qualifier("masterDataSource") DataSource masterDataSource,
            @Autowired @Qualifier("slaveDataSource") DataSource slaveDataSource) {
        var ds = new RoutingDataSource();
        // 关联两个DataSource:
        ds.setTargetDataSources(Map.of(
                "masterDataSource", masterDataSource,
                "slaveDataSource", slaveDataSource));
        // 默认使用masterDataSource:
        ds.setDefaultTargetDataSource(masterDataSource);
        return ds;
    }

    @Bean
    JdbcTemplate jdbcTemplate(@Autowired DataSource dataSource) {
        return new JdbcTemplate(dataSource);
    }

    @Bean
    DataSourceTransactionManager dataSourceTransactionManager(@Autowired DataSource dataSource) {
        return new DataSourceTransactionManager(dataSource);
    }
}
仍然需要自己创建JdbcTemplate和PlatformTransactionManager,注入的是标记为@Primary的RoutingDataSource。
这样,我们通过如下的代码就可以切换RoutingDataSource底层使用的真正的DataSource:
RoutingDataSourceContext.setDataSourceRoutingKey("slaveDataSource");
jdbcTemplate.query(...);
只不过写代码切换DataSource即麻烦又容易出错,更好的方式是通过注解配合AOP实现自动切换,这样,客户端代码实现如下:
@Controller
public class UserController {
	@RoutingWithSlave // <-- 指示在此方法中使用slave数据库
	@GetMapping("/profile")
	public ModelAndView profile(HttpSession session) {
        ...
    }
}
实现上述功能需要编写一个@RoutingWithSlave注解,一个AOP织入和一个ThreadLocal来保存key。由于代码比较简单,这里我们不再详述。
如果我们想要确认是否真的切换了DataSource,可以覆写determineTargetDataSource()方法并打印出DataSource的名称:
class RoutingDataSource extends AbstractRoutingDataSource {
    ...

    @Override
    protected DataSource determineTargetDataSource() {
        DataSource ds = super.determineTargetDataSource();
        logger.info("determin target datasource: {}", ds);
        return ds;
    }
}
访问不同的URL,可以在日志中看到两个DataSource,分别是HikariPool-1和hikariPool-2:
2020-06-14 17:55:21.676  INFO 91561 --- [nio-8080-exec-7] c.i.learnjava.config.RoutingDataSource   : determin target datasource: HikariDataSource (HikariPool-1)
2020-06-14 17:57:08.992  INFO 91561 --- [io-8080-exec-10] c.i.learnjava.config.RoutingDataSource   : determin target datasource: HikariDataSource (HikariPool-2)
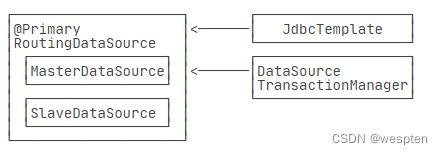
我们用一个图来表示创建的DataSource以及相关Bean的关系:
注意到DataSourceTransactionManager和JdbcTemplate引用的都是RoutingDataSource,所以,这种设计的一个限制就是:在一个请求中,一旦切换了内部数据源,在同一个事务中,不能再切到另一个,否则,DataSourceTransactionManager和JdbcTemplate操作的就不是同一个数据库连接。
10、添加Filter
Spring中的Filter,本质上就是通过代理,把Spring管理的Bean注册到Servlet容器中,不过步骤比较繁琐,需要配置web.xml。
在Spring Boot中,添加一个Filter更简单了,可以做到零配置。我们来看看在Spring Boot中如何添加Filter。
Spring Boot会自动扫描所有的FilterRegistrationBean类型的Bean,然后,将它们返回的Filter自动注册到Servlet容器中,无需任何配置。
我们还是以AuthFilter为例,首先编写一个AuthFilterRegistrationBean,它继承自FilterRegistrationBean:
@Component
public class AuthFilterRegistrationBean extends FilterRegistrationBean {
    @Autowired
    UserService userService;

    @Override
    public Filter getFilter() {
        setOrder(10);
        return new AuthFilter();
    }

    class AuthFilter implements Filter {
        ...
    }
}
FilterRegistrationBean本身不是Filter,它实际上是Filter的工厂。Spring Boot会调用getFilter(),把返回的Filter注册到Servlet容器中。因为我们可以在FilterRegistrationBean中注入需要的资源,然后,在返回的AuthFilter中,这个内部类可以引用外部类的所有字段,自然也包括注入的UserService,所以,整个过程完全基于Spring的IoC容器完成。
再注意到AuthFilterRegistrationBean使用了setOrder(10),因为Spring Boot支持给多个Filter排序,数字小的在前面,所以,多个Filter的顺序是可以固定的。
我们再编写一个ApiFilter,专门过滤/api/*这样的URL。首先编写一个ApiFilterRegistrationBean
@Component
public class ApiFilterRegistrationBean extends FilterRegistrationBean {
    @PostConstruct
    public void init() {
        setOrder(20);
        setFilter(new ApiFilter());
        setUrlPatterns(List.of("/api/*"));
    }

    class ApiFilter implements Filter {
        ...
    }
}
这个ApiFilterRegistrationBean和AuthFilterRegistrationBean又有所不同。因为我们要过滤URL,而不是针对所有URL生效,因此,在@PostConstruct方法中,通过setFilter()设置一个Filter实例后,再调用setUrlPatterns()传入要过滤的URL列表。
七、Mybatis-Plus 概述
1、Mybatis-Plus 简介
MyBatis-Plus(简称 MP)是一个 MyBatis 的增强工具,在 MyBatis 的基础上只做增强不做改变,为简化开发、提高效率而生。
-
官网:https://mybatis.plus/ 或 Redirect
-
文档地址:https://mybatis.plus/guide/
-
源码地址:GitHub - baomidou/mybatis-plus: An powerful enhanced toolkit of MyBatis for simplify development
特性:
- 无侵入:只做增强不做改变,引入它不会对现有工程产生影响,如丝般顺滑。
- 损耗小:启动即会自动注入基本 CURD,性能基本无损耗,直接面向对象操作。
- 强大的 CRUD 操作:内置通用 Mapper、通用 Service,仅仅通过少量配置即可实现单表大部分 CRUD 操作,更有强大的条件构造器,满足各类使用需求。
- 支持 Lambda 形式调用:通过 Lambda 表达式,方便的编写各类查询条件,无需再担心字段写错。
- 支持多种数据库:支持 MySQL、MariaDB、Oracle、DB2、H2、HSQL、SQLite、Postgre、SQLServer2005、SQLServer 等多种数据库。
- 支持主键自动生成:支持多达 4 种主键策略(内含分布式唯一 ID 生成器 - Sequence),可自由配置,完美解决主键问题。
- 支持 XML 热加载:Mapper 对应的 XML 支持热加载,对于简单的 CRUD 操作,甚至可以无 XML 启动。
- 支持 ActiveRecord 模式:支持 ActiveRecord 形式调用,实体类只需继承 Model 类即可进行强大的 CRUD 操作。
- 支持自定义全局通用操作:支持全局通用方法注入(Write once, use anywhere )。
- 支持关键词自动转义:支持数据库关键词(order、key、...)自动转义,还可自定义关键词。
- 内置代码生成器:采用代码或者 Maven 插件可快速生成 Mapper 、 Model 、 Service 、 Controller 层代码,支持模板引擎,更有超多自定义配置等你来使用。
- 内置分页插件:基于 MyBatis 物理分页,开发者无需关心具体操作,配置好插件之后,写分页等同于普通 List 查询。
- 内置性能分析插件:可输出 Sql 语句以及其执行时间,建议开发测试时启用该功能,能快速揪出慢查询。
- 内置全局拦截插件:提供全表 delete 、 update 操作智能分析阻断,也可自定义拦截规则,预防误操作。
- 内置 Sql 注入剥离器:支持 Sql 注入剥离,有效预防 Sql 注入攻击。
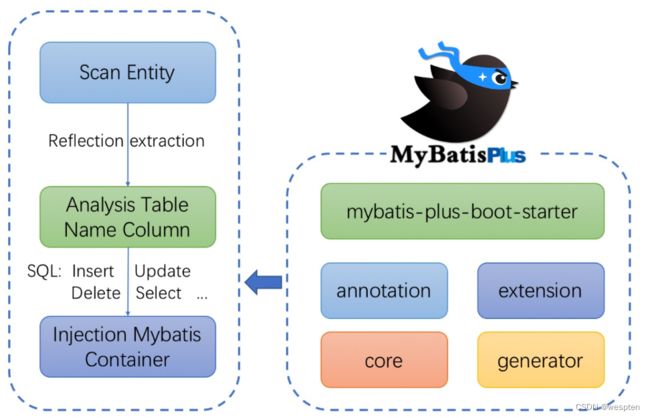
架构:
作者:
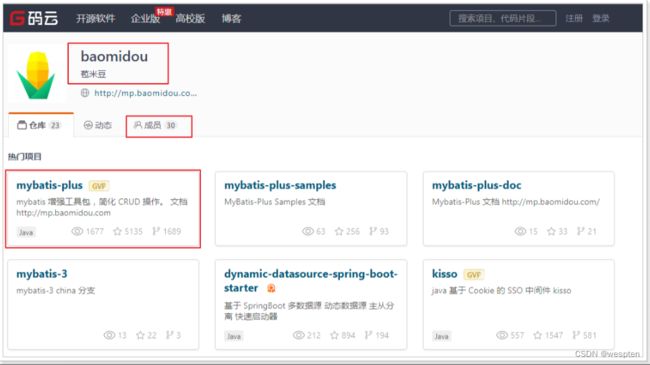
Mybatis-Plus 是由 baomidou(苞米豆)组织开发并且开源的,目前该组织大概有 30 人左右。
码云地址:baomidou: 苞米豆,为提高生产率而生!
2、Mybatis-Plus 快速入门
对于 Mybatis 整合 MP,有三种常用用法,分别是:
- Mybatis + MP
- Spring + Mybatis + MP
- Spring Boot + Mybatis + MP
表数据准备:
-- 创建测试表
CREATE TABLE `tb_user` (
  `id` bigint(20) NOT NULL AUTO_INCREMENT COMMENT '主键ID',
  `user_name` varchar(20) NOT NULL COMMENT '用户名',
  `password` varchar(20) NOT NULL COMMENT '密码',
  `name` varchar(30) DEFAULT NULL COMMENT '姓名',
  `age` int(11) DEFAULT NULL COMMENT '年龄',
  `email` varchar(50) DEFAULT NULL COMMENT '邮箱',
  PRIMARY KEY (`id`)
) ENGINE=InnoDB AUTO_INCREMENT=1 DEFAULT CHARSET=utf8;

-- 插入测试数据
INSERT INTO `tb_user` (`id`, `user_name`, `password`, `name`, `age`, `email`) VALUES ('1', 'zhangsan', '123456', '张三', '18', '[email protected]');
INSERT INTO `tb_user` (`id`, `user_name`, `password`, `name`, `age`, `email`) VALUES ('2', 'lisi', '123456', '李四', '20', '[email protected]');
INSERT INTO `tb_user` (`id`, `user_name`, `password`, `name`, `age`, `email`) VALUES ('3', 'wangwu', '123456', '王五', '28', '[email protected]');
INSERT INTO `tb_user` (`id`, `user_name`, `password`, `name`, `age`, `email`) VALUES ('4', 'zhaoliu', '123456', '赵六', '21', '[email protected]');
INSERT INTO `tb_user` (`id`, `user_name`, `password`, `name`, `age`, `email`) VALUES ('5', 'sunqi', '123456', '孙七', '24', '[email protected]');
1. Mybatis 整合 MP
导入依赖:
            com.baomidou
            mybatis-plus
            3.1.1


            mysql
            mysql-connector-java
            5.1.47


            com.alibaba
            druid
            1.0.11


            org.projectlombok
            lombok
            true
            1.18.4


            org.junit.jupiter
            junit-jupiter
            RELEASE
            test


            org.slf4j
            slf4j-log4j12
            1.6.4
2. JDBC 配置文件
jdbc.properties:
jdbc.driverClassName=com.mysql.cj.jdbc.Driver
jdbc.url=jdbc:mysql://localhost:3306/world?serverTimezone=UTC
jdbc.username=root
jdbc.password=admin
3. Mybatis 配置文件
Mybatis-config.xml:
4. User 实体类
package entity;

import com.baomidou.mybatisplus.annotation.TableName;
import lombok.AllArgsConstructor;
import lombok.Data;
import lombok.NoArgsConstructor;

@Data  // 代替getter、setter方法
@NoArgsConstructor  // 代替无参构造方法
@AllArgsConstructor  // 代替全参构造方法
@TableName("tb_user")  // 映射数据表名
public class User {

    private Long id;
    private String userName;
    private String password;
    private String name;
    private Integer age;
    private String email;

}
5. UserMapper.xml
6. 测试类
import com.baomidou.mybatisplus.core.MybatisSqlSessionFactoryBuilder;
import entity.User;
import mapper.UserMapper;
import org.apache.ibatis.io.Resources;
import org.apache.ibatis.session.SqlSession;
import org.apache.ibatis.session.SqlSessionFactory;
import org.junit.jupiter.api.Test;

import java.io.IOException;
import java.io.InputStream;
import java.util.List;

public class MybatisPlusTest {

    @Test
    void testDemo1() throws IOException {
        String resource = "mybatis-config.xml";
        InputStream inputStream = Resources.getResourceAsStream(resource);
        // 这里使用的是MP中的MybatisSqlSessionFactoryBuilder
        SqlSessionFactory sqlSessionFactory;
        sqlSessionFactory = new MybatisSqlSessionFactoryBuilder().build(inputStream);
        SqlSession sqlSession = sqlSessionFactory.openSession();

        UserMapper userMapper = sqlSession.getMapper(UserMapper.class);

        // 可以调用BaseMapper中定义的方法
        List list = userMapper.selectList(null);
        for (User user : list) {
            System.out.println(user);
        }
    }
}
执行结果:
...
[main] [mapper.UserMapper.selectList]-[DEBUG] ==>  Preparing: SELECT id,user_name,password,name,age,email FROM tb_user
[main] [mapper.UserMapper.selectList]-[DEBUG] ==> Parameters:
[main] [mapper.UserMapper.selectList]-[DEBUG] <==      Total: 5
User(id=1, userName=zhangsan, password=123456, name=张三, age=18, [email protected])
User(id=2, userName=lisi, password=123456, name=李四, age=20, [email protected])
User(id=3, userName=wangwu, password=123456, name=王五, age=28, [email protected])
User(id=4, userName=zhaoliu, password=123456, name=赵六, age=21, [email protected])
User(id=5, userName=sunqi, password=123456, name=孙七, age=24, [email protected])
八、SpringBoot整合Mybatis-Plus
使用 SpringBoot 可以进一步地简化 MP 的整合。
导入依赖:
            org.springframework.boot
            spring-boot-starter


                    org.springframework.boot
                    spring-boot-starter-logging


            org.springframework.boot
            spring-boot-starter-test
            test


            org.slf4j
            slf4j-log4j12


            org.projectlombok
            lombok
            true


            com.baomidou
            mybatis-plus-boot-starter
            3.1.1


            mysql
            mysql-connector-java
            8.0.11
log4j.properties:
log4j.rootLogger=DEBUG,A1

log4j.appender.A1=org.apache.log4j.ConsoleAppender
log4j.appender.A1.layout=org.apache.log4j.PatternLayout
log4j.appender.A1.layout.ConversionPattern=[%t] [%c]-[%p] %m%n
application.properties:
spring.application.name = mp-springboot

spring.datasource.driver-class-name=com.mysql.cj.jdbc.Driver
spring.datasource.url=jdbc:mysql://localhost:3306/world?serverTimezone=UTC&useUnicode=true&characterEncoding=utf8&autoReconnect=true&allowMultiQueries=true&useSSL=false
spring.datasource.username=root
spring.datasource.password=admin
实体类:
package com.example.apiweb.entity;

import com.baomidou.mybatisplus.annotation.TableName;
import lombok.Data;
import lombok.NoArgsConstructor;
import lombok.AllArgsConstructor;

@Data
@NoArgsConstructor
@AllArgsConstructor
@TableName("tb_user")
public class User {

    private Long id;
    private String userName;
    private String password;
    private String name;
    private Integer age;
    private String email;

}
mapper 接口:
package com.example.apiweb.mapper;

import com.baomidou.mybatisplus.core.mapper.BaseMapper;
import com.example.apiweb.entity.User;

public interface UserMapper extends BaseMapper {

}
启动类:
package com.example.apiweb;

import org.mybatis.spring.annotation.MapperScan;
import org.springframework.boot.SpringApplication;
import org.springframework.boot.autoconfigure.SpringBootApplication;

@MapperScan("com.example.apiweb.mapper")  // 设置mapper接口的扫描包
@SpringBootApplication
public class ApiWebApplication {

    public static void main(String[] args) {
        SpringApplication.run(ApiWebApplication.class, args);
    }

}
测试类:
package com.example.apiweb;

import com.example.apiweb.entity.User;
import com.example.apiweb.mapper.UserMapper;
import org.junit.jupiter.api.Test;
import org.springframework.beans.factory.annotation.Autowired;
import org.springframework.boot.test.context.SpringBootTest;

import java.util.List;

@SpringBootTest
class ApiWebApplicationTests {

    @Autowired
    private UserMapper userMapper;

    @Test
    void testSelectOne() {
        List userList = userMapper.selectList(null);
        for (User user : userList) {
            System.out.println(user);
        }
    }

}
测试结果:
User(id=1, userName=zhangsan, password=123456, name=张三, age=18, [email protected])
User(id=2, userName=lisi, password=123456, name=李四, age=20, [email protected])
User(id=3, userName=wangwu, password=123456, name=王五, age=28, [email protected])
User(id=4, userName=zhaoliu, password=123456, name=赵六, age=21, [email protected])
User(id=5, userName=sunqi, password=123456, name=孙七, age=24, [email protected])
九、Mybatis-Plus 使用
1、通用CRUD
1. 插入操作
方法定义:
    /**
     * 插入一条记录
     *
     * @param entity 实体对象
     */
    int insert(T entity);
MP 支持的 id 自增策略:
package com.baomidou.mybatisplus.annotation;

import lombok.Getter;

/**
 * 生成ID类型枚举类
 *
 * @author hubin
 * @since 2015-11-10
 */
@Getter
public enum IdType {
    /**
     * 数据库ID自增
     */
    AUTO(0),
    /**
     * 该类型为未设置主键类型
     */
    NONE(1),
    /**
     * 用户输入ID
     * 该类型可以通过自己注册自动填充插件进行填充
     */
    INPUT(2),

    /* 以下3种类型、只有当插入对象ID 为空,才自动填充。 */
    /**
     * 全局唯一ID (idWorker)
     */
    ID_WORKER(3),
    /**
     * 全局唯一ID (UUID)
     */
    UUID(4),
    /**
     * 字符串全局唯一ID (idWorker 的字符串表示)
     */
    ID_WORKER_STR(5);

    private final int key;

    IdType(int key) {
        this.key = key;
    }
}
实体类配置 id 自增策略:
package com.example.apiweb.entity;

import com.baomidou.mybatisplus.annotation.IdType;
import com.baomidou.mybatisplus.annotation.TableId;
import com.baomidou.mybatisplus.annotation.TableName;
import lombok.Data;
import lombok.NoArgsConstructor;
import lombok.AllArgsConstructor;

@Data
@NoArgsConstructor
@AllArgsConstructor
@TableName("tb_user")
public class User {

    @TableId(type= IdType.AUTO)  // 数据库主键自增
    private Long id;
    private String userName;
    private String password;
    private String name;
    private Integer age;
    private String email;

}
测试类:
    @Test
    void testInsert() {
        User user = new User();
        user.setName("小明");
        user.setAge(18);
        user.setUserName("xiaoming");
        user.setPassword("123456");
        user.setEmail("[email protected]");
        int resultRowCount = userMapper.insert(user);  // 返回受影响的行数
        System.out.println("result row count => " + resultRowCount);
        // 获取自增长后的id(会回填给User实体)
        System.out.println("new id => " + user.getId());
    }
测试结果:
result row count => 1
new id => 6
在 MP 中,可以通过 @TableField 注解来指定字段的一些属性。常用场景有以下两点:
-
对象中的属性名和字段名不一致的问题(非驼峰)。
-
对象中的属性字段在表中不存在的问题。
代码示例:
package com.example.apiweb.entity;

import com.baomidou.mybatisplus.annotation.IdType;
import com.baomidou.mybatisplus.annotation.TableField;
import com.baomidou.mybatisplus.annotation.TableId;
import com.baomidou.mybatisplus.annotation.TableName;
import lombok.Data;
import lombok.NoArgsConstructor;
import lombok.AllArgsConstructor;

@Data
@NoArgsConstructor
@AllArgsConstructor
@TableName("tb_user")
public class User {

    @TableId(type= IdType.AUTO)  // 设置主键增长策略
    private Long id;
    private String userName;
    @TableField(select = false)  // 查询时不返回该字段的值
    private String password;
    private String name;
    private Integer age;
    @TableField(value = "email")  // 解决属性名与数据库字段名不一致的问题
    private String mail;
    @TableField(exist = false)  // 解决数据库中不存在该字段的问题
    private String address;

}
测试效果:
2. 更新操作
在 MP 中,更新操作有两种方式:一种是根据 id 更新,另一种是根据条件更新。
1)根据 id 更新
方法定义:
    /**
     * 根据 ID 修改
     *
     * @param entity 实体对象
     */
    int updateById(@Param(Constants.ENTITY) T entity);
测试:
    @Test
    void testUpdateById() {
        User user = new User();
        user.setId(6L);  // 主键(6)
        user.setAge(21);  // 更新的字段

        // 根据id更新,更新不为 null 的字段
        int resultRowCount = userMapper.updateById(user);
        System.out.println("result row count =>" + resultRowCount);
    }
2)根据条件更新
方法定义:
    /**
     * 根据 whereEntity 条件,更新记录
     *
     * @param entity        实体对象 (set 条件值,可以为 null)
     * @param updateWrapper 实体对象封装操作类(可以为 null,里面的 entity 用于生成 where 语句)
     */
    int update(@Param(Constants.ENTITY) T entity, @Param(Constants.WRAPPER) Wrapper updateWrapper);
测试:
    // 方式一:通过 QueryWrapper
    @Test
    void testUpdateByQueryWrapper() {
        User user = new User();
        // 更新的字段
        user.setAge(23);
        // 更新的条件:主键为 6
        QueryWrapper wrapper = new QueryWrapper<>();
        wrapper.eq("id", 6);  // 此处的字段使用的是数据库的字段名,而不是实体类的属性名
        // 执行更新操作
        int resultRowCount = userMapper.update(user, wrapper);
        System.out.println("result row count => " + resultRowCount);

    }

    // 方式二:通过 UpdateWrapper
    @Test
    void testUpdateByUpdateWrapper() {
        // 更新的条件以及字段
        UpdateWrapper wrapper = new UpdateWrapper<>();
        wrapper.eq("id", 6).set("age", 24).set("email", "[email protected]");

        // 执行更新操作
        int resultRowCount = userMapper.update(null, wrapper);
        System.out.println("result row count => " + resultRowCount);
    }
3. 删除操作
1)根据主键删除
方法定义:
/**
 * 根据 ID 删除
 *
 * @param id:主键ID
 */
int deleteById(Serializable id);
测试:
    @Test
    void testDelete() {
        // 根据主键删除
        int resultRowCount = this.userMapper.deleteById(6L);
        System.out.println("result row count => " + resultRowCount);
    }
2)根据主键集合批量删除
方法定义:
    /**
     * 删除(根据 ID 批量删除)
     *
     * @param idList:主键ID列表(不能为null以及empty)
     */
    int deleteBatchIds(@Param(Constants.COLLECTION) Collection idList);
测试:
    @Test
    public void testDeleteByMap() {
        // 根据id集合批量删除
        int resultRowCount = this.userMapper.deleteBatchIds(Arrays.asList(1L, 2L, 3L));
        System.out.println("result row count => " + resultRowCount);
    }
3)根据数据库字段删除
方法定义:
    /**
     * 根据 columnMap 条件,删除记录
     *
     * @param columnMap 表字段 map 对象
     */
    int deleteByMap(@Param(Constants.COLUMN_MAP) Map columnMap);
测试:
    @Test
    public void testDeleteByMap() {
        Map columnMap = new HashMap<>();
        columnMap.put("age", 20);  // 删除条件1
        columnMap.put("name", "张三");  // 删除条件2

        // 将columnMap中的元素设置为删除的条件,多个之间为and关系
        int result = this.userMapper.deleteByMap(columnMap);
        System.out.println("result = " + result);
    }
4)根据实体属性删除
方法定义:
/**
 * 根据 entity 条件,删除记录
 *
 * @param wrapper 实体对象封装操作类(可以为 null)
 */
int delete(@Param(Constants.WRAPPER) Wrapper wrapper);
测试:
    @Test
    public void testDeleteByMap() {
        User user = new User();
        user.setAge(20);
        user.setName("张三");

        // 将实体对象进行包装,包装为操作条件
        QueryWrapper wrapper = new QueryWrapper<>(user);

        int result = this.userMapper.delete(wrapper);
        System.out.println("result = " + result);
    }
4. 查询操作
MP 提供了多种查询操作,比如根据 id 查询、批量查询、查询单条数据、查询列表、分页查询等。
1)根据主键查询
方法定义:
    /**
     * 根据 ID 查询
     *
     * @param id 主键ID
     */
    T selectById(Serializable id);
测试:
    @Test
    public void testSelectById() {
        //根据id查询数据
        User user = this.userMapper.selectById(2L);
        System.out.println("result = " + user);
    }
2)根据主键集合批量查询
方法定义:
    /**
     * 查询(根据ID 批量查询)
     *
     * @param idList 主键ID列表(不能为 null 以及 empty)
     */
    List selectBatchIds(@Param(Constants.COLLECTION) Collection idList);
测试:
    @Test
    public void testSelectBatchIds() {
        // 根据id集合批量查询
        List users = this.userMapper.selectBatchIds(Arrays.asList(2L, 3L, 10L));
        for (User user : users) {
            System.out.println(user);
        }
    }
3)根据实体属性查询一条数据
方法定义:
    /**
     * 根据 entity 条件,查询一条记录
     *
     * @param queryWrapper 实体对象封装操作类(可以为 null)
     */
     T selectOne(@Param(Constants.WRAPPER) Wrapper queryWrapper);
测试:
    @Test
    public void testSelectOne() {
        QueryWrapper wrapper = new QueryWrapper();
        wrapper.eq("name", "李四");

        // 根据条件查询一条数据,如果结果超过一条会报错
        User user = this.userMapper.selectOne(wrapper);
        System.out.println(user);
    }
4)根据实体属性查询多条数据
方法定义:
    /**
     * 根据 entity 条件,查询全部记录
     *
     * @param queryWrapper 实体对象封装操作类(可以为 null)
     */
    List selectList(@Param(Constants.WRAPPER) Wrapper queryWrapper);
测试:
    @Test
    public void testSelectList() {
        QueryWrapper wrapper = new QueryWrapper();
        wrapper.gt("age", 23);  // 年龄大于23岁

        // 根据条件查询数据
        List users = this.userMapper.selectList(wrapper);
        for (User user : users) {
            System.out.println("user = " + user);
        }
    }
5)查询总数
方法定义:
    /**
     * 根据 Wrapper 条件,查询总记录数
     *
     * @param queryWrapper 实体对象封装操作类(可以为 null)
     */
    Integer selectCount(@Param(Constants.WRAPPER) Wrapper queryWrapper);
测试:
    @Test
    public void testSelectCount() {
        QueryWrapper wrapper = new QueryWrapper();
        wrapper.gt("age", 23);  // 年龄大于23岁

        // 根据条件查询数据条数
        Integer count = this.userMapper.selectCount(wrapper);
        System.out.println("count = " + count);
    }
6)翻页查询
方法定义:
    /**
     * 根据 entity 条件,查询全部记录(并翻页)
     *
     * @param page         分页查询条件(可以为 RowBounds.DEFAULT)
     * @param queryWrapper 实体对象封装操作类(可以为 null)
     */
    IPage selectPage(IPage page, @Param(Constants.WRAPPER) Wrapper queryWrapper);
配置分页插件:
package com.example.apiweb.config;

import com.baomidou.mybatisplus.extension.plugins.PaginationInterceptor;
import org.mybatis.spring.annotation.MapperScan;
import org.springframework.context.annotation.Bean;
import org.springframework.context.annotation.Configuration;

@Configuration
@MapperScan("com.example.apiweb.mapper")  // 设置mapper接口的扫描包
public class PageConfig {
    /**
     * 分页插件
     */
    @Bean
    public PaginationInterceptor paginationInterceptor() {
        return new PaginationInterceptor();
    }
}
测试:
    @Test
    void testSelectPage() {
        QueryWrapper wrapper = new QueryWrapper();
        wrapper.gt("age", 20);  // 年龄大于20岁

        Page page = new Page<>(1,1);  // 查询第一页,每页一条数据

        // 根据条件查询数据
        IPage iPage = this.userMapper.selectPage(page, wrapper);
        System.out.println("数据总条数:" + iPage.getTotal());  // 3
        System.out.println("总页数:" + iPage.getPages());  // 3
        System.out.println("当前页数:" + iPage.getCurrent());  // 1
        // 遍历当前页的数据
        List users = iPage.getRecords();
        for (User user : users) {
            System.out.println("user = " + user);
        }
    }
2、条件构造器
在 MP 中,Wrapper 接口的实现类关系如下:
可以看到,AbstractWrapper 和 AbstractChainWrapper 是重点实现,接下来主要介绍 AbstractWrapper 及其子类。
说明:
QueryWrapper(LambdaQueryWrapper) 和 UpdateWrapper(LambdaUpdateWrapper) 的父类
用于生成 sql 的 where 条件, entity 属性也用于生成 sql 的 where 条件。
而 entity 生成的 where 条件与 使用各个 api 生成的 where 条件没有任何关联行为。
官网文档地址:https://mybatis.plus/guide/wrapper.html
1. allEq
方法定义一:
allEq(Map params)
allEq(Map params, boolean null2IsNull)
allEq(boolean condition, Map params, boolean null2IsNull)
个别参数说明:
params : key为数据库字段名,value为字段值
null2IsNull : 为true时,则在map的value为null时调用 isNull 方法;为false时,则忽略value为null。
- 例1:
allEq({id:1,name:"老王",age:null})表示id = 1 and name = '老王' and age is null - 例2:
allEq({id:1,name:"老王",age:null}, false)表示id = 1 and name = '老王'
方法定义二:
allEq(BiPredicate filter, Map params)
allEq(BiPredicate filter, Map params, boolean null2IsNull)
allEq(boolean condition, BiPredicate filter, Map params, boolean null2IsNull)
个别参数说明:
filter:过滤函数,是否允许字段传入比对条件中
params 与 null2IsNull:同上
- 例1:
allEq((k,v) -> k.indexOf("a") > 0, {id:1,name:"老王",age:null})表示name = '老王' and age is null - 例2:
allEq((k,v) -> k.indexOf("a") > 0, {id:1,name:"老王",age:null}, false)表示name = '老王'
测试:
    @Test
    public void testWrapper() {
        QueryWrapper wrapper = new QueryWrapper<>();

        // 设置条件
        Map params = new HashMap<>();
        params.put("name", "曹操");
        params.put("age", "20");
        params.put("password", null);

        // wrapper.allEq(params);  // 表示:SELECT * FROM tb_user WHERE password IS NULL AND name = ? AND age = ?
        // wrapper.allEq(params, false);  // 表示:SELECT * FROM tb_user WHERE name = ? AND age = ?

        // wrapper.allEq((k, v) -> (k.equals("name") || k.equals("age")) ,params);  // 表示:SELECT * FROM tb_user WHERE name = ? AND age = ?

        List users = this.userMapper.selectList(wrapper);
        for (User user : users) {
            System.out.println(user);
        }

    }
2. 基本比较操作
| 方法名 | 说明 |
|---|---|
| eq | 等于 = |
| ne | 不等于 <> |
| gt | 大于 > |
| ge | 大于等于 >= |
| lt | 小于 < |
| le | 小于等于 <= |
| between | BETWEEN 值1 AND 值2 |
| notBetween | NOT BETWEEN 值1 AND 值2 |
| in | 字段 IN (v0, v1, ...) |
| notIn | 字段 NOT IN (v0, v1, ...) |
测试:
    @Test
    public void testEq() {
        QueryWrapper wrapper = new QueryWrapper<>();

        // SELECT id,user_name,password,name,age,email FROM tb_user WHERE password = ? AND age >= ? AND name IN (?,?,?)
        wrapper.eq("password", "123456")
               .ge("age", 20)
               .in("name", "李四", "王五", "赵六");

        List users = this.userMapper.selectList(wrapper);
        for (User user : users) {
            System.out.println(user);
        }

    }
3. 模糊查询
| 方法名 | 说明 | 示例 |
|---|---|---|
| like | LIKE '%值%' | like("name", "王")表示name like '%王%' |
| notLike | NOT LIKE '%值%' | notLike("name", "王")表示name not like '%王%' |
| likeLeft | LIKE '%值' | likeLeft("name", "王")表示name like '%王' |
| likeRight | IKE '值%' | likeRight("name", "王")表示name like '王%' |
测试:
    @Test
    public void testWrapper() {
        QueryWrapper wrapper = new QueryWrapper<>();

        // SELECT id,user_name,password,name,age,email FROM tb_user WHERE name LIKE ?
        // Parameters: %曹%(String)
        wrapper.like("name", "曹");

        List users = this.userMapper.selectList(wrapper);
        for (User user : users) {
            System.out.println(user);
        }

    }
4. 排序
| 方法名 | 说明 | 示例 |
|---|---|---|
| orderBy | ORDER BY 字段, ... | orderBy(true, true, "id", "name")表示order by id ASC,name ASC |
| orderByAsc | ORDER BY 字段, ... ASC | orderByAsc("id", "name")表示order by id ASC,name ASC |
| orderByDesc | ORDER BY 字段, ... DESC | orderByDesc("id", "name")表示order by id DESC,name DESC |
测试:
    @Test
    public void testWrapper() {
        QueryWrapper wrapper = new QueryWrapper<>();

        // SELECT id,user_name,password,name,age,email FROM tb_user ORDER BY age DESC
        wrapper.orderByDesc("age");

        List users = this.userMapper.selectList(wrapper);
        for (User user : users) {
            System.out.println(user);
        }

    }
5. 逻辑查询
方法:
- or
- 拼接 OR
- 主动调用
or表示紧接着下一个方法不是用and连接(不调用or则默认为使用and连接)。
- and
- AND 嵌套
- 例:
and(i -> i.eq("name", "李白").ne("status", "活着"))表示and (name = '李白' and status <> '活着')
测试:
    @Test
    public void testWrapper() {
        QueryWrapper wrapper = new QueryWrapper<>();

        // SELECT id,user_name,password,name,age,email FROM tb_user WHERE name = ? OR age = ?
        wrapper.eq("name","李四").or().eq("age", 24);

        List users = this.userMapper.selectList(wrapper);
        for (User user : users) {
            System.out.println(user);
        }

    }
6. select
在 MP 中默认是查询所有的字段,如果有需要也可以通过 select 方法进行指定字段。
    @Test
    public void testWrapper() {
        QueryWrapper wrapper = new QueryWrapper<>();

        // SELECT id,name,age FROM tb_user WHERE name = ? OR age = ?
        wrapper.eq("name", "李四")
                .or()
                .eq("age", 24)
                .select("id", "name", "age");

        List users = this.userMapper.selectList(wrapper);
        for (User user : users) {
            System.out.println(user);
        }

    }
3、自动填充
有些时候我们可能会有这样的需求:在插入或更新数据时,希望有些字段可以自动填充数据,比如密码、version 等。在 MP 中就提供了这样的功能,可以实现自动填充。
1. 添加 @TableField 注解
@TableField(fill = FieldFill.INSERT)  // 插入数据时进行填充
private String password;
FieldFill 提供了多种模式选择:
public enum FieldFill {
    /**
    * 默认不处理
    */
    DEFAULT,

    /**
    * 插入时填充字段
    */
    INSERT,

    /**
    * 更新时填充字段
    */
    UPDATE,

    /**
    * 插入和更新时填充字段
    */
    INSERT_UPDATE
}
2. 编写 MyMetaObjectHandler
import com.baomidou.mybatisplus.core.handlers.MetaObjectHandler;
import org.apache.ibatis.reflection.MetaObject;
import org.springframework.stereotype.Component;

@Component
public class MyMetaObjectHandler implements MetaObjectHandler {

    // 插入时自动填充
    @Override
    public void insertFill(MetaObject metaObject) {
        Object password = getFieldValByName("password", metaObject);
        //字段为空时进行填充
        if(null == password){
            setFieldValByName("password", "123456", metaObject);
        }
    }

    // 更新时自动填充
    @Override
    public void updateFill(MetaObject metaObject) {
    }
}
3. 测试
@Test
public void testInsert(){
    User user = new User();
    user.setName("关羽");
    user.setUserName("guanyu");
    user.setAge(30);
    user.setEmail("[email protected]");
    user.setVersion(1);

    int result = this.userMapper.insert(user);
    System.out.println("result = " + result);
}
测试结果:
4、ActiveRecord
ActiveRecord(简称 AR)一直广受动态语言( PHP 、 Ruby 等)的喜爱,而 Java 作为准静态语言,对于
ActiveRecord 往往只能感叹其优雅。
什么是 ActiveRecord ?
- ActiveRecord 也属于 ORM(对象关系映射)层,由 Rails 最早提出,遵循标准的 ORM 模型:表映射到记录,记录映射到对象,字段映射到对象属性。配合遵循的命名和配置惯例,能够很大程度的快速实现模型的操作,而且简洁易懂。
- ActiveRecord 的主要思想:
- 每一个数据库表对应创建一个类,类的每一个对象实例对应于数据库中表的一行记录。通常表的每个字段
在类中都有相应的 Field 。 - ActiveRecord 同时负责把自己持久化,在 ActiveRecord 中封装了对数据库的访问,即 CURD 。
- ActiveRecord 是一种领域模型(Domain Model),封装了部分业务逻辑。
- 每一个数据库表对应创建一个类,类的每一个对象实例对应于数据库中表的一行记录。通常表的每个字段
1. 开启 AR
在 MP 中开启 AR 非常简单,只需要将实体对象继承 Model 即可(注意:UserMapper 还是需要保留的)。
package com.example.apiweb.entity;

import com.baomidou.mybatisplus.annotation.IdType;
import com.baomidou.mybatisplus.annotation.TableField;
import com.baomidou.mybatisplus.annotation.TableId;
import com.baomidou.mybatisplus.annotation.TableName;
import com.baomidou.mybatisplus.extension.activerecord.Model;
import lombok.Data;
import lombok.NoArgsConstructor;
import lombok.AllArgsConstructor;

@Data
@NoArgsConstructor
@AllArgsConstructor
@TableName("tb_user")
public class User extends Model {

    @TableId(type= IdType.AUTO)  // 设置主键增长策略
    private Long id;
    private String userName;
    private String password;
    private String name;
    private Integer age;
    private String email;

}
2. 根据主键查询
    @Test
    void testSelectById() {
        User user = new User();
        user.setId(2L);
        User resultUser = user.selectById();
        System.out.println(resultUser);
    }
3. 新增操作
    @Test
    public void testAR() {
        User user = new User();
        user.setName("刘备");
        user.setAge(30);
        user.setPassword("123456");
        user.setUserName("liubei");
        user.setEmail("[email protected]");
        boolean insert = user.insert();
        System.out.println(insert);
    }
4. 根据主键更新
    @Test
    public void testAR() {
        User user = new User();
        user.setId(8L);
        user.setAge(35);
        boolean update = user.updateById();
        System.out.println(update);
    }
5. 根据主键删除
    @Test
    public void testAR() {
        User user = new User();
        user.setId(7L);
        boolean delete = user.deleteById();
        System.out.println(delete);
    }
6. 根据条件查询
    @Test
    public void testAR() {
        User user = new User();
        QueryWrapper userQueryWrapper = new QueryWrapper<>();
        userQueryWrapper.le("age", "20");
        // 根据条件更新、删除等操作的用法相同
        List users = user.selectList(userQueryWrapper);

        for (User user1 : users) {
        	System.out.println(user1);
        }
    }
5、逻辑删除
在系统开发中,有时删除操作需要实现逻辑删除,所谓逻辑删除就是将数据标记为删除,而并非真正的物理删除(非 DELETE 操作),在查询时需要携带状态条件,确保被标记的数据不被查询到。这样做的目的就是避免数据被真正的删除。
1. 修改表结构
为 tb_user 表增加 deleted 字段,用于表示数据是否被删除,1 代表删除,0 代表未删除。
ALTER TABLE `tb_user` ADD COLUMN `deleted` int(1) NULL DEFAULT 0 COMMENT '1代表删除,0代表未删除' AFTER `version`;同时,也修改 User 实体,增加 deleted 属性并且添加 @TableLogic 注解:
@TableLogic
private Integer deleted;
2. 配置
application.properties:
# 逻辑已删除值(默认为 1)
mybatis-plus.global-config.db-config.logic-delete-value=1
# 逻辑未删除值(默认为 0)
mybatis-plus.global-config.db-config.logic-not-delete-value=0
3. 测试删除
@Test
public void testDeleteById(){
    this.userMapper.deleteById(2L);
}
测试结果:
[main] [cn.itcast.mp.mapper.UserMapper.deleteById]-[DEBUG] ==> Preparing: UPDATE
tb_user SET deleted=1 WHERE id=? AND deleted=0
[main] [cn.itcast.mp.mapper.UserMapper.deleteById]-[DEBUG] ==> Parameters: 2(Long)
[main] [cn.itcast.mp.mapper.UserMapper.deleteById]-[DEBUG] <== Updates: 1
4. 测试查询
@Test
public void testSelectById(){
    User user = this.userMapper.selectById(2L);
    System.out.println(user);
}
测试结果:
[main] [cn.itcast.mp.mapper.UserMapper.selectById]-[DEBUG] ==> Preparing: SELECT
id,user_name,password,name,age,email,version,deleted FROM tb_user WHERE id=? AND
deleted=0
[main] [cn.itcast.mp.mapper.UserMapper.selectById]-[DEBUG] ==> Parameters: 2(Long)
[main] [cn.itcast.mp.mapper.UserMapper.selectById]-[DEBUG] <== Total: 0
可见,已经实现了逻辑删除。
6、通用枚举
此方案解决了繁琐的配置,让 mybatis 优雅地使用枚举属性。
1. 修改表结构
ALTER TABLE `tb_user` ADD COLUMN `sex` int(1) NULL DEFAULT 1 COMMENT '1-男,2-女' AFTER `deleted`;2. 定义枚举
package=cn.itcast.mp.enums;

import com.baomidou.mybatisplus.core.enums.IEnum;
import com.fasterxml.jackson.annotation.JsonValue;

public enum SexEnum implements IEnum {

    MAN(1,"男"),
    WOMAN(2,"女");

    private int value;
    private String desc;

    SexEnum(int value, String desc) {
        this.value = value;
        this.desc = desc;
    }

    @Override
    public Integer getValue() {
        return this.value;
    }

    @Override
    public String toString() {
        return this.desc;
    }
}
3. 配置
# 枚举包扫描
mybatis-plus.type-enums-package=cn.itcast.mp.enums
4. 修改实体类
private SexEnum sex;5. 测试插入数据
@Test
public void testInsert(){
    User user = new User();
    user.setName("貂蝉");
    user.setUserName("diaochan");
    user.setAge(20);
    user.setEmail("[email protected]");
    user.setVersion(1);

    user.setSex(SexEnum.WOMAN);

    int result = this.userMapper.insert(user);
    System.out.println("result = " + result);
}
测试结果:
[main] [cn.itcast.mp.mapper.UserMapper.insert]-[DEBUG] ==> Preparing: INSERT INTO
tb_user ( user_name, password, name, age, email, version, sex ) VALUES ( ?, ?, ?, ?, ?,
?, ? )
[main] [cn.itcast.mp.mapper.UserMapper.insert]-[DEBUG] ==> Parameters:
diaochan(String), 123456(String), 貂蝉(String), 20(Integer), [email protected](String),
1(Integer), 2(Integer)
[main] [cn.itcast.mp.mapper.UserMapper.insert]-[DEBUG] <== Updates: 1
6. 测试查询
@Test
public void testSelectById(){
    User user = this.userMapper.selectById(2L);
    System.out.println(user);
}
测试结果:
[main] [cn.itcast.mp.mapper.UserMapper.selectById]-[DEBUG] ==> Preparing: SELECT
id,user_name,password,name,age,email,version,deleted,sex FROM tb_user WHERE id=? AND
deleted=0
[main] [cn.itcast.mp.mapper.UserMapper.selectById]-[DEBUG] ==> Parameters: 2(Long)
[main] [cn.itcast.mp.mapper.UserMapper.selectById]-[DEBUG] <== Total: 1
User(id=2, userName=lisi, password=123456, name=李四, age=30, [email protected],
address=null, version=2, deleted=0, sex=女)
条件查询时也是有效的:
@Test
public void testSelectBySex() {
    QueryWrapper wrapper = new QueryWrapper<>();
    wrapper.eq("sex", SexEnum.WOMAN);
    List users = this.userMapper.selectList(wrapper);
    for (User user : users) {
        System.out.println(user);
    }
}
测试结果:
[main] [cn.itcast.mp.mapper.UserMapper.selectList]-[DEBUG] ==> Preparing: SELECT
id,user_name,password,name,age,email,version,deleted,sex FROM tb_user WHERE deleted=0
AND sex = ?
[main] [cn.itcast.mp.mapper.UserMapper.selectList]-[DEBUG] ==> Parameters: 2(Integer)
[main] [cn.itcast.mp.mapper.UserMapper.selectList]-[DEBUG] <== Total: 3
