ubuntu18.04_host环境搭建__OpenVINO安装
最后一步又报错了,仅团队交流学习用,不算经验贴
1. OpenVINO介绍
What is OpenVINO?
Intel’s OpenVINO is an acceleration library for optimized computing with Intel’s hardware portfolio.
OpenVINO supports Intel CPUs, GPUs, FPGAs, and VPUs.
Deep learning libraries you’ve come to rely upon such as TensorFlow, Caffe, and mxnet are supported by OpenVINO.
Intel has even optimized OpenCV’s DNN module to support its hardware for deep learning.
In fact, many newer smart cameras use Intel’s hardware along with the OpenVINO toolkit. OpenVINO is edge computing and IoT at its finest — it enables resource-constrained devices like the Raspberry Pi to work with the Movidius coprocessor to perform deep learning at speeds that are useful for real-world applications.
2. Installing OpenVINO’s optimized OpenCV on the ubuntu18.04
Let’s update our system:
$ sudo apt-get update && sudo apt-get upgrade
2.2 And then install developer tools including CMake:
$ sudo apt-get install build-essential cmake unzip pkg-config
2.3 Next
It is time to install a selection of image and video libraries — these are key to being able to work with image and video files:
$ sudo apt-get install libjpeg-dev libpng-dev libtiff-dev
$ sudo apt-get install libavcodec-dev libavformat-dev libswscale-dev libv4l-dev
$ sudo apt-get install libxvidcore-dev libx264-dev
From there, let’s install GTK, our GUI backend:
$ sudo apt-get install libgtk-3-dev
And now let’s install a package which may help to reduce GTK warnings:
$ sudo apt-get install libcanberra-gtk*
The asterisk ensures we will grab the ARM-specific GTK. It is required.
Now we need two packages which contain numerical optimizations for OpenCV:
$ sudo apt-get install libatlas-base-dev gfortran
And finally, let’s install the Python 3 development headers:
$ sudo apt-get install python3-dev
Once you have all of these prerequisites installed you can move on to the next step.
2.4: install the Intel® Distribution of OpenVINO™ Toolkit Core Components for your ubuntu18.04
Download the Intel® Distribution of OpenVINO™ toolkit package file from Intel® Distribution of OpenVINO™ toolkit for Linux*. Select the Intel® Distribution of OpenVINO™ toolkit for Linux package from the dropdown menu.
- Open a command prompt terminal window.
- Change directories to where you downloaded the Intel Distribution of OpenVINO toolkit for Linux* package file.
If you downloaded the package file to the current user’ssoftwaredirectory:
cd ~/software/
By default, the file is saved as l_openvino_toolkit_p_ 1
- Unpack the .tgz file:
tar -xvzf l_openvino_toolkit_p_<version>.tgz
The files are unpacked to the l_openvino_toolkit_p_ directory.
- Go to the
l_openvino_toolkit_p_directory:
cd l_openvino_toolkit_p_<version>
If you have a previous version of the Intel Distribution of OpenVINO toolkit installed, rename or delete these two directories:
~/inference_engine_samples_build~/openvino_models
- Choose your installation option and run the related script as root to use either a GUI installation wizard or command line instructions (CLI).
Screenshots are provided for the GUI, but not for CLI. The following information also applies to CLI and will be helpful to your installation where you will be presented with the same choices and tasks.
- Option 1: GUI Installation Wizard:2
sudo ./install_GUI.sh
- Option 2: Command Line Instructions:
sudo ./install.sh
- Option 3: Command Line Silent Instructions:
sudo sed -i 's/decline/accept/g' silent.cfg
sudo ./install.sh -s silent.cfg
You can select which OpenVINO components will be installed by modifying the COMPONENTS parameter in the silent.cfg file. For example, to install only CPU runtime for the Inference Engine, set COMPONENTS=intel-openvino-ie-rt-cpu__x86_64 in silent.cfg. To get a full list of available components for installation, run the ./install.sh --list_components command from the unpacked OpenVINO™ toolkit package.
在这个页面,个人不喜欢被收集个人信息,因此选择第二项,选第一项也没差的,点击NEXT后会出现进度条,等待结束自动跳转。

- Follow the instructions on your screen. Watch for informational messages such as the following in case you must complete additional steps:

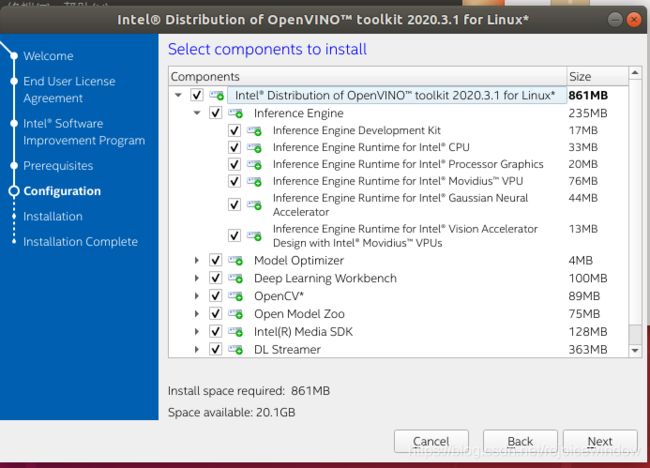
- If you select the default options, the Installation summary GUI screen looks like this:

By default, the Intel® Distribution of OpenVINO™ is installed to the following directory, referred to as
For root or administrator: /opt/intel/openvino_
For regular users: /home/ For simplicity, a symbolic link to the latest installation is also created: /opt/intel/openvino_2020.4.287/.
- Optional: You can choose Customize to change the installation directory or the components you want to install:
NOTE: If there is an OpenVINO™ toolkit version previously installed on your system, the installer will use the same destination directory for next installations. If you want to install a newer version to a different directory, you need to uninstall the previously installed versions.
NOTE: The Intel® Media SDK component is always installed in the
/opt/intel/mediasdkdirectory regardless of the OpenVINO installation path chosen.
- A Complete screen indicates that the core components have been installed:
The first core components are installed. Continue to the next section to install additional dependencies.
2.5 Install External Software Dependencies
NOTE: If you installed the Intel® Distribution of OpenVINO™ to the non-default install directory, replace /opt/intel with the directory in which you installed the software.
These dependencies are required for:
- Intel-optimized build of OpenCV library
- Deep Learning Inference Engine
- Deep Learning Model Optimizer tools
- Change to the install_dependencies directory:
- Change to the
install_dependenciesdirectory:
cd /opt/intel/openvino_2020.4.287/install_dependencies
- Run a script to download and install the external software dependencies:
sudo -E ./install_openvino_dependencies.sh
The dependencies are installed. Continue to the next section to set your environment variables.
PS:此处如果出现错误:
ModuleNotFoundError: No module named 'apt_pkg'
解决办法:
sudo apt-get remove --purge python3-apt
sudo apt-get install python3-apt -f
cd /usr/lib/python3/dist-packages/
sudo cp apt_pkg.cpython-36m-x86_64-linux-gnu.so apt_pkg.cpython-37m-x86_64-linux-gnu.so
3. Set the Environment Variables
You must update several environment variables before you can compile and run OpenVINO™ applications. Run the following script to temporarily set your environment variables:
source /opt/intel/openvino_2020.4.287/bin/setupvars.sh
为了下次启用方便,此步骤还是做一下:
Optional: The OpenVINO environment variables are removed when you close the shell. As an option, you can permanently set the environment variables as follows:
- Open the
.bashrcfile in
vi ~/.bashrc
- Add this line to the end of the file:
source /opt/intel/openvino_2020.4.287/bin/setupvars.sh
- Save and close the file: press the Esc key and type
:wq. - To test your change, open a new terminal. You will see
[setupvars.sh] OpenVINO environment initialized.
The environment variables are set. Continue to the next section to configure the Model Optimizer.
Configure the Model Optimizer
The Model Optimizer is a Python*-based command line tool for importing trained models from popular deep learning frameworks such as Caffe*, TensorFlow*, Apache MXNet*, ONNX* and Kaldi*.
The Model Optimizer is a key component of the Intel Distribution of OpenVINO toolkit. You cannot perform inference on your trained model without running the model through the Model Optimizer. When you run a pre-trained model through the Model Optimizer, your output is an Intermediate Representation (IR) of the network. The Intermediate Representation is a pair of files that describe the whole model:
.xml: Describes the network topology.bin: Contains the weights and biases binary data- For more information about the Model Optimizer, refer to the Model Optimizer Developer Guide.
4. Model Optimizer Configuration Steps
You can choose to either configure all supported frameworks at once OR configure one framework at a time. Choose the option that best suits your needs. If you see error messages, make sure you installed all dependencies.
NOTE: Since the TensorFlow framework is not officially supported on CentOS*, the Model Optimizer for TensorFlow can’t be configured and ran on those systems.
IMPORTANT: The Internet access is required to execute the following steps successfully. If you have access to the Internet through the proxy server only, please make sure that it is configured in your OS environment.
简单起见,选择第一种方式
>>> Option 1: Configure all supported frameworks at the same time
- Go to the Model Optimizer prerequisites directory:
cd /opt/intel/openvino_2020.4.287/deployment_tools/model_optimizer/install_prerequisites
- Run the script to configure the Model Optimizer for Caffe, TensorFlow 1.x, MXNet, Kaldi*, and ONNX:
sudo ./install_prerequisites.sh
PS: 如果此处出现错误:
- fatal: 不是一个 git 仓库(或者任何父目录):.git
解决:
Command "/usr/bin/python3 -u -c "import setuptools, tokenize;
__file__='/tmp/pip-build-u18wjxip/onnx/setup.py';
f=getattr(tokenize, 'open', open)(__file__);code=f.read().replace('\r\n', '\n');f.close();exec(compile(code, __file__, 'exec'))" install --record /tmp/pip-cigm8pw8-record/install-record.txt --single-version-externally-managed --compile"
failed with error code 1 in /tmp/pip-build-u18wjxip/onnx/
解决办法:
sudo apt-get remove protobuf-compiler
sudo apt-get install protobuf-compiler
Option 2: Configure each framework separately
Configure individual frameworks separately ONLY if you did not select Option 1 above.
- Go to the Model Optimizer prerequisites directory:
cd /opt/intel/openvino_2020.4.287/deployment_tools/model_optimizer/install_prerequisites
- Run the script for your model framework. You can run more than one script:
For Caffe:
sudo ./install_prerequisites_caffe.sh
For TensorFlow 1.x:
sudo ./install_prerequisites_tf.sh
For TensorFlow 2.x:
sudo ./install_prerequisites_tf2.sh
For MXNet:
sudo ./install_prerequisites_mxnet.sh
For ONNX:
sudo ./install_prerequisites_onnx.sh
For Kaldi:
sudo ./install_prerequisites_kaldi.sh
The Model Optimizer is configured for one or more frameworks.
You have completed all required installation, configuration and build steps in this guide to use your CPU to work with your trained models.
To enable inference on other hardware, see:
- Steps for Intel® Processor Graphics (GPU)
- Steps for Intel® Neural Compute Stick 2
- Steps for Intel® Vision Accelerator Design with Intel® Movidius™ VPUs
Or proceed to the Get Started to get started with running code samples and demo applications.
5. Steps for Intel® Neural Compute Stick 2
因为我买的计算棒2,所以后面只截取计算棒2方面的教程,需要其他的教程,直接进入原网页看就行了(文末资源第2个链接)
These steps are only required if you want to perform inference on Intel® Movidius™ NCS powered by the Intel® Movidius™ Myriad™ 2 VPU or Intel® Neural Compute Stick 2 powered by the Intel® Movidius™ Myriad™ X VPU. See also the Get Started page for Intel® Neural Compute Stick 2:
- Add the current Linux user to the
usersgroup:
sudo usermod -a -G users "$(whoami)"
Log out and log in for it to take effect.
- To perform inference on Intel® Neural Compute Stick 2, install the USB rules as follows:
sudo cp /opt/intel/openvino_2020.3.341/inference_engine/external/97-myriad-usbboot.rules /etc/udev/rules.d/
sudo udevadm control --reload-rules
sudo udevadm trigger
sudo ldconfig
NOTE: You may need to reboot your machine for this to take effect.
You’ve completed all required configuration steps to perform inference on Intel® Neural Compute Stick 2. Proceed to the Get Started to get started with running code samples and demo applications.
6. Get Started
Now you are ready to get started. To continue, see the following pages:
- OpenVINO™ Toolkit Overview
- Get Started Guide for Linux to learn the basic OpenVINO™ toolkit workflow and run code samples and demo applications with pre-trained models on different inference devices.
如果需要关于卸载和其他资源部分,直接进入原链接看即可(文末资源第2个链接)
资源:
- OpenVINO, OpenCV, and Movidius NCS on the Raspberry Pi.
- Get Started with OpenVINO™ Toolkit on Linux*.
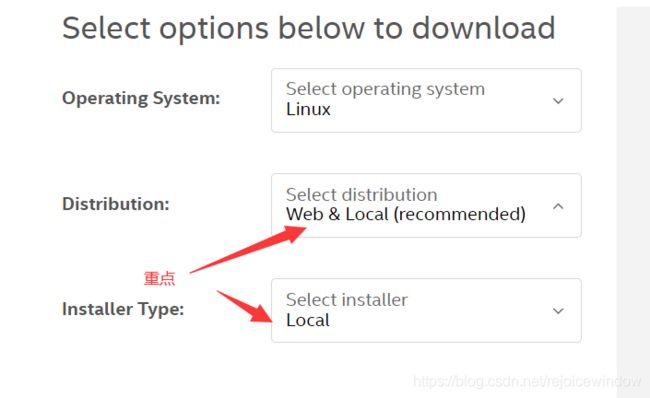
PS:点击上面的下载链接,上面推荐了很多方法,gitee、github下载下来的文件与本教程完全不一致,因为本人比较懒,一直不选注册下载完整安装包的选项,不管怎么试都不能跟着教程安装一样,最后只能乖乖的去注册下载,为了保持与部署端树莓派的版本一致,我选了2020 4版本,可按自己需求安装不同版本。
下载方法:
点击下载链接.,单击:

进入下一个链接,继续选择:
初次使用的话,根据提示把信息注册好,会自动跳转到下载链接:
 ↩︎
↩︎GUI方式无疑是最方便的安装方式,注意:不管是采取哪种安装方式,设备都必须是64位的,不然就会出现这个:
 ↩︎
↩︎