tensorrt基础知识+torch版lenet转c++ trt
官网文档
API文档
Docker镜像
自定义Plugin仓库
0.安装
1.安装tensorrt
从官网下载.deb包,要注意的是cuda版本
sudo dpkg -i nv-tensorrt-repo-ubuntu1604-cuda10.0-trt7.0.0.11-ga-20191216_1-1_amd64.deb
sudo apt update
sudo apt install tensorrt
Engine plan 的兼容性依赖于GPU的compute capability 和 TensorRT 版本, 不依赖于CUDA和CUDNN版本.
2.安装opencv
sudo apt-get update
sudo apt install libopencv-dev
apt-get install tensorrt报错
https://github.com/NVIDIA/TensorRT/issues/792
 tensorrt : Depends: libnvinfer7 (= 7.0.0-1+cuda10.0) but 7.2.2-1+cuda11.1 is to be installed
            Depends: libnvinfer-plugin7 (= 7.0.0-1+cuda10.0) but 7.2.2-1+cuda11.1 is to be installed
            Depends: libnvparsers7 (= 7.0.0-1+cuda10.0) but 7.2.2-1+cuda11.1 is to be installed
            Depends: libnvonnxparsers7 (= 7.0.0-1+cuda10.0) but 7.2.2-1+cuda11.1 is to be installed
            Depends: libnvinfer-bin (= 7.0.0-1+cuda10.0) but it is not going to be installed
            Depends: libnvinfer-dev (= 7.0.0-1+cuda10.0) but 7.2.2-1+cuda11.1 is to be installed
            Depends: libnvinfer-plugin-dev (= 7.0.0-1+cuda10.0) but 7.2.2-1+cuda11.1 is to be installed
            Depends: libnvparsers-dev (= 7.0.0-1+cuda10.0) but 7.2.2-1+cuda11.1 is to be installed
            Depends: libnvonnxparsers-dev (= 7.0.0-1+cuda10.0) but 7.2.2-1+cuda11.1 is to be installed
            Depends: libnvinfer-samples (= 7.0.0-1+cuda10.0) but it is not going to be installed
            Depends: libnvinfer-doc (= 7.0.0-1+cuda10.0) but it is not going to be installed
mv /etc/apt/sources.list.d/nvidia-ml.list /etc/apt/sources.list.d/nvidia-ml.list.bak
在apt-get install tensorrt 即可
1.优化流程:
TensorRT总共有5个阶段:创建网络、构建推理Engine、序列化引擎、反序列化引擎以及执行推理Engine。
其中第1,2,3大概就是c++api写的网络结构或者其他第三方格式,经过NetworkDefinition进行定义,采用builder加载模型权重,进行一些参数的优化,然后再用engine序列化成“Plan”(流图),其不仅保存了计算时所需的网络weights也保存了Kernel执行的调度流程。。
而4,5就是推理:采用engine反序列化,创建运行环境,在进行推理即可。
可看出TensorRT在获得网络计算流图后会针对计算流图进行优化.
深度学习框架在做推理时,会对每一层调用多个/次功能函数。而由于这样的操作都是在GPU上运行的,从而会带来多次的CUDA Kernel launch过程。相较于Kernel launch以及每层tensor data读取来说,kernel的计算是更快更轻量的,从而使得这个程序受限于显存带宽并损害了GPU利用率。
TensorRT通过以下三种方式来解决这个问题:
-
Kernel纵向融合:通过融合相同顺序的操作来减少Kernel Launch的消耗以及避免层之间的显存读写操作。如上图所示,卷积、Bias和Relu层可以融合成一个Kernel,这里称之为CBR。
-
Kernel横向融合:TensorRT会去挖掘输入数据且filter大小相同但weights不同的层,对于这些层不是使用三个不同的Kernel而是使用一个Kernel来提高效率,如上图中超宽的1x1 CBR所示,把结构相同但权重不同的层合并成更宽的层,从而减少cuda核心的使用.。
-
消除concatenation层,通过预分配输出缓存以及跳跃式的写入方式来避免这次转换。
通过这样的优化,TensorRT可以获得更小、更快、更高效的计算流图,其拥有更少层网络结构以及更少Kernel Launch次数。下表列出了常见几个网络在TensorRT优化后的网络层数量,很明显的看到TensorRT可以有效的优化网络结构、减少网络层数从而带来性能的提升。
2.torch版lenet转trt
2.1 torch版代码:
lenet.py
# coding:utf-8
import torch
from torch import nn
from torch.nn import functional as F


class Lenet5(nn.Module):
    """
    for cifar10 dataset.
    """

    def __init__(self):
        super(Lenet5, self).__init__()

        self.conv1 = nn.Conv2d(1, 6, kernel_size=5, stride=1, padding=0)
        self.pool1 = nn.AvgPool2d(kernel_size=2, stride=2, padding=0)
        self.conv2 = nn.Conv2d(6, 16, kernel_size=5, stride=1, padding=0)
        self.fc1 = nn.Linear(16 * 5 * 5, 120)
        self.fc2 = nn.Linear(120, 84)
        self.fc3 = nn.Linear(84, 10)

    def forward(self, x):
        # print('input: ', x.shape)
        x = F.relu(self.conv1(x))
        # print('conv1', x.shape)
        x = self.pool1(x)
        # print('pool1: ', x.shape)
        x = F.relu(self.conv2(x))
        # print('conv2', x.shape)
        x = self.pool1(x)
        # print('pool2', x.shape)
        x = x.view(x.size(0), -1)
        # print('view: ', x.shape)
        x = F.relu(self.fc1(x))
        # print('fc1: ', x.shape)
        x = F.relu(self.fc2(x))
        x = F.softmax(self.fc3(x), dim=1)
        return x


def main():
    import os
    os.environ["CUDA_VISIBLE_DEVICES"] = "1"
    print('cuda device count: ', torch.cuda.device_count())
    torch.manual_seed(1234)
    net = Lenet5()
    net = net.to('cuda:0')
    net.eval()
    import time
    st_time = time.time()
    nums = 10000
    for i in range(nums):
        tmp = torch.ones(1, 1, 32, 32).to('cuda:0')
        out = net(tmp)
        # print('lenet out shape:', out.shape)
    print('lenet out:', out)
    end_time = time.time()
    print('==cost time{}'.format((end_time - st_time)))
    torch.save(net, "lenet5.pth")


if __name__ == '__main__':
    main()
将模型权重存储为.pth,并测试时间为:
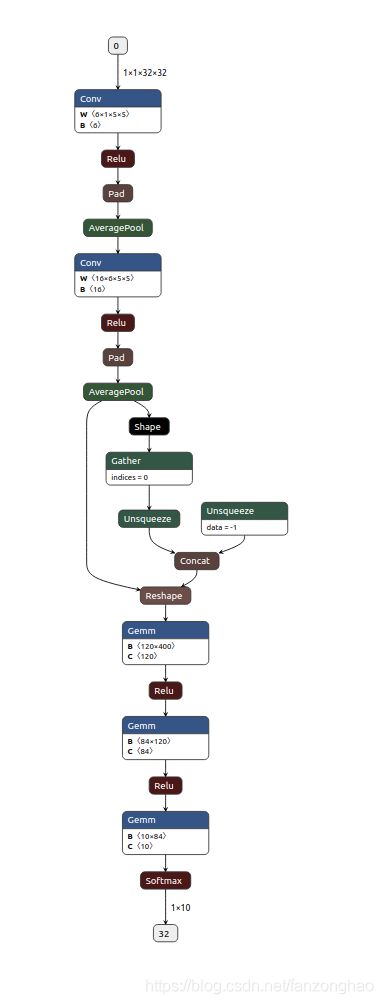
2.2.pth存储为.onnx
为了方便查看网络结构
# coding:utf-8
import torch
from torch import nn
from torch.nn import functional as F

class Lenet5(nn.Module):
    """
    for cifar10 dataset.
    """

    def __init__(self):
        super(Lenet5, self).__init__()

        self.conv1 = nn.Conv2d(1, 6, kernel_size=5, stride=1, padding=0)
        self.pool1 = nn.AvgPool2d(kernel_size=2, stride=2, padding=0)
        self.conv2 = nn.Conv2d(6, 16, kernel_size=5, stride=1, padding=0)
        self.fc1 = nn.Linear(16 * 5 * 5, 120)
        self.fc2 = nn.Linear(120, 84)
        self.fc3 = nn.Linear(84, 10)

    def forward(self, x):
        # print('input: ', x.shape)
        x = F.relu(self.conv1(x))
        # print('conv1', x.shape)
        x = self.pool1(x)
        # print('pool1: ', x.shape)
        x = F.relu(self.conv2(x))
        # print('conv2', x.shape)
        x = self.pool1(x)
        # print('pool2', x.shape)
        x = x.view(x.size(0), -1)
        # print('view: ', x.shape)
        x = F.relu(self.fc1(x))
        # print('fc1: ', x.shape)
        x = F.relu(self.fc2(x))
        x = F.softmax(self.fc3(x), dim=1)
        return x

def main():
    import os
    os.environ["CUDA_VISIBLE_DEVICES"] = "1"
    print('cuda device count: ', torch.cuda.device_count())
    torch.manual_seed(1234)
    net = Lenet5()
    net = net.to('cuda:0')
    net.eval()
    import time
    st_time = time.time()
    nums = 10000
    for i in range(nums):
        tmp = torch.ones(1, 1, 32, 32).to('cuda:0')
        out = net(tmp)
        # print('lenet out shape:', out.shape)
    print('lenet out:', out)
    end_time = time.time()
    print('==cost time{}'.format((end_time - st_time)))
    torch.save(net, "lenet5.pth")

def model_onnx():
    input = torch.ones(1, 1, 32, 32, dtype=torch.float32).cuda()
    model = Lenet5()
    model = model.cuda()
    torch.onnx.export(model, input, "./lenet.onnx", verbose=True)

if __name__ == '__main__':
    # main()
    model_onnx()
抓换onnx,遇到好几种问题,用这种基本都解决了.
    torch.onnx.export(model,  # model being run
                      input,  # model input (or a tuple for multiple inputs)
                      "./xxxx.onnx",
                      opset_version=10,
                      verbose=False,  # store the trained parameter weights inside the model file
                      training=False,
                      do_constant_folding=True,
                      input_names=['input'],
                      output_names=['output']
                      )
2.3 .pth存储为.wts
将模型权重按照key,value形式存储为16进制文件, inference.py
import torch
from torch import nn
from lenet5 import Lenet5
import os
import struct

def main():
    print('cuda device count: ', torch.cuda.device_count())
    net = torch.load('lenet5.pth')
    net = net.to('cuda:0')
    net.eval()
    #print('model: ', net)
    #print('state dict: ', net.state_dict()['conv1.weight'])
    tmp = torch.ones(1, 1, 32, 32).to('cuda:0')
    #print('input: ', tmp)
    out = net(tmp)
    print('lenet out:', out)

    f = open("lenet5.wts", 'w')
    print('==net.state_dict().keys():', net.state_dict().keys())
    f.write("{}\n".format(len(net.state_dict().keys())))
    for k, v in net.state_dict().items():
        print('key: ', k)
        print('value: ', v.shape)
        vr = v.reshape(-1).cpu().numpy()
        f.write("{} {}".format(k, len(vr)))
        for vv in vr:
            # print('=vv:', vv)
            f.write(" ")
            # print(struct.pack(">f", float(vv)).hex())#
            f.write(struct.pack(">f", float(vv)).hex())
        f.write("\n")
    print('==f:', f)

def  test_struct():
    vv = 16
    print(struct.pack(">f", float(vv)))  #

if __name__ == '__main__':
    main()
    # test_struct()
2.4 .wts转换成.engine与利用.engine推理
lenet.cpp
#include CMakeLists.txt
cmake_minimum_required(VERSION 2.6)

project(lenet)

add_definitions(-std=c++11)

set(TARGET_NAME "lenet")

option(CUDA_USE_STATIC_CUDA_RUNTIME OFF)
set(CMAKE_CXX_STANDARD 11)
set(CMAKE_BUILD_TYPE Debug)

include_directories(${PROJECT_SOURCE_DIR}/include)
# include and link dirs of cuda and tensorrt, you need adapt them if yours are different
# cuda
include_directories(/usr/local/cuda/include)
link_directories(/usr/local/cuda/lib64)
# tensorrt
include_directories(/usr/include/x86_64-linux-gnu)
link_directories(/usr/lib/x86_64-linux-gnu)

#tar包 tensorrt
#include_directories(/red_detection/tensorrt_learn/software/TensorRT-7.0.0.11/include)
#link_directories(/red_detection/tensorrt_learn/software/TensorRT-7.0.0.11/lib)

FILE(GLOB SRC_FILES ${PROJECT_SOURCE_DIR}/lenet.cpp ${PROJECT_SOURCE_DIR}/include/*.h)

add_executable(${TARGET_NAME} ${SRC_FILES})
target_link_libraries(${TARGET_NAME} nvinfer)
target_link_libraries(${TARGET_NAME} cudart)

add_definitions(-O2 -pthread)
./lenet -s 转换成 .engine文件
./lenet -d 进行推理
推理时间:
可看出时间和torch的相比加快了至少4倍,而结果却差不多。
一些很不错的仓库:
https://github.com/wang-xinyu/tensorrtx
https://github.com/zerollzeng/tiny-tensorrt


