【LeetCode算法笔记-Python(PyCharm运行)】剑指 Offer 35. 复杂链表的复制
剑指 Offer 35. 复杂链表的复制
- 写在开头
- 题目描述
- 题目解析
-
- 方法一:哈希表
-
- 算法流程:
- 复杂度分析:
- Python代码
- 方法二:拼接 + 拆分
-
- 算法流程:
- 复杂度分析:
- Python代码
- PyCharm调试
写在开头
今天在学习这个算法的时候一开始很难理解,有点小白地问道,设计这个算法有什么用呢,后来想到,如果需要不改变原链表的前提下对链表进行操作就需要复制一个链表到不同的内存,这样就能保存原链表。在Pycharm上调试的时候代码有些不明白,后来也是因为疏忽了变量赋值会指向同一内存空间,当进行while循环时,cur的变化会引起head的变化,这样就不难理解了。
题目描述
请实现 copyRandomList 函数,复制一个复杂链表。在复杂链表中,每个节点除了有一个next指针指向下一个节点,还有一个 random 指针指向链表中的任意节点或者 null。
输入:head = [[7,null],[13,0],[11,4],[10,2],[1,0]]
输出:[[7,null],[13,0],[11,4],[10,2],[1,0]]
输入:head = [[1,1],[2,1]]
输出:[[1,1],[2,1]]
输入:head = [[3,null],[3,0],[3,null]]
输出:[[3,null],[3,0],[3,null]]
示例 4:
输入:head = []
输出:[]
解释:给定的链表为空(空指针),因此返回 null。
题目解析
普通链表的节点定义如下:
# Definition for a Node.
class Node:
    def __init__(self, x: int, next: 'Node' = None):
        self.val = int(x)
        self.next = next
本题链表的节点定义如下:
# Definition for a Node.
class Node:
    def __init__(self, x: int, next: 'Node' = None, random: 'Node' = None):
        self.val = int(x)
        self.next = next
        self.random = random
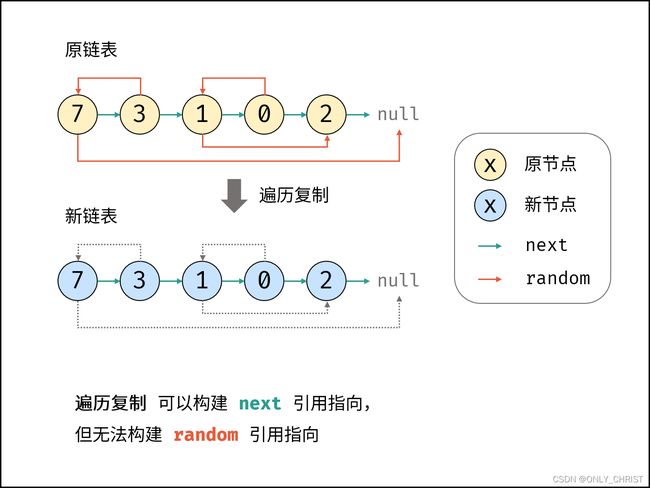
给定链表的头节点 head ,复制普通链表很简单,只需遍历链表,每轮建立新节点 + 构建前驱节点 pre 和当前节点 node 的引用指向即可。
本题链表的节点新增了 random 指针,指向链表中的 任意节点 或者 null 。这个 random 指针意味着在复制过程中,除了构建前驱节点和当前节点的引用指向 pre.next ,还要构建前驱节点和其随机节点的引用指向 pre.random 。
方法一:哈希表
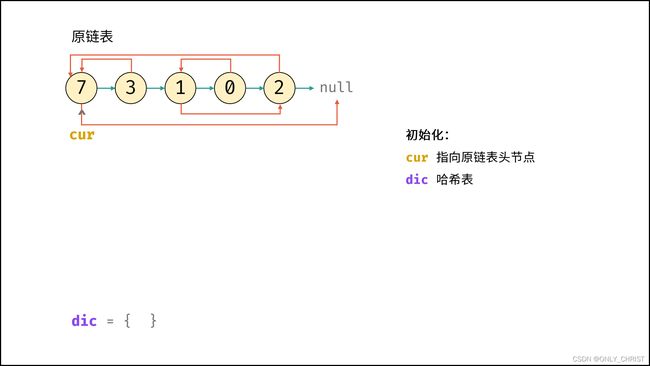
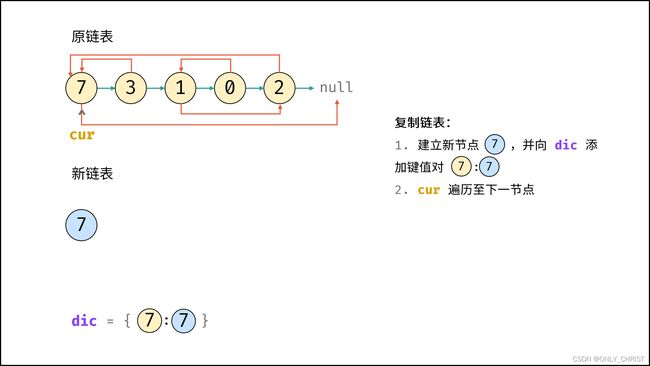
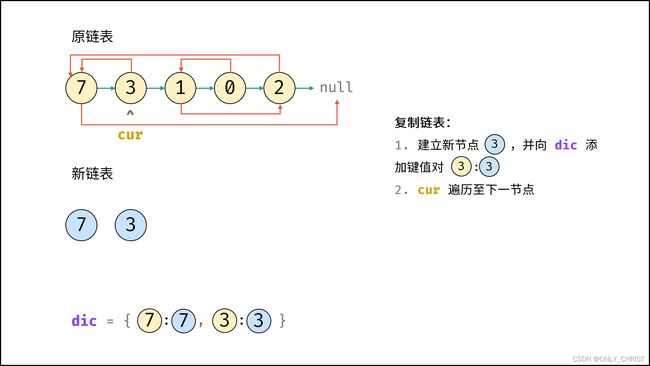
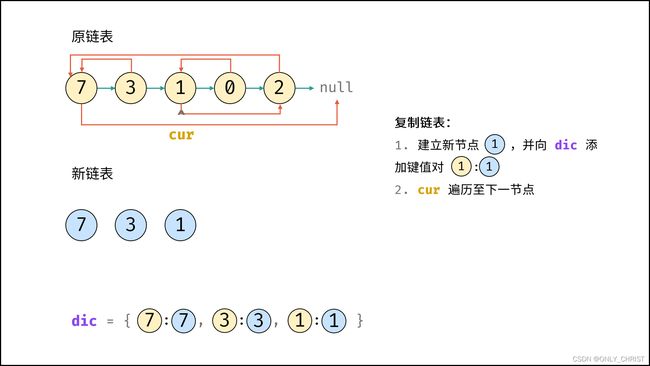
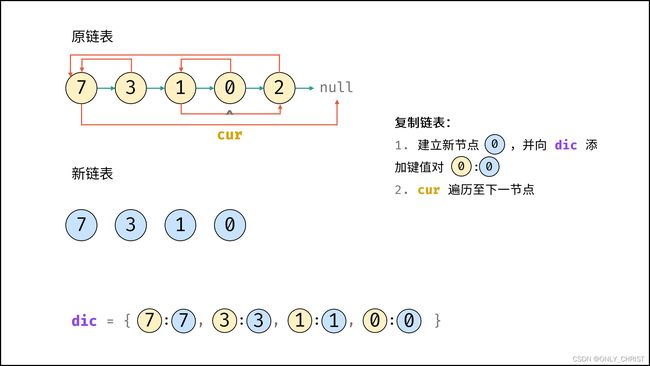
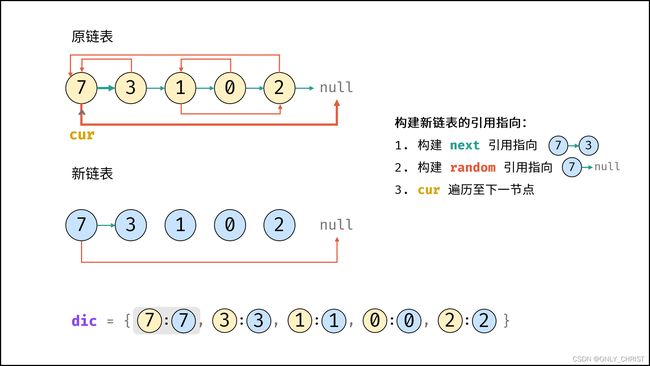
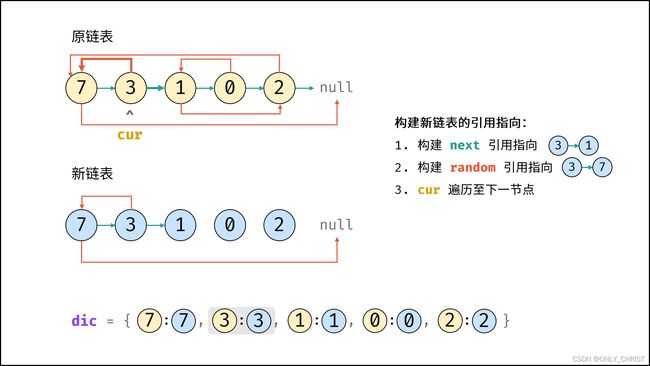
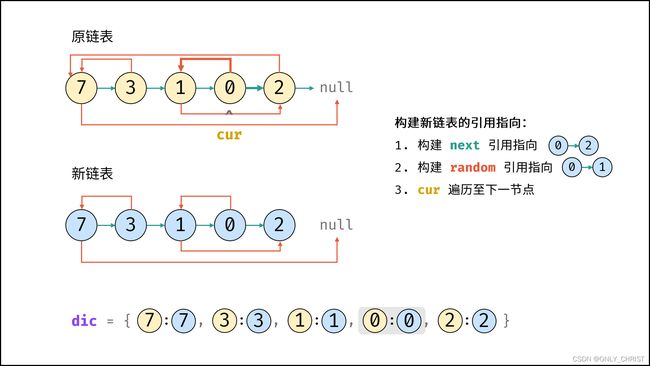
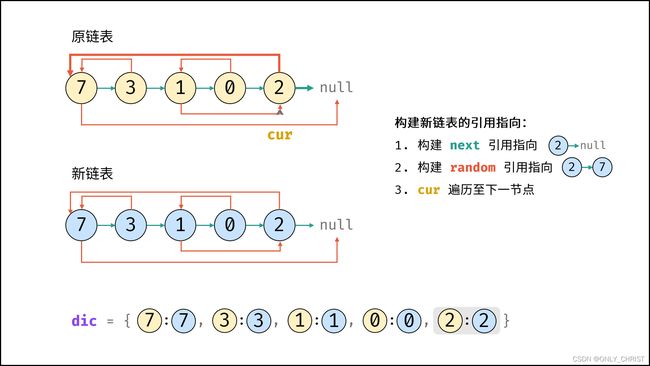
利用哈希表的查询特点,考虑构建 原链表节点 和 新链表对应节点 的键值对映射关系,再遍历构建新链表各节点的 next 和 random 引用指向即可。
算法流程:
- 若头节点
head为空节点,直接返回null; - 初始化: 哈希表
dic, 节点cur指向头节点; - 复制链表:
- 建立新节点,并向
dic添加键值对 (原cur节点, 新cur节点) ; cur遍历至原链表下一节点;
- 建立新节点,并向
- 构建新链表的引用指向:
- 构建新节点的
next和random引用指向;cur遍历至原链表下一节点;- 返回值: 新链表的头节点
dic[cur];
复杂度分析:
Python代码
class Solution:
    def copyRandomList(self, head: 'Node') -> 'Node':
        if not head: return
        dic = {}
        # 3. 复制各节点,并建立 “原节点 -> 新节点” 的 Map 映射
        cur = head
        while cur:
            dic[cur] = Node(cur.val)
            cur = cur.next
        cur = head
        # 4. 构建新节点的 next 和 random 指向
        while cur:
            dic[cur].next = dic.get(cur.next)
            dic[cur].random = dic.get(cur.random)
            cur = cur.next
        # 5. 返回新链表的头节点
        return dic[head]
方法二:拼接 + 拆分
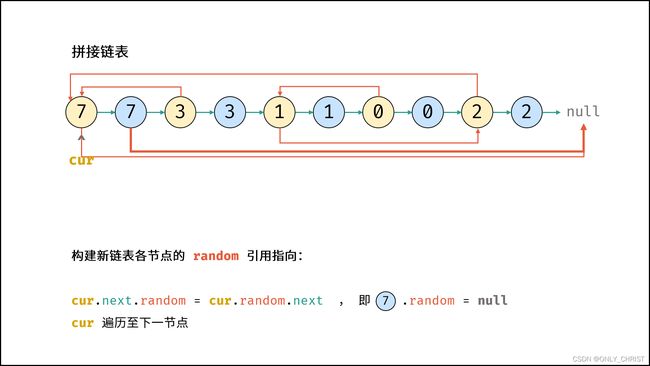
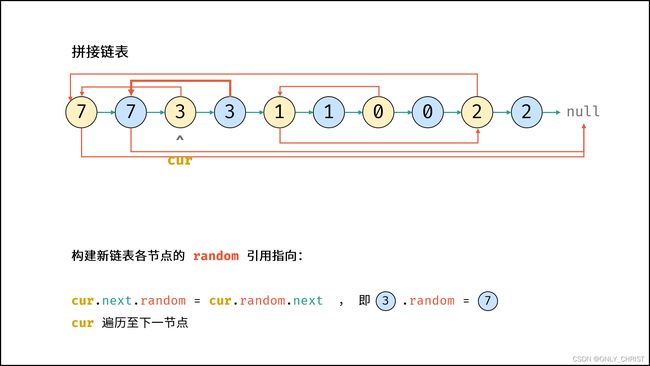
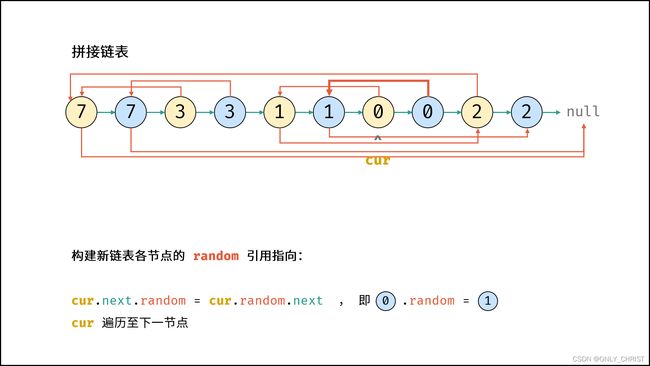
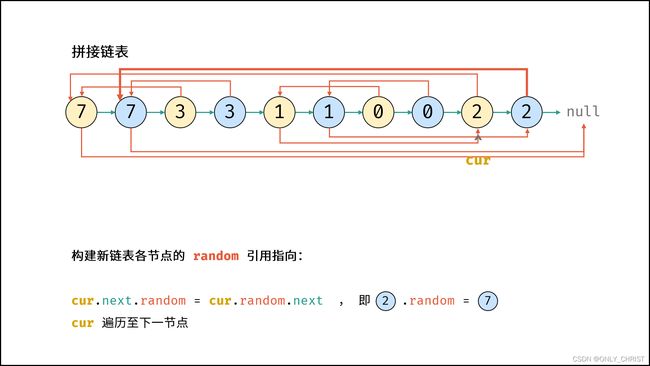
考虑构建 原节点 1 -> 新节点 1 -> 原节点 2 -> 新节点 2 -> ……的拼接链表,如此便可在访问原节点的 random 指向节点的同时找到新对应新节点的random指向节点。
算法流程:
- 复制各节点,构建拼接链表:
- 设原链表为 node1 -> node2 -> ⋯ ,构建的拼接链表如下所示:
node1 -> node1new -> node2 -> node2new ->⋯
- 构建新链表各节点的
random指向:
当访问原节点cur的随机指向节点cur.random时,对应新节点cur.next的随机指向节点为cur.random.next。 - 拆分原 / 新链表:
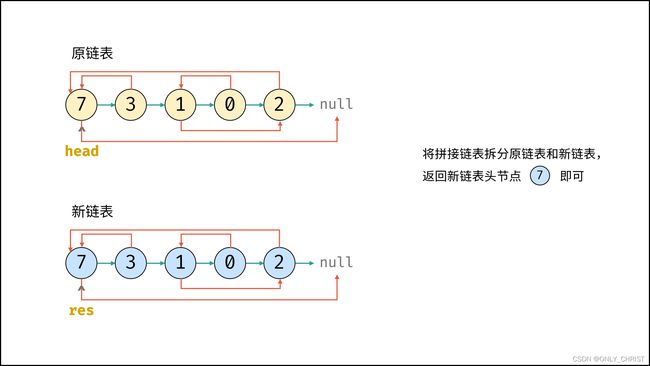
- 设置
pre / cur分别指向原 / 新链表头节点,遍历执行pre.next = pre.next.next和cur.next = cur.next.next将两链表拆分开。
- 返回新链表的头节点
res即可。
复杂度分析:
Python代码
class Solution:
    def copyRandomList(self, head: 'Node') -> 'Node':
        if not head: return
        cur = head
        # 1. 复制各节点,并构建拼接链表
        while cur:
            tmp = Node(cur.val)
            tmp.next = cur.next
            cur.next = tmp
            cur = tmp.next
        # 2. 构建各新节点的 random 指向
        cur = head
        while cur:
            if cur.random:
                cur.next.random = cur.random.next
            cur = cur.next.next
        # 3. 拆分两链表
        cur = res = head.next
        pre = head
        while cur.next:
            pre.next = pre.next.next
            cur.next = cur.next.next
            pre = pre.next
            cur = cur.next
        pre.next = None # 单独处理原链表尾节点
        return res      # 返回新链表头节点
PyCharm调试
class Solution:
    def copyRandomList(self, head):
        if not head: return
        dic = {}
        # 3. 复制各节点,并建立 “原节点 -> 新节点” 的 Map 映射
        cur = head
        while cur:
            dic[cur] = Node(cur.val)  # 创建每一个节点
            cur = cur.next
        cur = head
        # 4. 构建新节点的 next 和 random 指向
        while cur:
            dic[cur].next = dic.get(cur.next)
            dic[cur].random = dic.get(cur.random)
            cur = cur.next
        # 5. 返回新链表的头节点
        return dic[head]

    def copyRandomList_1(self, head):
        if not head: return
        cur = head  # 指向同一个内存
        # 1. 复制各节点,并构建拼接链表
        while cur:
            tmp = Node(cur.val)
            tmp.next = cur.next
            cur.next = tmp
            cur = tmp.next
        # 2. 构建各新节点的 random 指向
        cur = head
        while cur:
            if cur.random:
                cur.next.random = cur.random.next
            cur = cur.next.next
        # 3. 拆分两链表
        cur = res = head.next
        pre = head
        while cur.next:
            pre.next = pre.next.next
            cur.next = cur.next.next
            pre = pre.next
            cur = cur.next
        pre.next = None  # 单独处理原链表尾节点
        return res  # 返回新链表头节点


# leetcode submit region end(Prohibit modification and deletion)

# Definition for a Node.
class Node:
    def __init__(self, x, next=None, random=None):
        self.val = int(x)
        self.next = next
        self.random = random


# 实例化节点
n1 = Node(7)  # 节点 head
n2 = Node(3)
n3 = Node(1)
n4 = Node(0)
n5 = Node(2)

# 构建引用指向
n1.next = n2
n2.next = n3
n3.next = n4
n4.next = n5

n1.random = None
n2.random = n1
n3.random = n5
n4.random = n3
n5.random = n1

solution = Solution()
a = solution.copyRandomList(n1)
本文转自:剑指 Offer 35. 复杂链表的复制


