【pytorch学习笔记】pytorch搭建AlexNet网络+FashionMnist数据集
目录
AlexNet网络介绍
pytorch搭建网络
AlexNet网络介绍
AlexNet 由⼋层组成:五个卷积层、两个全连接隐藏层和⼀个全连接输出层。其次, AlexNet 使⽤ ReLU 而不是sigmoid 作为其激活函数。
在 AlexNet 的第⼀层,卷积窗口的形状是 11 ×11,,需要⼀个更⼤的卷积窗口来捕获⽬标。
AlexNet 将 sigmoid 激活函数改为更简单的 ReLU 激活函数。⼀⽅⾯, ReLU 激活函数的计算更简单,它 不需要如sigmoid 激活函数那般复杂的求幂运算。另⼀⽅⾯,当使⽤不同的参数初始化⽅法时, ReLU 激活函 数使训练模型更加容易。当sigmoid 激活函数的输出⾮常接近于 0 或 1 时,这些区域的梯度⼏乎为 0 ,因此反向传播⽆法继续更新⼀些模型参数。相反,ReLU 激活函数在正区间的梯度总是 1 。因此,如果模型参数没有正 确初始化,sigmoid 函数可能在正区间内得到⼏乎为 0 的梯度,从而使模型⽆法得到有效的训练。
AlexNet 通过 dropout 控制全连接层的模型复杂度。
小结:
- AlexNet的结构与LeNet相似,但使⽤了更多的卷积层和更多的参数来拟合⼤规模的ImageNet数据集。
- 今天,AlexNet已经被更有效的结构所超越,但它是从浅层⽹络到深层⽹络的关键⼀步。
- 尽管AlexNet的代码只⽐LeNet多出⼏⾏,但学术界花了很多年才接受深度学习这⼀概念,并应⽤其出 ⾊的实验结果。这也是由于缺乏有效的计算⼯具。
- Dropout、ReLU和预处理是提升计算机视觉任务性能的其他关键步骤。
pytorch搭建网络
代码内有详细注释。
from matplotlib.pyplot import plot
import torch
from torch import  nn
from torchvision import datasets,transforms
import numpy as np
import matplotlib.pyplot as plt


"""
使用AlexNet 网络训练Fashion_MNist 数据集
"""
# 数据预处理
# FashionMnist 数据集分辨率28*28,但是AlexNet网络输入为224*224,所以使用函数将大小扩充成224
data_transforms = transforms.Compose([
    transforms.ToTensor(),
    transforms.Resize((224,224)),
# 这里归一化,因为FashionMnist数据集时灰度图,单通道,所以归一化时是单通道归一化
    transforms.Normalize((0.5,),(0.5,))])

# 加载数据集
train_data = datasets.FashionMNIST(
    root="data",
    train=True,
    download=True,
    transform=data_transforms
)
# 构建训练集数据载入器 并提供给定数据集的可迭代对象。
training_loader = torch.utils.data.DataLoader(train_data,batch_size=1,shuffle=True)

test_data = datasets.FashionMNIST(
    root="data",
    train=False,
    download=True,
    transform=data_transforms
)
test_loader = torch.utils.data.DataLoader(test_data,batch_size=1,shuffle=True)


img,label = next(iter(training_loader))
# img 中有4张图片
print("img:",img)
print(f"img.size:{img.size()}")
print("label:",label)
print(f"lebel.size:",label.size())

# 构建AlexNet网络
class AlexNet(nn.Module):
    # 网络初始化
    def __init__(self):
        super(AlexNet,self).__init__()
        # 在容器中构建AlexNet网络
        self.features = nn.Sequential(
            # 使用11x11的卷积核捕捉对象,大窗口
            # s=4,减少输出的高度和宽度
            nn.Conv2d(1,96,(11,11),stride=4,padding=1),nn.ReLU(),
            nn.MaxPool2d((3,3),stride=2),
            # 使用小的卷积核,填充为2,来保持输出的大小不变
            nn.Conv2d(96,256,kernel_size=(5,5),padding=2),nn.ReLU(),
            nn.MaxPool2d(3,stride=2),
            # 连续三次卷积,前两次卷积都会增加输出的通道数
            nn.Conv2d(256,384,kernel_size=3,padding=1),nn.ReLU(),
            nn.Conv2d(384,384,kernel_size=3,padding=1),nn.ReLU(),
            nn.Conv2d(384,256,kernel_size=3,padding=1),nn.ReLU(),
            nn.MaxPool2d(kernel_size=3,stride=2),
            nn.Flatten()
        )
        self.classies = nn.Sequential(
            # 使用dropout技术防止过拟合
            nn.Linear(6400,4096),nn.ReLU(),
            nn.Dropout(),   # 防止过拟合
            nn.Linear(4096,4096),nn.ReLU(),
            nn.Dropout(),
            # 输出层 ,使用的时Fashion-Minist 数据集,分类总数为10
            nn.Linear(4096,10)
        )


    def forward(self,x):
        features = self.features(x)
        out = self.classies(features.view(x.shape[0],-1))
        return out

# GPU训练网络
device = torch.device('cuda' if torch.cuda.is_available() else "cpu")
print("device:",device)
# 实例化模型
module = AlexNet().to(device)
# 定义损失函数
criterion = nn.CrossEntropyLoss()
# 定义优化方法
optimizer = torch.optim.SGD(module.parameters(),lr=0.01,momentum=0.01)
epochs = 10
# 训练误差,测试误差
train_losses = []
test_losses = []
for epoch in range(epochs):
    losses = 0.0
    # 遍历数据集
    for images,labels in training_loader:
        images,labels = images.to(device),labels.to(device)
        optimizer.zero_grad()   # 梯度置零
        output = module(images)
        loss = criterion(output,labels)
        loss.backward() # 梯度向后传播 -- 这里不明白数学原理
        optimizer.step()    # 更新参数
        losses += loss.item()   # 损失函数求和
    else:
        # 测试数据集
        test_loss = 0
        pr = 0.0
        # 测试的时候不需要求导和反向传播
        with torch.no_grad():
            module.eval()   # 将模型转换为evla模式,测试之前必须要做的
            # 遍历数据集
            for images,labels in test_loader:
                images,labels = images.to(device),labels.to(device)
                output = module(images)
                loss = criterion(output,labels)
                test_loss += loss.item()
                # 返回矩阵每一行最大值和下标,元组类型
                ps = torch.exp(output)
                top_p,top_class = ps.topk(1,dim=1)
                equals = top_class == labels.view(*top_class.shape)
                pr += torch.mean(equals.type(torch.FloatTensor))
        module.train()
        # 将训练误差和测试误差放到列表中
        train_losses.append(losses/len(training_loader))
        test_losses.append(test_loss/len(test_loader))
        print("test_loader:",test_loader)
        print("训练集训练次数:{}/{}:".format((epoch+1),epochs),
                "训练误差:{:.3f}".format(losses/len(training_loader)),
                "测试误差:{:.3f}".format(test_loss/len(test_loader)),
                "模型分类准确率:{:.3f}".format(pr/len(test_loader)))
# 可视化误差
# 将训练误差和测试误差数据从GPU转回CPU 并且将tensor->numpy (因为numpy 是cup only 的数据类型)
train_loss = np.array(torch.tensor(train_losses),device = "cpu")
test_loss = np.array(torch.tensor(test_losses),device = "cpu")
# 可视化
plt.plot(train_loss,labels="train_loss")
plt.plot(test_loss,label="test_loss")
plt.legend()
plt.show()
搭建网络是遇到的bug
1. output with shape [1, 28, 28] doesn't match the broadcast shape [3, 28, 28]。
解决方案:
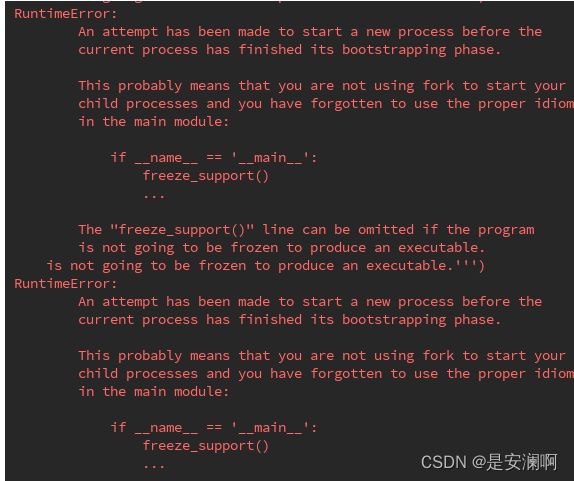
2.
解决方案:
这是因为多线程的原因,可以在training_loader那里取消多线程,将num_workers 参数去掉
参考:《动手学深度学习》


