SpringBoot Web开发
前言
SpringBoot,就是一个javaweb的开发框架,作为当下热门的企业级开发框架,是每一个java后端学习者必要学习的技能;之前在小破站跟着狂神的课程学习,做了一篇大体学习笔记,给自己积累学习,温故 知新,文章中若出现错误,望指正。(课程链接及其相关文献将附在文末)
一、Spring Boot是什么?
Spring Boot是一个基于Java的开源框架,用于创建微服务。它由Pivotal Team开发,用于构建独立的生产就绪Spring应用。
Sring Boot为Java开发人员提供了一个很好的平台,可以开发一个可以运行的独立和生产级Spring应用程序。可以开始使用最少的配置,而无需进行整个Spring配置设置。
优点:
Spring Boot为其开发人员提供以下优势 -
• 易于理解和开发Spring应用
• 提高生产力
• 缩短开发时间
二、为什么选择Spring Boot?
选择Spring Boot,因为它提供的功能和优点如下 -
• 它提供了一种灵活的方法来配置Java Bean,XML配置和数据库事务。
• 它提供强大的批处理和管理REST端点。
• 在Spring Boot中,一切都是自动配置的; 无需手动配置。
• 它提供基于注释的spring应用程序。
• 简化依赖管理。
• 它包括嵌入式Servlet容器。
核心:自动装配:
SpringBoot帮我们配置了什么东西?
- XxxAutoConfiguraion:向容器中自动配置组件
- XxxPoperties:自动装配类,装配配置文件中自定义的一些内容
三、要解决的问题?
- 首页
- Jsp,模板引入Thymeleaf
- 装配扩展 SpringMVC
- 增删改查
- 拦截器
- 国际化(中英文)
四、快速开始
静态资源:
1、在SpringBoot下,我们可以通过使用以下方式处理静态资源
- webjars localhost:8080/webjars/**
- public,static,/**,resources,localhost:8080/
2、优先级:resources>static(默认)>public
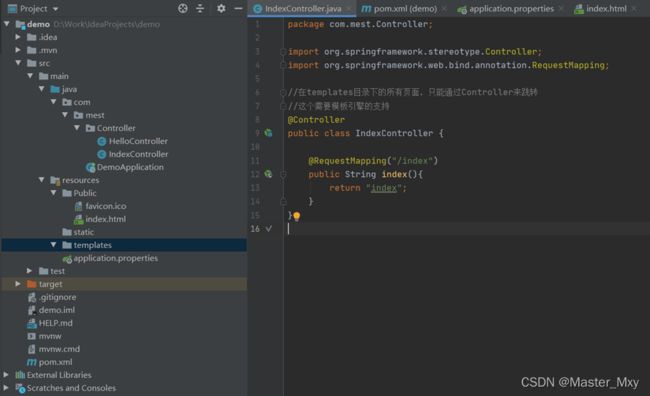
首页如何跳转:

注意:更改图标,图标文件放在Public文件夹下
#关闭默认图标,需要降低版本
#spring.mvc.favicon.enabled=false
模板引擎:
引入thymeleaf
- 1、 Thymeleaf官网:https://www.thymeleaf.org/
- 2、 Thymeleaf在Github的主页:https://github.com/thymeleaf/thymeleaf/
- 3、 Spring官方文档:https://docs.spring.io/spring-boot/docs/2.1.6.RELEASE/reference/htmlsingle/#using-boot-starter/
结论:只要需要使用thymeleaf,只需要导入依赖就可以了!我们将html页面放在templates目录下。
所有的html文件都可以被thymeleaf替换接管: th:元素名
取值语法:
@Controller

public class IndexController {

    @RequestMapping("/index")
    public String index(Model model){
        model.addAttribute("mest","520saisai");
        return "index";
    }
}
<!DOCTYPE html>

<html xmlns:th="http://www.thymeleaf.org">
<head>
    <meta charset="UTF-8">
    <title>Title</title>
</head>
<body>
<div th:text="${mest}"></div>
</body>
</html>
遍历取值:
model.addAttribute("lovers", Arrays.asList("shengsheng", "saisai"));
<h3 th:each="love:${lovers}" th:text="${love}"></h3>
<h3 th:each="love:${lovers}">[[${love}]]</h3>
1、 所有页面的静态资源都需要使用thymeleaf接管
2、 url: @{}
页面国际化:
1、 需要配置i18n文件
2、 我们如果需要在项目中进行按钮自动切换,需要自定义一个组件LocaleResolver
3、 记得将写的组件配置到spring容器@Bean
4、 #{}
拦截器:
RequestDispatcher.forward()方法将当前的request和response重定向到该 RequestDispacher指定的资源。这在实际项目中大量使用,因为完成一个业务操作往往需要跨越多个步骤,每一步骤完成相应的处理后,转向到下 一个步骤。
比如,通常业务处理在Servlet中处理,处理的结果转向到一个JSP页面进行显示。这样看起来类似于Servlet链的功能,但是还有一些 区别。一个RequestDispatcher对象可以把请求发送到任意一个服务器资源,而不仅仅是另外一个Servlet。 include()方法将把Request Dispatcher资源的输出包含到当前输出中。
注意,只有在尚未向客户端输出响应时才可以调用forward()方法,如果页面缓存不为空,在重定向前将自动清除缓存。否则将抛出一个IllegalStateException异常。
员工列表展示
-
提取公共页面
a) th :fragment=”sidebar”
b) th: replace=”~{Commons/common::topbar}”
c) 如果要传递参数,可以直接使用()传参,接收判断即可
th:replace=”~{Commons/common::topbar(active=’main.html’)}” -
列表循环展示
添加员工
- 按钮提交
- 跳转到添加页面
- 添加员工成功
- 返回首页
(#日期格式化#spring.mvc.format.date=yyyy-MM-dd)
CRUD增删改查
404页面
五、整合JDBC使用
前端:
模板:别人写好的,自己拿来改成自己需要的
框架:组件:自己动手拼接 Bootstrp Layui semantic-ui
前期思考:
1、 前端搞定:页面长什么样子:数据
2、 设计数据库(难点)
3、 前端让他能够自动运行,独立化工程
4、 数据接口如何对接:json,对象 all in one
5、 前后端联调测试
6、 有一套自己熟悉的后台模板:x-admin
7、 前端页面:通过前端框架,组合一个页面出来
P31:视频第8分钟创建Mybatis数据库的SQL语句:
CREATE DATABASE `mybatis`;

USE `mybatis`;

CREATE TABLE `user`(
	`id` INT(20) NOT NULL PRIMARY KEY,
	`name` VARCHAR(30) DEFAULT NULL,
	`pwd` VARCHAR(30) DEFAULT NULL
)ENGINE=INNODB DEFAULT CHARSET=utf8;

INSERT INTO `user`(`id`,`name`,`pwd`) VALUES
(1,'狂神','123456'),
(2,'张三','123456'),
(3,'李四','123456');
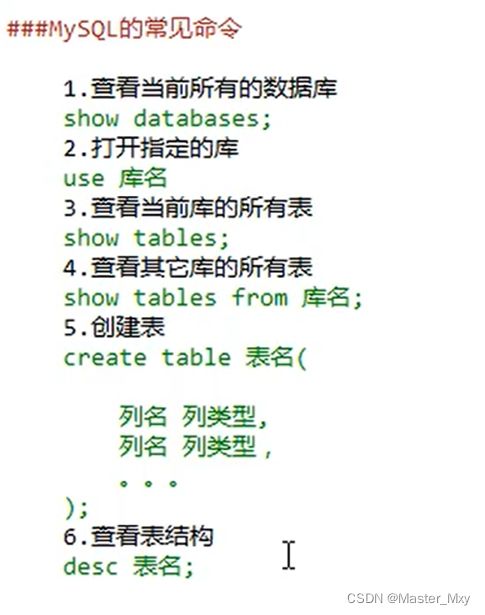
附常用的mysql语句:

mysql再学习-链接:https://blog.csdn.net/ezconn/article/details/103840699
六、整合Druid数据源
#SpringBoot默认是不注入这些的,需要自己绑定
  #druid数据源专有配置
    initialSize: 5
    minIdle: 5
    maxActive: 20
    maxWait: 60000
    timeBetweenEvictionRunsMillis: 60000
    minEvictableIdleTimeMillis: 300000
    validationQuery: SELECT 1 FROM DUAL
    testWhileIdle: true
    testOnBorrow: false
    testOnReturn: false
    poolPreparedStatements: true
 #配置监控统计拦截的filters,stat:监控统计、log4j:日志记录、wall:防御sql注入
    #如果允许报错,java.lang.ClassNotFoundException: org.apache.Log4j.Properity
    #则导入log4j 依赖就行
    filters: stat,wall,log4j
    maxPoolPreparedStatementPerConnectionSize: 20
    useGlobalDataSourceStat: true
	connectionProperties: druid.stat.mergeSql=true;druid.stat.slowSqlMillis=500
MVC
M:(model)数据和业务
V:视图层 HTML
C:controller 交接
七、整合Mybatis框架
整合包mybatis-spring-boot-starter
- 1、 导入包
- 2、 配置文件
- 3、 Mybatis配置
- 4、 编写sql
- 5、 Service调用dao层
- 6、 Controller调用service层
@Data //生成getter,setter等函数
@AllArgsConstructor //生成全参数构造函数
@NoArgsConstructor//生成无参构造函数
八、Shiro
- 导入依赖
- 配置文件
快速c+v:
Thymeleaf依赖:
<!--thymeleaf模板-->
<dependency>
    <groupId>org.thymeleaf</groupId>
    <artifactId>thymeleaf-spring5</artifactId>
</dependency>
<dependency>
    <groupId>org.thymeleaf.extras</groupId>
    <artifactId>thymeleaf-extras-java8time</artifactId>
</dependency>
命名空间的约束:
xmlns:th=http://www.thymeleaf.org

<dependency>
    <groupId>mysql</groupId>
    <artifactId>mysql-connector-java</artifactId>
</dependency>
<dependency>
    <groupId>log4j</groupId>
    <artifactId>log4j</artifactId>
    <version>1.2.17</version>
</dependency>
<dependency>
    <groupId>com.alibaba</groupId>
    <artifactId>druid</artifactId>
    <version>1.1.12</version>
</dependency>
        <dependency>
            <groupId>org.mybatis.spring.boot</groupId>
            <artifactId>mybatis-spring-boot-starter</artifactId>
            <version>2.1.1</version>
        </dependency>
八、Swagger
学习目标:
- 1、 了解Swagger的作用和概念
- 2、 了解前后端分离
- 3、 在SpringBoot中集成Swagger
前后端分离概念:
后端:后端控制层,服务层,数据访问层
前端:前端控制层,视图层
伪造后端数据,json,不需要后端,前端依旧能跑起来
前后端如何交互?—>API接口
前后端相对独立,松耦合;
前后端甚至可以部署在不同的服务器上;
Swagger
- 号称最流行的API框架
- RestFul API文档在线自动生成工具->API文档与API定义同步更新
- 直接运行,可以在线测试API接口;
- 支持多种语言
在项目中使用Swagger
- 需要Springbox;
- Swagger2
- Ui
SpringBoot集成Swagger
1、 新建一个SpringBoot-web项目
2、 导入相关依赖
<!-- /springfox-swagger2 -->
<dependency>
<groupId>io.springfox</groupId>
<artifactId>springfox-swagger2</artifactId>
<version>2.9.2</version>
</dependency>
<!--/springfox-swagger-ui -->
<dependency>
<groupId>io.springfox</groupId>
<artifactId>springfox-swagger-ui</artifactId>
<version>2.9.2</version>
</dependency>
3、 编写一个工程
4、 配置Swagger–>configer
@Configuration

@EnableSwagger2    //开启Swagger2
public class SwaggerConfiger {
}
配置Swagger
Swagger的Bean实例Docket
//配置了Swagger的Docket的bean实例

@Bean
public Docket docket(){
    return new Docket(DocumentationType.SWAGGER_2)
            .apiInfo(apiInfo())
            .select()
            //RequestHandlerSelectors,配置要扫描接口的方式
            //basePackage,指定要扫描的包
            //any():扫描全部
            //none():都不扫描
            //withClassAnnotation:扫描类上的注解
            //withMethodAnnotation:扫描方法上的注解
            //.apis(RequestHandlerSelectors.basePackage("com.mest.swagger.controller"))
            .apis(RequestHandlerSelectors.basePackage("com.mest.swagger.controller"))
            //.paths()过滤什么路径
            .paths(PathSelectors.ant("/mest/**"))
            .build();
}
配置是否启动Swagger
.enable(false)
Eg:我只希望我的Swagger在生产环境中使用,在发布的时候不使用?
- 判断是否是生产环境 flag=false
- 注入enable(flag)
  //配置了Swagger的Docket的bean实例

    @Bean
    public Docket docket(Environment environment){

        //设置要显示 的Swagger环境
        Profiles profiles = Profiles.of("dev","test");
     //获取项目的环境 通过environment.acceptsProfiles判断是否处在设定的环境当中
        boolean flag = environment.acceptsProfiles(profiles);

        return new Docket(DocumentationType.SWAGGER_2)
                .apiInfo(apiInfo())
                //              .enable(false)是否启用swagger,true为是
                .enable(flag)
                .select()
                //RequestHandlerSelectors,配置要扫描接口的方式
                //basePackage,指定要扫描的包
                //any():扫描全部
                //none():都不扫描
                //withClassAnnotation:扫描类上的注解
                //withMethodAnnotation:扫描方法上的注解
                //.apis(RequestHandlerSelectors.basePackage("com.mest.swagger.controller"))
                .apis(RequestHandlerSelectors.basePackage("com.mest.swagger.controller"))
                //.paths()过滤什么路径
                .paths(PathSelectors.ant("/mest/**"))
                .build();
    }
配置API文档的分组
.groupName("mest")
如何配置多个分组?
@Bean

 public Docket docket1(Environment environment){
     return new Docket(DocumentationType.SWAGGER_2).groupName("A");
 }
 @Bean
 public Docket docket2(Environment environment){
     return new Docket(DocumentationType.SWAGGER_2).groupName("B");
 }
 @Bean
 public Docket docket3(Environment environment){
     return new Docket(DocumentationType.SWAGGER_2).groupName("C");
 }
实体类配置?
User
package com.mest.swagger.pojo;

import io.swagger.annotations.ApiImplicitParam;
import io.swagger.annotations.ApiModel;
import io.swagger.annotations.ApiModelProperty;

@ApiModel("用户实体类")//给生成的文档加一个注释
public class User {
    @ApiModelProperty("用户名")
    public String username;
    @ApiModelProperty("密码")
    public String password;
}
Controller
package com.mest.swagger.controller;

import com.mest.swagger.pojo.User;
import io.swagger.annotations.ApiOperation;
import org.springframework.web.bind.annotation.PostMapping;
import org.springframework.web.bind.annotation.RequestMapping;
import org.springframework.web.bind.annotation.RestController;

@RestController
public class HelloController {

    @RequestMapping("/hello")
    public String hello(){
        return "hello";
    }

    //只要我们的接口,返回值中存在实体类,就会被扫描到Swagger中
    @PostMapping()
    public User user(){
        return new User();
    }
}
总结:
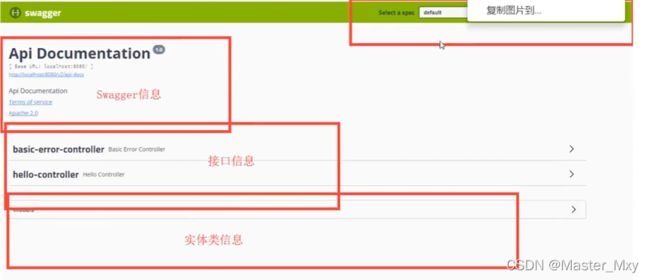
- 我们可以通过swagger给一些比较难理解的属性或者接口,增加注释信息
- 接口文档可以实时更新
- 可以在线测试,try it out
九、任务
1.异步任务
package com.mest.service;

import org.springframework.scheduling.annotation.Async;
import org.springframework.stereotype.Service;

@Service
//告诉Spring这是一个异步方法
@Async
public class AsyncService {
    public void hello(){
        try {
            Thread.sleep(3000);
        } catch (InterruptedException e) {
            e.printStackTrace();
        }
        System.out.println("数据正在处理。。。");
    }
}
package com.mest;

import org.springframework.boot.SpringApplication;
import org.springframework.boot.autoconfigure.SpringBootApplication;
import org.springframework.scheduling.annotation.EnableAsync;

//开启异步功能
@EnableAsync

@SpringBootApplication
public class TaskApplication {
    public static void main(String[] args) {
        SpringApplication.run(TaskApplication.class, args);
    }

}
2.定时任务
//在一个特定的时间执行
//cron()表达式
/*
30 15 10 * * ?  每天的10点15分30执行
0 0/5 10,18 * * ?  每天的10点和18点,每隔5分钟执行执行一次
0 15 10 ? * 1-6    每个月的星期1-6 的10点15分执行一次
0 15 10 L * ?    每个月的最后一天的10点15分执行一次
0/2 * * * * ?     每隔两秒执行一次

* */
//秒 分 时 日 月 星期
@Scheduled(cron = "0/2 * * * * ?")
public void hello(){
    System.out.println("hello,你被执行了");
}
3.邮件发送
把发送邮件的功能封装成方法:

SpringBoot整合
SpringBoot操作数据:spring-data jpa jdbc mongodb redis
SpringData也是和SpringBoot齐名的项目
十、总结
参考博客:
视频资源:https://www.bilibili.com/video/BV1PE411i7CV?spm_id_from=333.1007.top_right_bar_window_default_collection.content.click
Spring官网快速启动:https://spring.io/quickstart
项目模板:https://www.cnblogs.com/cxylff/p/10969375.html
Github地址:https://github.com/alibaba/druid/
(部分内容存在遗漏,后期完善,望斧正)


