在Android上运行基于TensorFlow Lite训练的二维码检测模型
二维码定位可以使用传统的图形学或者机器学习。那么哪种在手机上运行的效率更高?我们可以动手实验下。
使用TensorFlow Lite训练二维码检测模型
训练图集来自于boofcv.org。为了方便,我整理之后放到了GitHub仓库里。
下载二维码图集:
git clone https://github.com/yushulx/barcode-qrcode-images.git
创建一个切分数据集的Python脚本partition_dataset.py:
""" usage: partition_dataset.py [-h] [-i IMAGEDIR] [-o OUTPUTDIR] [-r RATIO] [-x]
Partition dataset of images into training and testing sets
optional arguments:
  -h, --help            show this help message and exit
  -i IMAGEDIR, --imageDir IMAGEDIR
                        Path to the folder where the image dataset is stored. If not specified, the CWD will be used.
  -o OUTPUTDIR, --outputDir OUTPUTDIR
                        Path to the output folder where the train and test dirs should be created. Defaults to the same directory as IMAGEDIR.
  -r RATIO, --ratio RATIO
                        The ratio of the number of test images over the total number of images. The default is 0.1.
  -x, --xml             Set this flag if you want the xml annotation files to be processed and copied over.
"""
import os
import re
from shutil import copyfile
import argparse
import math
import random
import cv2

def png2jpg(source, filename):
    if filename[-4:] == '.png':
        filepath = os.path.join(source, filename)
        img = cv2.imread(filepath)
        filepath = filepath[:-4] + '.jpg'
        filename = filename[:-4] + '.jpg'
        cv2.imwrite(filepath, img)
        print(filepath)

    return filename

def iterate_dir(source, dest, ratio, copy_xml):
    source = source.replace('\\', '/')
    dest = dest.replace('\\', '/')
    train_dir = os.path.join(dest, 'train')
    test_dir = os.path.join(dest, 'test')

    if not os.path.exists(train_dir):
        os.makedirs(train_dir)
    if not os.path.exists(test_dir):
        os.makedirs(test_dir)

    images = [f for f in os.listdir(source)
              if re.search(r'([a-zA-Z0-9\s_\\.\-\(\):])+(?i)(.jpg|.jpeg|.png)$', f)]

    num_images = len(images)
    num_test_images = math.ceil(ratio*num_images)

    for i in range(num_test_images):
        idx = random.randint(0, len(images)-1)
        filename = images[idx]
        filename = png2jpg(source, filename)
        copyfile(os.path.join(source, filename),
                 os.path.join(test_dir, filename))
        if copy_xml:
            xml_filename = os.path.splitext(filename)[0]+'.xml'
            copyfile(os.path.join(source, xml_filename),
                     os.path.join(test_dir,xml_filename))
        images.remove(images[idx])

    for filename in images:
        filename = png2jpg(source, filename)
        copyfile(os.path.join(source, filename),
                 os.path.join(train_dir, filename))
        if copy_xml:
            xml_filename = os.path.splitext(filename)[0]+'.xml'
            copyfile(os.path.join(source, xml_filename),
                     os.path.join(train_dir, xml_filename))


def main():

    # Initiate argument parser
    parser = argparse.ArgumentParser(description="Partition dataset of images into training and testing sets",
                                     formatter_class=argparse.RawTextHelpFormatter)
    parser.add_argument(
        '-i', '--imageDir',
        help='Path to the folder where the image dataset is stored. If not specified, the CWD will be used.',
        type=str,
        default=os.getcwd()
    )
    parser.add_argument(
        '-o', '--outputDir',
        help='Path to the output folder where the train and test dirs should be created. '
             'Defaults to the same directory as IMAGEDIR.',
        type=str,
        default=None
    )
    parser.add_argument(
        '-r', '--ratio',
        help='The ratio of the number of test images over the total number of images. The default is 0.1.',
        default=0.1,
        type=float)
    parser.add_argument(
        '-x', '--xml',
        help='Set this flag if you want the xml annotation files to be processed and copied over.',
        action='store_true'
    )
    args = parser.parse_args()

    if args.outputDir is None:
        args.outputDir = args.imageDir

    # Now we are ready to start the iteration
    iterate_dir(args.imageDir, args.outputDir, args.ratio, args.xml)


if __name__ == '__main__':
    main()
运行脚本,把图集分成训练集和测试集:
python partition_dataset.py -x -i ../images -r 0.1 -o ./
安装tflite-model-maker:
pip install tflite-model-maker
创建训练脚本train.py:
# https://www.tensorflow.org/lite/tutorials/model_maker_object_detection
from tflite_model_maker.config import QuantizationConfig
from tflite_model_maker.config import ExportFormat
from tflite_model_maker import model_spec
from tflite_model_maker import object_detector

import tensorflow as tf
assert tf.__version__.startswith('2')

tf.get_logger().setLevel('ERROR')
from absl import logging
logging.set_verbosity(logging.ERROR)

spec = model_spec.get('efficientdet_lite0')
# https://www.tensorflow.org/lite/api_docs/python/tflite_model_maker/object_detector/DataLoader#from_pascal_voc
train_data = object_detector.DataLoader.from_pascal_voc(images_dir="train", annotations_dir="train", label_map={1: "QR_CODE"} )
validation_data = object_detector.DataLoader.from_pascal_voc(images_dir="test", annotations_dir="test", label_map={1: "QR_CODE"} )
model = object_detector.create(train_data, model_spec=spec, batch_size=8, train_whole_model=True, validation_data=validation_data)
model.export(export_dir='.')
运行脚本之后等待一段时间就可以获得model.tflite模型文件:
python train.py
准备一张测试图片,运行下面的代码看看模型效果:
import cv2
import numpy as np
import tensorflow as tf
from PIL import Image

model_path = 'model.tflite'

# Load the labels into a list
classes = ['QR_CODE']

# Define a list of colors for visualization
COLORS = np.random.randint(0, 255, size=(len(classes), 3), dtype=np.uint8)

def preprocess_image(image_path, input_size):
  """Preprocess the input image to feed to the TFLite model"""
  img = tf.io.read_file(image_path)
  img = tf.io.decode_image(img, channels=3)
  img = tf.image.convert_image_dtype(img, tf.uint8)
  original_image = img
  resized_img = tf.image.resize(img, input_size)
  resized_img = resized_img[tf.newaxis, :]
  resized_img = tf.cast(resized_img, dtype=tf.uint8)
  return resized_img, original_image


def detect_objects(interpreter, image, threshold):
  """Returns a list of detection results, each a dictionary of object info."""

  signature_fn = interpreter.get_signature_runner()

  # Feed the input image to the model
  output = signature_fn(images=image)

  # Get all outputs from the model
  count = int(np.squeeze(output['output_0']))
  scores = np.squeeze(output['output_1'])
  classes = np.squeeze(output['output_2'])
  boxes = np.squeeze(output['output_3'])

  results = []
  for i in range(count):
    if scores[i] >= threshold:
      result = {
        'bounding_box': boxes[i],
        'class_id': classes[i],
        'score': scores[i]
      }
      results.append(result)
  return results


def run_odt_and_draw_results(image_path, interpreter, threshold=0.5):
  """Run object detection on the input image and draw the detection results"""
  # Load the input shape required by the model
  _, input_height, input_width, _ = interpreter.get_input_details()[0]['shape']

  # Load the input image and preprocess it
  preprocessed_image, original_image = preprocess_image(
      image_path,
      (input_height, input_width)
    )

  # Run object detection on the input image
  results = detect_objects(interpreter, preprocessed_image, threshold=threshold)

  # Plot the detection results on the input image
  original_image_np = original_image.numpy().astype(np.uint8)
  for obj in results:
    # Convert the object bounding box from relative coordinates to absolute
    # coordinates based on the original image resolution
    ymin, xmin, ymax, xmax = obj['bounding_box']
    xmin = int(xmin * original_image_np.shape[1])
    xmax = int(xmax * original_image_np.shape[1])
    ymin = int(ymin * original_image_np.shape[0])
    ymax = int(ymax * original_image_np.shape[0])

    # Find the class index of the current object
    class_id = int(obj['class_id'])

    # Draw the bounding box and label on the image
    color = [int(c) for c in COLORS[class_id]]
    cv2.rectangle(original_image_np, (xmin, ymin), (xmax, ymax), color, 2)
    # Make adjustments to make the label visible for all objects
    y = ymin - 15 if ymin - 15 > 15 else ymin + 15
    label = "{}: {:.0f}%".format(classes[class_id], obj['score'] * 100)
    cv2.putText(original_image_np, label, (xmin, y),
        cv2.FONT_HERSHEY_SIMPLEX, 0.5, color, 2)

  # Return the final image
  original_uint8 = original_image_np.astype(np.uint8)
  return original_uint8


DETECTION_THRESHOLD = 0.3

TEMP_FILE = 'test.png'

im = Image.open(TEMP_FILE)
im.thumbnail((512, 512), Image.ANTIALIAS)
im.save(TEMP_FILE, 'PNG')

# Load the TFLite model
interpreter = tf.lite.Interpreter(model_path=model_path)
interpreter.allocate_tensors()

# Run inference and draw detection result on the local copy of the original file
detection_result_image = run_odt_and_draw_results(
    TEMP_FILE,
    interpreter,
    threshold=DETECTION_THRESHOLD
)

# Show the detection result
image  = Image.fromarray(detection_result_image)
image.show()
没有问题的话,准备导入到Android工程中。
在Android应用中使用二维码检测模型
为了在Android上快速验证检测模型,我们可以下载官方提供的示例代码:
git clone https://github.com/tensorflow/examples.git
在Android Studio中打开工程https://github.com/tensorflow/examples/tree/master/lite/examples/object_detection/android。
把训练好的model.tflite拖入工程的assets目录。
修改目录中的labelmap.txt文件。删除里面的文本,加入:
QR_CODE
打开DetectorActivity.java,并修改:
private static final String TF_OD_API_MODEL_FILE = "model.tflite";
现在编译运行Android程序。以下是Huawei P30 Pro上的测试效果:
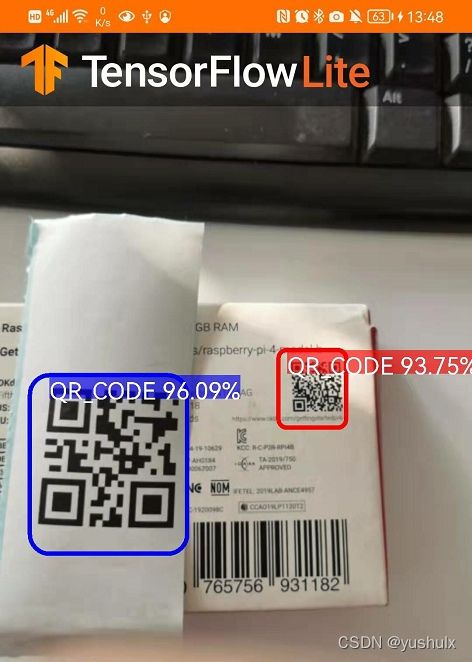
注意:解码依然需要二维码SDK。机器学习在这里只是做了定位。返回的信息可以作为二维码SDK的设置参数,比如检测区域,检测数量。
已经检测到了二维码,下面和Dynamsoft Barcode SDK来做一下比较。
安卓二维码扫描程序
我们可以基于CameraX来快速搭建一个Camera应用。具体可以参考Google提供的MLKit vision demo。
在settings.gradle中添加:
dependencyResolutionManagement {
    repositoriesMode.set(RepositoriesMode.FAIL_ON_PROJECT_REPOS)
    repositories {
        google()
        mavenCentral()
        jcenter() // Warning: this repository is going to shut down soon
        maven{url "https://download.dynamsoft.com/maven/dbr/aar"}
    }
}
在build.gradle中添加:
implementation 'org.tensorflow:tensorflow-lite-task-vision:0.3.0'
implementation 'com.dynamsoft:dynamsoftbarcodereader:8.9.0@aar'
同样,把mode.tflite和labelmap.txt拖入assets目录中。
在onCreate()函数中,加载初始化TensorFlow Lite模型:
    // Configuration values for the prepackaged QR Code model.
    private static final int TF_OD_API_INPUT_SIZE = 416;
    private static final boolean TF_OD_API_IS_QUANTIZED = true;
    private static final String TF_OD_API_MODEL_FILE = "model.tflite";
    private static final String TF_OD_API_LABELS_FILE = "labelmap.txt";
    // Minimum detection confidence to track a detection.
    private static final float MINIMUM_CONFIDENCE_TF_OD_API = 0.5f;

    private Detector detector;
    int cropSize = TF_OD_API_INPUT_SIZE;

protected void onCreate(Bundle savedInstanceState) {
	...
	initTFDetector();
}

private void initTFDetector() {
        try {
            detector =
                    TFLiteObjectDetectionAPIModel.create(
                            this,
                            TF_OD_API_MODEL_FILE,
                            TF_OD_API_LABELS_FILE,
                            TF_OD_API_INPUT_SIZE,
                            TF_OD_API_IS_QUANTIZED);
            cropSize = TF_OD_API_INPUT_SIZE;
        } catch (final IOException e) {
            e.printStackTrace();
            Toast toast =
                    Toast.makeText(
                            getApplicationContext(), "Detector could not be initialized", Toast.LENGTH_SHORT);
            toast.show();
            finish();
        }
    }
在视频帧获取的回调函数中调用检测接口以及解码接口:
analysisUseCase.setAnalyzer(cameraExecutor,
                                imageProxy -> {
												Bitmap bitmap = ImageUtils.getBitmap(imageProxy);
												final long startTime = SystemClock.uptimeMillis();
							  					final List<Detector.Recognition> tfResults = detector.recognizeImage(bitmap);
							  					final long lastProcessingTimeMs = SystemClock.uptimeMillis() - startTime;

							 					// Decode QR code
							                    TextResult[] results = null;
                                                try {
                                                    PublicRuntimeSettings settings = reader.getRuntimeSettings();
                                                    settings.barcodeFormatIds = EnumBarcodeFormat.BF_QR_CODE;
                                                    settings.expectedBarcodesCount = tfResults.size();
                                                    reader.updateRuntimeSettings(settings);
                                                } catch (BarcodeReaderException e) {
                                                    e.printStackTrace();
                                                }
												long start = SystemClock.uptimeMillis();
                                                try {
                                                    results = reader.decodeBufferedImage(bitmap, "");
                                                } catch (BarcodeReaderException e) {
                                                    e.printStackTrace();
                                                }
												final long decodingTime = SystemClock.uptimeMillis() - start;

								}
);
这里TensorFlow Lite做了二维码的区域检测。而Dynamsoft Barcode SDK做了区域检测(没有用到TensorFlow返回的区域值)以及解码。
运行效果:

总结
在初始化TensorFlow Lite的时候,我设置了useNnapi()用于硬件加速。但是从结果看,基于传统图形学的算法耗时比机器学习要少很多。在实时扫码的这种场景中,如果用机器学习做码区定位,在速度上没有优势。所以如果要做手机上的扫码程序,只需要集成一个barcode SDK就可以了。
当然,机器学习还是有应用场景的。如果一张高清的静态图中包含大量的二维码,通过机器学习定位抠图,配合barcode SDK可以让解码速度大幅提升。
源码
https://github.com/yushulx/android-camera2-preview-qr-code-scanner