springboot整合mybatis-plus, swagger, easyexcel以及自定义异常处理demo
前面几章分别介绍了mybatis-plus代码生成器,swagger的使用以及easyexcel实现表格读写功能,本章就将这几部分整合到一起,并且加入了自定义异常处理等,写了一个小demo.
首先建立数据库shop,表名subject。
CREATE TABLE `subject` (
	`id` CHAR (57),
	`title` VARCHAR (30),
	`parent_id` CHAR (57),
	`gmt_create` DATETIME ,
	`gmt_modified` DATETIME
);

INSERT INTO `subject` (`id`, `title`, `parent_id`,  `gmt_create`, `gmt_modified`) VALUES('1293200126289928194','语文','0','2020-08-11 22:58:31','2020-08-11 22:58:31');
INSERT INTO `subject` (`id`, `title`, `parent_id`,  `gmt_create`, `gmt_modified`) VALUES('1293200126319288322','书法','1293200126289928194','2020-08-11 22:58:31','2020-08-11 22:58:31');
INSERT INTO `subject` (`id`, `title`, `parent_id`,  `gmt_create`, `gmt_modified`) VALUES('1293200126365425666','朗读','1293200126289928194','2020-08-11 22:58:31','2020-08-11 22:58:31');
INSERT INTO `subject` (`id`, `title`, `parent_id`,  `gmt_create`, `gmt_modified`) VALUES('1293200126688387074','作文','1293200126289928194','2020-08-11 22:58:31','2020-08-11 22:58:31');
INSERT INTO `subject` (`id`, `title`, `parent_id`,  `gmt_create`, `gmt_modified`) VALUES('1293200126705164289','数学','0','2020-08-11 22:58:31','2020-08-11 22:58:31');
INSERT INTO `subject` (`id`, `title`, `parent_id`,  `gmt_create`, `gmt_modified`) VALUES('1293200126730330114','算法','1293200126705164289','2020-08-11 22:58:31','2020-08-11 22:58:31');
INSERT INTO `subject` (`id`, `title`, `parent_id`,  `gmt_create`, `gmt_modified`) VALUES('1293200126772273153','应用','1293200126705164289','2020-08-11 22:58:31','2020-08-11 22:58:31');
INSERT INTO `subject` (`id`, `title`, `parent_id`,  `gmt_create`, `gmt_modified`) VALUES('1293200126793244674','英语','0','2020-08-11 22:58:31','2020-08-11 22:58:31');
INSERT INTO `subject` (`id`, `title`, `parent_id`,  `gmt_create`, `gmt_modified`) VALUES('1293200126810021889','听力','1293200126793244674','2020-08-11 22:58:31','2020-08-11 22:58:31');
随后创建一个项目,加入相应的pom依赖,将所有版本都写在properties标签中,便于后续统一版本管理。
    4.0.0

        org.springframework.boot
        spring-boot-starter-parent
        2.2.1.RELEASE


    com.example
    excel
    0.0.1-SNAPSHOT
    Demo project for Spring Boot


        1.8
        0.0.1-SNAPSHOT
        3.0.5
        2.7.0
        2.10.1
        3.17
        1.3.1
        2.6
        20170516
        1.2.28
        2.8.6
        2.1.1


                org.springframework.boot
                spring-boot-starter-web


                com.baomidou
                mybatis-plus-boot-starter
                ${mybatis-plus.version}


                org.freemarker
                freemarker


                io.springfox
                springfox-swagger2
                ${swagger.version}


                io.springfox
                springfox-swagger-ui
                ${swagger.version}


                mysql
                mysql-connector-java


                joda-time
                joda-time
                ${jodatime.version}


                org.apache.poi
                poi
                ${poi.version}


                org.apache.poi
                poi-ooxml
                ${poi.version}


                commons-fileupload
                commons-fileupload
                ${commons-fileupload.version}


                commons-io
                commons-io
                ${commons-io.version}


                com.alibaba
                fastjson
            ${fastjson.version}


                com.google.code.gson
                gson
                ${gson.version}


                com.alibaba
                easyexcel
                ${easyexcel.version}


                org.json
                json
                ${json.version}


                junit
                junit


                org.projectlombok
                lombok


                org.springframework.boot
                spring-boot-maven-plugin
相应的配置在application.properties中
# 服务端口
server.port=8888

# 环境设置:dev、test、prod
spring.profiles.active=dev
# mysql数据库连接
spring.datasource.driver-class-name=com.mysql.cj.jdbc.Driver
spring.datasource.url=jdbc:mysql://localhost:3306/shop?serverTimezone=GMT%2B8&characterEncoding=UTF-8
spring.datasource.username=root
spring.datasource.password=

#返回json的全局时间格式
spring.jackson.date-format=yyyy-MM-dd HH:mm:ss
spring.jackson.time-zone=GMT+8

#mybatis日志
mybatis-plus.configuration.log-impl=org.apache.ibatis.logging.stdout.StdOutImpl
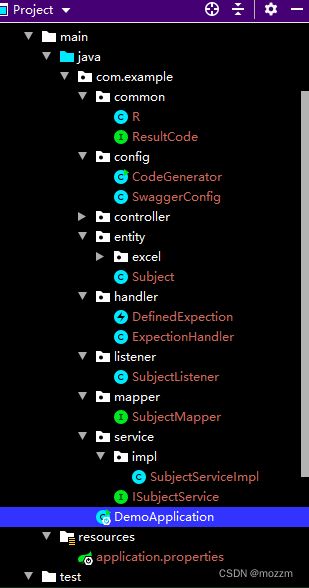
然后创建相应的package,如下图所示。
在config中创建CodeGenerate,通过CodeGenerate实现代码自动生成。注意代码生成器中相应的路径以及命名等自己根据需求来改就行了
package com.example.config;


import com.baomidou.mybatisplus.core.exceptions.MybatisPlusException;
import com.baomidou.mybatisplus.core.toolkit.StringPool;
import com.baomidou.mybatisplus.core.toolkit.StringUtils;
import com.baomidou.mybatisplus.generator.AutoGenerator;
import com.baomidou.mybatisplus.generator.InjectionConfig;
import com.baomidou.mybatisplus.generator.config.*;
import com.baomidou.mybatisplus.generator.config.po.TableInfo;
import com.baomidou.mybatisplus.generator.config.rules.NamingStrategy;
import com.baomidou.mybatisplus.generator.engine.FreemarkerTemplateEngine;

import java.util.ArrayList;
import java.util.List;
import java.util.Scanner;

public class CodeGenerator {
        /**
         *
         * 读取控制台内容
         *
         */
        public static String scanner(String tip) {
                Scanner scanner = new Scanner(System.in);
                StringBuilder help = new StringBuilder();
                help.append("请输入" + tip + ":");
                System.out.println(help.toString());
                if (scanner.hasNext()) {
                        String ipt = scanner.next();
                        if (StringUtils.isNotEmpty(ipt)) {
                                return ipt;
                        }
                }
                throw  new MybatisPlusException("请输入正确的" + tip + "!");
        }
        public static void main(String[] args) {
                // 代码生成器
                AutoGenerator mpg = new AutoGenerator();
                // 全局配置
                GlobalConfig gc = new GlobalConfig();
                String projectPath = System.getProperty("user.dir");
                gc.setOutputDir(projectPath + "/src/main/java");
                //作者
                gc.setAuthor("mozz");
                //打开输出目录
                gc.setOpen(false);
                //xml开启 BaseResultMap
                gc.setBaseResultMap(true);
                //xml 开启BaseColumnList
                gc.setBaseColumnList(true);
                // 实体属性 Swagger2 注解
                gc.setSwagger2(true);
                mpg.setGlobalConfig(gc);
                // 数据源配置
                DataSourceConfig dsc = new DataSourceConfig();
                dsc.setUrl("jdbc:mysql://localhost:3306/shop? useUnicode=true&characterEncoding=UTF-8&serverTimezone=Asia" + "/Shanghai");
                dsc.setDriverName("com.mysql.cj.jdbc.Driver");
                dsc.setUsername("root");
                dsc.setPassword("");
                mpg.setDataSource(dsc);
                // 包配置
                PackageConfig pc = new PackageConfig();
                pc.setParent("com.example")
                        .setEntity("entity")
                        .setMapper("mapper")
                        .setService("service")
                        .setServiceImpl("service.impl")
                        .setController("controller");
                mpg.setPackageInfo(pc);
                // 自定义配置
                InjectionConfig cfg = new InjectionConfig() {
                        @Override
                        public void initMap() {
                                // to do nothing
                        }
                };
                // 如果模板引擎是 freemarker
                String templatePath = "/templates/mapper.xml.ftl";
                // 如果模板引擎是 velocity
                // String templatePath = "/templates/mapper.xml.vm";
                // 自定义输出配置
                List focList = new ArrayList<>();
                // 自定义配置会被优先输出
                focList.add(new FileOutConfig(templatePath) {
                        @Override
                        public String outputFile(TableInfo tableInfo) {
                                // 自定义输出文件名 , 如果你 Entity 设置了前后缀、此处注意 xml 的名称会
                                return projectPath + "/demo1/src/main/resources/mapper/"
                                        + tableInfo.getEntityName() + "Mapper"
                                        + StringPool.DOT_XML;
                        }
                });
                cfg.setFileOutConfigList(focList);
                mpg.setCfg(cfg);
                // 配置模板
                TemplateConfig templateConfig = new TemplateConfig();
                templateConfig.setXml(null);
                mpg.setTemplate(templateConfig);
                // 策略配置
                StrategyConfig strategy = new StrategyConfig();
                //数据库表映射到实体的命名策略
                strategy.setNaming(NamingStrategy.underline_to_camel);
                //数据库表字段映射到实体的命名策略
                strategy.setColumnNaming(NamingStrategy.nochange);
                //lombok模型
                strategy.setEntityLombokModel(true);
                //生成 @RestController 控制器
                strategy.setRestControllerStyle(true);
                strategy.setInclude(scanner("表名,多个英文逗号分割").split(","));
                strategy.setControllerMappingHyphenStyle(true);
                //表前缀
//        strategy.setTablePrefix("t_");
                mpg.setStrategy(strategy);
                mpg.setTemplateEngine(new FreemarkerTemplateEngine());
                mpg.execute();
        }
}
通过代码生成器会自动生成entity,mapper,service以及controller相关的内容,这就不需要我们再去写了,非常方便。
然后在service层写入方法
package com.example.service;

import com.example.entity.Subject;
import com.baomidou.mybatisplus.extension.service.IService;
import org.springframework.web.multipart.MultipartFile;

/**
 *
 *  服务类
 *
 *
 * @author mozz
 * @since 2022-06-22
 */
public interface ISubjectService extends IService {

    void saveSubject(MultipartFile file,ISubjectService iSubjectService);
}
package com.example.service.impl;

import com.alibaba.excel.EasyExcel;
import com.example.service.ISubjectService;
import com.example.entity.Subject;
import com.example.entity.excel.SubjectData;
import com.example.listener.SubjectListener;
import com.example.mapper.SubjectMapper;
import com.baomidou.mybatisplus.extension.service.impl.ServiceImpl;
import org.springframework.stereotype.Service;
import org.springframework.web.multipart.MultipartFile;

import java.io.InputStream;

/**
 *
 *  服务实现类
 *
 *
 * @author mozz
 * @since 2022-06-22
 */
@Service
public class SubjectServiceImpl extends ServiceImpl implements ISubjectService {

    @Override
    public void saveSubject(MultipartFile file,ISubjectService iSubjectService) {

        try {
            InputStream in = file.getInputStream();
            EasyExcel.read(in, SubjectData.class, new SubjectListener(iSubjectService)).sheet().doRead();
        }catch (Exception e){
            e.printStackTrace();
        }


    }
}
通过文件流的方式获取到文件,easyExcel.read对表格进行读取操作,这边需要传入监听器,新建一个监听器SubjectListener。
首先我们这边需要了解本次创建的数据库是二级的,语文数学英语是一级分类,不能重复,且以及分类的parent_id为0,一级分类下面对应的是二级分类,所以我们可以先创建一个只含一级分类和二级分类实体类。实体类中通过注解的方式id会随机生成,且时间通过@Table注解实现了自动填充,我们需要关注的就是title和parent_id。
一级和二级分类实体类SubjectData
package com.example.entity.excel;

import com.alibaba.excel.annotation.ExcelProperty;
import lombok.Data;

@Data
public class SubjectData {

    @ExcelProperty(index = 0,value = "一级分类")
    private String oneSubjectName;

    @ExcelProperty(index = 1,value = "二级分类")
    private String twoSubjectName;
}
package com.example.listener;

import com.alibaba.excel.context.AnalysisContext;
import com.alibaba.excel.event.AnalysisEventListener;
import com.baomidou.mybatisplus.core.conditions.query.QueryWrapper;
import com.example.entity.Subject;
import com.example.entity.excel.SubjectData;
import com.example.service.ISubjectService;
import com.example.handler.DefinedExpection;
import lombok.extern.slf4j.Slf4j;

import java.util.Map;

@Slf4j
public class SubjectListener extends AnalysisEventListener {

    public ISubjectService iSubjectService;

    public SubjectListener() {}

    public SubjectListener(ISubjectService iSubjectService) {
        this.iSubjectService = iSubjectService;
    }

    @Override
    public void invoke(SubjectData subjectData, AnalysisContext analysisContext) {
        if(subjectData == null){
            throw new DefinedExpection(10001,"文件为空");
        }

        Subject subject1 = this.haveOneSubject(iSubjectService, subjectData.getOneSubjectName());
        if(subject1 == null){ //没有相同的一级目录
            subject1 = new Subject();
            subject1.setTitle(subjectData.getOneSubjectName());
            subject1.setParentId("0");
            iSubjectService.save(subject1);
        }

        String pid = subject1.getId();
        Subject subject2 = this.haveTwoSubject(iSubjectService, subjectData.getTwoSubjectName(),pid);
        if(subject2 == null){ //没有相同的一级目录
            subject2 = new Subject();
            subject2.setTitle(subjectData.getTwoSubjectName());
            subject2.setParentId(pid);
            iSubjectService.save(subject2);
        }


    }

    //判断一级分类不能重复添加
    public Subject haveOneSubject(ISubjectService iSubjectService,String name){
        QueryWrapper queryWrapper = new QueryWrapper<>();
        queryWrapper.eq("title",name);
        queryWrapper.eq("parent_id","0");
        Subject oneSubject = iSubjectService.getOne(queryWrapper);
        return oneSubject;
    }
    //判断二级分类不能重复添加
    public Subject haveTwoSubject(ISubjectService iSubjectService,String name,String pid){
        QueryWrapper queryWrapper = new QueryWrapper<>();
        queryWrapper.eq("title",name);
        queryWrapper.eq("parent_id",pid);
        Subject twoSubject = iSubjectService.getOne(queryWrapper);
        return twoSubject;
    }

    public void invokeHeadMap(Map headMap, AnalysisContext context) {
        log.info("表头信息:"+headMap);
    }

    @Override
    public void doAfterAllAnalysed(AnalysisContext analysisContext) {

    }
}
首先我们在监听器invoke方法中先判断是否存在一级分类,如果不存在就报异常,该异常可以通过自定义来定义,首先创建一个handler包,在包中定义一个类DefinedExpection类,包含状态码和异常信息,然后在创建一个ExpectionHandler用来返回自定义状态码和异常信息,这样一个自定义的异常就定义好了,下面就可以直接用。
package com.example.handler;

import lombok.AllArgsConstructor;
import lombok.Data;
import lombok.NoArgsConstructor;

@Data
@NoArgsConstructor
@AllArgsConstructor
public class DefinedExpection extends RuntimeException{

    private Integer code; //状态码

    private String msg; //异常信息

}
package com.example.handler;

import com.example.common.R;
import lombok.extern.slf4j.Slf4j;
import org.springframework.web.bind.annotation.ControllerAdvice;
import org.springframework.web.bind.annotation.ExceptionHandler;
import org.springframework.web.bind.annotation.ResponseBody;

@ControllerAdvice
@Slf4j
public class ExpectionHandler {

    //自定义异常
    @ExceptionHandler(DefinedExpection.class)
    @ResponseBody  //为了返回数据
    public R error(DefinedExpection e){
        log.error(e.getMessage());
        e.printStackTrace();
        return R.error().code(e.getCode()).message(e.getMsg());
    }

}
监听器中还有几点需要注意,因为我们需要对数据库进行操作,所以就需要引入service,但是监听器不能交给spring去管理,listener是由servlet容器(例如tomcat)管理的,所以我们需要手动引入,通过getter和setter方法。其次在添加二级分类的时候,我们需要引入pid,这个pid是根据一级分类的id获取得到,二级分类的parent_id就是其上级的id。
随后在controller层写入添加课程信息。这边我们需要了解一下MultipartFile ,他是SpringMVC提供简化上传操作的工具类。
package com.example.controller;


import com.example.common.R;
import com.example.service.ISubjectService;
import org.springframework.beans.factory.annotation.Autowired;
import org.springframework.web.bind.annotation.PostMapping;
import org.springframework.web.bind.annotation.RequestMapping;

import org.springframework.web.bind.annotation.RestController;
import org.springframework.web.multipart.MultipartFile;

/**
 *
 *  前端控制器
 *
 *
 * @author mozz
 * @since 2022-06-22
 */
@RestController
@RequestMapping("/subject")
public class SubjectController {

    @Autowired
    private ISubjectService iSubjectService;

    //添加分类
    @PostMapping("addSubject")
    public R addSubject(MultipartFile file){
        iSubjectService.saveSubject(file,iSubjectService);
        return R.ok();
    }


}
最后引入swagger配置,在config下创建SwaggerConfig文件。
package com.example.config;

import com.google.common.base.Predicates;
import org.springframework.context.annotation.Bean;
import org.springframework.context.annotation.Configuration;
import springfox.documentation.builders.ApiInfoBuilder;
import springfox.documentation.builders.PathSelectors;
import springfox.documentation.service.ApiInfo;
import springfox.documentation.service.Contact;
import springfox.documentation.spi.DocumentationType;
import springfox.documentation.spring.web.plugins.Docket;
import springfox.documentation.swagger2.annotations.EnableSwagger2;

@Configuration
@EnableSwagger2
public class SwaggerConfig {

    @Bean
    public Docket webApiConfig(){
        return new Docket(DocumentationType.SWAGGER_2)
                .groupName("webApi")
                .apiInfo(webApiInfo())
                .select()
                .paths(Predicates.not(PathSelectors.regex("/admin/.*")))
                .paths(Predicates.not(PathSelectors.regex("/error.*")))
                .build();

    }
    private ApiInfo webApiInfo(){
         return new ApiInfoBuilder()
         .title("API文档")
         .description("接口定义")
         .version("1.0")
         .contact(new Contact("mozz", "http://www.baidu.com",
                "[email protected]"))
         .build();
         }
}
启动类需要mapperscan来扫描mapper文件
package com.example;

import org.mybatis.spring.annotation.MapperScan;
import org.springframework.boot.SpringApplication;
import org.springframework.boot.autoconfigure.SpringBootApplication;
import org.springframework.context.annotation.ComponentScan;

@SpringBootApplication
@MapperScan("com.example.mapper")
public class DemoApplication {

    public static void main(String[] args) {
        SpringApplication.run(DemoApplication.class, args);
    }

}
最后整个demo目录如下图:
最后启动项目:
在swagger中进行测试。
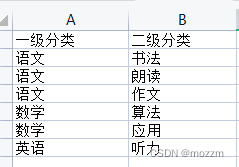
注意这个上传的表格只有一级和二级的名称
先删除数据库信息 DELETE FROM `subject`;
此时数据库没有信息了,上传文件后,数据库有信息,后台没有报错,上传成功
数据库有数据


