总结2-深度学习网络搭建学习
- 分享一个PyTorch医学图像分割开源库
-
从实战的角度看看,稍微有点收获,视频:CNN 从0到1助你快速入门PyTorch和TensorFlow。github网页:Convolutional Neural Network
- 常用激活函数(激励函数)理解与总结
------------------Pytorch学习--------------
-
书籍,深度学习框架与pytorch入门与实践:第四章 神经网络工具箱nn
- 《PyTorch的nn.Linear()详解》 ,官网《torch.nn.Linear》
1)学习具体参数,class:torch.nn.Linear(in_features, out_features, bias=True, device=None, dtype=None)
2)Linear的in_features、out_features大小计算:
in_features指的是输入的二维张量的大小,即输入的[batch_size, size]中的size。
out_features指的是输出的二维张量的大小,即输出的二维张量的形状为[batch_size,output_size],当然,它也代表了该全连接层的神经元个数。
从输入输出的张量的shape角度来理解,相当于一个输入为[batch_size, in_features]的张量变换成了[batch_size, out_features]的输出张量。
3) 全连接层:全连接层(fully connected layers,FC)在整个卷积神经网络中起到“分类器”的作用。如果说卷积层、池化层和激活函数层等操作是将原始数据映射到隐层特征空间的话,全连接层则起到将学到的“分布式特征表示”映射到样本标记空间的作用。在实际使用中,全连接层可由卷积操作实现:对前层是全连接的全连接层可以转化为卷积核为1x1的卷积;而前层是卷积层的全连接层可以转化为卷积核为hxw的全局卷积,h和w分别为前层卷积结果的高和宽(注1)。参考文章《CNN 入门讲解:什么是全连接层(Fully Connected Layer)?》、《全连接层的作用是什么?》
在计算机视觉中,全连接层和卷积层没有太大区别。卷积层其实就是在spatial上部分连接,在channel上全连接的结构。因此如果舍弃在spatial上的部分连接,将卷积核换成1x1的,那么就只有在channel上全连接。这个时候卷积层=全连接层。这就是为什么imagenet分类最后一层是pooling+fc。pooling完之后feature就1x1xC的了,这时候再做fc就是对channel进行全连接,把feature映射到label上。细心的人会发现很多特征融合的卷积都采用1x1的kernel,这也算是全连接层的一个功能。
# 例子1 # in_features指的是输入的二维张量的大小,即输入的[batch_size, size]中的size。 input = torch.randn(128, 20) # input(batch_size, size) m = nn.Linear(20, 30)# Linear(in_features, out_features)等同于Linear(size, out_features) output = m(input) # output二维张量输出形状为[batch_size,out_features], print(output.size())# torch.Size([128, 30]) #例子2 import torch as t from torch import nn # in_features由输入张量的形状决定,out_features则决定了输出张量的形状 connected_layer = nn.Linear(in_features = 64*64*3, out_features = 1) # 假定输入的图像形状为[64,64,3] input = t.randn(1,64,64,3) # 将四维张量转换为二维张量之后,才能作为全连接层的输入 input = input.view(1,64*64*3) print(input.shape) # torch.Size([1, 12288]) output = connected_layer(input) # 调用全连接层 print(output.shape) # torch.Size([1, 1]) # 例子3 def __init__(self): super(LeNet, self).__init__() # Conv2d的第一个参数是输入的channel数量, # 第二个是输出的channel数量,第三个是kernel size self.conv1 = nn.Conv2d(3, 6, 5) self.conv2 = nn.Conv2d(6, 16, 5) # 由于上一层有16个channel输出, # 每个feature map大小为5*5, # 所以linear的输入样本大小是16*5*5 self.fc1 = nn.Linear(16*5*5, 120) self.fc2 = nn.Linear(120, 84) # 最终有10类,所以最后一个Linear输出样本大小是10 self.fc3 = nn.Linear(84, 10) self.pool = nn.MaxPool2d(2, 2) - 《Conv2d函数详解(Pytorch)》,官网《torch.nn.Conv2d》
学习具体参数,了解推算过程。定义:torch.nn.Conv2d(in_channels, out_channels, kernel_size, stride=1, padding=0, dilation=1, groups=1, bias=True, padding_mode='zeros', device=None, dtype=None)[
# With square kernels and equal stride m = nn.Conv2d(16, 33, 3, stride=2) #nn.Conv2d(Cin, Cout, kernel_size, stride=1) input = torch.randn(20, 16, 50, 100) # torch.Size([20, 16, 50, 100]) output = m(input) # torch.Size([20, 33, 24, 49]) # input和output对比,Conv2d只改变通道数和图像大小 - 《pytorch avg_pool2d》,官网《torch.nn.AvgPool2d》。走一遍例子,熟悉一下平均池化的具体参数。
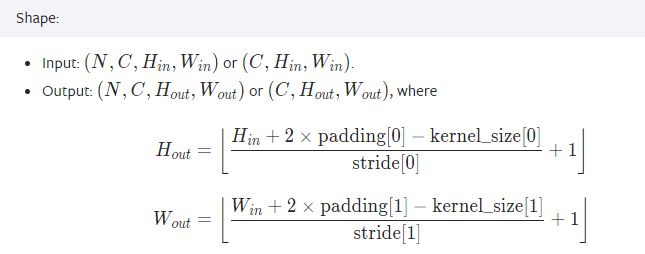
定义:平均池化,取样操作,只需要关注kernel_size、stride与padding三个参数就行了。也就是N和C不变,只关心图像大小变化H、W。torch.nn.AvgPool2d(kernel_size, stride=None, padding=0, ceil_mode=False, count_include_pad=True, divisor_override=None)
shape:
代码例子:# pool of square window of size=3, stride=2 m = nn.AvgPool2d(3, stride=2) input = torch.randn(20, 16, 50, 32) # torch.Size([20, 16, 50, 32]) output = m(input) # torch.Size([20, 16, 24, 15]) # input和output之间,N和C不变,只关心图像大小变化H、W。 - 《torch.nn.MaxPool2d详解》,官网《torch.nn.MaxPool2d》。
作用:对邻域内特征点取最大,减小卷积层参数误差造成估计均值的偏移的误差,更多的保留纹理信息。
定义:torch.nn.MaxPool2d( kernel_size , stride = None , padding = 0 , dilation = 1 , return_indices = False , ceil_mode = False )
参数:
kernel_size(int or tuple) - max pooling的窗口大小
stride(int or tuple, optional) - max pooling的窗口移动的步长。默认值是kernel_size
padding(int or tuple, optional) - 输入的每一条边补充0的层数
dilation(int or tuple, optional) – 一个控制窗口中元素步幅的参数
return_indices - 如果等于True,会返回输出最大值的序号,对于上采样操作会有帮助
ceil_mode - 如果等于True,计算输出信号大小的时候,会使用向上取整,代替默认的向下取整的操作
Shape:
代码例子:# pool of square window of size=3, stride=2 m = nn.MaxPool2d(3, stride=2) # pool of non-square window m = nn.MaxPool2d((3, 2), stride=(2, 1)) input = torch.randn(20, 16, 50, 32) output = m(input) input.shape # Out[33]: torch.Size([20, 16, 50, 32]) output.shape # Out[34]: torch.Size([20, 16, 24, 31])
- 批标准化。
机器学习中,进行模型训练之前,需对数据做归一化处理,使其分布一致。在深度神经网络训练过程中,通常一次训练是一个batch,而非全体数据。每个batch具有不同的分布产生了internal covarivate shift问题——在训练过程中,数据分布会发生变化,对下一层网络的学习带来困难。
Batch Normalization将数据拉回到均值为0,方差为1的正态分布上(归一化),一方面使得数据分布一致,另一方面避免梯度消失、梯度爆炸。 Batch Noramlization 是想让输入满足同一个分布, 那么是让输入的什么特征满足同一分布呢?就是让每张图片的相同通道的所有像素值的均值和方差相同。比如我们有两张图片(都为3通道),我们现在只说R通道,我们希望第一张图片的R通道的均值 和 第二张图片R通道的均值相同,方差同理。
为了减小Internal Covariate Shift,对神经网络的每一层做归一化不就可以了,假设将每一层输出后的数据都归一化到0均值,1方差,满足正态分布。但是,此时有一个问题,每一层的数据分布都是标准正太分布,导致其完全学习不到输入数据的特征,因为,费劲心思学习到的特征分布被归一化了,因此,直接对每一层做归一化显然是不合理的。 但是如果稍作修改,加入可训练的参数做归一化,那就是Batch Norm实现的。
这篇文章解释了整个过程,《Pytorch:nn.BatchNorm2d()函数》
分别描述一遍:
《pytorch中BatchNorm1d、BatchNorm2d、BatchNorm3d》
《pytorch——nn.BatchNorm1d()》,官网《nn > BatchNorm1d》;代码验证批处理的过程参考《【PyTorch】详解pytorch中nn模块的BatchNorm2d()函数》;
定义:torch.nn.BatchNorm2d(num_features, eps=1e-05, momentum=0.1, affine=True, track_running_stats=True, device=None, dtype=None)>>> # With Learnable Parameters >>> m = nn.BatchNorm2d(100) >>> input = torch.randn(20, 100, 35, 45) >>> output = m(input)
优点:①不仅仅极大提升了训练速度,收敛过程大大加快;
②还能增加分类效果,一种解释是这是类似于Dropout的一种防止过拟合的正则化表达方式,所以不用Dropout也能达到相当的效果;
③另外调参过程也简单多了,对于初始化要求没那么高,而且可以使用大的学习率等。
- nn.dropout:
我们在前向传播的时候,让某个神经元的激活值以一定的概率p停止工作,这样可以使模型泛化性更强,因为它不会太依赖某些局部的特征。网络可以防止出现过拟合。
测试代码参考这篇《torch.nn.dropout和torch.nn.dropout2d的区别》,网络中实际使用参考这篇《pytorch之Dropout》
定义:torch.nn.Dropout(p=0.5, inplace=False)>>> m = nn.Dropout(p=0.2) >>> input = torch.randn(20, 16) >>> output = m(input) - 激活函数:
1)原理:激活函数对于人工神经网络模型去学习、理解非常复杂和非线性的函数来说具有十分重要的作用。它们将非线性特性引入到我们的网络中。在神经元中,输入的 inputs 通过加权,求和后,还被作用了一个函数,这个函数就是激活函数。引入激活函数是为了增加神经网络模型的非线性。没有激活函数的每层都相当于矩阵相乘。就算你叠加了若干层之后,无非还是个矩阵相乘罢了。”
如果不用激励函数(其实相当于激励函数是f(x) = x),在这种情况下你每一层节点的输入都是上层输出的线性函数,很容易验证,无论你神经网络有多少层,输出都是输入的线性组合,与没有隐藏层效果相当,这种情况就是最原始的感知机(Perceptron)了,那么网络的逼近能力就相当有限。正因为上面的原因,我们决定引入非线性函数作为激励函数,这样深层神经网络表达能力就更加强大(不再是输入的线性组合,而是几乎可以逼近任意函数)。
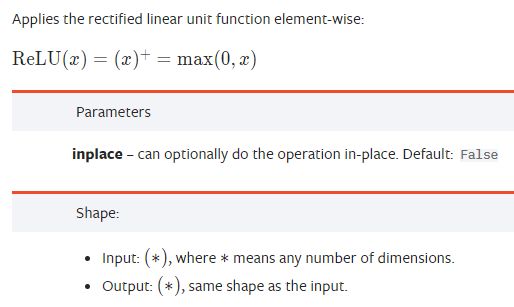
2)参数解释,参考官网《nn.ReLU》。
示例参考:《关于nn.ReLU函数》。
3)torch.nn.ReLU:relu称为线性整流函数(修正线性单元),tf.nn.relu()用于将输入小于0的值增幅为0,输入大于0的值不变。
4)torch.nn.sigmoid():将值映射到0-1之间。
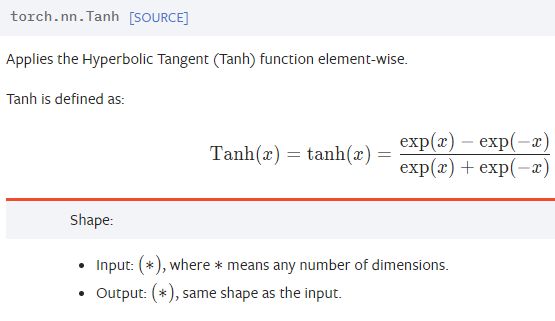
5)torch.nn.Tanh:将一个实值输入映射至 [-1, 1]的范围
6)总结区分,参考 《详解激活函数(Sigmoid/Tanh/ReLU/Leaky ReLu等》。激活函数是向神经网络中引入非线性因素,通过激活函数神经网络就可以拟合各种曲线。激活函数主要分为饱和激活函数(Saturated Neurons)和非饱和函数(One-sided Saturations)。Sigmoid和Tanh是饱和激活函数,而ReLU以及其变种为非饱和激活函数。非饱和激活函数主要有如下优势:
1.非饱和激活函数可以解决梯度消失问题。
2.非饱和激活函数可以加速收敛。

1. Sigmoid极容易导致梯度消失问题。饱和神经元会使得梯度消失问题雪上加霜,假设神经元输入Sigmoid的值特别大或特别小,对应的梯度约等于0,即使从上一步传导来的梯度较大,该神经元权重(w)和偏置(bias)的梯度也会趋近于0,导致参数无法得到有效更新。
2. 计算费时。 在神经网络训练中,常常要计算Sigmid的值进行幂计算会导致耗时增加。
3. Sigmoid函数不是关于原点中心对称的(zero-centered)。
4.Tanh激活函数解决了原点中心对称问题。
5.ReLU激活函数的提出就是为了解决梯度消失问题。ReLU的梯度只可以取两个值:0或1,当输入小于0时,梯度为0;当输入大于0时,梯度为1。好处就是:ReLU的梯度的连乘不会收敛到0,连乘的结果也只可以取两个值:0或1 。如果值为1,梯度保持值不变进行前向传播;如果值为0 ,梯度从该位置停止前向传播。
6.像ReLU这样单侧饱和还能使得神经元对于噪声干扰更具鲁棒性。
7.ReLU激活函数在计算上也是高效的。相对于Sigmoid函数梯度的计算,ReLU函数梯度取值只有0或1。且ReLU将负值截断为0 ,为网络引入了稀疏性,进一步提升了计算高效性。
8.ReLU尽管稀疏性可以提升计算高效性,但同样也可能阻碍训练过程。通常,激活函数的输入值有一偏置项(bias),假设bias变得太小,以至于输入激活函数的值总是负的,那么反向传播过程经过该处的梯度恒为0,对应的权重和偏置参数此次无法得到更新。如果对于所有的样本输入,该激活函数的输入都是负的,那么该神经元再也无法学习,称为神经元”死亡“问题。
9.Leaky ReLU可以解决神经元”死亡“问题Leaky ReLU的提出就是为了解决神经元”死亡“问题,Leaky ReLU与ReLU很相似,仅在输入小于0的部分有差别,ReLU输入小于0的部分值都为0,而LeakyReLU输入小于0的部分,值为负,且有微小的梯度。函数图像为(d)。
使用Leaky ReLU的好处就是:在反向传播过程中,对于Leaky ReLU激活函数输入小于零的部分,也可以计算得到梯度(而不是像ReLU一样值为0),这样就避免了梯度方向锯齿问题。
10.梯度误差是在神经网络训练期间计算的方向和梯度,神经网络以正确的方向和数值更新网络权重。在深度网络或递归神经网络中,梯度误差可能在更新过程中累积,造成非常大的梯度。这反过来会导致网络权重的大量更新,进而导致网络不稳定。在极端情况下,权重值可能变得太大,以至于溢出并导致NaN值现成梯度爆炸现象。梯度爆炸是通过指数增长发生的,通过在网络层(其值大于1.0)中重复乘以梯度。
11.梯度爆炸现象比较明显的现象:
1.模型无法“加入”训练数据,比如损失函数很差。
2.模型不稳定,每次更新的损失变化很大。
3.模型损失在训练过程中变为NaN另外还有一些不太明显的现象:
1.模型权重在训练期间很快变化很大。
2.模型权重在训练过程中变为NaN.
3.训练期间每个节点和层的梯度误差始终高于1.0。
12.何解决梯度爆炸1.重现设计神经网络
减少网络层数、减小batch szie、截断。
2.使用LSTM
3.使用梯度裁剪
clipnorm=1.0 clipvalue=0.5
4.使用权重正则
L1 & L213.如何选择激活函数
1.除非在二分类问题中,否则请小心使用Sigmoid函数。
2.可以试试Tanh,不过大多数情况下它的效果会比不上 ReLU 和 Maxout。
3.如果你不知道应该使用哪个激活函数, 那么请优先选择ReLU。
4.如果你使用了ReLU, 需要注意一下Dead ReLU问题, 此时你需要仔细选择 Learning rate, 避免出现大的梯度从而导致过多的神经元 “Dead” 。
5.如果发生了Dead ReLU问题, 可以尝试一下leaky ReLU,ELU等ReLU变体, 说不定会有很好效果。 - torch.nn.Sequential:网络模块有序初始化,自动实现了forword函数,必须确保前一个模块的输出大小和下一个模块的输入大小是一致的。具体讲解,参考《pytorch系列7 -----nn.Sequential讲解》
from collections import OrderedDict
net3= nn.Sequential(OrderedDict([
          ('conv1', nn.Conv2d(3, 3, 3)),
          ('bn1', nn.BatchNorm2d(3)),
          ('relu1', nn.ReLU())
        ]))
print('net3:', net3)
输出:
net3: Sequential(
(conv1): Conv2d(3, 3, kernel_size=(3, 3), stride=(1, 1))
(bn1): BatchNorm2d(3, eps=1e-05, momentum=0.1, affine=True, track_running_stats=True)
(relu1): ReLU()
) - nn.ModuleList,和Sequential比,Modulelist内部没有forword功能,没有顺序性要求,也没有级联需求。ModuleList是Module的子类,当在Module中使用它的时候,就能自动识别为子module。
- 损失函数
1、不同损失函数的对比,参考文章《损失函数总结(pytorch)》,一般针对分类问题采用交叉熵作为loss函数。
交叉熵:它主要刻画的是实际输出(概率)与期望输出(概率)的距离,也就是交叉熵的值越小,两个概率分布就越接近。假设概率分布p为期望输出,概率分布q为实际输出, H(p,q) 为交叉熵,则Pytorch中的CrossEntropyLoss()函数,计算公式如下:

2)nn.CrossEntropyLoss()中的计算方法:
最后一步求多组输出的loss:
如果reduction='mean',就是求均值。
如果reduction='mean',就是求和。
import torch import torch.nn as nn import math criterion = nn.CrossEntropyLoss() output = torch.randn(3, 5, requires_grad=True) label = torch.empty(3, dtype=torch.long).random_(5) loss = criterion(output, label) print("网络输出为3个5类:") print(output) print("要计算loss的类别:") print(label) print("计算loss的结果:") print(loss) first = [0, 0, 0] for i in range(3): first[i] = -output[i][label[i]] second = [0, 0, 0] for i in range(3): for j in range(5): second[i] += math.exp(output[i][j]) res = 0 for i in range(3): res += (first[i] + math.log(second[i])) print("自己的计算结果:") print(res/3) ########################## 网络输出为3个5类: tensor([[ 1.1499, -0.2208, -0.8943, -1.5002, 0.3065], [-0.0155, 0.7495, 0.4617, 0.5376, 1.2006], [-0.3464, 0.7741, -1.9237, 0.0350, 0.5038]], requires_grad=True) 要计算loss的类别: tensor([1, 0, 4]) 计算loss的结果: tensor(1.8443, grad_fn=) 自己的计算结果: tensor(1.8443, grad_fn= )
nn.CrossEntropyLoss例子:# Example of target with class probabilities loss = nn.CrossEntropyLoss() input = t.randn(3, 5, requires_grad=True) target = t.randn(3, 5).softmax(dim=1) output = loss(input, target) output.backward()# batch_size=3,计算对应每个类别的分数(只有两个类别) score = t.randn(3, 2) # 三个样本分别属于1,0,1类,label必须是LongTensor label = t.Tensor([1, 0, 1]).long() # loss与普通的layer无差异 criterion = nn.CrossEntropyLoss() loss = criterion(score, label) loss - 优化器torch.optim:,使用方法,参考教程《优化器:torch.optim》。
1)四种常用的优化器比较,参考《Pytorch中常用的四种优化器SGD、Momentum、RMSProp、Adam》
作者建议:
a)RMSProp算法在经验上已经被证明是一种有效且实用的深度神经网络优化算法。目前它是深度学习从业者经常采用的优化方法之一。
b) SGD 是最普通的优化器, 也可以说没有加速效果, 而 Momentum 是 SGD 的改良版, 它加入了动量原则. 后面的 RMSprop 又是 Momentum 的升级版. 而 Adam 又是 RMSprop 的升级版。
c)在实际操作中,推荐Adam作为默认算法,一般比RMSProp要好一点。
为了验证四种算法的性能,在pytorch中的对同一个网络进行优化,比较四种算法损失函数随着时间的变化情况。代码如下:opt_SGD=torch.optim.SGD(net_SGD.parameters(),lr=LR) opt_Momentum=torch.optim.SGD(net_Momentum.parameters(),lr=LR,momentum=0.8) opt_RMSprop=torch.optim.RMSprop(net_RMSprop.parameters(),lr=LR,alpha=0.9) opt_Adam=torch.optim.Adam(net_Adam.parameters(),lr=LR,betas=(0.9,0.99))
2)如何自适应调整学习率,参考《PyTorch 笔记(18)— torch.optim 优化器的使用》;
3)通过源码解读torch.optim《PyTorch 源码解读之 torch.optim:优化算法接口详解》;
4)不同优化器的区分《PyTorch: torch.optim 的6种优化器及优化算法介绍》; - 初始化策略torch.nn.init: PyTorch中nn.Module的模块参数都采取了较为合理的初始化策略,因此一般不用我们考虑。当我们在使用Parameter时,自定义初始化则尤为重要,因t.Tensor()返回的是内存中的随机数,很可能会有极大值,这在实际训练网络中会造成溢出或者梯度消失。PyTorch中
nn.init模块就是专门为初始化而设计。
初始化Tensor的分布,参考这篇《torch.nn.init 官方使用手册「总结」》、还有官网《torch.nn.init》
例子:import torch import torch.nn as nn w = torch.empty(3,5) #1.均匀分布 - u(a,b) #torch.nn.init.uniform_(tensor, a=0.0, b=1.0) print(nn.init.uniform_(w)) # ======================================================= # tensor([[0.9160, 0.1832, 0.5278, 0.5480, 0.6754], # [0.9509, 0.8325, 0.9149, 0.8192, 0.9950], # [0.4847, 0.4148, 0.8161, 0.0948, 0.3787]]) # ======================================================= - nn.Module深入分析:
如果想要更深入地理解nn.Module,究其原理是很有必要的。首先来看看nn.Module基类的构造函数:
其中每个属性的解释如下:def __init__(self): self._parameters = OrderedDict() self._modules = OrderedDict() self._buffers = OrderedDict() self._backward_hooks = OrderedDict() self._forward_hooks = OrderedDict() self.training = True
_parameters:字典,保存用户直接设置的parameter,self.param1 = nn.Parameter(t.randn(3, 3))会被检测到,在字典中加入一个key为'param',value为对应parameter的item。而self.submodule = nn.Linear(3, 4)中的parameter则不会存于此。
_modules:子module,通过self.submodel = nn.Linear(3, 4)指定的子module会保存于此。
_buffers:缓存。如batchnorm使用momentum机制,每次前向传播需用到上一次前向传播的结果。
_backward_hooks与_forward_hooks:钩子技术,用来提取中间变量,类似variable的hook。
training:BatchNorm与Dropout层在训练阶段和测试阶段中采取的策略不同,通过判断training值来决定前向传播策略。
上述几个属性中,_parameters、_modules和_buffers这三个字典中的键值,都可以通过self.key方式获得,效果等价于self._parameters['key'].
- 《pytorch——梯度计算》讲的不错
- ddd
