CVPR2021| RfDNet 代码运行配环境采坑记录(Ubuntu)
试图运行以下代码:
https://github.com/yinyunie/RfDNet
花了很久,特此记录采坑总结。
更新
之前是按照pip来安装。现在改用cuda了,方便多了。
步骤:
不要动自己的cuda。确保cuda版本和系统硬件是匹配的
增加清华源
在environment.yml开头改成这样:
name: rfdnet
channels:
  - https://mirrors.tuna.tsinghua.edu.cn/anaconda/cloud/conda-forge
  - https://mirrors.tuna.tsinghua.edu.cn/anaconda/pkgs/main
  - https://mirrors.tuna.tsinghua.edu.cn/anaconda/pkgs/free
  - conda-forge
  - pytorch
  - defaults
dependencies:
这样会更快一些。
但有时候我也不知道为什么网就是不行,就是很慢,我第一天试的时候就奇慢无比,第二天就很快了。
之后完全按官方readme即可
可能的问题:RuntimeError: The NVIDIA driver on your system is too old
我反反复复装过几次,前几次都会自动根据我系统的cuda版本选择对应的torch和cudatoolkit安装。但最后一次没有,装了一个更高版本的cudatoolkit。报错如下:
RuntimeError: The NVIDIA driver on your system is too old (found version 10010). Please update your GPU driver by downloading and installing a new versi
on from the URL: http://www.nvidia.com/Download/index.aspx Alternatively, go to: https://pytorch.org to install a PyTorch version that has been compiled
with your version of the CUDA driver.
我激活虚拟环境并用conda list命令一看,他装得是cudatoolkit 11.多,而我的cuda是10.1。
于是
- 从torch官网摘录一个安装命令:
conda install pytorch==1.x torchvision==0.x torchaudio==0.x cudatoolkit=10.1 -c pytorch
- 打开environment.yml, 填入对应的版本:
conda install pytorch==1.7.1 torchvision==0.8.2 torchaudio==0.7.2 cudatoolkit=10.1 -c pytorch
- 运行
- 后面继续按readme安装external 和pointnet等。就行了。
以下是老版内容
总结
关于install:
- pip install -r requirements.txt 之前先看一下他的要求,会发现里面有的用了本地链接。这种要删掉。
- 同时如果requirements.txt 里面都是明确指定了版本号,即用的==而非>=, 也要慎重。可能的话,先从requirements.txt里面删掉自己已经安装过的软件。
- 尽量不要动cuda,跟硬件和驱动都有关,如果不适配的话动torch。
- torch也不要直接用reuqirements安装,可能会导致和cuda版本不匹配。
关于图形界面显示
如果出现
vtkXOpenGLRenderWindow.:448 ERR| vtkXOpenGLRenderWindow (0x93811700): bad X server connection. DISPLAY=
其中DISPLAY是要配的环境变量,指向远程显示客户端的ip地址。
这个报错是因为,代码想显示图形界面,但你的linux系统只有命令行,他想从X server机制显示界面在别处,但这个X server连接不太行。网上有一些使用Xming等工具配置的教程,挺简单的。
方法一:使用XShell(没有成功)
https://jingyan.baidu.com/article/d45ad148967fcd69552b80f6.html
根据这个操作,即用xshell的时候,选隧道,发送到xmanager。
之后可能要安装gnome panel。
我直接安装到最后说some archies 下不了,让我apt-get update或–fix -missing.
我先用了apt-get update.
但再试还是不行。
后来就 apt-get install gnome panel --fix -missing.
中间让选了几次地区,因为要选时区,得选一个北京时间的位置。
但最后还是有几个faile to fetch 的。 试了一下他说的url,直接浏览器是可以下载成功的。
于是又试了一遍apt-get install gnome panel --fix -missing。说已经是最新版本了,还说让我autoremove一些没用的东西。照做即可。
但接下来报错;
Unable to init server: Could not connect: Connection refused (gnome-panel:17490): Gtk-WARNING **: 11:29:29.360: cannot open display:
https://blog.csdn.net/likwang/article/details/104785085/
这里说要配一个xhost。
之后说没有xhost:
apt install x11-xserver-utils
unable to open display “”
https://blog.csdn.net/preamble_1/article/details/70883978
这里说要:
export DISPLAY=:0.0
xhost: unable to open display “:0.0”
感觉可能是我没安装xmanager吧。
方法二
如果配不成功,可以选择放弃图形界面显示在linux上,而是保存结果文件,放回windows来显示。
但不知道是不是因为我是教育网,我没配成功。我选择直接注释掉可视化代码,把结果保存。
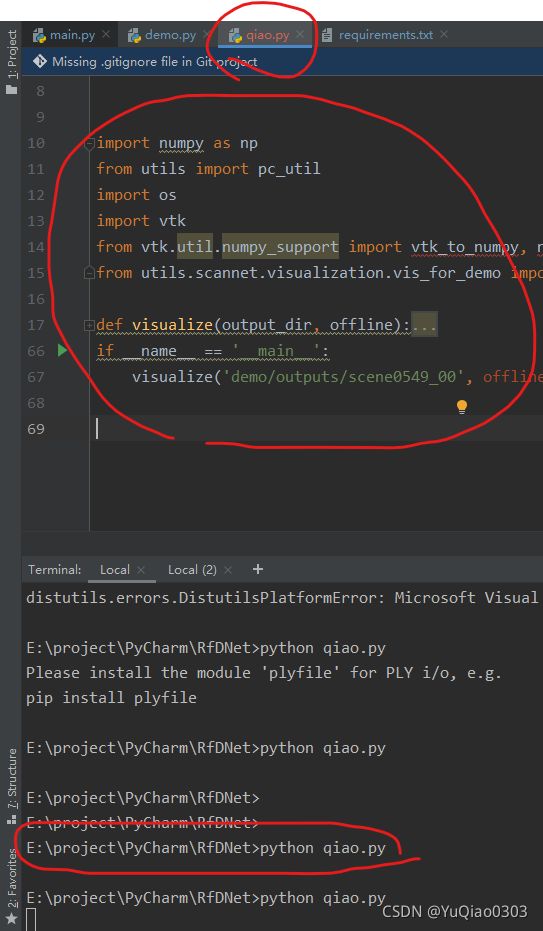
visualize()函数是直接读取的一个本地文件,所以我把这部分代码专门放到一个脚本里,该脚本直接在windows本地运行,就可以了。具体步骤:
- 新建一个脚本,把demo.py里面的所有import,visualize函数复制过来,再加上最后的if main 里面调用visualize,路径写如图路径。
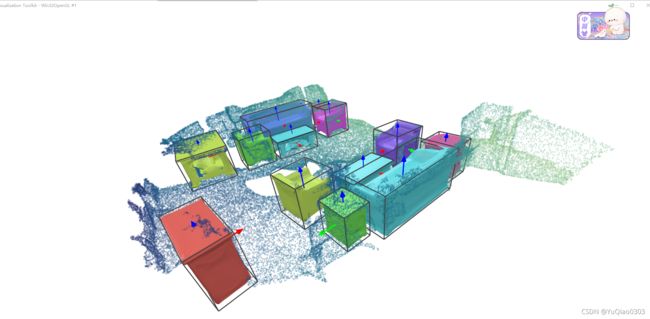
- 删掉所有灰色的(没用到的)import,然后在本地terminal运行这段代码
交互方法:
鼠标左键单击或长按:旋转,效果仿佛你把这个位置压下去了
鼠标右键单击或长按:放大
滚动滚轮:放大缩小
鼠标中键单击或长按:移动。整个场景会往你单击的地方移动。
注意:那些红绿蓝的箭头并点不动
方法三:xming
好像非常复杂,暂时没尝试。
关于修改代码
先开始我在AIStation的jupyter book直接修改代码,一直不行,最后在pycharm里面修改才生效。
后来发现是因为我的工程根目录不知道啥时候套了一层,我应该修改RfDNet/demo.py (删掉可视化部分),但改成了RfDNet/RfDNet/demo.py。 而运行的一直是前者,所以表现为咋改代码都不生效。
过程
过程很心酸。
先开始用windows试的,最后一直卡在> distutils.errors.DistutilsPlatformError: Microsoft Visual C++ 14.0 or greater is required. Get it with “Microsoft C++ Build Tools”
装了无数东西都没用。
后来还是决定改linux。
主要挫折是一开始想配成和作者完全一样的环境,就要改cuda,改半天驱动好像有点问题。最后放弃了。
重点是,requirements.txt里面规定了所有包的精确版本,但pointNet这个依赖里是需要pytorch>1.4.
所以我最后的做法是找了一个已有的torch符合要求,且cuda也配好了的电脑进行。后面只用装其他包即可。
在torch和cuda配好的情况下,基本只需要以下步骤:
0. 测试一下torch和cuda配好没有:
import torch
print(torch.__version__)  # >=1.4就行
print(torch.cuda.is_available()) # 为true即可
这时候直接执行demo那行命令:
python main.py --config configs/config_files/ISCNet_test.yaml --mode demo --demo_path demo/inputs/scene0549_00.off
应该会说缺pointNet。
ModuleNotFoundError: No module named ‘pointnet2_ops’
-
安装pointNet:
cd external/pointnet2_ops_lib
pip install . -
这时候可能会说却别的包,比如trimesh。由于他的包很多,最好还是一气儿都安装了。
我本人把requirements.txt里面的本地路径的删了,所有版本号都删了。在根目录RfD里面测试
pip install -r requirements.txt
说mkl不行。最后我把requirements.txt里面带mkl都删了,再试就行了。 -
下一个报错是
RuntimeError: Ninja is required to load C++ extensions
百度得到解决方案为:
wget https://github.com/ninja-build/ninja/releases/download/v1.8.2/ninja-linux.zip
unzip ninja-linux.zip -d /usr/local/bin/
update-alternatives --install /usr/bin/ninja ninja /usr/local/bin/ninja 1 --force
- 下一个报错:
Traceback (most recent call last):
File “main.py”, line 37, in
import demo
File “/li_wei/yuqiao/point_cloud/RfDNet/demo.py”, line 19, in
import vtk
File “/usr/local/lib/python3.6/dist-packages/vtk.py”, line 30, in
all_m = importlib.import_module(‘vtkmodules.all’)
File “/usr/lib/python3.6/importlib/init.py”, line 126, in import_module
return _bootstrap._gcd_import(name[level:], package, level)
File “/usr/local/lib/python3.6/dist-packages/vtkmodules/all.py”, line 8, in
from .vtkWebCore import *
ImportError: libGL.so.1: cannot open shared object file: No such file or directory
百度得到解决方案:
apt-get update ##[edited]
apt-get install ffmpeg libsm6 libxext6 -y
- 最后一个报错:
vtkXOpenGLRenderWindow.:448 ERR| vtkXOpenGLRenderWindow (0x93811700): bad X server connection. DISPLAY=
如上文所述,原因是我的服务器之有命令行,但代码想显示图形界面。这个X server我想配到windows没成功,于是就注释掉可视化的代码。也就是demo.py的最后一句:
#visualize(output_dir, offline=False)
大功告成!
同时我还在save_visualization里面输出了一下保存路径:
    '''Dump boxes'''
    if np.sum(objectness_prob > DUMP_CONF_THRESH) > 0:
        if len(box_params) > 0:
            save_path = os.path.join(output_dir, '%06d_pred_confident_nms_bbox.npz' % (batch_id))
            np.savez(save_path,
                     obbs=box_params[np.logical_and(objectness_prob > DUMP_CONF_THRESH, pred_mask[batch_id, :] == 1), :],
                     proposal_map=BATCH_PROPOSAL_IDs)
            print(save_path) # 在这里输出
然后去看结果:
有一个png文件和一些ply文件:

如果先要图形交互界面,可以按上文中操作,直接把相关代码移到windows端运行。
requirements.txt
我最后把requirements.txt删减成这样用的:
absl-py
cachetools
certifi
chardet
cycler
Cython
decorator
google-auth
google-auth-oauthlib
grpcio
idna
imageio
importlib-metadata
kiwisolver
llvmlite
Markdown
matplotlib
networkx
numba
numpy-quaternion
oauthlib
olefile
pandas
plyfile
protobuf
pyasn1
pyasn1-modules
PyMCubes
pyparsing
python-dateutil
pytz
PyWavelets
PyYAML
requests
requests-oauthlib
rsa
scikit-image
scipy
seaborn
Shapely
tensorboard
tensorboard-plugin-wit
tifffile
tqdm
trimesh
urllib3
vtk
Werkzeug
zipp

