记录PU-GCN复现过程
参考链接:GitHub - guochengqian/PU-GCN: PU-GCN: Point Cloud Upsampling using Graph Convolutional Networks (CVPR2021)
一、安装anaconda3
#cd ~/
#wget https://repo.anaconda.com/archive/Anaconda3-2019.07-Linux-x86_64.sh
#bash Anaconda3-2019.07-Linux-x86_64.sh
(官方教程,没试过)
二、下载
1. 下载PU-GCN代码:
下载地址:GitHub - guochengqian/PU-GCN: PU-GCN: Point Cloud Upsampling using Graph Convolutional Networks (CVPR2021)
cd PU-GCN2. 下载PU1K数据集:
下载地址:release - Google 云端硬盘
建立软连接:
mkdir data #在PU-GCN下建立data文件夹
ln -s /path/to/PU1K ./data/   #路径修改为ln -s /home/lyl/pu/PU1K ./data/
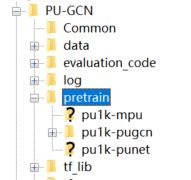
3. 下载预训练代码:
下载地址:pretrained_PU1K.zip - Google 云端硬盘
路径如下:
三、安装pugcn环境
1. 创建pugcn环境
conda remove --name pugcn --all
conda create -n pugcn python=3.6.8 cudatoolkit=10.0 cudnn numpy=1.16
2. 激活pugcn环境
conda activate pugcn3. 安装包
pip install matplotlib tensorflow-gpu==1.13.1 open3d==0.9 sklearn Pillow gdown plyfile注:请不要通过 conda 安装 tensorflow gpu。 它可能会影响以下编译。
四、编译tf_ops
cd tf_ops
bash compile.sh linux
五、训练
1、下载预训练模型和数据集
2、训练
-
PU-GCN
python main.py --phase train --model pugcn --upsampler nodeshuffle --k 20 -
PU-Net
python main.py --phase train --model punet --upsampler original -
MPU
python main.py --phase train --model mpu --upsampler duplicate -
PU-GAN
python main.py --phase train --model pugan --more_up 2
六、测试和评估(一体的)
1、编译evaluation_code
cd evaluation_code
bash compile.sh
2、存放路径:
训练好用于测试的模型:/home/lyl/pu/PU-GCN/pretrain/pu1k-pugcn
测试后生成的上采样点云:/home/lyl/pu/PU-GCN/evaluation_code/result
评估得到的性能指标数据:/home/lyl/pu/PU-GCN/pretrain/pu1k-pugcn/evaluation.csv
3、根据需要修改测试代码
PU1K数据集:
原始版本:
test_pu1k_allmodels.sh:
#!/usr/bin/env bash

### result of
source test_pu1k_all.sh pretrain/pu1k-pugcn/ 0 1 --model pugcn --k 20
#source test_pu1k.sh pretrain/pu1k-punet/ 0 1 --model punet --upsampler original
#source test_pu1k.sh pretrain/pu1k-mpu/ 0 1 --model mpu --upsampler duplicate
test_pu1k.sh不改动。
简化版本:
test_pu1k_allmodels.sh:
#!/usr/bin/env bash

### result of
source test_pu1k_all.sh pretrain/pu1k-pugcn/ 0 --model pugcn --k 20
批量测试 test_pu1k_all.sh:
#!/usr/bin/env bash

cur_dir=$PWD
echo "current project director is: $cur_dir"
pretrain_folder=$1   # the pretrain
GPU=$2
PY_ARGS=${@:3}
in_data_dir=data/PU1K/test/input_2048/input_2048
gt_data_dir=data/PU1K/test/input_2048/gt_8192

logdir=$pretrain_folder
echo "===> test the ckpt from ${logdir}"
echo ;

for (( i = 0; i < 40; i++ )) ;   #40可以根据模型数量更改
do
    #训练
    CUDA_VISIBLE_DEVICES=${GPU} python main.py --phase test --restore ${logdir} --data_dir  ${in_data_dir} ${PY_ARGS}
    #测试 CD HD
    CUDA_VISIBLE_DEVICES=${GPU} python evaluate.py --pred evaluation_code/result/ --gt ${gt_data_dir} --save_path ${logdir}
done
单个测试 test_pu1k.sh:
#!/usr/bin/env bash

cur_dir=$PWD
echo "current project director is: $cur_dir"
pretrain_folder=$1   # the pretrain
GPU=$2
PY_ARGS=${@:3}
in_data_dir=data/PU1K/test/input_2048/input_2048
gt_data_dir=data/PU1K/test/input_2048/gt_8192

logdir=$pretrain_folder
echo "===> test the ckpt from ${logdir}"
echo ;
# test
CUDA_VISIBLE_DEVICES=${GPU} python main.py --phase test --restore ${logdir} --data_dir  ${in_data_dir} ${PY_ARGS}

# evaluation p2f
#cd evaluation_code
#bash eval_pu1k.sh
#cd ..

# evaluation CD HD
CUDA_VISIBLE_DEVICES=${GPU} python evaluate.py --pred evaluation_code/result/ --gt ${gt_data_dir} --save_path ${logdir}
kitti数据集:
修改main.py:
FLAGS.test_data = os.path.join(FLAGS.data_dir, '*.xyz')
改为
FLAGS.test_data = os.path.join(FLAGS.data_dir, '*.ply')
4、运行测试指令
- Test on PU1K dataset
bash test_pu1k_allmodels.sh- Test on PU-GAN dataset
bash test_pugan_allmodels.sh- Test on real-scanned dataset
bash test_realscan_allmodels.sh- Visualization.
check below. You have to modify the path inside.
python vis_benchmark.py七、tensorboard可视化
参考链接:python编程之TensorBoard的使用入门教程,傻瓜教程_tian_jiangnan的博客-CSDN博客_tensorboard使用教程
1. 打开服务器图形界面
win + R
输入 mstsc
确定
然后输入你的用户名密码
2. 打开终端
3. 激活虚拟环境
source activate pugcn4. 在终端输入
tensorboard --logdir=/home/lyl/pu/PU-GCN3/log/20211123-101315 #events.out.tfevents...所在路径5. 打开浏览器,输入网址localhost:6006
