Nginx日志统一化
本系列故事纯属虚构,如有雷同实属巧合
为了完成对Nginx服务器的日志分析,小B对Q公司的Nginx日志做了统一化要求。下面是小B在统一化过程中遇到的一些知识点:
Nginx日志与字段解析
Q公司的Nginx版本信息是:1.17.6,使用编译安装,安装过程如下:
yum install zlib-devel.x86_64 zlib.x86_64 openssl.x86_64 openssl-devel.x86_64 pcre-devel.x86_64 -y

# 安装lua支持,后续的response_body需要
# 这里有坑,解决方案见最后
wget http://luajit.org/download/LuaJIT-2.0.5.tar.gz
tar -xf LuaJIT-2.0.5.tar.gz -C /opt/ && cd /opt/LuaJIT-2.0.5/
make install PREFIX=/usr/local/luajit

echo 'export LUAJIT_LIB=/usr/local/luajit/lib' >> /etc/profile
echo 'export LUAJIT_INC=/usr/local/luajit/include/luajit-2.0' >> /etc/profile
source /etc/profile

# 下载ngx_devel_kit
wget https://github.com/simpl/ngx_devel_kit/archive/v0.3.1.tar.gz
tar -xf v0.3.1.tar.gz -C /opt/

# 下载lua-nginx-module
# 这里有坑,解决方案见最后
wget https://github.com/openresty/lua-nginx-module/archive/v0.10.15.tar.gz
tar -xf v0.10.15.tar.gz -C /opt/

# 下载nginx
wget https://nginx.org/download/nginx-1.17.6.tar.gz
tar -xf nginx-1.17.6.tar.gz && cd nginx-1.17.6/

# 安装nginx
./configure --prefix=/opt/nginx --with-http_realip_module --with-http_ssl_module --with-pcre --with-ld-opt=-Wl,-rpath,/usr/local/luajit/lib --add-module=/opt/lua-nginx-module-0.10.15 --add-module=/opt/ngx_devel_kit-0.3.1

make -j2 && make install
- Nginx原始日志格式:
vim /opt/nginx/conf/nginx.conf
    log_format  main  '$remote_addr - $remote_user [$time_local] "$request" '
                      '$status $body_bytes_sent "$http_referer" '
                      '"$http_user_agent" "$http_x_forwarded_for"';

    access_log  logs/access.log  main;
- 原始Nginx的日志为:
tail -n 1 -f /opt/nginx/logs/access.log
10.10.10.1 - - [18/Dec/2019:13:27:27 +0800] "GET / HTTP/1.1" 200 612 "-" "Mozilla/5.0 (Macintosh; Intel Mac OS X 10_15_2) AppleWebKit/537.36 (KHTML, like Gecko) Chrome/79.0.3945.79 Safari/537.36" "-"
Nginx日志字段解析
首先小B需要弄明白Nginx日志中每个字段的含义:
Nginx获取body信息
在Q公司目前的架构中,使用GET传递参数的方式已经很少了,为了了解攻击者是否在body中嵌入攻击payload以及了解攻击者获取到了什么结果,小B需要采集body的日志信息。
打印request_body
打印request_body有两种方式:一种是使用nginx的模块;另外一种是使用lua编写脚本,如果需要限制nginx收集request_body的长度,最好使用后者。
- 使用nginx ngx_http_core模块采集request_body
ngx_http_core模块官网地址 http://nginx.org/en/docs/http/ngx_http_core_module.html 中有一段关于采集request_body的说明,内容如下:
The variable’s value is made available in locations processed by the proxy_pass, fastcgi_pass, uwsgi_pass, and scgi_pass directives when the request body was read to a memory buffer.
# 首先修改配置文件,我这里采集的日志只有request_body字段
vim /opt/nginx/conf/nginx.conf
    log_format  main    $request_body;

    access_log  logs/access.log  main;

        location / {
            root   /opt/nginx/html;
            # 以下为添加内容
            fastcgi_pass 127.0.0.1:9000;
            fastcgi_index index.php;
            fastcgi_param SCRIPT_FILENAME       $document_root$fastcgi_script_name;
            include fastcgi_params;
        }
此时Nginx的日志为:
使用ngx_http_core模块收集日志有没有办法限制request_body的长度呢?其实是有的。
在nginx配置文件中的http{}里面添加client_max_body_size 1k;即可。
但是这个配置是不允许用户上传超过1K大小的body内容,如果用户需要上传图片,业务可能就无法正常运行,所以不推荐使用此种方法。
我们在这里测试一下ngx_http_core的内容限制:
# 我这里使用1024个A来测试,我的配置是否有效
curl -XPOST "http://10.10.10.13/test.php?id=123" -H "X-Forwarded-For: 10.10.10.5" -H "Referer: http://10.10.10.13" --data "AAAAAAAAAAAAAAAAAAAAAAAAAAAAAAAAAAAAAAAAAAAAAAAAAAAAAAAAAAAAAAAAAAAAAAAAAAAAAAAAAAAAAAAAAAAAAAAAAAAAAAAAAAAAAAAAAAAAAAAAAAAAAAAAAAAAAAAAAAAAAAAAAAAAAAAAAAAAAAAAAAAAAAAAAAAAAAAAAAAAAAAAAAAAAAAAAAAAAAAAAAAAAAAAAAAAAAAAAAAAAAAAAAAAAAAAAAAAAAAAAAAAAAAAAAAAAAAAAAAAAAAAAAAAAAAAAAAAAAAAAAAAAAAAAAAAAAAAAAAAAAAAAAAAAAAAAAAAAAAAAAAAAAAAAAAAAAAAAAAAAAAAAAAAAAAAAAAAAAAAAAAAAAAAAAAAAAAAAAAAAAAAAAAAAAAAAAAAAAAAAAAAAAAAAAAAAAAAAAAAAAAAAAAAAAAAAAAAAAAAAAAAAAAAAAAAAAAAAAAAAAAAAAAAAAAAAAAAAAAAAAAAAAAAAAAAAAAAAAAAAAAAAAAAAAAAAAAAAAAAAAAAAAAAAAAAAAAAAAAAAAAAAAAAAAAAAAAAAAAAAAAAAAAAAAAAAAAAAAAAAAAAAAAAAAAAAAAAAAAAAAAAAAAAAAAAAAAAAAAAAAAAAAAAAAAAAAAAAAAAAAAAAAAAAAAAAAAAAAAAAAAAAAAAAAAAAAAAAAAAAAAAAAAAAAAAAAAAAAAAAAAAAAAAAAAAAAAAAAAAAAAAAAAAAAAAAAAAAAAAAAAAAAAAAAAAAAAAAAAAAAAAAAAAAAAAAAAAAAAAAAAAAAAAAAAAAAAAAAAAAAAAAAAAAAAAAAAAAAAAAAAAAAAAAAAAAAAAAAAAAAAAAAAAAAAAAAAAAAAAAAAAAAAAAAAAAAAAAAAAAAAAAAAAAAAAAAAAAAAAAAAAAAAAAAAAAAAAAAAAAAAAAAAAAAAAAAAAAAAAAAAAAAAAAAAAAAAAAAAAAAAAAAAAAAAAAAAAAAAAAAAAAAAAAAAAAAAAAAAAAAAAAAAAAAAAAAAAAAAAAAAA"
此时Nginx正常打印出了request_body。
# 如果我们超过1024个字节,就会报错,注意1024个A后面有一个1
curl -XPOST "http://10.10.10.13/test.php?id=123" -H "X-Forwarded-For: 10.10.10.5" -H "Referer: http://10.10.10.13" --data "AAAAAAAAAAAAAAAAAAAAAAAAAAAAAAAAAAAAAAAAAAAAAAAAAAAAAAAAAAAAAAAAAAAAAAAAAAAAAAAAAAAAAAAAAAAAAAAAAAAAAAAAAAAAAAAAAAAAAAAAAAAAAAAAAAAAAAAAAAAAAAAAAAAAAAAAAAAAAAAAAAAAAAAAAAAAAAAAAAAAAAAAAAAAAAAAAAAAAAAAAAAAAAAAAAAAAAAAAAAAAAAAAAAAAAAAAAAAAAAAAAAAAAAAAAAAAAAAAAAAAAAAAAAAAAAAAAAAAAAAAAAAAAAAAAAAAAAAAAAAAAAAAAAAAAAAAAAAAAAAAAAAAAAAAAAAAAAAAAAAAAAAAAAAAAAAAAAAAAAAAAAAAAAAAAAAAAAAAAAAAAAAAAAAAAAAAAAAAAAAAAAAAAAAAAAAAAAAAAAAAAAAAAAAAAAAAAAAAAAAAAAAAAAAAAAAAAAAAAAAAAAAAAAAAAAAAAAAAAAAAAAAAAAAAAAAAAAAAAAAAAAAAAAAAAAAAAAAAAAAAAAAAAAAAAAAAAAAAAAAAAAAAAAAAAAAAAAAAAAAAAAAAAAAAAAAAAAAAAAAAAAAAAAAAAAAAAAAAAAAAAAAAAAAAAAAAAAAAAAAAAAAAAAAAAAAAAAAAAAAAAAAAAAAAAAAAAAAAAAAAAAAAAAAAAAAAAAAAAAAAAAAAAAAAAAAAAAAAAAAAAAAAAAAAAAAAAAAAAAAAAAAAAAAAAAAAAAAAAAAAAAAAAAAAAAAAAAAAAAAAAAAAAAAAAAAAAAAAAAAAAAAAAAAAAAAAAAAAAAAAAAAAAAAAAAAAAAAAAAAAAAAAAAAAAAAAAAAAAAAAAAAAAAAAAAAAAAAAAAAAAAAAAAAAAAAAAAAAAAAAAAAAAAAAAAAAAAAAAAAAAAAAAAAAAAAAAAAAAAAAAAAAAAAAAAAAAAAAAAAAAAAAAAAAAAAAAAAAAAAAAAAAAAAAAAAAAAAAAAAAAAAAAAAAAAAAAAAAAAAAAAAAAAAAAAAAAAAAAAAAAAA1"
此时Nginx无法打印request_body。
- 使用lua编写脚本采集request_body
# 修改nginx的配置文件
vim /opt/nginx/conf/nginx.conf
    log_format  main    $request_body_head;

    access_log  logs/access.log  main;

        location / {
            root   /opt/nginx/html;
            # 以下为添加内容
            set $request_body_head      "";
            content_by_lua_block {
                ngx.req.read_body()
                local   req_body = ngx.req.get_body_data()
				# 这里的1000代表我们截取request_body的长度,不要取的太长,否则容易导致日志过大
                ngx.var.request_body_head =  req_body:sub(1,1000)
            }
        }
此时Nginx的日志为:
打印response_body
对于response_body我们只有使用lua编写脚本来采集。
- 修改nginx的配置:
vim /opt/nginx/conf/nginx.conf
    server {
        listen       80;
        server_name  localhost;
        # 以下为添加内容
        lua_need_request_body   on;
        set $response_body      "";
        body_filter_by_lua      '
            # 这里的1000就代表截取response_body的长度,不要取的太长,否则容易导致日志过大
            local       response_body = string.sub(ngx.arg[1],1,1000)
            ngx.ctx.buffered =  (ngx.ctx.buffered or "")        ..      response_body
            if ngx.arg[2] then
                ngx.var.response_body = ngx.ctx.buffered
            end
            ';
    }
此时Nginx的日志为:
request_body与response_body如果在上传文件或者下载文件时,内容会很大,采集全部内容需要考虑对系统、Nginx性能和日志存储等方面的影响。如果采集的body内容太短,也会导致采取不到我们想要的信息,所以根据业务取一个合理阈值。
nginx–>syslog–>logstash
小B在测试中与朋友交流得知,可以将nginx日志直接传输到logstash中而不落盘,但是这种方法传输的日志不可靠,并且会对nginx产生性能影响,可以在测试的时候使用。
- nginx配置文件:
vim /opt/nginx/conf/nginx.conf
    log_format  logstash  '$remote_addr - $remote_user [$time_local] "$request" '
						  '$status $body_bytes_sent "$http_referer" '
						  '"$http_user_agent" "$http_x_forwarded_for"';

    # access_log  logs/access.log  main;
    access_log  syslog:server=127.0.0.1:514,nohostname,tag=nginx_access logstash;
- logstash配置文件:
vim /etc/logstash/conf.d/nginx.conf
input {
    udp {
        host => "127.0.0.1"
        port => 514
    }
}
output {
    stdout {}
}
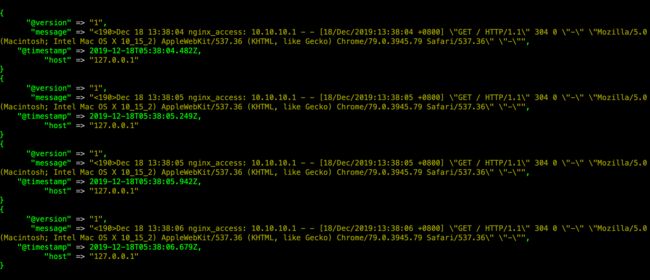
- 执行logstash,并查看效果:
/usr/share/logstash/bin/logstash -f /etc/logstash/conf.d
统一Nginx日志格式
在完成了调研之后,小B就开始统一所有的日志字段了,为了方便后续查询分析操作,小B决定所有的字段采用JSON格式存盘,并且添加了运维、安全、研发都关注的字段。
- 修改配置文件:
vim /opt/nginx/conf/nginx.conf
# 完整的nginx配置

worker_processes  1;
events {
    worker_connections  1024;
}

http {
    include       mime.types;
    default_type  application/octet-stream;
    log_format main     escape=json '{'
                                        '"timestamp": $time_local '
                                        '"remote_addr": $remote_addr '
                                        '"remote_user": "$remote_user '
                                        '"request_method": $request_method '
                                        '"request_uri": "$request_uri" '
                                        '"request_protocol": "$server_protocol" '
                                        '"request_length": $request_length '
                                        '"request_time": $request_time '
					                    '"request_body_head": "$request_body_head" '
                                        '"response_status": $status '
                                        '"body_bytes_sent": $body_bytes_sent '
                                        '"bytes_sent": $bytes_sent '
					                    '"response_body": "$response_body" '
                                        '"http_referer": "$http_referer" '
                                        '"http_user_agent": "$http_user_agent" '
                                        '"http_x_forwarded_for": "$http_x_forwarded_for" '
                                        '"http_host": "$http_host" '
                                        '"server_name": "$server_name" '
                                        '"upstream_addr": "$upstream_addr" '
                                        '"upstream_status": $upstream_status'
                                        '}';

    access_log  logs/access.log  main;
    sendfile        on;
    keepalive_timeout  65;

    server {
        listen       80;
        server_name  localhost;
	    lua_need_request_body   on;
	    set $response_body      "";
	    body_filter_by_lua      '
	        local       response_body = string.sub(ngx.arg[1],1,1000)
	        ngx.ctx.buffered =  (ngx.ctx.buffered or "")        ..      response_body
	        if ngx.arg[2] then
		        ngx.var.response_body = ngx.ctx.buffered
	        end
	    ';

        location /lua {
	        root	html;
	        index	index.html;
	        set $request_body_head      "";
	        content_by_lua_block {
		        ngx.req.read_body()
		        local   req_body = ngx.req.get_body_data()
		        ngx.var.request_body_head =  req_body:sub(1,1000)
	        }
        }

        error_page   500 502 503 504  /50x.html;
        location = /50x.html {
            root   html;
        }
    }
}
此时Nginx的日志为:
小结一下
- 对于timestamp参数,可以不使用time_local而使用time_iso8601。
- 如果运维对于网络的性能有要求,可以考虑使用
$tcpinfo_rtt, $tcpinfo_rttvar, $tcpinfo_snd_cwnd, $tcpinfo_rcv_space这些参数可能需要我们给nginx添加其他模块。
踩坑记录
启动nginx报错
- 由于luajit导致的报错
nginx: [alert] detected a LuaJIT version which is not OpenResty's; many optimizations will be disabled and performance will be compromised (see https://github.com/openresty/luajit2 for OpenResty's LuaJIT or, even better, consider using the OpenResty releases from https://openresty.org/en/download.html)
解决方案:卸载原有的luajit
wget https://github.com/openresty/luajit2/archive/v2.1-20190912.tar.gz
tar -xf v2.1-20190912.tar.gz && cd luajit2-2.1-20190912/
make install PREFIX=/usr/local/luajit

echo 'export LUAJIT_LIB=/usr/local/luajit/lib' >> /etc/profile
echo 'export LUAJIT_INC=/usr/local/luajit/include/luajit-2.1' >> /etc/profile
source /etc/profile
- 由于lua-nginx-module导致的报错
nginx: [error] lua_load_resty_core failed to load the resty.core module from https://github.com/openresty/lua-resty-core; ensure you are using an OpenResty release from https://openresty.org/en/download.html (rc: 2, reason: module 'resty.core' not found:
解决方案:不要使用v0.10.15,使用14就没有问题了
wget https://github.com/openresty/lua-nginx-module/archive/v0.10.14.tar.gz
tar -xf v0.10.14.tar.gz -C /opt/

# 安装nginx
./configure --prefix=/opt/nginx --with-http_realip_module --with-http_ssl_module --with-pcre --with-ld-opt=-Wl,-rpath,/usr/local/luajit/lib --add-module=/opt/lua-nginx-module-0.10.14 --add-module=/opt/ngx_devel_kit-0.3.1

make -j2 && make install
参考资料
- Nginx安装Lua支持:http://1t.click/b6ru
- Nginx安装lua-nginx-module:http://1t.click/b6tw
History
日志分析系列(一):介绍篇
日志分析系列(外传一):Nginx透过代理获取真实客户端IP


