【MMDet Note】MMDetection中Loss之FocalLoss代码理解与解读
文章目录
- 前言
- 一、FocalLoss计算原理介绍
- 二、FocalLoss代码解读
-
- 1. class FocalLoss
- 2. def py_focal_loss_with_prob
- 总结
前言
mmdetection/mmdet/models/losses/focal_loss.py中的FocalLoss类的个人理解与代码解读。
一、FocalLoss计算原理介绍
Focal loss最先在RetinaNet一文中被提出。论文链接
其在目标检测算法中主要用以前景(foreground)和背景(background)的分类,是一个分类损失。由于现在已经有很多文章详细地介绍了Focal loss,我就不再介绍了,想详细了解的可以直接阅读RetinaNet论文,我这里简单地以举例子的形式来介绍一下这一种损失函数。下面将用6个模拟的样本数据的例子来解释该损失函数具体是如何计算的(不考虑 α \alpha α)。

以上计算过程只对目标类别对应下的损失进行计算,可以看到例如第5个样本的真实标签为0,但预测其为1的概率为0.9,显然十分错误,因此便给予其标签0对应损失更高的权重 ( 1 − p t ) γ = 0.9 (1-p_t)^\gamma=0.9 (1−pt)γ=0.9。
总而言之,Focal loss可以简单看作是在原本的Cross Entropy Loss之上加了一个权重,使得难例样本(hard examples)的损失有更高的权重,从而模型更加关注这些样本的学习。
二、FocalLoss代码解读
1. class FocalLoss
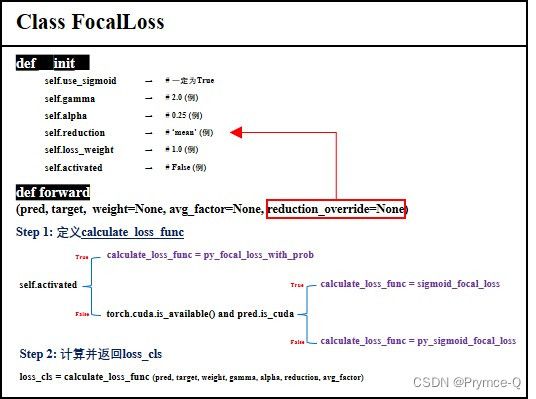
这里我将Class FocalLoss的构成情况总结为下图:

FocalLoss类由两个方法构成:def __init__与def forward。其中,def __init__定义了一系列相关的变量。def forward用来进行计算分类损失。
def forward中,首先,会指定reduction变量,优先为reduction_override,若其为空则为self.reduction。接着,根据一些条件来确定用来计算损失的具体函数calculate_loss_func为[1.py_focal_loss_with_prob, 2.sigmoid_focal_loss, 3.py_sigmoid_focal_loss]中的哪个,最后,调用calculate_loss_func与相关变量进行具体计算。
代码解读如下:
@LOSSES.register_module()
class FocalLoss(nn.Module):
    def __init__(self,
                 use_sigmoid=True,
                 gamma=2.0,
                 alpha=0.25,
                 reduction='mean',
                 loss_weight=1.0,
                 activated=False):

        super(FocalLoss, self).__init__()
        assert use_sigmoid is True, 'Only sigmoid focal loss supported now.'
        # 定义一些变量
        self.use_sigmoid = use_sigmoid
        self.gamma = gamma              # 2.0
        self.alpha = alpha              # 0.25
        self.reduction = reduction      # 'mean'
        self.loss_weight = loss_weight  # 1.0
        self.activated = activated      # False

    def forward(self,
                pred,
                target,
                weight=None,
                avg_factor=None,
                reduction_override=None):

        assert reduction_override in (None, 'none', 'mean', 'sum')
        reduction = (               # 为reduction重新赋值,优先为foward方法中的reduction_override值
            reduction_override if reduction_override else self.reduction)

        if self.use_sigmoid:        # 一定为True
        	# Step1 根据条件选择calculate_loss_func
            if self.activated:
                calculate_loss_func = py_focal_loss_with_prob
            else:
                if torch.cuda.is_available() and pred.is_cuda:
                    calculate_loss_func = sigmoid_focal_loss
                else:
                	# 提前将target处理为one-hot编码格式
                    num_classes = pred.size(1)
                    target = F.one_hot(target, num_classes=num_classes + 1)
                    target = target[:, :num_classes]
                    calculate_loss_func = py_sigmoid_focal_loss

            # Step2 使用指定的calculate_loss_func计算并返回loss_cls
            loss_cls = self.loss_weight * calculate_loss_func(
            	# 以下变量在介绍具体的方法中会更详细地介绍
                pred,					# 预测值
                target,					# 目标值
                weight,
                gamma=self.gamma,		# 2.0
                alpha=self.alpha,		# 0.25
                reduction=reduction,	# 'mean'
                avg_factor=avg_factor)

        else:
            raise NotImplementedError
        return loss_cls
下面介绍py_focal_loss_with_prob的损失计算代码。其余两种方法类似,主要区别为数据格式的处理。
2. def py_focal_loss_with_prob
def py_focal_loss_with_prob(pred,
                            target,
                            weight=None,
                            gamma=2.0,
                            alpha=0.25,
                            reduction='mean',
                            avg_factor=None):
    """
    假设:
    1. 只有0和1这两个类
    2. pred (torch.Tensor) = [[p00,p01],
                              [p10,p11],
                              [p20,p21]]
       pred.shape = (N=3, C=2) 3个样本,2种类别
    3. target (torch.Tensor) = [0,1,1]
    """
    # STEP1:将target转化为one-hot编码格式
    num_classes = pred.size(1)          # num_class = 2
    target = F.one_hot(target, num_classes=num_classes + 1)
    target = target[:, :num_classes]    # target = tensor([[1, 0], [0, 1], [0, 1]]) 也就是3个样本的所属类别的one-hot编码

    target = target.type_as(pred)

    # STEP2:计算CrossEntropyLoss前的权重
    pt = (1 - pred) * target + pred * (1 - target)    # pt = [[1-p00, p01], [p10,1-p11], [p20, 1-p21]]
    focal_weight = (alpha * target + (1 - alpha) *
                    (1 - target)) * pt.pow(gamma)

    # Step3: 基于pred与target计算CrossEntropyLoss, 同时乘以上面计算的权重focal_weight
    loss = F.binary_cross_entropy(
        pred, target, reduction='none') * focal_weight
    if weight is not None:
        if weight.shape != loss.shape:
            if weight.size(0) == loss.size(0):
                # For most cases, weight is of shape (num_priors, ),
                #  which means it does not have the second axis num_class
                weight = weight.view(-1, 1)
            else:
                # Sometimes, weight per anchor per class is also needed. e.g.
                #  in FSAF. But it may be flattened of shape
                #  (num_priors x num_class, ), while loss is still of shape
                #  (num_priors, num_class).
                assert weight.numel() == loss.numel()
                weight = weight.view(loss.size(0), -1)
        assert weight.ndim == loss.ndim

    # Step4: 求loss的平均值为最终loss
    loss = weight_reduce_loss(loss, weight, reduction, avg_factor)  # reduction='mean'
    return loss
总结
本文仅代表个人理解,若有不足,欢迎批评指正。