Win10+yolov5 踩坑记录
Windows10下配置yolov5环境 踩坑记录
- 起因随笔
- 基本的环境要求
- yolov5各代码作用
- 踩坑的Package
-
- windwos下torch和torchvision的安装
- windows下pycocotools安装
- 运行测试yolov5
起因随笔
为响应国家号召(doge),导师目前想将实验室往半导体的工业生产上进行转变,重点解决半导体生产上可以突破的薄弱环节。结合实验室本身是通过传统机器视觉对工业生产上的产品缺陷进行检测的,目前的发展方向是针对晶圆生产过程进行改良,主要针对晶圆的压焊板、针测点、铝线路等可能存在的缺陷通过机器视觉的方式进行检测。但是由于传统的机器视觉很难解决复杂背景下的缺陷,因此试图引入比较常用的yolo网络来解决问题。去年五月左右yolo更新至yolov5,这里主要记录在环境配置过程中踩到的一些坑。
刚换了新的电脑(玩家国度-幻15),所以所有环境都是从零开始搭的。
基本的环境要求
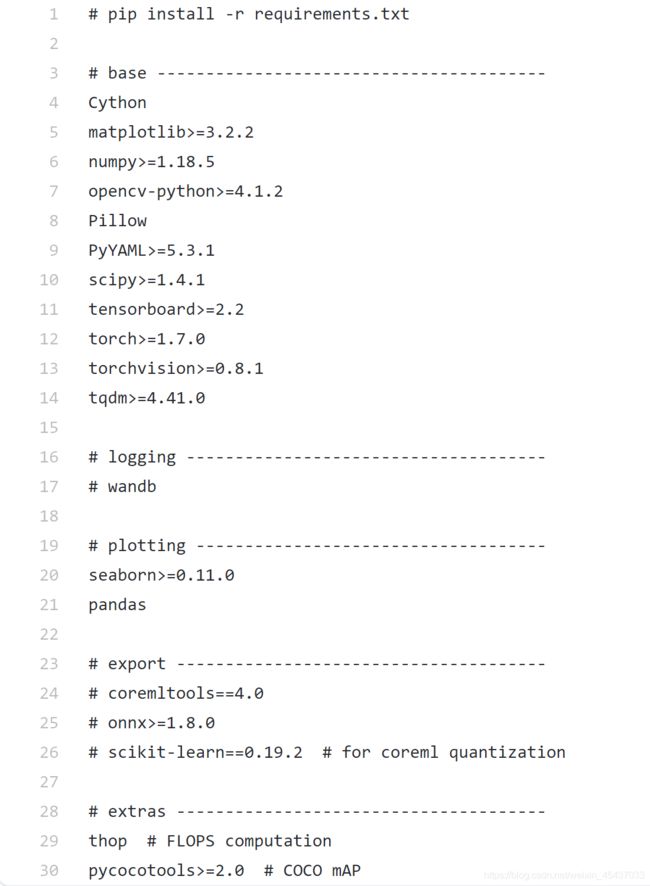
在github的yolov5项目中可以找到项目的指导和环境要求
pip install -r requirements.txt
但是我害怕安装过程中由于网络问题或者版本问题导致安装失败,后续寻找问题较为困难,因此这里选择一个个包自己下载安装
yolov5各代码作用
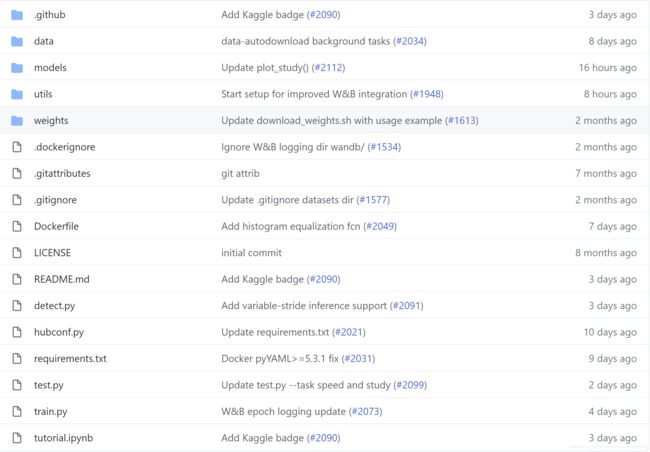
从github上下载得到的yolov5包含下面几个部分,这里简单介绍一些比较常用到的(其他我还在研究)

data文件夹在训练自己数据集中有用,存放数据集与测试集原图等
models文件夹放权重文件与转换的文件
utils文件夹主要放一些用到的函数文件
weights文件夹放初始的权重文件
detect.py用来测试图像数据
test.py用来训练models
train.py用来训练models
参考地址:https://blog.csdn.net/qq_23158887/article/details/108884680
踩坑的Package
大部分包的安装没有什么问题,如果网络不行去pypi找对应包就能安装,笔者的版本大概是这样:
| Package | Version |
|---|---|
| Python | 3.8 |
| matplotlib | 3.3.3 |
| numpy | 1.19.5 |
| opencv-python | 4.5.1.48 |
| PyYAML | 5.4.1 |
| scipy | 1.6.0 |
| tensorboard | 2.4.1 |
| tqdm | 4.56.0 |
但是torch、torchvision、pycocotools这三个包的安装存在问题,主要是这三个包本身官方没有windows版本。
windwos下torch和torchvision的安装
按照pycharm的自动安装,下载到的是torch的1.7.1版本,以及torchvision的0.2.2post3,只有torchvision的版本不符合要求。
一次尝试:由于yolo在运行过程中有check package 是否满足requirements.txt的动作,所以这里直接将requirements.txt里的torchvision注释掉了,运行报错。
二次尝试:从pypi下载对应包,发现没有对应的windwos版本,于是从下面的下载地址下载torchvision对应版本0.8.2+cu101,torch还是原先自动下载的1.7.1,报错版本不匹配,奇怪明明是下载了对应版本。(猜想CPU/GPU啥的版本问题?)
RuntimeError: Couldn’t load custom C++ ops. This can happen if your PyTorch and torchvision versions are incompatible, or if you had errors while compiling torchvision from source. For further information on the compatible versions, check https://github.com/pytorch/vision#installation for the compatibility matrix. Please check your PyTorch version with torch.version and your torchvision version with torchvision.version and verify if they are compatible, and if not please reinstall torchvision so that it matches your PyTorch install.
三次尝试:将torch版本也换成从下载地址下载得到的1.7.0+cu101版本,torchvision换成0.8.1+cu101版本,总算成功。
对应版本查看地址:https://github.com/pytorch/vision#installation
下载地址:https://download.pytorch.org/whl/torch_stable.html
windows下pycocotools安装
pycocotools的安装主要参考了下面作者的做法(网址在下方),两个方法都试过
第一种:先安装git然后直接输入以下指令下载,由于我担心github的网络可能也不会太好(需要设置),于是也尝试了第二种
pip install git+https://github.com/philferriere/cocoapi.git#subdirectory=PythonAPI
第二种:先从github上将克隆项目代码,然后自己编译,但是由于是新电脑我没有下载过VS,居然连VC++14.0都没有,于是就去下了VS,之后cd到对应目录输入下面指令就可以
# install pycocotools locally
python setup.py build_ext --inplace

# install pycocotools to the Python site-packages
python setup.py build_ext install
参考地址:https://www.jianshu.com/p/8658cda3d553
COCO 地址:https://github.com/cocodataset/cocoapi
Windows COCO 地址:https://github.com/philferriere/cocoapi
运行测试yolov5
安装完所有的环境,直接运行detect,会发现找不到weight文件
fatal: Not a git repository (or any of the parent directories): .git
由于没有自己训练数据集,先用yolov5自带的权重文件进行测试,yolov5提供了yolov5s.pt、yolov5m.pt、yolov5l.pt、yolov5x.pt几种,在github上可以下载到,地址如下
下载地址:https://github.com/ultralytics/yolov5/releases
将下载到的权重文件放在与detect程序同一个文件夹下,修改detect主程序中程序配置的部分,将‘–weight’部分的default的值改成自己权重文件的地址,如下所示(包括了各部分的作用)
/*
        weights:训练的权重
        source:测试数据,可以是图片/视频路径,也可以是'0'(电脑自带摄像头),也可以是rtsp等视频流
        output:网络预测之后的图片/视频的保存路径
        img-size:网络输入图片大小
        conf-thres:置信度阈值
        iou-thres:做nms的iou阈值
        device:设置设备
        view-img:是否展示预测之后的图片/视频,默认False
        save-txt:是否将预测的框坐标以txt文件形式保存,默认False
        classes:设置只保留某一部分类别,形如0或者0 2 3
        agnostic-nms:进行nms是否也去除不同类别之间的框,默认False
        augment:推理的时候进行多尺度,翻转等操作(TTA)推理
        update:如果为True,则对所有模型进行strip_optimizer操作,去除pt文件中的优化器等信息,默认为False
*/

    parser = argparse.ArgumentParser()
    parser.add_argument('--weights', nargs='+', type=str, default='C:/Users/xxxx/PycharmProjects/pythonProject/yolov5s.pt', help='model.pt path(s)')
    parser.add_argument('--source', type=str, default='data/images', help='source')  # file/folder, 0 for webcam
    parser.add_argument('--img-size', type=int, default=640, help='inference size (pixels)')
    parser.add_argument('--conf-thres', type=float, default=0.25, help='object confidence threshold')
    parser.add_argument('--iou-thres', type=float, default=0.45, help='IOU threshold for NMS')
    parser.add_argument('--device', default='', help='cuda device, i.e. 0 or 0,1,2,3 or cpu')
    parser.add_argument('--view-img', action='store_true', help='display results')
    parser.add_argument('--save-txt', action='store_true', help='save results to *.txt')
    parser.add_argument('--save-conf', action='store_true', help='save confidences in --save-txt labels')
    parser.add_argument('--classes', nargs='+', type=int, help='filter by class: --class 0, or --class 0 2 3')
    parser.add_argument('--agnostic-nms', action='store_true', help='class-agnostic NMS')
    parser.add_argument('--augment', action='store_true', help='augmented inference')
    parser.add_argument('--update', action='store_true', help='update all models')
    parser.add_argument('--project', default='runs/detect', help='save results to project/name')
    parser.add_argument('--name', default='exp', help='save results to project/name')
    parser.add_argument('--exist-ok', action='store_true', help='existing project/name ok, do not increment')
    opt = parser.parse_args()
    print(opt)
重新run我们的程序,成功得到我们的结果!保存在我们的runs文件夹里面,点开查看。简单的环境配置,之后要训练自己的数据集了。(TΛT)

