Fast-DDS库的安装教程
Fast-DDS库的安装教程
- 0 序言
- 1 安装依赖
- 2 安装Fast-DDS
-
- 2.1 编译foonathan_memory_vendor
- 2.2 编译Fast-CDR
- 2.3 编译Fast-DDS
- 2.4 编译Fast-DDS-Gen
- 2.5 添加环境变量
- 2.6 验证
- 3 可能会遇到的问题
-
- 3.1 Fast-DDS编译到70%报错
- 3.2 `Permission denied`(拒绝访问)
- 3.3 其他问题
- 4 参考资料
- 4 写在最后
工欲善其事,必先利其器。首先要知道
Fast-DDS是什么?要知道 Fast-DDS是什么,又要先知道 DDS是什么?听起来似乎像是无限套娃。由于篇幅原因,本文仅给出 Fast-DDS的泛概念及用途,至于 DDS,感兴趣的读者请自行查阅了解。
简单来说,Fast-DDS是eProsima实现的一个开源的DDS库,目前主要用于机器人的ROS2以及一些工业领域设备间通信,由于本文是一篇Fast-DDS库的安装教程,不再对其作过多赘述,感兴趣的读者请自行查阅了解。
0 序言
以下是我的环境配置:
Operating System:Debian 9(Stretch)
cmake version:3.24.3
gcc/g++ version:6.3.0(后改为9.3.0)
foonathan_memory_vendor version:0.7.1
Fast-CDR version:1.0.21
Fast-DDS(Fast-RTPS) version:2.4.0
Tip:关于怎么看最后这三个文件的版本,在第2.1小节到2.3小节中每次执行
cmake .. -DCMAKE_INSTALL_PREFIX=/usr/local/ -DBUILD_SHARED_LIBS=ON这条命令的时候,都会出现它们的版本号,自己注意看一下。
1 安装依赖
sudo apt install cmake g++ python3-pip wget git
sudo apt install libasio-dev libtinyxml2-dev
sudo apt install libssl-dev
2 安装Fast-DDS
2.1 编译foonathan_memory_vendor
如图所示,通过执行命令pwd,输出当前目录的全路径名称。

一般情况下,我们会在/home/用户名这个目录下进行操作。
逐条执行下述命令:
git config --global url."https://gitclone.com/github.com/".insteadOf "https://github.com/"
mkdir ~/Fast-DDS
cd ~/Fast-DDS
git clone https://github.com/eProsima/foonathan_memory_vendor.git
mkdir foonathan_memory_vendor/build
cd foonathan_memory_vendor/build
cmake .. -DCMAKE_INSTALL_PREFIX=/usr/local/ -DBUILD_SHARED_LIBS=ON
sudo cmake --build . --target install
2.2 编译Fast-CDR
cd ~/Fast-DDS
git clone https://github.com/eProsima/Fast-CDR.git
mkdir Fast-CDR/build
cd Fast-CDR/build
cmake .. -DCMAKE_INSTALL_PREFIX=/usr/local/
sudo cmake --build . --target install
2.3 编译Fast-DDS
cd ~/Fast-DDS
git clone https://github.com/eProsima/Fast-DDS.git
mkdir Fast-DDS/build
cd Fast-DDS/build
cmake .. -DCMAKE_INSTALL_PREFIX=/usr/local/
sudo cmake --build . --target install
2.4 编译Fast-DDS-Gen
cd ~/Fast-DDS
git clone --recursive https://github.com/eProsima/Fast-DDS-Gen.git
cd Fast-DDS-Gen
sudo apt install openjdk-8-jdk
./gradlew assemble
2.5 添加环境变量
不要直接复制,搞清楚你的scripts的路径是什么?
export PATH=/home/你的用户名/Fast-DDS/Fast-DDS-Gen/scripts:$PATH
如图所示,是我的scripts所在的目录。

执行下述命令,查看环境变量:
vim ~/.bashrc


可以看到,环境变量已经成功添加。
此时,在命令行中输入fast,然后按两下Tab键,能够在可补全列表中显示出fastddsgen,如下图所示,可以进一步证明,环境变量添加成功。

2.6 验证
测试Fast-DDS的HelloWorldExample:
cd ~/Fast-DDS/Fast-DDS/examples/C++/HelloWorldExample
mkdir build
cd build
cmake .. -DCMAKE_INSTALL_PREFIX=/usr/local/
make
新建一个终端,执行下述命令:
cd ~/Fast-DDS/Fast-DDS/examples/C++/HelloWorldExample/build
./HelloWorldExample publisher
新建另一个终端,执行下述命令:
cd ~/Fast-DDS/Fast-DDS/examples/C++/HelloWorldExample/build
./HelloWorldExample subscriber
输出结果如下:
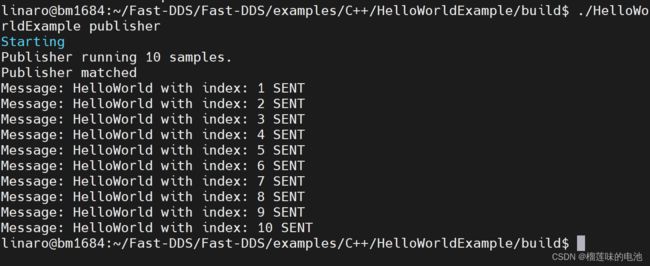
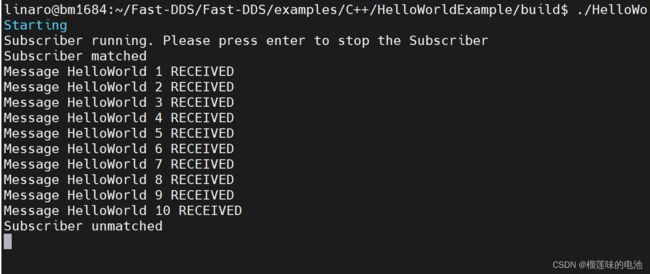
至此,Fast-DDS库编译安装完成。
3 可能会遇到的问题
3.1 Fast-DDS编译到70%报错
/usr/include/c++/6/ext/new_allocator.h:120:4: error: use of deleted function ‘constexpr std::pair<
首先,文中所使用的第2.3小节中的Fast-DDS的版本号是2.3.0;如果你使用的是Fast-DDS 2.4.0的话,需要将gcc和g++的版本要求至少要升级到7.5.0以上,不然编译到70%的时候就会报错。
报错如下:


升级后需要把你的gcc和g++的调用路径改一下,修改方法如下。
切换gcc和g++的命令:
export CC=/usr/local/gcc-9.3.0/bin/gcc
export CXX=/usr/local/gcc-9.3.0/bin/g++
Tips:自己注意一下自己的gcc和g++的安装路径,改成自己的路径。
3.2 Permission denied(拒绝访问)
还有人可能会在第2.4小节编译Fast-DDS-Gen时遇到问题,就是在执行./gradlew assemble出现Permission denied的报错;这是因为你当前的访问身份是普通用户,你必须切换成超级管理员模式下才能执行上述命令,即执行su。如果实在不想切换的话,可以执行下述命令,给予其足够的权限:
chmod 777 ./gradlew assemble
3.3 其他问题
我们在执行第2.1小节到第2.4小节的命令时,不可能一遍就成功,总会编到某一小节报错了,那就需要重来。重来的时候就不需要在git clone下载那些Fast-DDS那些文件了,只需要清空build里面的东西再编译。以第2.1小节中编译foonathan_memory_vendor为例:
cd foonathan_memory_vendor/build
sudo rm -rf *
cmake .. -DCMAKE_INSTALL_PREFIX=/usr/local/ -DBUILD_SHARED_LIBS=ON
sudo cmake --build . --target install
第2.2小节和第2.3小节也这样操作。
第2.4小节的话,就把build和share文件夹删除,即在Fast-DDS-Gen目录下,执行下述命令:
sudo rm -rf build
sudo rm -rf share
4 参考资料
《安装Fast-DDS库 官方文档》
https://fast-dds.docs.eprosima.com/en/latest/installation/sources/sources_linux.html
《Ubuntu 18.04 安装fast-dds笔记》
https://blog.csdn.net/mkt123338702/article/details/125880446
《DDS开源库FastDDS分析 - 安装》
https://blog.csdn.net/w5678912345/article/details/125882684
《Fast RTPS(DDS) 安装指南》
https://blog.csdn.net/shao5166233/article/details/126599414
《Fast-RTPS调坑记录(linux源码安装)》
https://blog.csdn.net/tao_292/article/details/125317670
《【FastDDS学习笔记】HelloWorld示例程序编译和运行》
https://blog.csdn.net/u012739527/article/details/124705821
4 写在最后
由于本文写作仓促,难免有一些不当之处,请各位读者多多包涵,如有错误之处,还望各位批评指正,本人感激不尽。
———————————————————————————————————————————
文章修改于2022年11月21日