阅读 PyTorch 自动微分文章 补充知识点
绪论
本文是作者在阅读 发表在NIPS 2017 Workshop上面的名为 Automatic differentiation in PyTorch 的 文章时,发现其中我缺少的一些知识点。查找后以本文记录。本文涉及到的点有
- 原地操作
- 计算机程序中的求值策略,迫切求值还是懒惰求值
- 自动求导,含正向累积与反向累积方法
- 向量-雅可比 积
原地操作
“ 原地运算是一种直接改变给定线性代数、向量、矩阵(张量)内容(content)的运算,而不需要复制。该定义取自本 Python 教程。
根据定义,原地操作不会 复制 输入。 这就是为什么它们可以在操作 高维数据时帮助减少内存使用的原因。
我想演示就地操作如何帮助消耗更少的 GPU 内存。 为了做到这一点,我将使用这个简单的函数,从 PyTorch 对非原地操作(out-of-place)的 ReLU 和原地操作(in-place)的 ReLU 的 分配内存:
# Import PyTorch
import torch # import main library
import torch.nn as nn # import modules like nn.ReLU()
import torch.nn.functional as F # import torch functions like F.relu() and F.relu_()

def get_memory_allocated(device, inplace = False):
    '''
    Function measures allocated memory before and after the ReLU function call.
    INPUT:
      - device: gpu device to run the operation
      - inplace: True - to run ReLU in-place, False - for normal ReLU call
    '''

    # Create a large tensor
    t = torch.randn(10000, 10000, device=device)

    # Measure allocated memory
    torch.cuda.synchronize()
    #torch.cuda.max_memory_allocated() 将返回自此程序开始以来的Tensor的峰值分配内存
    # 1024**2 ,以 MB 为单位
    start_max_memory = torch.cuda.max_memory_allocated() / 1024**2
    #torch.cuda.memory_allocated() 将返回当前Tensor占用的GPU内存(以字节为单位),
    start_memory = torch.cuda.memory_allocated() / 1024**2

    # Call in-place or normal ReLU
    if inplace:
        F.relu_(t)
    else:
        output = F.relu(t)

    # Measure allocated memory after the call
    torch.cuda.synchronize()
    end_max_memory = torch.cuda.max_memory_allocated() / 1024**2
    end_memory = torch.cuda.memory_allocated() / 1024**2

    # Return amount of memory allocated for ReLU call
    return end_memory - start_memory, end_max_memory - start_max_memory
通过代码2 来为 非原地操作的 ReLU 函数分配内存:
# setup the device
device = torch.device('cuda:0' if torch.cuda.is_available() else "cpu")

# call the function to measure allocated memory
memory_allocated, max_memory_allocated = get_memory_allocated(device, inplace = False)
print('Allocated memory: {}'.format(memory_allocated))
print('Allocated max memory: {}'.format(max_memory_allocated))
然后会得到下面的输出:
Allocated memory: 382.0
Allocated max memory: 382.0
接着通过代码3 为 原地操作的 ReLU 函数分配内存:
memory_allocated_inplace, max_memory_allocated_inplace = get_memory_allocated(device, inplace = True)
print('Allocated memory: {}'.format(memory_allocated_inplace))
print('Allocated max memory: {}'.format(max_memory_allocated_inplace))
得到下面的输出
Allocated memory: 0.0
Allocated max memory: 0.0
看起来使用就地操作可以帮助我们节省一些 GPU 内存。 然而,在使用就地操作时,我们应该非常谨慎,并仔细检查。 在下面中,我将告诉您为什么。
使用就地操作的缺点
就地操作的主要缺点是,它们可能会覆盖计算梯度所需的值,这意味着破坏模型的训练过程。 这就是 PyTorch autograd 的官方文档所说的:
Supporting in-place operations in autograd is a hard matter, and we discourage their use in most cases. Autograd’s aggressive buffer freeing and reuse makes it very efficient and there are very few occasions when in-place operations actually lower memory usage by any significant amount. Unless you’re operating under heavy memory pressure, you might never need to use them.
There are two main reasons that limit the applicability of in-place operations:
In-place operations can potentially overwrite values required to compute gradients.
Every in-place operation actually requires the implementation to rewrite the computational graph. Out-of-place versions simply allocate new objects and keep references to the old graph, while in-place operations, require changing the creator of all inputs to the Function representing this operation.
谨慎使用就地操作的另一个原因是它们的实现非常 tricky 。 这就是为什么我建议使用 PyTorch 标准的就地操作(就像上面的 就地ReLU ),而不是手动实现一个。
让我们看一个 SiLU (或 Swish-1)激活函数的例子。 这是SiLU的非原地操作实现:
def silu(input):
    '''
    Out-of-place implementation of SiLU activation function
    https://arxiv.org/pdf/1606.08415.pdf
    '''
    return input * torch.sigmoid(input)
让我们尝试用 torch.sigmoid_ 实现 就地操作的 SiLU 函数
def silu_inplace_1(input):
    '''
    Incorrect implementation of in-place SiLU activation function
    https://arxiv.org/pdf/1606.08415.pdf
    '''
    return input * torch.sigmoid_(input) # THIS IS INCORRECT!!!
上面的代码不正确地实现了就地SiLU。 只要比较两个函数返回值,我们就可以确定。 实际上,函数silu_inplace_1返回 sigmoid(input) * sigmoid(input)! 使用torch_sigmoid_ 就地实现 SiLU 的工作示例如下: :
def silu_inplace_2(input):
    '''
    Example of implementation of in-place SiLU activation function using torch.sigmoid_
    https://arxiv.org/pdf/1606.08415.pdf
    '''
    result = input.clone()
    torch.sigmoid_(input)
    input *= result
    return input
这个小示例演示了为什么在使用就地操作时要谨慎并进行检查。
总结:
- 我描述了原地操作及其目的。 演示了原地操作如何帮助消耗更少的GPU内存。
- 我描述了原地操作的显著缺点。 人们应该非常小心地使用它们,并检查结果。
迫切求值与惰性求值
在编程语言中,求值策略(evaluation strategy)是一组用于求值表达式的规则。该术语通常用于指代更为具体的参数传递策略概念。该策略定义了传递给函数的每个参数的值的种类(绑定策略)。是否计算函数调用的参数,以及如果是,按什么顺序(求值顺序)。
-
迫切求值(贪婪求值)(eager evaluation, greedy evaluation)。应用顺序(Applicative order)是一组求值顺序,在此顺序中,函数的参数在被应用之前被完全求值。 这使得函数变得严格,也就是说,如果任意一个参数是未定义的,那么函数的结果就是未定义的,所以应用顺序计算通常被称为严格计算(strict evaluation )。 此外,函数调用在过程中一旦遇到就会立即执行,因此它也被称为迫切求值或贪婪求值。 一些作者将严格的计算称为“按值调用”,因为按值调用绑定策略需要严格的评估。
-
惰性求值(lazy evaluation)。非严格求值顺序是不严格的求值顺序,也就是说,一个函数可能在其所有参数都被完全求值之前返回结果。典型的例子是正常顺序(normal order)求值,它不会对任何参数求值,直到它们在函数体中是必需的。正常顺序求值具有这样的特性,即只要任何其他求值顺序无错误地终止,它就会无错误地终止。请注意,惰性求值在本文中归类为绑定技术而不是求值顺序。但是这种区别并不总是被遵循,一些作者将惰性求值定义为正常顺序求值,反之亦然,或者将非严格性与惰性求值混淆。
许多语言中的布尔表达式使用一种称为短路求值的非严格求值形式,其中只要确定一个明确的布尔值将导致求值就立即返回——例如,在遇到真值的析取表达式 (OR) 中, 或在遇到 false 的合取表达式 (AND) 中,等等。条件表达式同样使用非严格评估 - 仅评估其中一个分支。
自动微分
在数学和计算机代数中,自动微分(automatic differentiation, AD),也称为algorithmic differentiation、computational differentiation、auto-differentiation 或简称 autodiff,是一套计算计算机程序指定函数的导数的技术。 AD 利用了这样一个事实:每一个计算机程序,无论多么复杂,都要执行一系列基本算术运算 (加减乘除等) 和基本函数(exp、log、sin、cos等)。 将链式法则反复应用于这些运算,可以自动计算任意阶导数,精确到工作精度,并且比原程序最多多使用一个小常数因子的算术运算。
自动微分不同于符号微分(symbolic differentiation)和数值微分(numerical differentiation)。符号微分面临将计算机程序转换为单个数学表达式的困难,并可能导致代码效率低下。数值微分(有限差分法)会在离散化过程中引入舍入误差。这两种经典方法在计算高阶导数时都存在问题,复杂性和误差都会增加。 最后,这两种经典方法在计算函数对多输入的偏导数时都很慢,这是基于梯度的优化算法所需要的。 自动微分法解决了所有这些问题。
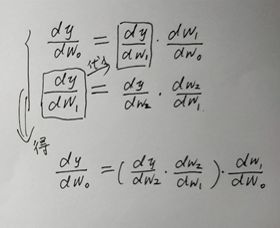
链式法则(chain rule)
AD 的基础是由链式法则提供的微分分解。 对于简单的复合,举个例子
y = f ( g ( h ( x ) ) ) = f ( g ( h ( w 0 ) ) ) = f ( g ( w 1 ) ) = f ( w 2 ) = w 3 y=f(g(h(x)))=f(g(h(w_{0})))=f(g(w_{1}))=f(w_{2})=w_{3} y=f(g(h(x)))=f(g(h(w0)))=f(g(w1))=f(w2)=w3
w 0 = x w_{0}=x w0=x
w 1 = h ( w 0 ) w_{1}=h(w_{0}) w1=h(w0)
w 2 = g ( w 1 ) w_{2}=g(w_{1}) w2=g(w1)
w 3 = f ( w 2 ) = y w_{3}=f(w_{2})=y w3=f(w2)=y
由链式法则,得
d y d x = d y d w 2 d w 2 d w 1 d w 1 d x = d f ( w 2 ) d w 2 d g ( w 1 ) d w 1 d h ( w 0 ) d x \frac{\mathrm{d} y }{\mathrm{d} x} = \frac{\mathrm{d} y }{\mathrm{d} w_{2}} \frac{\mathrm{d} w_{2} }{\mathrm{d} w_{1}} \frac{\mathrm{d} w_{1} }{\mathrm{d} x} = \frac{\mathrm{d} f(w_{2}) }{\mathrm{d} w_{2}} \frac{\mathrm{d} g(w_{1}) }{\mathrm{d} w_{1}} \frac{\mathrm{d} h(w_{0}) }{\mathrm{d} x} dxdy=dw2dydw1dw2dxdw1=dw2df(w2)dw1dg(w1)dxdh(w0)
通常, AD 有两种不同的模式,正向累积(或正向模式)(forward accumulation, forward mode)和反向累积(或反向模式)(reverse accumulation,reverse mode)。正向累积指定从内到外遍历链式法则(即,首先计算 d w 1 d x \frac{\mathrm{d} w_{1} }{\mathrm{d} x} dxdw1 ,然后 d w 2 d w 1 \frac{\mathrm{d} w_{2} }{\mathrm{d} w_{1}} dw1dw2 ,最后 d y d w 2 \frac{\mathrm{d} y }{\mathrm{d} w_{2}} dw2dy),然而反向累积从外到内遍历(首先计算 d y d w 2 \frac{\mathrm{d} y }{\mathrm{d} w_{2}} dw2dy ,然后 d w 2 d w 1 \frac{\mathrm{d} w_{2} }{\mathrm{d} w_{1}} dw1dw2, 最后 d w 1 d x \frac{\mathrm{d} w_{1} }{\mathrm{d} x} dxdw1 )。更加简洁地说,
- 正向累积计算如下递归关系式:
d w i d x = d w i d w i − 1 d w i − 1 d x , w 3 = y \frac{\mathrm{d} w_{i} }{\mathrm{d} x} = \frac{\mathrm{d} w_{i} }{\mathrm{d} w_{i-1}} \frac{\mathrm{d} w_{i-1} }{\mathrm{d} x},\quad w_{3}=y dxdwi=dwi−1dwidxdwi−1,w3=y
- 反向累积计算如下递归关系式:
d y d w i = d y d w i + 1 d w i + 1 d w i , w 0 = x \frac{\mathrm{d} y }{\mathrm{d} w_{i}} = \frac{\mathrm{d} y }{\mathrm{d} w_{i+1}} \frac{\mathrm{d} w_{i+1} }{\mathrm{d} w_{i}},\quad w_{0}=x dwidy=dwi+1dydwidwi+1,w0=x
正向累积
在前向累积 AD中,执行微分的自变量首先要固定,并递归计算每个子表达式的导数。
∂ y ∂ x = ∂ y ∂ w n − 1 ∂ w n − 1 ∂ x = ∂ y ∂ w n − 1 ( ∂ w n − 1 ∂ w n − 2 ∂ w n − 2 ∂ x ) = ∂ y ∂ w n − 1 ( ∂ w n − 1 ∂ w n − 2 ( ∂ w n − 2 ∂ w n − 3 ∂ w n − 3 ∂ x ) ) = . . . \begin{aligned} \frac{\partial y}{\partial x} &= \frac{\partial y}{\partial w_{n-1}} \frac{\partial w_{n-1}}{\partial x}\\ &= \frac{\partial y}{\partial w_{n-1}} (\frac{\partial w_{n-1}}{\partial w_{n-2}} \frac{\partial w_{n-2}}{\partial x}) \\ &= \frac{\partial y}{\partial w_{n-1}} (\frac{\partial w_{n-1}}{\partial w_{n-2}} (\frac{\partial w_{n-2}}{\partial w_{n-3}} \frac{\partial w_{n-3}}{\partial x})) \\ &= \quad ...\end{aligned} ∂x∂y=∂wn−1∂y∂x∂wn−1=∂wn−1∂y(∂wn−2∂wn−1∂x∂wn−2)=∂wn−1∂y(∂wn−2∂wn−1(∂wn−3∂wn−2∂x∂wn−3))=...
这可以推广到作为雅可比矩阵乘积的多变量。
与反向累积相比,正向累积是自然的,易于实现,因为导数信息的流动与计算顺序一致。
变量 w w w 的导数 w ˙ \dot{w} w˙(存储为数值,而不是符号表达式),
w ˙ = ∂ w ∂ x \dot{w}=\frac{\partial w}{\partial x} w˙=∂x∂w
用点表示。 然后,在求值过程中同步计算导数,并利用链式法则与其他导数相结合。
例如,考虑以下函数:
z = f ( x 1 , x 2 ) = x 1 x 2 + sin x 1 = w 1 w 2 + sin w 1 = w 3 + w 4 = w 5 \begin{aligned} z &= f(x_{1}, x_{2})\\ &= x_{1}x_{2}+\sin x_{1} \\ &= w_{1}w_{2}+\sin w_{1}\\ &= w_{3}+w_{4} \\&=w_{5} \end{aligned} z=f(x1,x2)=x1x2+sinx1=w1w2+sinw1=w3+w4=w5
为清楚起见,各个子表达式已用变量 w i w_{i} wi 标记。执行微分的自变量的选择会影响种子值 w 1 ˙ \dot{w_{1}} w1˙ 和 w 2 ˙ \dot{w_{2}} w2˙。
假如求函数关于 x 1 x_{1} x1 的导数,种子值应设置为:
w 1 ˙ = ∂ x 1 ∂ x 1 = 1 \dot{w_{1}}= \frac{\partial x_{1}}{\partial x{1}}=1 w1˙=∂x1∂x1=1
w 2 ˙ = ∂ x 2 ∂ x 1 = 0 \dot{w_{2}}=\frac{\partial x_{2}}{\partial x{1}}=0 w2˙=∂x1∂x2=0
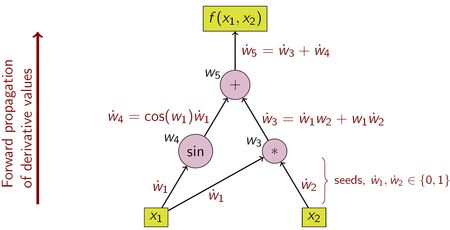
设置好种子值后,这些值将使用链式规则进行传播,如表1 所示。
图3 以计算图的形式展示了这个过程的图示。
| 计算值的操作 | 计算导数的操作 |
|---|---|
| w 1 = x 1 w_{1}=x_{1} w1=x1 | w 1 ˙ = 1 ( s e e d ) \dot{w_{1}}= 1 ( seed ) w1˙=1(seed) |
| w 2 = x 2 w_{2}=x_{2} w2=x2 | w 2 ˙ = 0 ( s e e d ) \dot{w_{2}}= 0 ( seed ) w2˙=0(seed) |
| w 3 = w 1 ⋅ w 2 w_{3}=w_{1}\cdot w_{2} w3=w1⋅w2 | w 3 ˙ = w 2 ⋅ w 1 ˙ + w 1 ⋅ w 2 ˙ \dot{w_{3}}= w_{2}\cdot \dot{w_{1}} +w_{1}\cdot \dot{w_{2}} w3˙=w2⋅w1˙+w1⋅w2˙ |
| w 4 = sin w 1 w_{4}=\sin w_{1} w4=sinw1 | w 4 ˙ = cos w 1 ⋅ w 1 ˙ \dot{w_{4}}= \cos w_{1} \cdot \dot{w_{1}} w4˙=cosw1⋅w1˙ |
| w 5 = w 3 + w 4 w_{5}=w_{3}+w_{4} w5=w3+w4 | w 5 ˙ = w 3 ˙ + w 4 ˙ \dot{w_{5}}=\dot{w_{3}}+\dot{w_{4}} w5˙=w3˙+w4˙ |
为了计算这个例子中的函数的梯度,这就不但需要函数 f \mathcal{f} f 关于 x 1 x_{1} x1 的导数,也需要关于 x 2 x_{2} x2 的。
这就需要对计算图有额外的扫描,种子值是 w 1 ˙ = 0 ; w 2 ˙ = 1 \dot{w_{1}}= 0; \dot{w_{2}}= 1 w1˙=0;w2˙=1 。
前向累积一次扫描的计算复杂度与原始代码的复杂度成正比。
对于具有 m ≫ n m \gg n m≫n 的函数 f : R n → R m \mathcal{f}:\mathbb{R}^{n} \rightarrow \mathbb{R}^{m} f:Rn→Rm,正向累积比反向累积更有效,因为只需要进行 n n n 次扫描,而反向累积则需要进行 m m m 次扫描。
反向累积
在反向累积 AD 中,要微分的因变量是固定的,并且针对每个子表达式递归地计算导数。
∂ y ∂ w 1 = ∂ y ∂ w 1 ∂ w 1 ∂ x = ( ∂ y ∂ w 2 ∂ w 2 ∂ w 1 ) ∂ w 1 ∂ x = ( ( ∂ y ∂ w 3 ∂ w 3 ∂ w 2 ) ∂ w 2 ∂ w 1 ) ∂ w 1 ∂ x = . . . \begin{aligned} \frac{\partial y}{\partial w_{1}} &= \frac{\partial y}{\partial w_{1}} \frac{\partial w_{1}}{\partial x} \\ &=(\frac{\partial y}{\partial w_{2}} \frac{\partial w_{2}}{\partial w_{1}})\frac{\partial w_{1}}{\partial x}\\ &= ((\frac{\partial y}{\partial w_{3}} \frac{\partial w_{3}}{\partial w_{2}})\frac{\partial w_{2}}{\partial w_{1}})\frac{\partial w_{1}}{\partial x} \\&=\quad...\end{aligned} ∂w1∂y=∂w1∂y∂x∂w1=(∂w2∂y∂w1∂w2)∂x∂w1=((∂w3∂y∂w2∂w3)∂w1∂w2)∂x∂w1=...
在反向累积中,感兴趣的量是伴随(adjoint)的,在符号上面加一横条表示( w ˉ \bar{w} wˉ);
它是所选因变量对子表达式 w w w 的导数:
w ˉ = ∂ y ∂ w \bar{w}=\frac{\partial y}{\partial w} wˉ=∂w∂y
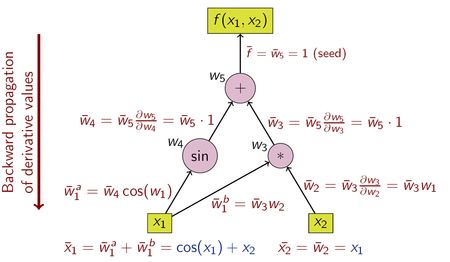
反向累积从外到内遍历链式法则,或者在图 4 中的计算图的情况下,从上到下遍历。示例函数是标量值,因此导数计算只有一个种子,计算图只需扫描一次即可计算(双分量)梯度。与前向累积相比,这只是工作量的一半,但反向累加需要将中间变量 w i w_{i} wi 以及产生它们的指令存储在称为 Wengert 列表(或“tape”)的数据结构中, 这可能消耗大量内存如果计算图很大。可以通过只存储中间变量的子集,然后通过重复计算来重建必要的工作变量,从而在一定程度上缓解这种情况,这种技术称为再实现(rematerialization)。 检查点还用于保存中间状态。
同样,考虑以下函数:
z = f ( x 1 , x 2 ) = x 1 x 2 + sin x 1 = w 1 w 2 + sin w 1 = w 3 + w 4 = w 5 \begin{aligned} z &= f(x_{1}, x_{2})\\ &= x_{1}x_{2}+\sin x_{1} \\ &= w_{1}w_{2}+\sin w_{1}\\ &= w_{3}+w_{4} \\&=w_{5} \end{aligned} z=f(x1,x2)=x1x2+sinx1=w1w2+sinw1=w3+w4=w5
使用反向累积计算导数的操作如下表所示(注意倒序):
| 计算导数的操作 |
|---|
| w 5 ˉ = 1 ( s e e d ) \bar{w_{5}}=1(seed) w5ˉ=1(seed) |
| w 4 ˉ = w 5 ˉ \bar{w_{4}}=\bar{w_{5}} w4ˉ=w5ˉ |
| w 3 ˉ = w 5 ˉ \bar{w_{3}}=\bar{w_{5}} w3ˉ=w5ˉ |
| w 2 ˉ = w 3 ˉ ⋅ w 1 \bar{w_{2}}=\bar{w_{3}}\cdot w_{1} w2ˉ=w3ˉ⋅w1 |
| w 1 ˉ = w 3 ˉ ⋅ w 2 + w 4 ˉ ⋅ cos w 1 \bar{w_{1}}=\bar{w_{3}}\cdot w_{2}+\bar{w_{4}}\cdot \cos w_{1} w1ˉ=w3ˉ⋅w2+w4ˉ⋅cosw1 |
对于具有 m ≪ n m \ll n m≪n 的函数 f : R n → R m \mathcal{f}:\mathbb{R}^{n} \rightarrow \mathbb{R}^{m} f:Rn→Rm,反向累计比正向累计更有效。因为反向累积只需要进行 m m m 次扫描,而正向累加则需要进行 n n n 次扫描。
反向模式 AD 由 Seppo Linnainmaa 于 1976 年首次出版[1] [2]。
多层感知器中的误差反向传播是机器学习中使用的一种技术,是反向模式 AD 的一种特殊情况 [3]。
向量-雅可比 积(Vector-Jacobian Products, 简写为 VJP)[4]
对于 y = f ( x ) , \bold{y}=\mathcal{f}(\bold{x}), y=f(x), f : R n → R m \mathcal{f}:\mathbb{R}^{n} \rightarrow \mathbb{R}^{m} f:Rn→Rm ,其 雅可比矩阵 J \bold{J} J 为:
J = ∂ y ∂ x = [ ∂ y 1 ∂ x 1 ⋯ ∂ y 1 ∂ x n ∂ y 2 ∂ x 1 ⋯ ∂ y 2 ∂ x n ⋮ ⋱ ⋮ ∂ y m ∂ x 1 ⋯ ∂ y m ∂ x n ] \bold{J}=\frac{\partial \bold{y}}{\partial \bold{x}}=\begin{bmatrix} \frac{\partial y_{1}}{\partial x_{1}} & \cdots & \frac{\partial y_{1}}{\partial x_{n}}\\ \frac{\partial y_{2}}{\partial x_{1}} & \cdots & \frac{\partial y_{2}}{\partial x_{n}}\\ \vdots & \ddots & \vdots \\ \frac{\partial y_{m}}{\partial x_{1}} & \cdots & \frac{\partial y_{m}}{\partial x_{n}} \end{bmatrix} J=∂x∂y=⎣⎢⎢⎢⎢⎡∂x1∂y1∂x1∂y2⋮∂x1∂ym⋯⋯⋱⋯∂xn∂y1∂xn∂y2⋮∂xn∂ym⎦⎥⎥⎥⎥⎤
vector-Jacobian product
x j ˉ = ∑ i y i ˉ ∂ y i ∂ x j \bar{x_{j}}=\sum_{i}\bar{y_{i}}\frac{\partial y_{i}}{\partial x_{j}} xjˉ=i∑yiˉ∂xj∂yi
或者
x ˉ = y ˉ T J \bold{\bar{x}}=\bar{\bold{y}}^{T} \bold{J} xˉ=yˉTJ
这得到一个行向量;
或者
x ˉ = J T y ˉ \bold{\bar{x}}=\bold{J}^{T} \bar{\bold{y}} xˉ=JTyˉ
这得到一个列向量。
例子
矩阵-向量乘法
z = W x \bold{z}=\bold{W}\bold{x} z=Wx
J = W x ˉ = W T z ˉ \bold{J}=\bold{W} \qquad \bold{\bar{x}}=\bold{W}^{T} \bar{\bold{z}} J=Wxˉ=WTzˉ
逐元素操作
y = exp ( z ) \bold{y}=\exp(\bold{z}) y=exp(z)
J = [ exp ( z 1 ) 0 ⋱ 0 exp ( z D ) ] \bold{J}=\begin{bmatrix}\exp(z_{1})& &0\\ & \ddots & \\ 0 & &\exp(z_{D}) \end{bmatrix} J=⎣⎡exp(z1)0⋱0exp(zD)⎦⎤
z ˉ = exp ( z ) ∘ y ˉ \bar{\bold{z}}=\exp(\bold{z})\circ \bar{\bold{y}} zˉ=exp(z)∘yˉ
注意:我们从不显式地构造雅可比矩阵。 直接计算VJP通常更简单、更有效。
- Linnainmaa, Seppo (1976). “Taylor Expansion of the Accumulated Rounding Error”. BIT Numerical Mathematics. 16 (2): 146–160. doi:10.1007/BF01931367. S2CID 122357351.
- ^ Griewank, Andreas (2012). “Who Invented the Reverse Mode of Differentiation?” (PDF). Optimization Stories, Documenta Matematica. Extra Volume ISMP: 389–400.
- Baydin, Atilim Gunes; Pearlmutter, Barak; Radul, Alexey Andreyevich; Siskind, Jeffrey (2018). [“aydin, Atilim Gunes; Pearlmutter, Barak; Radul, Alexey Andreyevich; Siskind, Jeffrey (2018). “Automatic differentiation in machine learning: a survey”. Journal of Machine Learning Research. 18: 1–43.”](http://jmlr.org/papers/v18/17-468.html). Journal of Machine Learning Research. 18: 1–43.
每部分内容来源
-
原地操作
https://towardsdatascience.com/in-place-operations-in-pytorch-f91d493e970e
-
计算策略
https://en.wikipedia.org/wiki/Evaluation_strategy
-
自动微分
https://en.wikipedia.org/wiki/Automatic_differentiation
-
向量雅可比积
Roger Grosse, CSC321 Lecture 10: Automatic Differentiation


