QT使用OpenCV实现摄像头显示实时图像
之前一直都是Windows下配置OpenCV进行使用,最近因为项目需求,所有的操作系统均换成银河麒麟,不得不在该系统下对OpenCV源码进行编译安装,多次测试之后终于可以跑通,把跑通的第一个例子写到网上与大家一起分享。心里话,没用习惯qt与opencv的搭配,感觉比vs稍微麻烦一些,主要是要把Mat转换为Qimage。至于是不是有更好的方法,本人还未探究。另一个可行的方案是是使用QCamera,后期本人会专门写一个关于QCamera调用摄像头的例子进行对比,找到更简单的方式。
老样子,先上整个项目的结构图,非常简单
 接下来,要放一下.pro文件,也就是项目文件的代码,因为其中需要包含多个库目录,少了之后运行代码会报错
#-------------------------------------------------
#
# Project created by QtCreator 2021-11-02T11:33:42
#
#-------------------------------------------------

QT       += core gui


greaterThan(QT_MAJOR_VERSION, 4): QT += widgets

TARGET = 1102demo3
TEMPLATE = app

# The following define makes your compiler emit warnings if you use
# any feature of Qt which as been marked as deprecated (the exact warnings
# depend on your compiler). Please consult the documentation of the
# deprecated API in order to know how to port your code away from it.
DEFINES += QT_DEPRECATED_WARNINGS

# You can also make your code fail to compile if you use deprecated APIs.
# In order to do so, uncomment the following line.
# You can also select to disable deprecated APIs only up to a certain version of Qt.
#DEFINES += QT_DISABLE_DEPRECATED_BEFORE=0x060000    # disables all the APIs deprecated before Qt 6.0.0
#LIBS+=/usr/local/lib/libopencv_shape.so
#LIBS+=/usr/local/lib/libopencv_shape.so
#LIBS+=/usr/local/lib/libopencv_videoio.so
LIBS += -L/usr/local/lib -lopencv_core -lopencv_imgcodecs -lopencv_highgui

SOURCES += \
        main.cpp \
        mainwindow.cpp

HEADERS += \
        mainwindow.h

FORMS += \
        mainwindow.ui
如果不加入LIBS +=这一行,写完之后运行代码大概率报错,多次查询后得到结论是没有包含库目录,这一点比较坑。
mainwindows.h
#ifndef MAINWINDOW_H
#define MAINWINDOW_H
#include mainwindows.cpp
#include "mainwindow.h"
#include "ui_mainwindow.h"

MainWindow::MainWindow(QWidget *parent) :
    QMainWindow(parent),
    ui(new Ui::MainWindow)
{
    ui->setupUi(this);
    timer = new QTimer(this);
    image = new QImage();
    connect(timer,SIGNAL(timeout()),this,SLOT(readFarme()));
    connect(ui->Open,SIGNAL(clicked()),this,SLOT(on_Open_triggered()));
    connect(ui->Stop,SIGNAL(clicked()),this,SLOT(on_Stop_triggered()));


}

MainWindow::~MainWindow()
{
    delete ui;
}

void MainWindow::on_Open_triggered()
{
    // 本机摄像头
    //cap.open(0);
    // rtsp流,如果是本地rtsp流,需要将本机ip地址与设备ip地址设置为同一网段
    //cap.open("rtsp://admin:[email protected]/xx0/yyy0");
    // 本机的视频文件
    cap.open("/home/jh308/桌面/test.mp4");
    timer->start(33);
}

void MainWindow::on_Stop_triggered()
{
    // 停止读取数据。
    timer->stop();
    cap.release();
    ui->cameraView->clear();
}
void MainWindow::readFarme()
{
    cap.read(src_image);
    QImage imag = MatImageToQt(src_image);
    ui->cameraView->setPixmap(QPixmap::fromImage(imag));
}

//Mat转成QImage
QImage MainWindow::MatImageToQt(const Mat &src)
{
    //CV_8UC1 8位无符号的单通道---灰度图片
    if(src.type() == CV_8UC1)
    {
        //使用给定的大小和格式构造图像
        //QImage(int width, int height, Format format)
        QImage qImage(src.cols,src.rows,QImage::Format_Indexed8);
        //扩展颜色表的颜色数目
        qImage.setColorCount(256);

        //在给定的索引设置颜色
        for(int i = 0; i < 256; i ++)
        {
            //得到一个黑白图
            qImage.setColor(i,qRgb(i,i,i));
        }
        //复制输入图像,data数据段的首地址
        uchar *pSrc = src.data;
        //
        for(int row = 0; row < src.rows; row ++)
        {
            //遍历像素指针
            uchar *pDest = qImage.scanLine(row);
            //从源src所指的内存地址的起始位置开始拷贝n个
            //字节到目标dest所指的内存地址的起始位置中
            memcmp(pDest,pSrc,src.cols);
            //图像层像素地址
            pSrc += src.step;
        }
        return qImage;
    }
    //为3通道的彩色图片
    else if(src.type() == CV_8UC3)
    {
        //得到图像的的首地址
        const uchar *pSrc = (const uchar*)src.data;
        //以src构造图片
        QImage qImage(pSrc,src.cols,src.rows,src.step,QImage::Format_RGB888);
        //在不改变实际图像数据的条件下,交换红蓝通道
        return qImage.rgbSwapped();
    }
    //四通道图片,带Alpha通道的RGB彩色图像
    else if(src.type() == CV_8UC4)
    {
        const uchar *pSrc = (const uchar*)src.data;
        QImage qImage(pSrc, src.cols, src.rows, src.step, QImage::Format_ARGB32);
        //返回图像的子区域作为一个新图像
        return qImage.copy();
    }
    else
    {
        return QImage();
    }
}
main.cpp
#include "mainwindow.h"
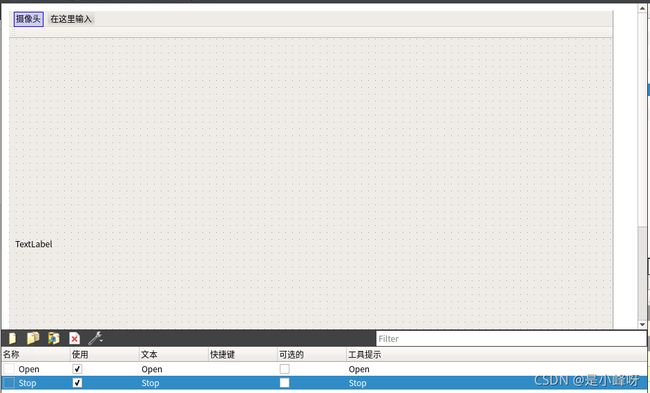
#include UI设计界面
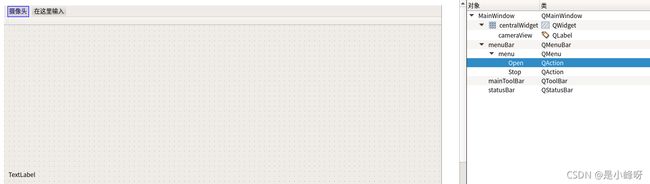
UI界面设计也很简单,就一个label跟两个按钮
关于菜单栏中按钮的添加,内容如下
 本文的代码来自博客
https://blog.csdn.net/matt45m/article/details/88976791
但是该博客中的缺点是没有指出报错后的解决方案(在.pro文件中添加链接库),本文在此进行补充说明。
下面是程序运行的结果,涉及隐私部分用白框遮挡。

关于本文的代码链接如下:
https://download.csdn.net/download/weixin_43552197/36481163