【Spring Boot 源码研究 】- 请求处理流程机制分析
1. 背景
之前我们对Spring Boot做了研究讲解,我们知道怎么去集成配置, 知道它如何启动, 如何实现自动化配置,那么它如何接收并处理外部请求, 具体原理是怎样, 又要流转哪些关键环节? filter,interceptor, view是在哪调用, 处理顺序是怎样?Spring Boot 和Spring MVC以及内置容器又是怎样的作用关系? 这里我们作具体剖析研究。
2. Spring Boot 的请求处理流程设计
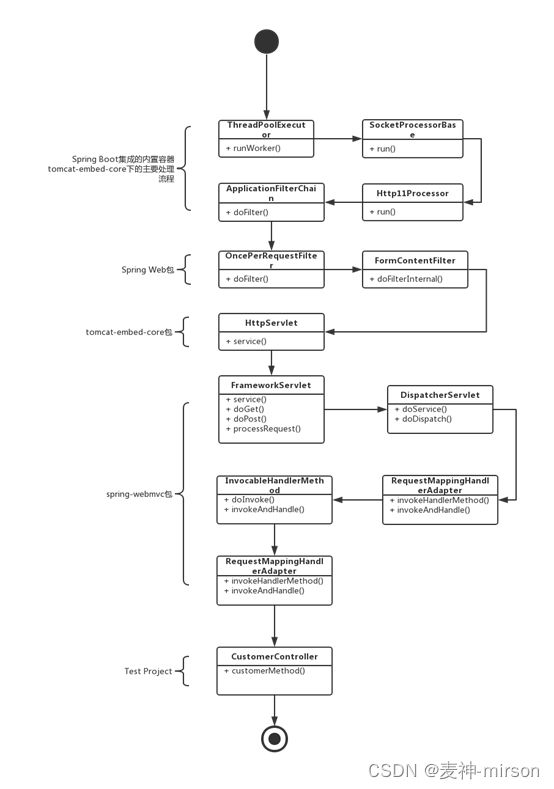
整理处理流程:
从流程图可以看到, 从内嵌的服务器接收请求到Spring Web包的处理, 再调用Spring MVC框架, 最后再到自定义的Controller。经过层层处理, 我们接下来再研究具体的处理机制。
UML关系图:
从UML图中可以看到, 层级较为复杂, 主要关注两个层面:
一是继承GenericWebApplicationContext类,具备上下文BEAN的管理能力;
另外是实现ConfigurableWebServerApplicationContext接口, 具备上下文配置能力。
3. Servlet服务模式请求流程分析
3.1 ServletWebServerApplicationContext 分析
Spring Boot启动时,会判断应用服务类型, 有两种, 一种是Servlet服务, 另一种是Reactive响应式服务。ServletWebServerApplicationContext就是Servlet服务核心实现类。
它实现 ConfigurableWebServerApplicationContext 接口,继承 GenericWebApplicationContext 类:
public interface ConfigurableWebServerApplicationContext
		extends ConfigurableApplicationContext, WebServerApplicationContext {

	/**
	 * 设置服务的命名空间
	 */
	void setServerNamespace(String serverNamespace);

}
继承ConfigurableApplicationContext, WebServerApplicationContext两个接口, 并定义setServerNamespace接口, 设置服务的命名空间。
看下WebServerApplicationContext源码:
public interface WebServerApplicationContext extends ApplicationContext {

	/**
	 * 获取WebServer管理对象
	 */
	WebServer getWebServer();

	/**
	 * 获取服务的命名空间
	 */
	String getServerNamespace();

}
webServer是一个服务管理接口, 包含服务的启动与停止管理功能。
ServletWebServerApplicationContext 的构造方法:
   /**
	 * 默认构造方法
	 */
	public ServletWebServerApplicationContext() {
	}

	/**
	 * 指定beanFactory的构造方法
	 */
	public ServletWebServerApplicationContext(DefaultListableBeanFactory beanFactory) {
		super(beanFactory);
	}
支持传递指定beanFactory进行对象初始化。
ServletWebServerApplicationContext 的refresh方法:
@Override
public final void refresh() throws BeansException, IllegalStateException {
    try {
        // 由父类方法初始化Spring上下文
        super.refresh();
    }
    catch (RuntimeException ex) {
        // 如果异常, 停止WebServer启动并释放资源
        stopAndReleaseWebServer();
        throw ex;
    }
}
refresh()方法, 可以参考【Spring Boot启动流程】第一章的3.2.4章节第12点说明, 里面做了具体说明, 就不再赘述。
ServletWebServerApplicationContext 的createWebServer方法:
private void createWebServer() {
		WebServer webServer = this.webServer;
        // 获取ServletContext上下文
		ServletContext servletContext = getServletContext();
		if (webServer == null && servletContext == null) {
            // 如果为空, 则进行初始化创建
			ServletWebServerFactory factory = getWebServerFactory();
			this.webServer = factory.getWebServer(getSelfInitializer());
		}
		else if (servletContext != null) {
			try {
                // 如果不为空,则直接启动
				getSelfInitializer().onStartup(servletContext);
			}
			catch (ServletException ex) {
				throw new ApplicationContextException("Cannot initialize servlet context", ex);
			}
		}
    	// 初始化属性资源配置信息
		initPropertySources();
	}
ServletWebServerApplicationContext 的selfInitialize方法:
	private void selfInitialize(ServletContext servletContext) throws ServletException {
        // 将ServeltContext设置为WebApplicationContext相关属性
		prepareWebApplicationContext(servletContext);
        // 注册ApplicationScope作用域
		registerApplicationScope(servletContext);
        // 注册环境变量中的bean信息, 在BeanFactory中也可以获得servletContext上下文信息
		WebApplicationContextUtils.registerEnvironmentBeans(getBeanFactory(), servletContext);
		for (ServletContextInitializer beans : getServletContextInitializerBeans()) {
            // 设置Bean在ServletContext加载完毕后进行初始化
			beans.onStartup(servletContext);
		}
	}
ServletWebServerApplicationContext 的finishRefresh方法:
	@Override
	protected void finishRefresh()
        // 完成刷新逻辑处理, 比如清除缓存, 发布刷新事件等
		super.finishRefresh();
		// 启动WebServer
		WebServer webServer = startWebServer();
		if (webServer != null)
            // 发布WebServer初始化完成事件
			publishEvent(new ServletWebServerInitializedEvent(webServer, this));
		}
	}
以上是整个Servlet模式服务的启动流程, ServletWebServerApplicationContext作为核心处理类,介绍了主要方法的处理逻辑 。
3.2 Servlet服务模式之请求流程具体分析
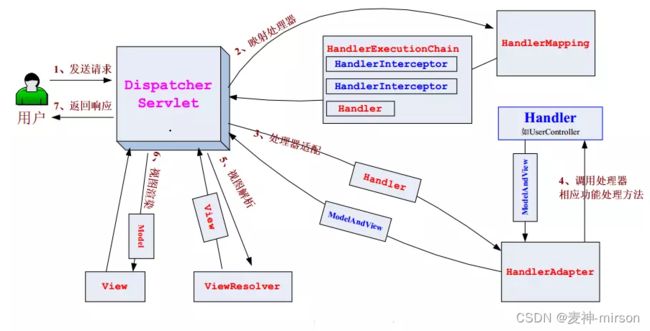
- Spring Boot 是基于MVC做的封装,先看下Spring MVC的处理流程:
-
Spring Boot 默认是采用Tomcat作为容器, WebServer的实现类为TomcatWebServer, start启动方法:
@Override public void start() throws WebServerException { // 增加同步锁 synchronized (this.monitor) { if (this.started) { // 如果启动, 则直接返回 return; } try { //处理tomcat的Connectors连接配置信息, 就是tomcat得xml配置得Connector信息 addPreviouslyRemovedConnectors(); Connector connector = this.tomcat.getConnector(); if (connector != null && this.autoStart) { // 如果存在Connector, 且为自动启动, 设置Tomcat的内置上下文延迟处理(服务成功启动后执行) performDeferredLoadOnStartup(); } // 检查配置的Connectors是否已经启动, 避免冲突 checkThatConnectorsHaveStarted(); this.started = true; logger.info("Tomcat started on port(s): " + getPortsDescription(true) + " with context path '" + getContextPath() + "'"); } catch (ConnectorStartFailedException ex) { // 出现异常, 静默停止 stopSilently(); throw ex; } catch (Exception ex) { if (findBindException(ex) != null) { throw new PortInUseException(this.tomcat.getConnector().getPort()); } throw new WebServerException("Unable to start embedded Tomcat server", ex); } finally { // 获取TOMCAT内置上下文 Context context = findContext(); // 解除与classloader类加载器的绑定关系 ContextBindings.unbindClassLoader(context, context.getNamingToken(), getClass().getClassLoader()); } } } -
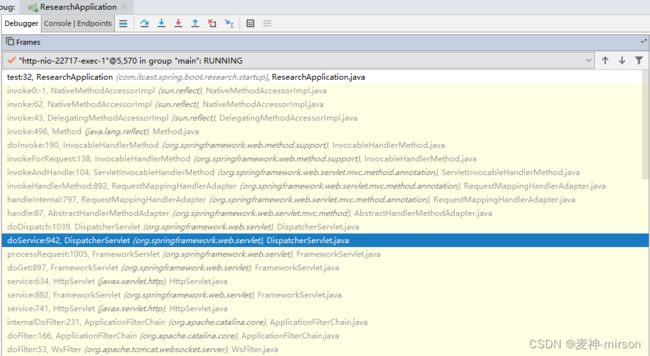
Web接口调用栈关系:
我们编写一个测试的Web接口, 看下其调用栈结构:
调用栈关系可以看到, 从tomcat的httpServlet接收到请求, 交给Spring MVC的DispatchServlet处理, 再分到我们自定义的WEB接口, 我们经常定义的过滤器Filter, 在进入httpServlet之前已经被处理。
-
DispatcherServlet的doService方法
我们查看下核心的, 请求分发处理流程:
@Override protected void doService(HttpServletRequest request, HttpServletResponse response) throws Exception // LOG日志记录请求信息 logRequest(request); // 记录Request级别作用域的请求变量信息, 必须要开启INCLUDE_REQUEST_URI_ATTRIBUTE属性 Map<String, Object> attributesSnapshot = null; if (WebUtils.isIncludeRequest(request)) { attributesSnapshot = new HashMap<>(); Enumeration<?> attrNames = request.getAttributeNames(); while (attrNames.hasMoreElements()) { String attrName = (String) attrNames.nextElement(); if (this.cleanupAfterInclude || attrName.startsWith(DEFAULT_STRATEGIES_PREFIX)) { attributesSnapshot.put(attrName, request.getAttribute(attrName)); } } } // 设置context上下文信息 request.setAttribute(WEB_APPLICATION_CONTEXT_ATTRIBUTE, getWebApplicationContext()); // 设置locale区域信息 request.setAttribute(LOCALE_RESOLVER_ATTRIBUTE, this.localeResolver); // 设置theme解析器 request.setAttribute(THEME_RESOLVER_ATTRIBUTE, this.themeResolver); // 设置theme源信息 request.setAttribute(THEME_SOURCE_ATTRIBUTE, getThemeSource()); // 设置flashmap信息, FlashMap 是传递重定向参数的时候要用到的一个类 if (this.flashMapManager != null) { FlashMap inputFlashMap = this.flashMapManager.retrieveAndUpdate(request, response); if (inputFlashMap != null) { request.setAttribute(INPUT_FLASH_MAP_ATTRIBUTE, Collections.unmodifiableMap(inputFlashMap)); } request.setAttribute(OUTPUT_FLASH_MAP_ATTRIBUTE, new FlashMap()); request.setAttribute(FLASH_MAP_MANAGER_ATTRIBUTE, this.flashMapManager); } try { // 分发请求, 对请求做真正的逻辑处理 doDispatch(request, response); } finally { // 判断是否异步处理请求 if (!WebAsyncUtils.getAsyncManager(request).isConcurrentHandlingStarted()) { // 上面初始化设置attributesSnapshot, 这里如果有记录, 做还原处理 if (attributesSnapshot != null) { restoreAttributesAfterInclude(request, attributesSnapshot); } } } } -
DispatcherServlet的doDispatch方法
doDispatch方法负责请求分发处理, 内部会找到我们定义的处理器, 负责处理具体的请求逻辑。
protected void doDispatch(HttpServletRequest request, HttpServletResponse response) throws Exception {
        // 定义初始变量
		HttpServletRequest processedRequest = request;
		HandlerExecutionChain mappedHandler = null;
		boolean multipartRequestParsed = false;
		// 获取Web异步请求管理器
		WebAsyncManager asyncManager = WebAsyncUtils.getAsyncManager(request);

		try {
			ModelAndView mv = null;
			Exception dispatchException = null;

			try {
                // 检查请求是否为form-multipart提交类型,我们常见的文件上传就是采用此类型
				processedRequest = checkMultipart(request);
                // 如果是multipart该类型, 通过MultipartResolver解析
				multipartRequestParsed = (processedRequest != request);

				// 获取当前请求的映射处理器, 也就是自定义的controller, 如果没有找到, 则返回, 不做下面逻辑处理
				mappedHandler = getHandler(processedRequest);
				if (mappedHandler == null) {
					noHandlerFound(processedRequest, response);
					return;
				}

				// 根据映射处理器, 获取处理适配器(实际为RequestMappingHandlerAdapter)
				HandlerAdapter ha = getHandlerAdapter(mappedHandler.getHandler());

				// 获取请求类型,包含GET,HEAD,POST,PUT,PATCH,DELETE,OPTIONS等
				String method = request.getMethod();
                // 判断是否为GET类型
				boolean isGet = "GET".equals(method);
				if (isGet || "HEAD".equals(method)) {
                    // 获取上次请求修改标记, 如果没有修改, 默认返回-1
					long lastModified = ha.getLastModified(request, mappedHandler.getHandler());
					if (new ServletWebRequest(request, response).checkNotModified(lastModified) && isGet) {
						return;
					}
				}
				// 在进入处理器之前, 先要判断有没设置拦截器, 如果有, 进入拦截器的前置处理逻辑, 默认有ResourceUrlProviderExposingInterceptor等拦截器
				if (!mappedHandler.applyPreHandle(processedRequest, response)) {
					return;
				}

				// 这里就是真正调用处理器, 也就是我们在controller中定义的方法
				mv = ha.handle(processedRequest, response, mappedHandler.getHandler());

				// 异步处理判断
				if (asyncManager.isConcurrentHandlingStarted()) {
					return;
				}
				// 判断有没采用ModelAndView返回, 并进行对应设置
				applyDefaultViewName(processedRequest, mv);
                // 这里是拦截器的后置处理逻辑, 如果有匹配设置, 则会进行调用处理
				mappedHandler.applyPostHandle(processedRequest, response, mv);
			}
			catch (Exception ex) {
				dispatchException = ex;
			}
			catch (Throwable err) {
				// As of 4.3, we're processing Errors thrown from handler methods as well,
				// making them available for @ExceptionHandler methods and other scenarios.
				dispatchException = new NestedServletException("Handler dispatch failed", err);
			}
            // 设置分发处理结果, 如果处理器的执行出现异常,会根据设置做对应渲染; 如果有设置视图, 则会进行渲染解析
			processDispatchResult(processedRequest, response, mappedHandler, mv, dispatchException);
		}
		catch (Exception ex) {
			triggerAfterCompletion(processedRequest, response, mappedHandler, ex);
		}
		catch (Throwable err) {
			triggerAfterCompletion(processedRequest, response, mappedHandler,
					new NestedServletException("Handler processing failed", err));
		}
		finally {
            // 异步请求标记处理
			if (asyncManager.isConcurrentHandlingStarted()) {
				// Instead of postHandle and afterCompletion
				if (mappedHandler != null) {
					mappedHandler.applyAfterConcurrentHandlingStarted(processedRequest, response);
				}
			}
			else {
				//如果采用multipart类型提交, 会做一些清除工作, 比如上传文件缓存等
				if (multipartRequestParsed) {
					cleanupMultipart(processedRequest);
				}
			}
		}
	}
通过以上分析, 我们可以了解到Servlet模式服务的请求流程, 重点是DispatcherServlet的doDispatch方法,要了解一个请求进入之前所做的事情, 请求处理完成之后所做的事情, 以及对于filter, interceptor执行顺序这些都要清楚, 可以帮助我们更好的运用, 以及排查请求过程中出现的问题。
4. Reactive服务模式请求流程分析
4.1 ReactiveWebServerApplicationContext 分析
ReactiveWebServerApplicationContext为响应式服务容器管理, 是提供Reactive Web环境的Spring 容器。 Spring WebFlux应用就采用ReactiveWebServerApplicationContext实现, ReactiveWebServerApplicationContext与ServletWebServerApplicationContext 的实现类似, 都是由SpringBoot统一封装设计, 总体处理流程基本一致。
-
ReactiveWebServerApplicationContext 构造方法
public class ReactiveWebServerApplicationContext extends GenericReactiveWebApplicationContext implements ConfigurableWebServerApplicationContext { // 服务管理类, 包含服务启动与停止, 以及请求handler处理 private volatile ServerManager serverManager; // 服务命名空间 private String serverNamespace; /** * 默认构造方法 */ public ReactiveWebServerApplicationContext() { } /** * 指定beanFactory的构造方法 */ public ReactiveWebServerApplicationContext(DefaultListableBeanFactory beanFactory) { super(beanFactory); } -
ReactiveWebServerApplicationContext#ServerManager内部类:
/** * 服务管理类 */ static final class ServerManager implements HttpHandler { // WebServer服务 private final WebServer server; // 是否懒加载 private final boolean lazyInit; // Http Handler请求处理器 private volatile HttpHandler handler; // 构造方法, 注入serverFactory与延迟加载标记 private ServerManager(ReactiveWebServerFactory factory, boolean lazyInit) { this.handler = this::handleUninitialized; this.server = factory.getWebServer(this); this.lazyInit = lazyInit; } // 处理未初始化的请求, 暂未实现 private Mono<Void> handleUninitialized(ServerHttpRequest request, ServerHttpResponse response) { throw new IllegalStateException("The HttpHandler has not yet been initialized"); } // 重载方法, 处理Web请求 @Override public Mono<Void> handle(ServerHttpRequest request, ServerHttpResponse response) { return this.handler.handle(request, response); } public HttpHandler getHandler() { return this.handler; } // 获取ServerManager服务管理类 public static ServerManager get(ReactiveWebServerFactory factory, boolean lazyInit) { return new ServerManager(factory, lazyInit); } // 获取WebServer服务 public static WebServer getWebServer(ServerManager manager) { return (manager != null) ? manager.server : null; } // 通过serverManager启动服务 public static void start(ServerManager manager, Supplier<HttpHandler> handlerSupplier) { if (manager != null && manager.server != null) { manager.handler = manager.lazyInit ? new LazyHttpHandler(Mono.fromSupplier(handlerSupplier)) : handlerSupplier.get(); manager.server.start(); } } // 通过serverManager停止服务 public static void stop(ServerManager manager) { if (manager != null && manager.server != null) { try { manager.server.stop(); } catch (Exception ex) { throw new IllegalStateException(ex); } } } } -
ReactiveWebServerApplicationContext#startReactiveWebServer方法:
	private WebServer startReactiveWebServer() {
		ServerManager serverManager = this.serverManager;
        // 启动WebServer, 从BeanFactory中获取HttpHandler
		ServerManager.start(serverManager, this::getHttpHandler);
        // 获取返回WebServer
		return ServerManager.getWebServer(serverManager);
	}
查看getHttpHandler方法:
protected HttpHandler getHttpHandler() { // 获取所有实现HttpHandler接口的实现类 String[] beanNames = getBeanFactory().getBeanNamesForType(HttpHandler.class); // HttpHandler实现类只能存在一个, 没有配置或多个都会抛出异常 if (beanNames.length == 0) { // throw new ApplicationContextException( "Unable to start ReactiveWebApplicationContext due to missing HttpHandler bean."); } // 存在多个, 抛出异常 if (beanNames.length > 1) { throw new ApplicationContextException( "Unable to start ReactiveWebApplicationContext due to multiple HttpHandler beans : " + StringUtils.arrayToCommaDelimitedString(beanNames)); } // 返回HttpHandler return getBeanFactory().getBean(beanNames[0], HttpHandler.class); } -
ReactiveWebServerApplicationContext#onClose方法:
@Override
protected void onClose() {
    // 先调用父类方法, 关闭逻辑处理, 目前是空实现
    super.onClose();
    // 通过ServerManager停止服务
    stopAndReleaseReactiveWebServer();
}
4.2 webflux服务模式之请求流程具体分析
上面讲解了ReactiveWebServerApplicationContext的代码实现流程, 我们看下webflux服务的请求处理流程。
-
定义HttpHandler
// 定义Reactive服务的HttpHandler,
@Bean
public HttpHandler httpHandler() {
   return WebHttpHandlerBuilder.applicationContext(this.applicationContext)
         .build();
}
webflux使用的httpHandler类型是HttpWebHandlerAdapter, 创建的webserver为NettyWebServer类型
@Override
public WebServer getWebServer(HttpHandler httpHandler) {
   // 创建HTTP SERVER服务
   HttpServer httpServer = createHttpServer();
   // 定义HTTP HANDLER处理适配器
   ReactorHttpHandlerAdapter handlerAdapter = new ReactorHttpHandlerAdapter(
         httpHandler);
   // 采用Netty作为WebServer实现
   return new NettyWebServer(httpServer, handlerAdapter, this.lifecycleTimeout);
}
创建ReactorHttpHandlerAdapter使用的httpHandler就是我们上面定义的WebHttpHandlerBuilder。
当一个请求进来的时候,就是通过ReactorHttpHandlerAdapter的apply()方法然后进入了了HttpWebHandlerAdapter类的handle方法, 再执行DispatcherHandler的handle方法:
public Mono<Void> handle(ServerWebExchange exchange) {
        // 校验handlerMappings是否存在
		if (this.handlerMappings == null) {
			return createNotFoundError();
		}
    	// 响应式操作, 调用Handler实现类处理逻辑, handleResult处理执行结果
		return Flux.fromIterable(this.handlerMappings)
				.concatMap(mapping -> mapping.getHandler(exchange))
				.next()
				.switchIfEmpty(createNotFoundError())
				.flatMap(handler -> invokeHandler(exchange, handler))
				.flatMap(result -> handleResult(exchange, result));
	}
通过RequestMappingHandlerMapping找到对应的HandlerMethod(就是我们Controller中对应的方法),然后执行invokeHandler方法:
	private Mono<HandlerResult> invokeHandler(ServerWebExchange exchange, Object handler) {
        // 校验Handler适配器是否存在
		if (this.handlerAdapters != null) {
            // 遍历handlerAdapters
			for (HandlerAdapter handlerAdapter : this.handlerAdapters) {
                // 判断是否支持的适配器类型
				if (handlerAdapter.supports(handler)) {
                    // 处理Handler适配器具体逻辑
					return handlerAdapter.handle(exchange, handler);
				}
			}
		}
		return Mono.error(new IllegalStateException("No HandlerAdapter: " + handler));
	}
HandlerAdapter是RequestMappingHandlerAdapter,在RequestMappingHandlerAdapter方法中执行了InvocableHandlerMethod的invode方法,然后通过反射执行了Controller中的方法, 最后把Controller方法执行的结果,通过DispatcherHandler中的handlerResult方法,输出返回给调用客户端。
5. 总结
学习研究Spring Boot的请求流程, 理解其内置容器, Spring MVC和自定义controller之间是如何流转处理的, 各自所做的事情, 每个环节的作用, 相互之间的调用关系, 才算是理解和掌握Spring Boot的使用, 在实际工作当中, 可能更多的是停留在使用层面, 但是如果能够对实现原理有进一步认知, 我们才知道更合理的去使用, 以及更高效的去排查使用过程当中出现的各种问题。


