使用 OpenCV 和 Tesseract 对图像中的感兴趣区域 (ROI) 进行 OCR
点击上方“小白学视觉”,选择加"星标"或“置顶”
重磅干货,第一时间送达
在这篇文章中,我们将使用 OpenCV 在图像的选定区域上应用 OCR。在本篇文章结束时,我们将能够对输入图像应用自动方向校正、选择感兴趣的区域并将OCR 应用到所选区域。
这篇文章基于 Python 3.x,假设我们已经安装了 Pytesseract 和 OpenCV。Pytesseract 是一个 Python 包装库,它使用 Tesseract 引擎进行 OCR。因此,如果我们没有安装 tesseract 引擎,请从https://github.com/UB-Mannheim/tesseract/wiki下载并安装它,并正确设置 TESSDATA_PREFIX 环境变量和路径变量。
深入到代码中,让我们从导入所需的库开始:
# Importing necessary libraries
import numpy as np
import cv2
import math
from scipy import ndimage
import pytesseract
现在,使用 opencv 的 imread() 方法将图像文件读入 python。
IMAGE_FILE_LOCATION = "test_image.jpg" # Photo by Amanda Jones on Unsplash
input_img = cv2.imread(IMAGE_FILE_LOCATION) # image read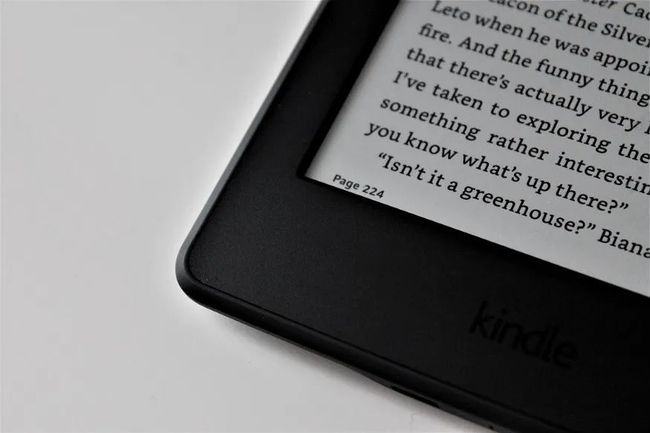
在直接提取感兴趣区域之前,让我们先检查它的方向,因为很多时候我们一定已经注意到文档或图像的方向不正确,这会导致 OCR 较差,所以现在我们将调整输入图像的方向以确保更好的 OCR 结果。
在这里,我们应用两种算法来检测输入图像的方向:Canny 算法(检测图像中的边缘)和 HoughLines(检测线)。
然后我们测量线的角度,并取出角度的中值来估计方向的角度。然后以这个中间角度旋转图像,将其转换为完美的方向,以便进一步步骤。
不用担心,OpenCV 只需几行代码即可为我们完成这项工作!
#####################################################################################################
# ORIENTATION CORRECTION/ADJUSTMENT


def orientation_correction(img, save_image = False):
    # GrayScale Conversion for the Canny Algorithm
img_gray = cv2.cvtColor(img, cv2.COLOR_BGR2GRAY)
    # Canny Algorithm for edge detection was developed by John F. Canny not Kennedy!! :)
img_edges = cv2.Canny(img_gray, 100, 100, apertureSize=3)
    # Using Houghlines to detect lines
lines = cv2.HoughLinesP(img_edges, 1, math.pi / 180.0, 100, minLineLength=100, maxLineGap=5)


    # Finding angle of lines in polar coordinates
angles = []
for x1, y1, x2, y2 in lines[0]:
angle = math.degrees(math.atan2(y2 - y1, x2 - x1))
angles.append(angle)


    # Getting the median angle
median_angle = np.median(angles)


    # Rotating the image with this median angle
img_rotated = ndimage.rotate(img, median_angle)


if save_image:
cv2.imwrite('orientation_corrected.jpg', img_rotated)
return img_rotated
#####################################################################################################


img_rotated = orientation_correction(input_img)
调整方向的图像
下一步是从图像中提取感兴趣的区域。
因此,首先我们为鼠标设置一个事件侦听器,使用户能够选择感兴趣的区域。在这里,我们设置了两个条件,一个是鼠标左键按下,第二个是鼠标左键向上。
我们存储按下鼠标左键时的起始坐标和释放鼠标左键时的结束坐标,然后在按下“enter”键时,我们提取这些起始坐标和结束坐标之间的区域,如果按下“c”,则清除坐标。
#####################################################################################################
# REGION OF INTEREST (ROI) SELECTION


# initializing the list for storing the coordinates
coordinates = []


# Defining the event listener (callback function)
def shape_selection(event, x, y, flags, param):
# making coordinates global
global coordinates


# Storing the (x1,y1) coordinates when left mouse button is pressed
if event == cv2.EVENT_LBUTTONDOWN:
        coordinates = [(x, y)]


# Storing the (x2,y2) coordinates when the left mouse button is released and make a rectangle on the selected region
elif event == cv2.EVENT_LBUTTONUP:
        coordinates.append((x, y))


# Drawing a rectangle around the region of interest (roi)
        cv2.rectangle(image, coordinates[0], coordinates[1], (0,0,255), 2)
        cv2.imshow("image", image)


# load the image, clone it, and setup the mouse callback function
image = img_rotated
image_copy = image.copy()
cv2.namedWindow("image")
cv2.setMouseCallback("image", shape_selection)


# keep looping until the 'q' key is pressed
while True:
# display the image and wait for a keypress
    cv2.imshow("image", image)
    key = cv2.waitKey(1) & 0xFF


if key==13: # If 'enter' is pressed, apply OCR
break


if key == ord("c"): # Clear the selection when 'c' is pressed
        image = image_copy.copy()


if len(coordinates) == 2:
    image_roi = image_copy[coordinates[0][1]:coordinates[1][1],
                               coordinates[0][0]:coordinates[1][0]]
    cv2.imshow("Selected Region of Interest - Press any key to proceed", image_roi)
    cv2.waitKey(0)


# closing all open windows
cv2.destroyAllWindows()


#####################################################################################################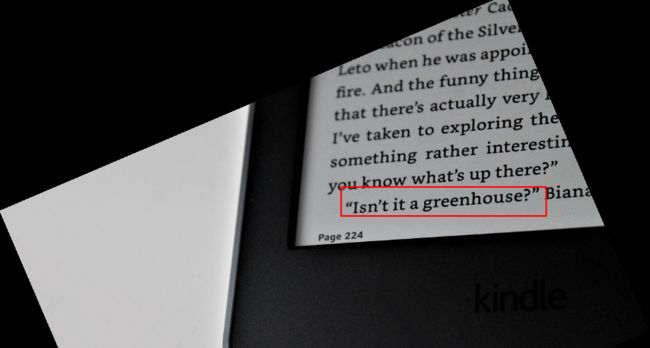
感兴趣区域的边界框
现在,使用 pytesseract 在 ROI 上应用光学字符识别 (OCR)。(也可以使用Google Vision或Azure Vision代替 Tesseract 引擎)。
##################################################################### OPTICAL CHARACTER RECOGNITION (OCR) ON ROI
text = pytesseract.image_to_string(image_roi)
print("The text in the selected region is as follows:")
print(text)
输出是:
"Isn't it a greenhouse?”计算机视觉和光学字符识别可以解决法律领域(将旧的法院判决数字化)、金融领域(从贷款协议、土地登记中提取重要信息)等领域的许多问题。
Github代码链接:
https://github.com/ChayanBansal/roi_selection_and_ocr_with_orientation_correction
下载1:OpenCV-Contrib扩展模块中文版教程
在「小白学视觉」公众号后台回复:扩展模块中文教程,即可下载全网第一份OpenCV扩展模块教程中文版,涵盖扩展模块安装、SFM算法、立体视觉、目标跟踪、生物视觉、超分辨率处理等二十多章内容。
下载2:Python视觉实战项目52讲
在「小白学视觉」公众号后台回复:Python视觉实战项目,即可下载包括图像分割、口罩检测、车道线检测、车辆计数、添加眼线、车牌识别、字符识别、情绪检测、文本内容提取、面部识别等31个视觉实战项目,助力快速学校计算机视觉。
下载3:OpenCV实战项目20讲
在「小白学视觉」公众号后台回复:OpenCV实战项目20讲,即可下载含有20个基于OpenCV实现20个实战项目,实现OpenCV学习进阶。
交流群
欢迎加入公众号读者群一起和同行交流,目前有SLAM、三维视觉、传感器、自动驾驶、计算摄影、检测、分割、识别、医学影像、GAN、算法竞赛等微信群(以后会逐渐细分),请扫描下面微信号加群,备注:”昵称+学校/公司+研究方向“,例如:”张三 + 上海交大 + 视觉SLAM“。请按照格式备注,否则不予通过。添加成功后会根据研究方向邀请进入相关微信群。请勿在群内发送广告,否则会请出群,谢谢理解~