学习记录——Pytorch模型移植Android小例子
提示:
注意文章时效性,2022.04.02。
目录
- 前言
- 零、使用的环境
- 一、模型准备
-
- 1.导出模型
- 2.错误记录
-
- 2.1要载入完整模型(网络结构+权重参数)
- 2.2导出的模型文件格式
- 二、Android部署
-
- 1.新建项目
- 2.填写项目信息
- 3.导包(添加依赖库)
- 4.页面布局
- 5.添加结果类别
- 6.添加模型文件和图片
- 7.调用模型
- 8.运行结果
- 三、总结
前言
最近在搞图像分类模型移植到Android上,本来是准备用Tensorflow来搞的,但是百度到的一些博文案例都有些老,17、18年的,然后找Tensorflow官方实现的例子,发现最开始的例子已经弃用了,换了个地方。但是这新例子里的README也没讲怎么处理模型,Tensorflow官网时常出现Service Unavailable,再加上我用Tensorflow实现的模型跑出的结果很奇怪。Pytorch倒是能找到比较新一点的例子:
- 将Pytorch模型部署到Android端_YDDUONG的博客-CSDN博客_pytorch安卓部署
- 如何将pytorch模型部署到安卓_AI浩的博客-CSDN博客_pytorch模型部署安卓
- Pytorch-Mobile-Android(3) 部署自己模型_Triton安的博客-CSDN博客_pytorch手机部署
果断放弃Tensorflow,改用Pytorch,参考官方的给例子操作,模型还是能够跑出来的。
这里就简单记录下实现过程和遇到的一些错误。
废话结束,正文开始。
零、使用的环境
| 使用的环境 | 版本 |
|---|---|
| 训练模型: | ↓ |
| Python | 3.7.3 |
| Pytorch | 1.11.0 |
| 导出模型: | ↓ |
| Python | 3.9 |
| Pytorch | 1.9.0 |
| Android部署: | ↓ |
| Android Studio | 4.1.1 |
| pytorch_android_lite | 1.9.0 |
| pytorch_android_torchvision | 1.9.0 |
如果有类似这样的报错:
No toolchains found in the NDK toolchains folder for ABI with prefix: arm-linux-androideabi
可能是NDK的问题,没安装NDK或者安装了ND但K缺少对应的库,可以参考这篇博文安装(完美解决 No toolchains found in the NDK toolchains folder for ABI with prefix: mips64el-linux-android_CodeForCoffee的博客-CSDN博客 )。不过,里面下载NDK的网址进不去了,可以到这里下载(AndroidDevTools - Android开发工具 Android SDK下载 Android Studio下载 Gradle下载 SDK Tools下载 )
一、模型准备
1.导出模型
按照参考的博文和官方教程讲的,都是要导出自己的模型的。博文里的方法也试了,不过最后我自己成功跑出来的,是在官方的例子上改的,如下:
import torch
from torch.utils.mobile_optimizer import optimize_for_mobile
from model_v3 import mobilenet_v3_large  # 导入自己的模型

model_pth = './MobileNetV3-20220330-01.pth'  # 训练得到的模型参数文件的路径
mobile_ptl = './mobilenetV3large.ptl'  # 模型保存为Android可以调用的文件的路径
model = mobilenet_v3_large(num_classes=7)  # 实例化模型
pre_weights = torch.load(model_pth, map_location='cpu')  # 读取参数
model.load_state_dict(pre_weights, strict=True)  # 将参数载入到模型
device = torch.device('cpu')  # 将torch.Tensor分配到的设备的对象,有cpu和cuda两种
model.to(device)  # 将模型加载到指定设备上
model.eval()  # 将模型设为验证模式
example = torch.rand(1, 3, 224, 224)  # 输入样例的格式为一张224*224的3通道图像
# 上面是准备模型,下面就是转换了
traced_script_module = torch.jit.trace(model, example)
traced_script_module_optimized = optimize_for_mobile(traced_script_module)
traced_script_module_optimized._save_for_lite_interpreter(mobile_ptl)
Pytorch官方的例子用的模型是预训练好的MobileNetV2,导入torchvision,然后调用。
……
import torchvision
……
model = torchvision.models.mobilenet_v2(pretrained=True)
……
2.错误记录
2.1要载入完整模型(网络结构+权重参数)
如果只载入参数,会报错;
AttributeError: 'collections.OrderedDict' object has no attribute 'eval' ……
只载入模型网络训练模型,等于没训练,模型没参数。
所以保存模型文件的时候,一般有两种不同的方式:
- 只保存模型的参数(官方推荐这个),如果训练的时候只保存了权重参数,载入的时候要把模型权重参数放模型里去。
# Save:
torch.save(model.state_dict(), PATH)
# Load:
model = TheModelClass(*args, **kwargs)
model.load_state_dict(torch.load(PATH))
model.eval()
- 保存整个模型(网络结构+参数)
# Save:
torch.save(model, PATH)
# Load:
# Model class must be defined somewhere
model = torch.load(PATH)
model.eval()
更具体的说明可以看官方的文档(SAVING AND LOADING MODELS)
2.2导出的模型文件格式
虽然那些参考博文都说是要导出为.pt文件,但是我在运行载入完整的模型导出的.pt文件运行会报错:
java.lang.RuntimeException: Unable to start activity ComponentInfo{org.pytorch.helloworld/org.pytorch.helloworld.MainActivity}: com.facebook.jni.CppException: PytorchStreamReader failed locating file bytecode.pkl: file not found ()
    Exception raised from valid at ../caffe2/serialize/inline_container.cc:157 (most recent call first):
    (no backtrace available)
照官方例子写的,导出成.ptl文件就能成功运行。
二、Android部署
这部分参考这篇博文(如何将pytorch模型部署到安卓,实现的和官方的例子差不多)的安卓部署部分,虽然最开始参考这篇博文写,没跑成功。
下面就参考大佬的步骤再走一遍。
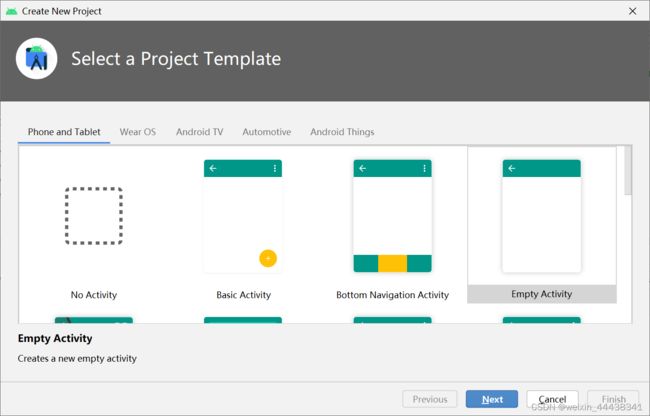
1.新建项目
2.填写项目信息
取个名字,就叫myModel了,其他保持默认,点击Finish。

3.导包(添加依赖库)
导入pytorch_android_lite的包(与pytorch_android不同区分,载入模型的方法不同)。
//Pytorch
implementation 'org.pytorch:pytorch_android_lite:1.9.0'
implementation 'org.pytorch:pytorch_android_torchvision:1.9.0'
plugins {
    id 'com.android.application'
}

android {
    compileSdkVersion 30
    buildToolsVersion "30.0.3"

    defaultConfig {
        applicationId "com.test.mymodel"
        minSdkVersion 23
        targetSdkVersion 30
        versionCode 1
        versionName "1.0"

        testInstrumentationRunner "androidx.test.runner.AndroidJUnitRunner"
    }

    buildTypes {
        release {
            minifyEnabled false
            proguardFiles getDefaultProguardFile('proguard-android-optimize.txt'), 'proguard-rules.pro'
        }
    }
    compileOptions {
        sourceCompatibility JavaVersion.VERSION_1_8
        targetCompatibility JavaVersion.VERSION_1_8
    }
}

dependencies {

    implementation 'androidx.appcompat:appcompat:1.2.0'
    implementation 'com.google.android.material:material:1.2.1'
    implementation 'androidx.constraintlayout:constraintlayout:2.0.4'
    testImplementation 'junit:junit:4.+'
    androidTestImplementation 'androidx.test.ext:junit:1.1.2'
    androidTestImplementation 'androidx.test.espresso:espresso-core:3.3.0'
    //Pytorch
    implementation 'org.pytorch:pytorch_android_lite:1.9.0'
    implementation 'org.pytorch:pytorch_android_torchvision:1.9.0'
}
注意:如果导出模型使用的Pytorch版本与Android项目使用的pytorch_andorid_lite包的版本不一样会报错。
java.lang.RuntimeException: Unable to start activity ComponentInfo{org.pytorch.helloworld/org.pytorch.helloworld.MainActivity}: com.facebook.jni.CppException: Lite Interpreter verson number does not match. The model version must be between 3 and 5But the model version is 7 ()
    Exception raised from parseMethods at ../torch/csrc/jit/mobile/import.cpp:320 (most recent call first):
    (no backtrace available)
我训练模型用的Pytorch版本是1.11.0,用这个版本导出的来跑会有上面这个错误,换成Android上相同版本的1.9.0就能跑了。
4.页面布局
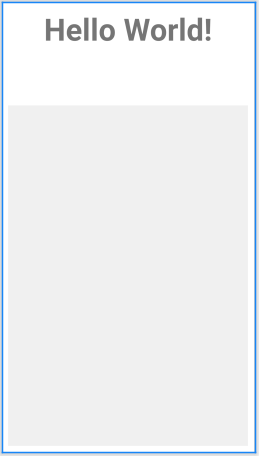
放了一个TextView用来显示文字结果,一个ImageView用来展示图片。

完整activity_main.xml文件如下:
<?xml version="1.0" encoding="utf-8"?>
<LinearLayout xmlns:android="http://schemas.android.com/apk/res/android"
    xmlns:tools="http://schemas.android.com/tools"
    android:layout_width="match_parent"
    android:layout_height="match_parent"
    android:orientation="vertical"
    tools:context=".MainActivity">

    <TextView
        android:id="@+id/tv"
        android:layout_weight="1"
        android:layout_width="match_parent"
        android:layout_height="0dp"
        android:layout_margin="10dp"
        android:layout_gravity="center"
        android:text="Hello World!"
        android:textSize="50sp"
        android:textAlignment="center"
        android:textStyle="bold"/>

    <ImageView
        android:id="@+id/iv"
        android:layout_weight="4"
        android:layout_width="match_parent"
        android:layout_height="0dp"
        android:layout_margin="10dp"
        android:background="#f0f0f0"
        android:layout_gravity="center"
        android:contentDescription="@string/iv_text" />

</LinearLayout>
5.添加结果类别
新建EmotionClasses.java类文件,我这里是表情分类,有七个类别,按训练的标签顺序放里面。(顺序不对的话,结果也会错位)

package com.test.mymodel;

public class EmotionClasses {
    public static String[] EMOTION_CLASSES = new String[]{
            "anger",
            "disgust",
            "fear",
            "happy",
            "normal",
            "sad",
            "surprised"
    };
}
6.添加模型文件和图片
在main文件夹下新建assets文件夹,并将模型的.ptl文件和要识别图片放入其中。(图片需要是前面导出模型时设置的example的大小,我这里是224*224的彩色图片)

7.调用模型
在MainActivity.java载入模型,对图片进行识别。
package com.test.mymodel;

import android.content.Context;
import android.graphics.Bitmap;
import android.graphics.BitmapFactory;
import android.os.Bundle;
import android.util.Log;
import android.widget.ImageView;
import android.widget.TextView;

import androidx.appcompat.app.AppCompatActivity;

import org.pytorch.IValue;
import org.pytorch.LiteModuleLoader;
import org.pytorch.MemoryFormat;
import org.pytorch.Module;
import org.pytorch.Tensor;
import org.pytorch.torchvision.TensorImageUtils;

import java.io.File;
import java.io.FileOutputStream;
import java.io.IOException;
import java.io.InputStream;
import java.io.OutputStream;

public class MainActivity extends AppCompatActivity {

    @Override
    protected void onCreate(Bundle savedInstanceState) {
        super.onCreate(savedInstanceState);
        setContentView(R.layout.activity_main);

        Bitmap bitmap = null;
        Module module = null;
        try {
            // creating bitmap from packaged into app android asset 'image.jpg',
            // app/src/main/assets/image.jpg
            bitmap = BitmapFactory.decodeStream(getAssets().open("happy01.jpg"));
            // loading serialized torchscript module from packaged into app android asset model.pt,
            // app/src/model/assets/model.pt
            module = LiteModuleLoader.load(assetFilePath(this, "mobilenetV3large.ptl"));
        } catch (IOException e) {
            Log.e("PytorchHelloWorld", "Error reading assets", e);
            finish();
        }

        // showing image on UI
        ImageView imageView = findViewById(R.id.iv);
        imageView.setImageBitmap(bitmap);

        // preparing input tensor
        final Tensor inputTensor = TensorImageUtils.bitmapToFloat32Tensor(bitmap,
                TensorImageUtils.TORCHVISION_NORM_MEAN_RGB, TensorImageUtils.TORCHVISION_NORM_STD_RGB, MemoryFormat.CHANNELS_LAST);

        // running the model
        final Tensor outputTensor = module.forward(IValue.from(inputTensor)).toTensor();

        // getting tensor content as java array of floats
        final float[] scores = outputTensor.getDataAsFloatArray();

        // searching for the index with maximum score
        float maxScore = -Float.MAX_VALUE;
        int maxScoreIdx = -1;
        for (int i = 0; i < scores.length; i++) {
            if (scores[i] > maxScore) {
                maxScore = scores[i];
                maxScoreIdx = i;
            }
        }

        String className = EmotionClasses.EMOTION_CLASSES[maxScoreIdx];

        // showing className on UI
        TextView textView = findViewById(R.id.tv);
        textView.setText(className);
    }

    /**
     * Copies specified asset to the file in /files app directory and returns this file absolute path.
     *
     * @return absolute file path
     */
    public static String assetFilePath(Context context, String assetName) throws IOException {
        File file = new File(context.getFilesDir(), assetName);
        if (file.exists() && file.length() > 0) {
            return file.getAbsolutePath();
        }

        try (InputStream is = context.getAssets().open(assetName)) {
            try (OutputStream os = new FileOutputStream(file)) {
                byte[] buffer = new byte[4 * 1024];
                int read;
                while ((read = is.read(buffer)) != -1) {
                    os.write(buffer, 0, read);
                }
                os.flush();
            }
            return file.getAbsolutePath();
        }
    }
}
注意:如果使用的是pytorch_android_lite依赖库,却使用Module.load()方法载入模型,会报错,提示找不到libpytorch_jni.so这个库,就需要使用LiteModuleLoader.load()方法来载入模型。官方的issue有人提过couldn’t find “libpytorch_jni.so”。
java.lang.UnsatisfiedLinkError: dlopen failed: library "libpytorch_jni.so" not found
8.运行结果
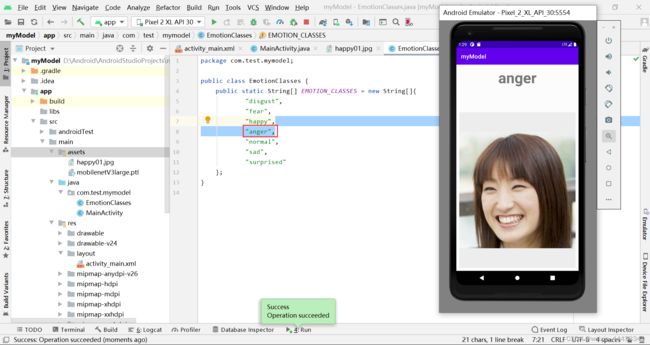
运行结果如下:

如果类别顺序错位,识别结果也会错位,如下图所示,将anger调到第四位,识别结果就成了anger。

三、总结
- 其实,如果只是想搞个简单的图像分类的话,把官方android-demo-app的HelloWorldApp里的模型以及分类的类别换一下,基本就能跑。
- 这些框架更新太快,导致一些文章的时效性有限,版本一换,甚至改了某个方法,就会跳出各种错误。解决办法就是各种搜索了。
- 其他的博客可以作为参考,主要的流程还是得看官方的教程,碰到问题可以去项目的
issue里找找看有没有和自己类似的问题,也许能从中得到启发。 - 最后跑出来的小demo,扔Gitee上了,在这里。
总结了个寂寞
如果有用,就点个赞。
发现有错,欢迎指正。
友善评论,平和交流。

