基本图形绘制
- 点和线:line
- 矩形:rectangle
- 圆:circle
- 椭圆:ellipse
- 填充:线宽值小于 0 就是填充
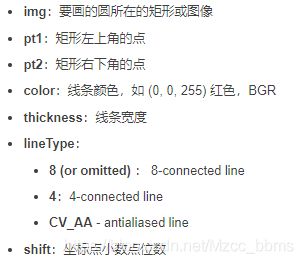
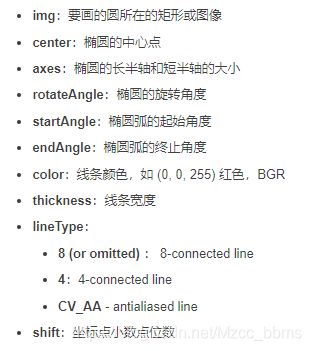
- PS: 基本图形绘制API中都有线条的颜色、线宽、线型和 shift :color: 线段的颜色,通过一个Scalar对象定义;thickness: 线条的宽度,默认是1;lineType: 线段的类型,可以取值8, 4, 和CV_AA, 分别代表8邻接连接线,4邻接连接线和反锯齿连接线。默认值为8邻接,为了获得更好地效果可以选用CV_AA(采用了高斯滤波);shift: 坐标点小数点位数,默认是0。
- C++ API
Mat canvas = Mat::zeros(Size(512,512), CV_8UC3);
namedWindow("canvas", WINDOW_AUTOSIZE);
line(canvas, Point(10,10), Point(400,400), Scalar(0,0,255), 1, LINE_8);
Rect rect(100,100,200,200);
rectangle(canvas, rect, Scalar(0, 255, 0), 1, LINE_8);
circle(canvas, Point(256, 256), 100, Scalar(255,0,0), 1, LINE_8);
RotatedRect rrt;
rrt.center = Point2f(256, 256);
rrt.angle = 45.0;
rrt.size = Size(100, 200);
ellipse(canvas, rrt, Scalar(0,255,0), 1, LINE_8 );
imshow("canvas", canvas);

cv2.line(img, pt1, pt2, color[, thickness[, lineType[, shift]]])

cv2.rectangle(img, pt1, pt2, color[, thickness[, lineType[, shift]]])

cv2.circle(img, center, radius, color[, thickness[, lineType[, shift]]])

cv2.ellipse(img, center, axes, rotateAngle, startAngle, endAngle, color[, thickness[, lineType[, shift]]])

cv2.putText(img, text, org, fontFace, fontScale, color[, thickness[, lineType[, bottomLeftOrigin]]])

import numpy as np
import cv2 as cv
img = np.zeros((320, 320, 3), np.uint8)
print(img.shape)
ptStart = (60, 60)
ptEnd = (260, 260)
point_color = (0, 255, 0)
thickness = 1
lineType = 4
cv.line(img, ptStart, ptEnd, point_color, thickness, lineType)
ptLeftTop = (60, 60)
ptRightBottom = (260, 260)
point_color = (255, 0, 0)
thickness = 1
lineType = 4
cv.rectangle(img, ptLeftTop, ptRightBottom, point_color, thickness, lineType)
cv.circle(img, (160, 160), 60, point_color, 0)
ptCenter = (160, 160)
axesSize = (100, 45)
rotateAngle = 90
startAngle = 0
endAngle = 360
point_color = (0, 0, 255)
thickness = 1
lineType = 4
cv.ellipse(img, ptCenter, axesSize, rotateAngle, startAngle, endAngle, point_color, thickness, lineType)
ptCenter = (160, 60)
axesSize = (100, 45)
rotateAngle = 0
startAngle = 180
endAngle = 360
point_color = (0, 0, 255)
thickness = 1
lineType = 4
cv.ellipse(img, ptCenter, axesSize, rotateAngle, startAngle, endAngle, point_color, thickness, lineType)
text = 'zcj'
org = (40, 80)
fontFace = cv.FONT_HERSHEY_COMPLEX
fontScale = 1
fontcolor = (0, 255, 0)
thickness = 1
lineType = 4
bottomLeftOrigin = 1
cv.putText(img, text, org, fontFace, fontScale, fontcolor, thickness, lineType)
cv.namedWindow("image")
cv.imshow('image', img)
cv.waitKey(0)
cv.destroyAllWindows()

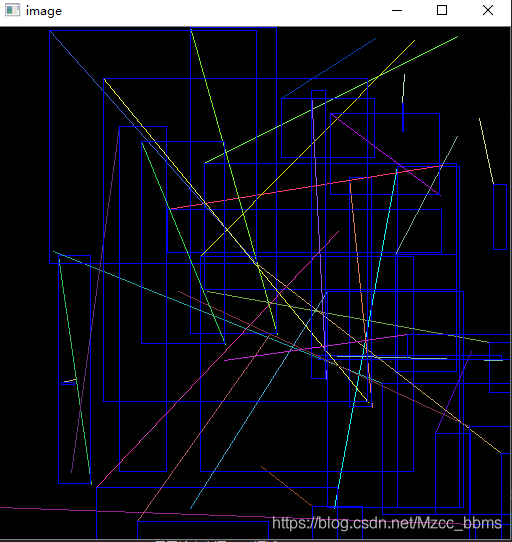
随机图形绘制
- 随机数类RNG生成坐标点和像素值,从而构造奇妙的图形,RNG类的使用
- 代码示例:通过 waitKey 函数控制循环,绘制随机图形(直线和矩形),waitKey函数详解
Mat image = Mat::zeros(Size(512, 512), CV_8UC3);
int x1 = 0, y1 = 0;
int x2 = 0, y2 = 0;
RNG rng(12345);
while (true) {
x1 = (int)rng.uniform(0, 512);
x2 = (int)rng.uniform(0, 512);
y1 = (int)rng.uniform(0, 512);
y2 = (int)rng.uniform(0, 512);
line(image, Point(x1, y1), Point(x2, y2), Scalar(rng.uniform(10,256), rng.uniform(10, 256), rng.uniform(10, 256)), 1, LINE_8);
int w = abs(x2 - x1);
int h = abs(y2 - y1);
Rect rect2;
rect2.x = x1;
rect2.y = y1;
rect2.width = w;
rect2.height = h;
rectangle(image, rect2, Scalar(255,0,0), 1, LINE_8);
imshow("image", image);
if ( (char)waitKey(1000) == 'q') {
break;
}
}

添加文字
putText(canvas, "hello opencv", Point(100, 50), FONT_HERSHEY_COMPLEX, 1.0, Scalar(0, 255, 0), 2, LINE_8);


