TensorRT实战(二) 如何使用TRT python API搭建简单的VGG16网络
2020-01-01 初版
2020-01-10 修改vgg结构至torchvision.models.vgg, 更新代码
一、读入权重并搭建网络
参考TRT提供的官方文档python_samples,注意这个TRT版本是6.0的,目前TRT已经更新到了7.0,不过看Release Note可以发现,TRT6.0与TRT7.0在API上没有变动,因此也不必有所顾忌。另外,由于这个Python Sample必须要将TRT整个给下载下来,才能看到其中的PyThon API的文档,因此这里我给的是自己的仓库链接。github上官方有提供CPP API文档,可见Building a Simple MNIST Network Layer by Layer,不过本文是使用PyThon API搭建,所以就不再谈及CPP API的事。
1.1 分析源码
python_samples/network_api_pytorch_mnist中有README.md、model.py、sample.py与requirement.txt,明显的,我们需要具体分析model.py与sample.py这两个文件,model.py是使用PyTorch搭建的MNIST网络,sample.py则是使用TRT API搭建,前者皆包含训练、测试过程,后者仅有测试,因此后者没有经过F.log_softmax操作。下面是我摘抄出来的部分核心代码,熟悉的人一眼便可明白:
model.py
# Network
class Net(nn.Module):
    def __init__(self):
        super(Net, self).__init__()
        self.conv1 = nn.Conv2d(1, 20, kernel_size=5)
        self.conv2 = nn.Conv2d(20, 50, kernel_size=5)
        self.conv2_drop = nn.Dropout2d()
        self.fc1 = nn.Linear(800, 500)
        self.fc2 = nn.Linear(500, 10)

    def forward(self, x):
        x = F.max_pool2d(self.conv1(x), kernel_size=2, stride=2)
        x = F.max_pool2d(self.conv2(x), kernel_size=2, stride=2)
        x = x.view(-1, 800)
        x = F.relu(self.fc1(x))
        x = self.fc2(x)
        return F.log_softmax(x, dim=1)
sample.py
def populate_network(network, weights):
    # Configure the network layers based on the weights provided.
    # 标记网络输入
    input_tensor = network.add_input(name=ModelData.INPUT_NAME, dtype=ModelData.DTYPE, shape=ModelData.INPUT_SHAPE)

    # 对应PyTorch之self.conv1
    conv1_w = weights['conv1.weight'].numpy()
    conv1_b = weights['conv1.bias'].numpy()
    conv1 = network.add_convolution(input=input_tensor, num_output_maps=20, kernel_shape=(5, 5), kernel=conv1_w, bias=conv1_b)
    conv1.stride = (1, 1)

    # 对应PyTorch之F.max_pool2d
    pool1 = network.add_pooling(input=conv1.get_output(0), type=trt.PoolingType.MAX, window_size=(2, 2))
    pool1.stride = (2, 2)

    # 对应PyTorch之self.conv2
    conv2_w = weights['conv2.weight'].numpy()
    conv2_b = weights['conv2.bias'].numpy()
    conv2 = network.add_convolution(pool1.get_output(0), 50, (5, 5), conv2_w, conv2_b)
    conv2.stride = (1, 1)

    # 对应PyTorch之F.max_pool2d
    pool2 = network.add_pooling(conv2.get_output(0), trt.PoolingType.MAX, (2, 2))
    pool2.stride = (2, 2)

    # 对应PyTorch之self.fc1
    fc1_w = weights['fc1.weight'].numpy()
    fc1_b = weights['fc1.bias'].numpy()
    fc1 = network.add_fully_connected(input=pool2.get_output(0), num_outputs=500, kernel=fc1_w, bias=fc1_b)

    # 对应PyTorch之self.relu
    relu1 = network.add_activation(input=fc1.get_output(0), type=trt.ActivationType.RELU)

    # 对应PyTorch之self.fc2
    fc2_w = weights['fc2.weight'].numpy()
    fc2_b = weights['fc2.bias'].numpy()
    fc2 = network.add_fully_connected(relu1.get_output(0), ModelData.OUTPUT_SIZE, fc2_w, fc2_b)

    # 设置该层输出名字
    fc2.get_output(0).name = ModelData.OUTPUT_NAME
    # 标记网络输出
    network.mark_output(tensor=fc2.get_output(0))
在sample.py的populate_network中,network是返回值,weights是输入值,对应model.py中Net的Net.state_dict(),注意weights是加载在CPU上的。
两者相互比较、对应,对于PyTorch而言,输入x首先经过conv1卷积、F.max_pool2d池化、conv2卷积、F.max_pool2d池化、view(-1)一维化、relu激活、fc全连接、F.log_softmax归一化输出结果概率分布;对于TRT而言,整个链路的行为需要跟PyTorch一致,不同的是TRT不需要训练,因此就不需要log_softmax了。比较两者可以归结如下表所示,简单且复杂:
| PyTorch Operators | TRT API Operators |
|---|---|
| self.conv1 = nn.Conv2d(1, 20, kernel_size=5) | conv1_w = weights[‘conv1.weight’].numpy() |
| conv1_b = weights[‘conv1.bias’].numpy() | |
| conv1 = network.add_convolution(input=input_tensor, num_output_maps=20, kernel_shape=(5, 5), kernel=conv1_w, bias=conv1_b) | |
| conv1.stride = (1, 1) | |
| F.max_pool2d(self.conv1(x), kernel_size=2, stride=2) | pool1 = network.add_pooling(input=conv1.get_output(0), type=trt.PoolingType.MAX, window_size=(2, 2)) |
| pool1.stride = (2, 2) | |
| self.conv2 = nn.Conv2d(20, 50, kernel_size=5) | conv2_w = weights[‘conv2.weight’].numpy() |
| conv2_b = weights[‘conv2.bias’].numpy() | |
| conv2 = network.add_convolution(pool1.get_output(0), 50, (5, 5), conv2_w, conv2_b) | |
| conv2.stride = (1, 1) | |
| F.max_pool2d(self.conv2(x), kernel_size=2, stride=2) | pool2 = network.add_pooling(conv2.get_output(0), trt.PoolingType.MAX, (2, 2)) |
| pool2.stride = (2, 2) | |
| self.fc1 = nn.Linear(800, 500) | fc1_w = weights[‘fc1.weight’].numpy() |
| fc1_b = weights[‘fc1.bias’].numpy() | |
| fc1 = network.add_fully_connected(input=pool2.get_output(0), num_outputs=500, kernel=fc1_w, bias=fc1_b) | |
| F.relu(self.fc1(x)) | relu1 = network.add_activation(input=fc1.get_output(0), type=trt.ActivationType.RELU) |
| self.fc2 = nn.Linear(500, 10) | fc2_w = weights[‘fc2.weight’].numpy() |
| fc2_b = weights[‘fc2.bias’].numpy() | |
| fc2 = network.add_fully_connected(relu1.get_output(0), ModelData.OUTPUT_SIZE, fc2_w, fc2_b) | |
| F.log_softmax(x, dim=1) | THERE IS NO NEED… |
注意
对于TRT API而言,network是tensorrt.INetworkDefinition类,使用network.add_xxx成员函数为该对象添加任意成员变量——网络层tensorrt.ILayer,不同的层继承自基类tensorrt.ILayer,派生出不同子类并拥有不同行为。这些网络层,都是TRT类,网络层的.get_output(0)只能输出tensorrt.ITensor类,无法在构建网络的时候输出其中的内容,这里又有TRT的run time与build time的概念,可阅读TensorRT Developer Guide之动态shape,如果需要对各层进行调试的话,只能xxxlayer.get_output(0).shape输出这个Tensor类的shape,或者在构建完成后的运行时输出结果,对内部进行调试是不可能的。
总之,TRT API的行为描述如下:
add_input与add_xxxlayers与get_output(0)与mark_output与对网路结构的清晰认知,如果你有上述5点,恭喜你TensorRT入门了。
1.2 搭建网络
那么对于VGG而言该怎么做呢?首先你得熟悉网络的构成,以VGG16为例,它应该长得如下图所示:

详细点,网络参数应该如下表所示,这里使用的是PyTorch的torchvision.models.vgg提供的VGG16结构:
| VGG16 Config |
|---|
| Conv-3x3-64-strd1-pad1 |
| Relu |
| Conv-3x3-64-strd1-pad1 |
| Relu |
| Maxpool-2x2-strd2-pad0 |
| Conv-3x3-128-strd1-pad1 |
| Relu |
| Conv-3x3-128-strd1-pad1 |
| Relu |
| Maxpool-2x2-strd2-pad0 |
| Conv-3x3-256-strd1-pad1 |
| Relu |
| Conv-3x3-256-strd1-pad1 |
| Relu |
| Conv-3x3-256-strd1-pad1 |
| Relu |
| Maxpool-2x2-strd2-pad0 |
| Conv-3x3-512-strd1-pad1 |
| Relu |
| Conv-3x3-512-strd1-pad1 |
| Relu |
| Conv-3x3-512-strd1-pad1 |
| Relu |
| Maxpool-2x2-strd2-pad0 |
| Conv-3x3-512-strd1-pad1 |
| Relu |
| Conv-3x3-512-strd1-pad1 |
| Relu |
| Conv-3x3-512-strd1-pad1 |
| Relu |
| Maxpool-2x2-strd2-pad0 |
| Avgpool-1x1-strd0-pad0 |
| FC-4096 |
| Relu |
| FC-4096 |
| Relu |
| FC-1000 |
| Relu |
源码torchvision.models.vgg的VGG16中,在features块和classifier块中有个avgpool块,里面是PyTorch内建的AdaptiveAvgPool2d层,这里我使用普通的Avgpool进行替代,该层的参数设置参考上篇文章PyTorch2ONNX2TensorRT 踩坑日志之5. 使用AvgPooling替换AdaptivePooling,另外,源码在全连接层后面跟了Dropout,这是在训练过程中防止过拟合的,在推理过程是不需要的,因此这里我就全部抛弃了。也就是说,我们需要用到add_convolution13次、add_fully_connected3次、add_activation13次、add_pooling6次,python_samples完全能够胜任。
"""
读入VGG16的权重,这里我使用的VGG16的信息如下:
    Lin T Y, Dollár P, Girshick R, et al. Feature pyramid networks for object detection[C]//Proceedings of the IEEE conference on computer vision and pattern recognition. 2017: 2117-2125.
    [VGG16 pre-trained weight](https://drive.google.com/open?id=1jOBAqe4fPFMCgRnYt794lYgSAlx4hwCj)

"""
weights = torch.load('./vgg16_20M.pth', map_location='cpu')
for k, v in weights.items():
    print("Layer: {}".format(k))
通过上述代码打印出模型各层的名字,将weights['xxx'].numpy()里的xxx进行逐一替代就好了。
1.3 完整代码
虽然很长,但熟练了以后,码起来就是重复工作了。在ModelData里的DTYPE需要显式地定义模型使用的数据类型,例如用FP32推理,就设定ModelData.DTYPE = trt.float32;用FP16推理,设定ModelData.DTYPE = trt.float16,并且在builder处强制设置builder.fp16_mode = True。
详细代码见github -> i_just_want_a_simple_demo/trt_api_pytorch/vgg16_sample/。
import tensorrt as trt


class ModelData(object):
    INPUT_NAME  = "in_frame"
    # P, C, H, W
    INPUT_SHAPE = (1, 3, 224, 224)
    OUTPUT_NAME = "out_frame"
    DTYPE       = trt.float32


def populate_network(network, weights):
    # Configure the network layers based on the weights provided.
    input_tensor      = network.add_input(name=ModelData.INPUT_NAME, dtype=ModelData.DTYPE, shape=ModelData.INPUT_SHAPE)

    # VGG16 features
    # VGG16_block_1
    vgg16_f0_w        = weights['features.0.weight'].numpy()
    vgg16_f0_b        = weights['features.0.bias'].numpy()
    vgg16_f0          = network.add_convolution(input=input_tensor, num_output_maps=64, kernel_shape=(3, 3), kernel=vgg16_f0_w, bias=vgg16_f0_b)
    vgg16_f0.padding  = (1, 1)
    vgg16_f0.name     = 'vgg16_conv_1_1'
    vgg16_f1          = network.add_activation(input=vgg16_f0.get_output(0), type=trt.ActivationType.RELU)
    vgg16_f1.name     = 'vgg16_relu_1_1'
    vgg16_f2_w        = weights['features.2.weight'].numpy()
    vgg16_f2_b        = weights['features.2.bias'].numpy()
    vgg16_f2          = network.add_convolution(input=vgg16_f1.get_output(0), num_output_maps=64, kernel_shape=(3, 3), kernel=vgg16_f2_w, bias=vgg16_f2_b)
    vgg16_f2.padding  = (1, 1)
    vgg16_f2.name     = 'vgg16_conv_1_2'
    vgg16_f3          = network.add_activation(input=vgg16_f2.get_output(0), type=trt.ActivationType.RELU)
    vgg16_f3.name     = 'vgg16_relu_1_2'
    vgg16_f4          = network.add_pooling(input=vgg16_f3.get_output(0), type=trt.PoolingType.MAX, window_size=(2, 2))
    vgg16_f4.stride   = (2, 2)
    vgg16_f4.name     = 'vgg16_max_pool_1'

    # VGG16_block_2
    vgg16_f5_w        = weights['features.5.weight'].numpy()
    vgg16_f5_b        = weights['features.5.bias'].numpy()
    vgg16_f5          = network.add_convolution(input=vgg16_f4.get_output(0), num_output_maps=128, kernel_shape=(3, 3), kernel=vgg16_f5_w, bias=vgg16_f5_b)
    vgg16_f5.padding  = (1, 1)
    vgg16_f5.name     = "vgg16_conv_2_1"
    vgg16_f6          = network.add_activation(input=vgg16_f5.get_output(0), type=trt.ActivationType.RELU)
    vgg16_f6.name     = 'vgg16_relu_2_1'
    vgg16_f7_w        = weights['features.7.weight'].numpy()
    vgg16_f7_b        = weights['features.7.bias'].numpy()
    vgg16_f7          = network.add_convolution(input=vgg16_f6.get_output(0), num_output_maps=128, kernel_shape=(3, 3), kernel=vgg16_f7_w, bias=vgg16_f7_b)
    vgg16_f7.padding  = (1, 1)
    vgg16_f7.name     = "vgg16_conv_2_2"
    vgg16_f8          = network.add_activation(input=vgg16_f7.get_output(0), type=trt.ActivationType.RELU)
    vgg16_f8.name     = 'vgg16_relu_2_2'
    vgg16_f9          = network.add_pooling(input=vgg16_f8.get_output(0), type=trt.PoolingType.MAX, window_size=(2, 2))
    vgg16_f9.stride   = (2, 2)
    vgg16_f9.name     = 'vgg16_max_pool_2'

    # VGG16_block_3
    vgg16_f10_w       = weights['features.10.weight'].numpy()
    vgg16_f10_b       = weights['features.10.bias'].numpy()
    vgg16_f10         = network.add_convolution(input=vgg16_f9.get_output(0), num_output_maps=256, kernel_shape=(3, 3), kernel=vgg16_f10_w, bias=vgg16_f10_b)
    vgg16_f10.padding = (1, 1)
    vgg16_f10.name    = "vgg16_conv_3_1"
    vgg16_f11         = network.add_activation(input=vgg16_f10.get_output(0), type=trt.ActivationType.RELU)
    vgg16_f11.name    = 'vgg16_relu_3_1'
    vgg16_f12_w       = weights['features.12.weight'].numpy()
    vgg16_f12_b       = weights['features.12.bias'].numpy()
    vgg16_f12         = network.add_convolution(input=vgg16_f11.get_output(0), num_output_maps=256, kernel_shape=(3, 3), kernel=vgg16_f12_w, bias=vgg16_f12_b)
    vgg16_f12.padding = (1, 1)
    vgg16_f12.name    = "vgg16_conv_3_2"
    vgg16_f13         = network.add_activation(input=vgg16_f12.get_output(0), type=trt.ActivationType.RELU)
    vgg16_f13.name    = 'vgg16_relu_3_2'
    vgg16_f14_w       = weights['features.14.weight'].numpy()
    vgg16_f14_b       = weights['features.14.bias'].numpy()
    vgg16_f14         = network.add_convolution(input=vgg16_f13.get_output(0), num_output_maps=256, kernel_shape=(3, 3), kernel=vgg16_f14_w, bias=vgg16_f14_b)
    vgg16_f14.padding = (1, 1)
    vgg16_f14.name    = "vgg16_conv_3_3"
    vgg16_f15         = network.add_activation(input=vgg16_f14.get_output(0), type=trt.ActivationType.RELU)
    vgg16_f15.name    = 'vgg16_relu_3_3'
    vgg16_f16         = network.add_pooling(input=vgg16_f15.get_output(0), type=trt.PoolingType.MAX, window_size=(2, 2))
    vgg16_f16.stride  = (2, 2)
    vgg16_f16.name    = 'vgg16_max_pool_3'

    # VGG16_block_4
    vgg16_f17_w       = weights['features.17.weight'].numpy()
    vgg16_f17_b       = weights['features.17.bias'].numpy()
    vgg16_f17         = network.add_convolution(input=vgg16_f16.get_output(0), num_output_maps=512, kernel_shape=(3, 3), kernel=vgg16_f17_w, bias=vgg16_f17_b)
    vgg16_f17.padding = (1, 1)
    vgg16_f17.name    = "vgg16_conv_4_1"
    vgg16_f18         = network.add_activation(input=vgg16_f17.get_output(0), type=trt.ActivationType.RELU)
    vgg16_f18.name    = 'vgg16_relu_4_1'
    vgg16_f19_w       = weights['features.19.weight'].numpy()
    vgg16_f19_b       = weights['features.19.bias'].numpy()
    vgg16_f19         = network.add_convolution(input=vgg16_f18.get_output(0), num_output_maps=512, kernel_shape=(3, 3), kernel=vgg16_f19_w, bias=vgg16_f19_b)
    vgg16_f19.padding = (1, 1)
    vgg16_f19.name    = "vgg16_conv_4_2"
    vgg16_f20         = network.add_activation(input=vgg16_f19.get_output(0), type=trt.ActivationType.RELU)
    vgg16_f20.name    = 'vgg16_relu_4_2'
    vgg16_f21_w       = weights['features.21.weight'].numpy()
    vgg16_f21_b       = weights['features.21.bias'].numpy()
    vgg16_f21         = network.add_convolution(input=vgg16_f20.get_output(0), num_output_maps=512, kernel_shape=(3, 3), kernel=vgg16_f21_w, bias=vgg16_f21_b)
    vgg16_f21.padding = (1, 1)
    vgg16_f21.name    = "vgg16_conv_4_3"
    vgg16_f22         = network.add_activation(input=vgg16_f21.get_output(0), type=trt.ActivationType.RELU)
    vgg16_f22.name    = 'vgg16_relu_4_3'
    vgg16_f23         = network.add_pooling(input=vgg16_f22.get_output(0), type=trt.PoolingType.MAX, window_size=(2, 2))
    vgg16_f23.stride  = (2, 2)
    vgg16_f23.name    = 'vgg16_max_pool_4'

    # VGG16_block_5
    vgg16_f24_w       = weights['features.24.weight'].numpy()
    vgg16_f24_b       = weights['features.24.bias'].numpy()
    vgg16_f24         = network.add_convolution(input=vgg16_f23.get_output(0), num_output_maps=512, kernel_shape=(3, 3), kernel=vgg16_f24_w, bias=vgg16_f24_b)
    vgg16_f24.padding = (1, 1)
    vgg16_f24.name    = "vgg16_conv_5_1"
    vgg16_f25         = network.add_activation(input=vgg16_f24.get_output(0), type=trt.ActivationType.RELU)
    vgg16_f25.name    = "vgg16_relu_5_1"
    vgg16_f26_w       = weights['features.26.weight'].numpy()
    vgg16_f26_b       = weights['features.26.bias'].numpy()
    vgg16_f26         = network.add_convolution(input=vgg16_f25.get_output(0), num_output_maps=512, kernel_shape=(3, 3), kernel=vgg16_f26_w, bias=vgg16_f26_b)
    vgg16_f26.padding = (1, 1)
    vgg16_f26.name    = "vgg16_conv_5_2"
    vgg16_f27         = network.add_activation(input=vgg16_f26.get_output(0), type=trt.ActivationType.RELU)
    vgg16_f27.name    = "vgg16_relu_5_2"
    vgg16_f28_w       = weights['features.28.weight'].numpy()
    vgg16_f28_b       = weights['features.28.bias'].numpy()
    vgg16_f28         = network.add_convolution(input=vgg16_f27.get_output(0), num_output_maps=512, kernel_shape=(3, 3), kernel=vgg16_f28_w, bias=vgg16_f28_b)
    vgg16_f28.padding = (1, 1)
    vgg16_f28.name    = "vgg16_conv_5_3"
    vgg16_f29         = network.add_activation(input=vgg16_f28.get_output(0), type=trt.ActivationType.RELU)
    vgg16_f29.name    = "vgg16_relu_5_3"
    vgg16_f30         = network.add_pooling(input=vgg16_f29.get_output(0), type=trt.PoolingType.MAX, window_size=(2, 2))
    vgg16_f30.stride  = (2, 2)
    vgg16_f30.name    = 'vgg16_max_pool_5'

    # VGG16 nn.AdaptiveAvgPool2d((7, 7))
    vgg16_a0          = network.add_pooling(input=vgg16_f30.get_output(0), type=trt.PoolingType.AVERAGE, window_size=(1, 1))
    vgg16_a0.name     = 'vgg16_avg_pool_0'

    # VGG16 torch.flatten(x, 1)
    # there is no need for torch.flatten(x, 1). because, tensorrt.IFullyConnectedLayer would first reshape the input
    # tensor from shape {P, C, H, W} into {P, C*H*W}.

    # VGG16 classifier
    # VGG16_fc_1
    vgg16_c0_w        = weights['classifier.0.weight'].numpy()
    vgg16_c0_b        = weights['classifier.0.bias'].numpy()
    vgg16_c0          = network.add_fully_connected(input=vgg16_a0.get_output(0), num_outputs=4096, kernel=vgg16_c0_w, bias=vgg16_c0_b)
    vgg16_c0.name     = "vgg16_fc_1"
    vgg16_c1          = network.add_activation(input=vgg16_c0.get_output(0), type=trt.ActivationType.RELU)
    vgg16_c1.name     = "vgg16_relu_fc_1"
    # there is no need for Dropout during inference

    # VGG16_fc_2
    vgg16_c3_w        = weights['classifier.3.weight'].numpy()
    vgg16_c3_b        = weights['classifier.3.bias'].numpy()
    vgg16_c3          = network.add_fully_connected(input=vgg16_c1.get_output(0), num_outputs=4096, kernel=vgg16_c3_w, bias=vgg16_c3_b)
    vgg16_c3.name     = "vgg16_fc_2"
    vgg16_c4          = network.add_activation(input=vgg16_c3.get_output(0), type=trt.ActivationType.RELU)
    vgg16_c4.name     = "vgg16_relu_fc_2"
    # there is no need for Dropout during inference

    # VGG16_fc_3
    vgg16_c6_w        = weights['classifier.6.weight'].numpy()
    vgg16_c6_b        = weights['classifier.6.bias'].numpy()
    vgg16_c6          = network.add_fully_connected(input=vgg16_c4.get_output(0), num_outputs=1000, kernel=vgg16_c6_w, bias=vgg16_c6_b)
    vgg16_c6.name     = "vgg16_fc_3"
    # Output
    vgg16_c6.get_output(0).name = ModelData.OUTPUT_NAME
    network.mark_output(tensor=vgg16_c6.get_output(0))
二、混合精度
(未完待续)
三、量化
(未完待续)
四、性能分析
(未完待续)
五、小技巧
5.1 如何动态输入、输出
如果在我的网络内部,先是定义了一个resize操作,让输入插值到固定尺寸,然后再编码/解码、得到结果,最后我还想让这个输出跟我的输入一致,即如下操作:
input             -> resized_input             -> inference -> output                  -> resized_output
{1, 3, in_w, in_h}   {1, 3, in_w_new, in_h_new}                {1, 3, out_w, img_out_h}   {1, 3, in_w, in_h}
TRT中如果是动态输入,TRT在运行时(runtime)就有个shape tensor的概念,区别于execution tensor,在网络建立的时候,就已经规定了输入、输出大小了,在7. Working With Dynamic Shapes中有详细说明。shape tensor是一个一维的tensor,记录着输入tensor的大小,对应的操作层为IShapeLayer,详见文档,所以我们就可以按下列操作获取输入的shape了。然后使用IResizeLayer就可以让输出与输入大小一致了。
input_tensor  = network.add_input("input", trt.float32,(1, 3, -1, -1))  # 输入顺序为BCWH, 这里的W和H设为-1, 即宽高是动态的, 需要在runtime才可以确定
input_shape   = network.add_shape(input=input_tensor)
print(input_shape.get_output(0).shape)  # 输出为(4,), 即一维tensor, input_shape 里面的内容为 input_tensor 的shape

output_tensor = network.add_resize(input=last_layer.get_output(0))  # 得到最后一层 last_layer 的输出
output_tensor.resize_mode   = trt.ResizeMode.LINEAR
output_tensor.align_corners = True
output_tensor.set_input(1, input_shape.get_output(0))
5.2 如何构建BN layer
TRT API中是没有Batch Normalization layer的,需要手动搭建。BN按公式需要矩阵操作,TRT API使用IScaleLayer层为BN提供矩阵乘法,因此使用IScaleLayer就可以搭建BN layer了。详见文章TensorRT实战(一) 如何搭建Batch Normalization层。
5.3 如何设定Pool layer的ceil mode
TRT API中tensorrt.IPoolingLayer处乍一看是没有ceil_mode字样的。实际上,ceil_mode=True的作用是when True, will use ceil instead of floor to compute the output shape,就是当采样框长度不能整除输入Tensor大小的时候,在Tensor的右下添加一圈-NaN,如下图所示,就能看懂ceil_mode的作用了。
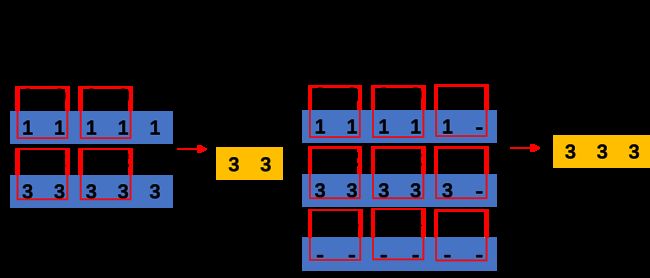
那么,TRT API所对应的,就是tensorrt.PaddingMode.EXPLICIT_ROUND_UP,官方文档torch2trt以及TensorRT#84也能提供印证。
六、错误合集
6.1 mEngine.getHasImplicitBatchDim()
6.1.1 报错信息
[TensorRT] ERROR: Parameter check failed at: engine.cpp::executeV2::701, condition: !mEngine.getHasImplicitBatchDim()
其中我使用的推理函数是execute_v2,所以报错为executeV2相关。该报错的原因是因为,在TRT的engine的建立过程中,使用了隐式的batch大小,即未规定builder.create_network的batch到底是隐式的、还是显式的。
6.1.2 解决办法
查看TRT的文档可以发现,create_network的原型为create_network(self: tensorrt.tensorrt.Builder, flags: int = 0) → tensorrt.tensorrt.INetworkDefinition,所以按下面代码就可以规定显式batch了。
flag = 1 << int(trt.NetworkDefinitionCreationFlag.EXPLICIT_BATCH)
builder.create_network(flag)
6.2 mEngine.bindingIsInput(bindingIndex)
6.2.1 报错信息
[TensorRT] ERROR: Parameter check failed at: engine.cpp::setBindingDimensions::893, condition: mEngine.bindingIsInput(bindingIndex)
网络使用了动态输入,在推理过程中,context未设置binding shape。
6.2.2 解决方法
查看文档,其原型为set_binding_shape(self: tensorrt.tensorrt.IExecutionContext, binding: int, shape: tensorrt.tensorrt.Dims) → bool,因此按下面代码规定就好了。
context.set_binding_shape(binding_index, (Batch, Channel, Width, Height))
# binding_index 动态输入的index,规定这是网络的第几个输入
# shape()       输入的shape,这里我使用的是BCWH