一篇搭建微服务工程学会Springcloud Eureka服务注册与发现
万字长文一篇文章教你搭建Rest微服务工程搞定Springcloud之Eureka服务注册与发现
微服务技术栈
多种技术的集合体
服务治理 服务注册 服务调用 服务监控 服务的负载均衡 spring cloud提供了一整套的服务。
天上飞的理念总有落地的实现。
什么是springcloud
springboot连接一切 springcloud协调一切。
springcloud是分布式微服务架构下的一站式解决方案,是微服务架构落地技术的集合体,俗称微服务全家桶。
springboot可以单独的使用不依赖于springcloud的,而springcloud必须依赖与springboot无法单独的使用。
springboot springcloud关注点
springboot关注于快速,方便的开发单个微服务个体,springcloud关注全局的服务治理框架。
简要介绍
SpringCloud=分布式微服务架构的一站式解决方案,是多种微服务架构落地技术的集合体,俗称微服务全家桶
SpringBoot是一种服务开发技术
服务注册与发现:EUREKA
服务负载均衡与调用:NETFLIX OSS RIBBON
服务负载与调用:NETTFLIX
服务熔断降级:HYSTRIX
服务网关:Zuul
服务分布式配置:SpringCloud Config
服务开发:SpingBoot
基本环境的搭建
约定>配置>编码
结构:父总工程
pom
project
module
构建项目的具体的步骤
- New project
- 聚合父工程的名字
- maven选版本
- 工程名字
- 字符编码
- 注解生效激活
- java编译版本选择
- File Type过滤
字符编码修改(在setting中修改file encoding中的编码选项修改为utf-8完成字符集的编码设置)
设置注解激活生效(在build中找到支持注解激活生效的选项)
同时需要选择java的编译的版本为jdk8
在File Type中设置文件过滤(过滤掉idea的相关的信息文件让界面更加的简洁)在过滤的信息中添加*.idea和 *.iml过滤掉这些指定类型的信息。
dependencyManagement使用简介
Maven中的dependencyManagement元素提供了一种管理依赖版本号的方式。在dependencyManagement元素中声明所依赖的jar包的版本号等信息,那么所有子项目再次引入此依赖jar包时则无需显式的列出版本号。Maven会沿着父子层级向上寻找拥有dependencyManagement 元素的项目,然后使用它指定的版本号。
举例
在父项目的POM.xml中配置:
<dependencyManagement>
       <dependencies>
           <dependency>
               <groupId>org.springframework.bootgroupId>
               <artifactId>spring-boot-starter-webartifactId>
               <version>1.2.3.RELEASEversion>
           dependency>
       dependencies>
dependencyManagement>
此配置即生命了spring-boot的版本信息。
子项目则无需指定版本信息:
<dependency>
    <groupId>org.springframework.bootgroupId>
    <artifactId>spring-boot-starter-webartifactId>
dependency>
使用优点
如果有多个子项目都引用同一样依赖,则可以避免在每个使用的子项目里都声明一个版本号。当想升级或切换到另一个版本时,只需要在顶层父容器里更新,而不需要逐个修改子项目;另外如果某个子项目需要另外的一个版本,只需要声明version即可。
注意事项
dependencyManagement中定义的只是依赖的声明,并不实现引入,因此子项目需要显式的声明需要用的依赖。
在子项目中没有指定版本号时才会继承父版本号的信息。
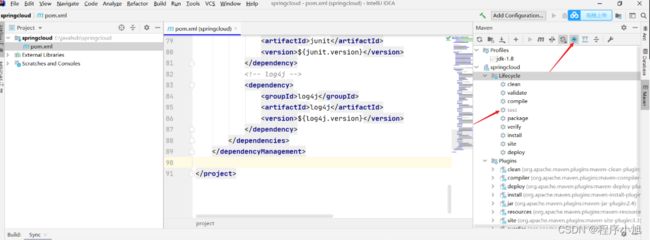
跳过单元测试的步骤
在idea中点击指定的按钮来跳过指定的单元测试。
在父工程创建完成执行mvn:install将父工程发布到仓库方便子工程来继承
出现了build success之后maven与idea与整合成功。
父工程pom文件设置
<project xmlns="http://maven.apache.org/POM/4.0.0"
         xmlns:xsi="http://www.w3.org/2001/XMLSchema-instance"
         xsi:schemaLocation="http://maven.apache.org/POM/4.0.0 http://maven.apache.org/xsd/maven-4.0.0.xsd">
    <modelVersion>4.0.0modelVersion>


    <groupId>org.examplegroupId>
    <artifactId>springcloudartifactId>
    <version>1.0-SNAPSHOTversion>


    <properties>
        <project.build.sourceEncoding>UTF-8project.build.sourceEncoding>
        <maven.compiler.source>1.8maven.compiler.source>
        <maven.compiler.target>1.8maven.compiler.target>
        <junit.version>4.12junit.version>
        <log4j.version>1.2.17log4j.version>
        <lombok.version>1.16.18lombok.version>
        <mysql.version>5.1.47mysql.version>
        <druid.verison>1.1.18druid.verison>
        <mybatis.spring.boot.verison>1.3.0mybatis.spring.boot.verison>
    properties>


    <dependencyManagement>
        <dependencies>

            <dependency>
                <groupId>org.springframework.bootgroupId>
                <artifactId>spring-boot-dependenciesartifactId>
                <version>2.2.2.RELEASEversion>
                <type>pomtype>
                <scope>importscope>
            dependency>

            <dependency>
                <groupId>org.springframework.cloudgroupId>
                <artifactId>spring-cloud-dependenciesartifactId>
                <version>Hoxton.SR1version>
                <type>pomtype>
                <scope>importscope>
            dependency>

            <dependency>
                <groupId>com.alibaba.cloudgroupId>
                <artifactId>spring-cloud-alibaba-dependenciesartifactId>
                <version>2.2.0.RELEASEversion>
                <type>pomtype>
                <scope>importscope>
            dependency>

            <dependency>
                <groupId>mysqlgroupId>
                <artifactId>mysql-connector-javaartifactId>
                <version>${mysql.version}version>
            dependency>

            <dependency>
                <groupId>com.alibabagroupId>
                <artifactId>druid-spring-boot-starterartifactId>
                <version>${druid.verison}version>
            dependency>

            <dependency>
                <groupId>org.mybatis.spring.bootgroupId>
                <artifactId>mybatis-spring-boot-starterartifactId>
                <version>${mybatis.spring.boot.verison}version>
            dependency>

            <dependency>
                <groupId>org.projectlombokgroupId>
                <artifactId>lombokartifactId>
                <version>${lombok.version}version>
            dependency>

            <dependency>
                <groupId>junitgroupId>
                <artifactId>junitartifactId>
                <version>${junit.version}version>
            dependency>

            <dependency>
                <groupId>log4jgroupId>
                <artifactId>log4jartifactId>
                <version>${log4j.version}version>
            dependency>
        dependencies>
    dependencyManagement>

project>
Rest微服务工程落地实现
微服务模块创建的步骤信息
- 建module
- 改pom
- 写yaml
- 主启动
- 业务类
建模块
在父工程下创建子模块cloud-provider-payment8001
创建完成之后观察父工程中的变化和子工程中的结构
可以发现在父工程中多了选项说明新创建的子工程已经作为了父工程的一个子模块,同时子工程中的中也引向了父工程的选项。
<modules>
	<module>cloud-provider-payment8001module>
modules>
<parent>
    <artifactId>springcloudartifactId>
    <groupId>org.examplegroupId>
    <version>1.0-SNAPSHOTversion>
parent>
约定大于配置大于编码,搭建好配置的环境比编写代码在微服务中更加的重要。
改pom文件
在子模块中引入对应的依赖信息版本号继承自父工程
<dependencies>
        <dependency>
            <groupId>org.springframework.bootgroupId>
            <artifactId>spring-boot-starter-webartifactId>
        dependency>
        <dependency>
            <groupId>org.springframework.bootgroupId>
            <artifactId>spring-boot-starter-actuatorartifactId>
        dependency>
        <dependency>
            <groupId>org.mybatis.spring.bootgroupId>
            <artifactId>mybatis-spring-boot-starterartifactId>
        dependency>
        <dependency>
            <groupId>com.alibabagroupId>
            <artifactId>druid-spring-boot-starterartifactId>
        dependency>
        <dependency>
            <groupId>mysqlgroupId>
            <artifactId>mysql-connector-javaartifactId>
        dependency>
        <dependency>
            <groupId>org.springframework.bootgroupId>
            <artifactId>spring-boot-starter-jdbcartifactId>
        dependency>
        <dependency>
            <groupId>org.springframework.bootgroupId>
            <artifactId>spring-boot-devtoolsartifactId>
            <scope>runtimescope>
            <optional>trueoptional>
        dependency>
        <dependency>
            <groupId>org.projectlombokgroupId>
            <artifactId>lombokartifactId>
        dependency>
        <dependency>
            <groupId>org.springframework.bootgroupId>
            <artifactId>spring-boot-testartifactId>
        dependency>
        <dependency>
            <groupId>log4jgroupId>
            <artifactId>log4jartifactId>
        dependency>
    dependencies>
写yaml配置文件
在子模块中添加yaml配置文件添加服务端口号和服务名称。和其他在springboot中常用 的配置类的信息。yaml文件的配置信息如下所示。
server:
  port: 8001 #服务端口

spring:
  application:
    name: cloud-payment-service #服务名
  datasource:
    type: com.alibaba.druid.pool.DruidDataSource  #当前数据源操作类型
    driver-class-name: com.mysql.jdbc.Driver #数据库驱动包
    url: jdbc:mysql://localhost:3306/cloud?characterEncoding=utf8&useSSL=false
    password: 123456

devtools:
  restart:
    enabled: true #是否支持热部署

mybatis:
  mapper-locations: classpath:mapper/*.xml
  type-aliases-package: com.dzu.springcloud.entities  #所有entity别名所在包
主启动
按照springboot项目的要求在src下面创建对应的包和主启动类的信息。
在com.dzu.springcloud下面创建对应的主启动类
package com.dzu.springcloud;

import org.springframework.boot.SpringApplication;
import org.springframework.boot.autoconfigure.SpringBootApplication;

/**
 * @author chenruxu
 * @date 2022 1/2
 * springboot的主启动类
 */
@SpringBootApplication
public class PaymentMain8001 {
    public static void main(String[] args) {
        SpringApplication.run(PaymentMain8001.class,args);
    }
}
业务类实现
之前的步骤配置好了基本的环境,之后通过具体的代码对业务类进行具体的实现和编写。
假设我们采用前后端分离的方式来对此进行业务类的实现,从数据库建表开始到数据持久层(dao层或Mapper层的编写)在到pojo的构建与返回结果封装类的编写通过对结果集的封装向前端返回指定的数据信息。之后完成业务逻辑层(service的接口和实现类)的编写。最后完成对controller层的控制器的编写。启动主启动类(或者我们说启动这个微服务或者说是启动了支付模块)
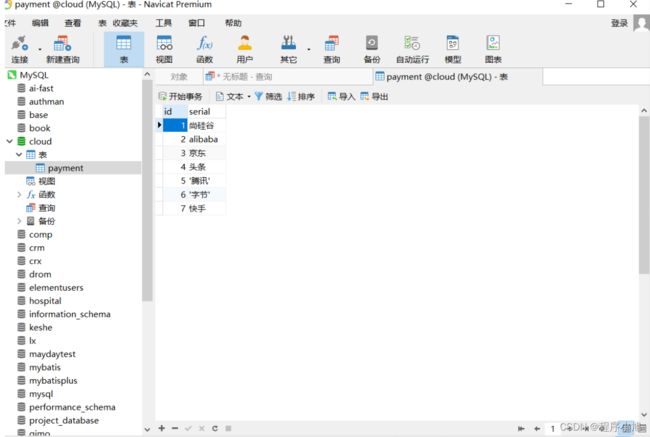
数据库建表的语句
CREATE TABLE `payment` (
  `id` bigint(20) NOT NULL AUTO_INCREMENT COMMENT 'ID',
  `serial` varchar(200) COLLATE utf8_unicode_ci DEFAULT NULL,
  PRIMARY KEY (`id`)
) ENGINE=InnoDB AUTO_INCREMENT=5 DEFAULT CHARSET=utf8 COLLATE=utf8_unicode_ci;

/*Data for the table `payment` */

insert  into `payment`(`id`,`serial`) values (1,'尚硅谷'),(2,'alibaba'),(3,'京东'),(4,'头条');
dao层(Mapper层的信息的编写)
Mapper接口的实现我们才mapper接口中只定义了读写两个简单的业务。通俗来说其实就是使用增加支付信息和根据编号来查询对应的支付相关的信息。
package com.dzu.springcloud.dao;

import com.dzu.springcloud.entities.Payment;
import org.apache.ibatis.annotations.Mapper;
import org.apache.ibatis.annotations.Param;
import org.springframework.stereotype.Repository;

/**
 * dao接口
 * @author chenruxu
 * @date 2022 1/2
 */

@Mapper
@Repository
public interface PaymentDao {
    int create(Payment payment);
    Payment getPaymentbyid(@Param("id")Long id);
}
mappe的映射文件,在文件中需要注意使用了resultmap进行了结果集的映射。其中column代表的是数据库中的列的信息,property则是需要映射的java实体类的信息。jdbctype则对应数据库中的字段的类型
DOCTYPE mapper PUBLIC "-//mybatis.org//DTD Mapper 3.0//EN" "http://mybatis.org/dtd/mybatis-3-mapper.dtd" >
<mapper namespace="com.dzu.springcloud.dao.PaymentDao">

   <insert id="create" parameterType="com.dzu.springcloud.entities.Payment" useGeneratedKeys="true" keyProperty="id">
        insert into payment(serial)values (#{serial})
   insert>

    <resultMap id="BaseResultMap" type="com.dzu.springcloud.entities.Payment">
        <id column="id" property="id" jdbcType="BIGINT"/>
        <id column="serial" property="serial" jdbcType="VARCHAR"/>
    resultMap>

    <select id="getPaymentbyid" parameterType="long" resultMap="BaseResultMap">
        select * from payment where id = #{id}
    select>
mapper>
其他的信息和springboot开发单体架构项目的流程基本一致,在下面直接的列举出对应的信息出来。
package com.dzu.springcloud.service.impl;

import com.dzu.springcloud.dao.PaymentDao;
import com.dzu.springcloud.entities.Payment;
import com.dzu.springcloud.service.PaymentService;
import org.springframework.beans.factory.annotation.Autowired;
import org.springframework.stereotype.Service;

@Service
public class PaymentServiceImpl implements PaymentService {

    //注入dao接口
    @Autowired
    private PaymentDao paymentDao;

    /**
     * 添加订单信息
     * @param payment
     * @return
     */
    @Override
    public int create(Payment payment) {
        return paymentDao.create(payment);
    }

    /**
     * 查询订购对应的信息
     * @param id
     * @return
     */
    @Override
    public Payment getPaymentbyid(Long id) {
        return paymentDao.getPaymentbyid(id);
    }
}
控制器的编写
package com.dzu.springcloud.controller;

import com.dzu.springcloud.entities.CommonResult;
import com.dzu.springcloud.entities.Payment;
import com.dzu.springcloud.service.PaymentService;
import lombok.extern.slf4j.Slf4j;
import org.springframework.beans.factory.annotation.Autowired;
import org.springframework.stereotype.Controller;
import org.springframework.web.bind.annotation.PathVariable;
import org.springframework.web.bind.annotation.RequestMapping;
import org.springframework.web.bind.annotation.ResponseBody;


@Controller
@Slf4j
public class PaymentController {
    @Autowired
    private PaymentService paymentService;

    @RequestMapping(value = "/payment/create")
    @ResponseBody
    public CommonResult create(Payment payment){
        int result = paymentService.create(payment);
        log.info("--->插入结果",result);
        if (result>0){
            return new CommonResult(200,"插入数据库成功",result);
        }else {
            return new CommonResult(400, "插入数据库失败");
        }
    }

    @ResponseBody
    @RequestMapping(value = "/payment/get/{id}")
    public CommonResult getPaymentbyid(@PathVariable("id")Long id){
        Payment payment = paymentService.getPaymentbyid(id);
        log.info("--->查询结果是",payment);
        if (payment!=null){
            return new CommonResult(200,"查询成功",payment);
        }else {
            return new CommonResult(400,"没有记录",null);
        }
    }
}
接口测试
之后启动项目在浏览器或者在postMan接口测试工具中对信息进行测试。在启动了主启动的项目之后先在浏览器上对根据id查询指定的西信息进行测试http://localhost:8001//payment/get/3
之后对添加指定的信息进行指定的测试。http://localhost:8001/payment/create?serial=%27%E8%85%BE%E8%AE%AF%27
热部署开启
在开发过程中开启自动热部署功能修改代码后自动的重启。便于开发人员进行调试。实现自动热部署的步骤如下所示。
- adding devtools to your project
- adding plugin to your pom.xml
- Enabling automatic build
- update the value of
- 重启idea
通过以上的步骤来配置热部署使热部署进行生效。
在8001支付微服务中添加依赖信息
<dependency>
            <groupId>org.springframework.bootgroupId>
            <artifactId>spring-boot-devtoolsartifactId>
            <scope>runtimescope>
            <optional>trueoptional>
        dependency>
在父工程的pom.xml文件中配置插件。
<build>
        <plugins>
            <plugin>
                <groupId>org.springframework.bootgroupId>
                <artifactId>spring-boot-maven-pluginartifactId>
                <version>2.5.1version>
                <configuration>
                    <fork>truefork>
                    <addResources>trueaddResources>
                configuration>
            plugin>
        plugins>
    build>
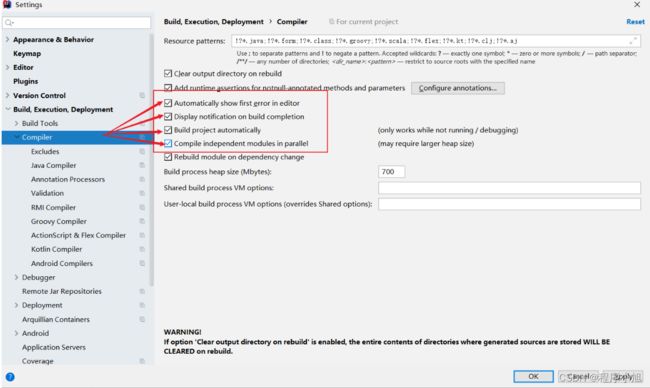
在idea的设置的build中开启自动配置的权限信息(A B C D)全部进行选中
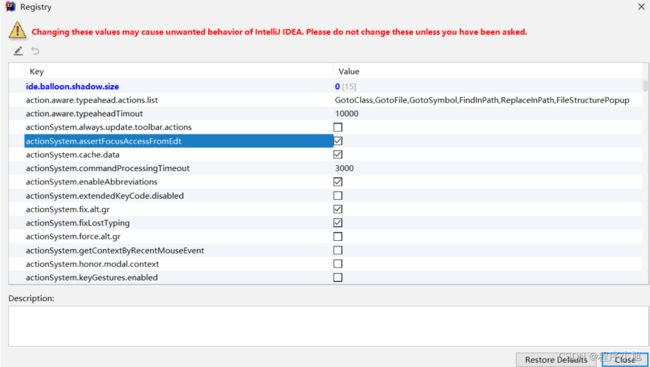
之后开启开启热注册使用快捷建的方式打开 ctrl+shift+alt+/ and search for the registry in the registry enable:
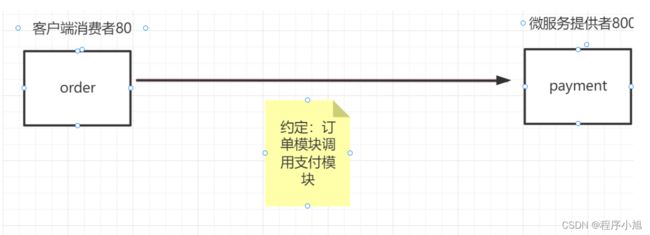
微服务消费者订单模块
上面8001端口对应的微服务是支付功能模块,从另一个角度来说这是一个付款功能的服务的提供者,为订单模块提供付款的服务,而订单的模块在付款的过程中调用了支付的模块是8001支付模块的服务的的消费者。在完成支付模块服务信息的编写之后。需要编写另外的一个服务消费之模块。之后便可以使用一站式的微服务框架springcloud来对各个服务之间进行协调和治理的操作
我们选择这个微服务的消费者的端口号为80端口。
和rest微服务创建的步骤相同,首先我们先创建一个模块订单模块cloud-consumer-order-80
之后我们修改该模块的pom文件引入对应的依赖信息。
<dependencies>
        <dependency>
            <groupId>org.springframework.bootgroupId>
            <artifactId>spring-boot-starter-webartifactId>
        dependency>

        <dependency>
            <groupId>org.springframework.bootgroupId>
            <artifactId>spring-boot-starter-actuatorartifactId>
        dependency>
        <dependency>
            <groupId>org.springframework.bootgroupId>
            <artifactId>spring-boot-devtoolsartifactId>
            <scope>runtimescope>
            <optional>trueoptional>
        dependency>

        <dependency>
            <groupId>org.projectlombokgroupId>
            <artifactId>lombokartifactId>
            <optional>trueoptional>
        dependency>

        <dependency>
            <groupId>org.springframework.bootgroupId>
            <artifactId>spring-boot-starter-testartifactId>
        dependency>

    dependencies>
创建yaml文件编写对应的配置信息
server:
  port: 80
之后创建对应的包结构和主启动类完成启动。之后我们面向消费者的进程,对服务消费者的集体的业务实现进行详细的编写和测试指定的信息。
在微服务的消费者中不需要对具体的业务的操作进行具体的实现,而是通过调用服务的提供者来进行的。在订单的模块中我们只需要创建pojo和controller来完成业务类的编写。
pojo类与8001服务的提供者的类相同不再赘述
RestTemplate简单使用
RestTemplate什么?
RestTemplate提供了多种便携访问远程http服务的方法,是一种简单便携的访问restful服务模板类,是spring提供的用于访问Rest服务的客户端模板工具集。是对HTTP client的一次封装的形式。
将RestTemplate类注入到我们的springboot的容器里面
此时用到了我们在springboot中知识,和springboot整合shiro的使用步骤相似,需要我们在sprigboot服务模块中使用config配置类加上注解的形式将RestTemplate类加载到springboot的容器之中。
下面对这个过程进行简要的概述和实现。
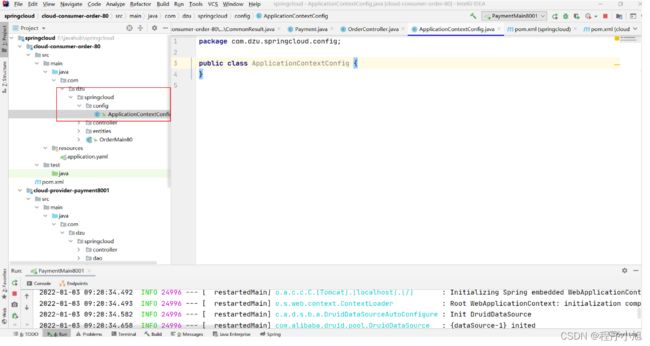
创建ApplicationContextConfig这个配置类。
package com.dzu.springcloud.config;

import org.springframework.context.annotation.Bean;
import org.springframework.context.annotation.Configuration;
import org.springframework.web.client.RestTemplate;

/**
 * @author chenruxu
 * RestTemplate的配置类
 */
@Configuration
public class ApplicationContextConfig {
    @Bean
    public RestTemplate getRestTemplate(){
        return new RestTemplate();
    }
}
将配置类注入到springboot的容器之后就可以编写控制器类,在控制器类中我们使用注入的RestTemplate类对服务提供者的信息进行调用。(注意点:在8001微服务的的控制器类中增加信息时需要在参数上加入@RequestBody注解)
@RequestBody主要用来接收前端传递给后端的请求体中的数据; GET方式无请求体,所以使用@RequestBody接收数据时,前端不能使用GET方式提交数据,而需要用POST方式进行提交。在后端的同一个接收方法里,@RequestBody与@RequestParam()可以同时使用,@RequestBody最多只能有一个,而@RequestParam()可以有多个。
注意:一个请求,只有一个RequestBody,但是可以有多个RequestParam。
这很好理解,请求体只有一个,请求参数可以有多个。
下面对是order中的订单的信息的控制类信息。之后先启动8001服务在开启order消费者的服务。通过浏览器调用消费者,消费便可以访问服务提供者的进程信息。完成整个Rest微服务工程的落地实现。
工程重构
观察问题
在80 和 8001两个微服务工程中,实体类是相同的。这种情况下当微服务项目变大之后会产生冗余的信息。因此需要对rest微服务工程进行工程信息的重构。将相似的部分直接拿出来。
新建
将重复的部分提到一个公共的公共的模块上,可以让所有的信息之间进行调配。
新建一个微服务模块。将微服务模块的名字设置为cloud-api-commons(因为不需要对外指定的服务或者调用指定的服务因此不需要暴露指定的端口信息,)
创建cloud-api-commons微服务项目的部署于之前的步骤相同。创建项目完成之后修改pom.xml文件引入对应的依赖信息
<dependencies>
    <dependency>
        <groupId>org.projectlombokgroupId>
        <artifactId>lombokartifactId>
        <optional>trueoptional>
    dependency>
    <dependency>
        <groupId>org.springframework.bootgroupId>
        <artifactId>spring-boot-devtoolsartifactId>
        <scope>runtimescope>
        <optional>trueoptional>
    dependency>
    <dependency>
        <groupId>cn.hutoolgroupId>
        <artifactId>hutool-allartifactId>
        <version>5.1.0version>
    dependency>
dependencies>
在创建的项目中建立起对应的实体类信息。之后将其他的两个服务提供者和服务消费者的实体类的信息删除掉。然后在这两个微服务的pom文件中引cloud-api-commons的坐标位置完成操作。通过将公共的模块提取出来一个单独的模块在其他的模块中导入pom坐标完成工程的重构提高了项目的内聚性降低了项目的耦合性
        <dependency>
            <groupId>org.examplegroupId>
            <artifactId>cloud-api-commonsartifactId>
            <version>${project.version}version>
        dependency>
引入完成之后删除原来的实体类模块重新的进行测试。成功之后工程重构成功,整个Rest微服务工程也全部的完成。
之后重启所有的微服务访问服务的消费者,测试读写操作的正确性。
总结:到这个过程结束我们完成了微服务基本环境的搭建和落地实施,体现了springboot开发和springcloud这种微服务开发的不同之处。之后需要学习哦springcloud自带的服务治理和协调的功能。
Eureka服务注册中心
Eureka服务治理(Eureka现在已经停止了更新了)
什么是服务治理?
spring cloud封装了Netflix公司开发的Eureka模块来实现服务治理
在传统的Rpc远程调用框架中,管理每个服务于服务之间的依赖关系比较复杂,需要服务的治理管理服务与服务之间的依赖关系,可以实现服务调用,负载均衡,容错,实现服务发现于注册。
管理和治理需要一个注册中心
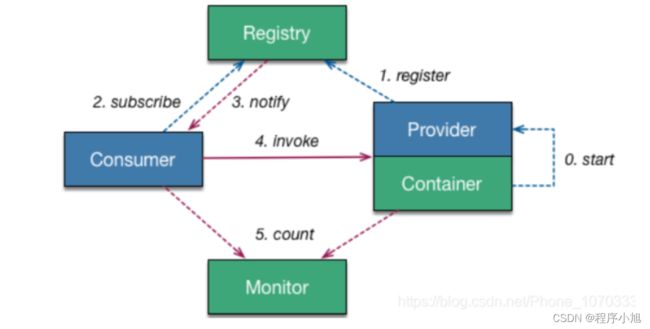
上面是Eureka和dubbo的架构图,通过两张架构图来观察两个注册中心的不同之处。
Eureka中一个服务消费者需要访问Eureka集群和服务提供者的集群(不使用集群可能出现单点故障)
采用了c/s架构是注册中心可以通过Eureka来监控服务是否在正常的运行。
Eureka的两个组件
Eureka包括了两个组件:Eureka Server 和 Eureka Client
Eureka server提供了服务注册的服务:对于注册完成的服务(服务节点)可以在界面中直观的看到。
Eureka Client 通过注册中心来进行访问
是一个Java的客户端,用于简化Eureka Server的交互,客户端同时也具备一个内置的、使用轮询负载算法的负载均衡器。在启动之后回向Eureka Server发送心跳(默认周期为30s)如果在多个周期内没有接收到某个节点的心跳会把这个节点在服务表中移除默认时间为90s
Eureka Server服务端的安装
Eureka server的默认的端口号是7001端口号。
idea生成Eureka server端服务注册中心类似于物业公司。
创建Eureka服务端的微服务模块
新建一个Eureka服务端模块名字为:Eureka server7001模块
修改pom文件引入相关的依赖信息。
<dependencies>

    <dependency>
        <groupId>org.springframework.cloudgroupId>
        <artifactId>spring-cloud-starter-netflix-eureka-serverartifactId>
    dependency>

    <dependency>
        <groupId>org.xzq.springcloudgroupId>
        <artifactId>cloud-api-commonsartifactId>
        <version>${project.version}version>
    dependency>

    <dependency>
        <groupId>org.springframework.bootgroupId>
        <artifactId>spring-bootartifactId>
    dependency>
    <dependency>
        <groupId>org.springframework.bootgroupId>
        <artifactId>spring-boot-starter-webartifactId>
    dependency>
    <dependency>
        <groupId>org.springframework.bootgroupId>
        <artifactId>spring-boot-starter-actuatorartifactId>
    dependency>
    <dependency>
        <groupId>org.springframework.bootgroupId>
        <artifactId>spring-boot-devtoolsartifactId>
        <scope>runtimescope>
        <optional>trueoptional>
    dependency>
dependencies>
创建yaml配置文件
server:
  port: 7001

eureka:
  instance:
    hostname: localhost  #eureka服务端的实例名名称
  client:
    #false表示不向注册中心注册自己
    register-with-eureka: false
    #false表示自己的端是注册中心不需要去在检索服务。
    fetch-registry: false
    service-url:
    #设置有eureka serever交互的地址查询服务和注册服务都需要依赖这个地址。
      defaultZone: http://${eureka.instance.hostname}:${server.port}/eureka/
主启动在eureka的微服务中创建启动类
package com.dzu.springcloud;

import org.springframework.boot.SpringApplication;
import org.springframework.boot.autoconfigure.SpringBootApplication;
import org.springframework.cloud.netflix.eureka.server.EnableEurekaServer;

/**
 * @author chenruxu
 * eureka服务端程序的主启动类
 */
 @SpringBootApplication
 @EnableEurekaServer
public class EurekaMain7001 {
    public static void main(String[] args) {
        SpringApplication.run(EurekaMain7001.class,args);
    }
}
同时使用@EnableEurekaServer注解表示Eureka7001是Eureka的服务注册中心
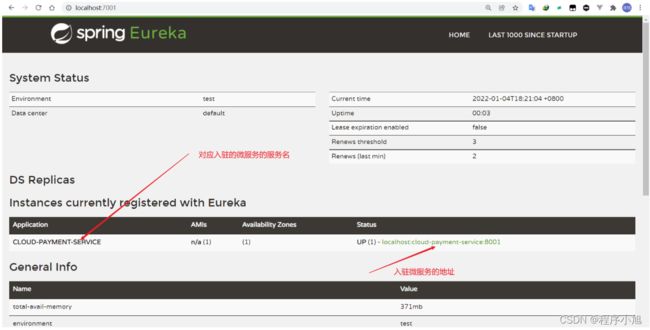
开启服务进行测试在浏览器中进入Eureka的服务注册中心则表示整个服务注册成功。
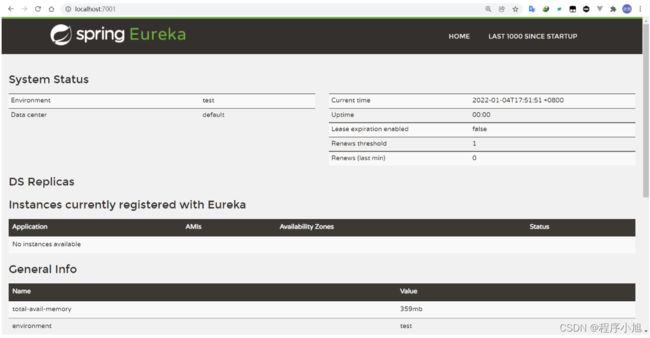
http://localhost:7001/ 单机的Eureka注册成功的页面如下所示。
Instances currently registered with Eureka:No instances available(代表当前没有实例存在)
支付微服务8001入驻eureka server
在前面的学习中我们知道eureka有两个基本的组件,eureka的server端和eureka的client 8001相对于7001而言是一个客户端它使用了客户端提供的服务信息。
- 先在对8001这个微服务模块进行修改引入eureka客户端的依赖jar包,同时在启动类上加入支持的注解。
<dependency>
    <groupId>org.springframework.cloudgroupId>
    <artifactId>spring-cloud-starter-netflix-eureka-clientartifactId>
dependency>
- 在yaml配置文件中加入eureka的相关的信息
eureka:
  client:
    register-with-eureka: true #表示向注册中心注册自己 默认为true
    fetch-registry: true #是否从EurekaServer抓取已有的注册信息,默认为true,单节点无所谓,集群必须设置为true才能配合ribbon使用负载均衡
    service-url:
      defaultZone: http://localhost:7001/eureka/ # 入驻地址
- 在8001的主启动类上加上@EnableEurekaClient注解表示这是一个Eureka的客户端模块
package com.dzu.springcloud;

import org.springframework.boot.SpringApplication;
import org.springframework.boot.autoconfigure.SpringBootApplication;
import org.springframework.cloud.netflix.eureka.EnableEurekaClient;

/**
 * @author chenruxu
 * @date 2022 1/2
 * springboot的主启动类
 */
@SpringBootApplication
@EnableEurekaClient
public class PaymentMain8001 {
    public static void main(String[] args) {
        SpringApplication.run(PaymentMain8001.class,args);
    }
}
- 启动8001和7001两个服务观察测试的结果
订单微服务80入驻eurekaServer
订单微服务80入驻eureka server的步骤和基本的思想于支付模块的步骤相同没有太多的差距。
首先引入eureka client所需要的pom依赖
        <dependency>
            <groupId>org.springframework.cloudgroupId>
            <artifactId>spring-cloud-starter-netflix-eureka-clientartifactId>
        dependency>
**之后修改yaml配置文件将服务名和eureka的相关的信息添加进yaml文件中 **
register-with-eureka: true #表示向eureka服务端中注册自己
register-with-eureka: false #表示不向eureka客户端服务中注册自己
server:
  port: 80

eureka:
  client:
    register-with-eureka: true #表示向注册中心注册自己 默认为true
    fetch-registry: true #是否从EurekaServer抓取已有的注册信息,默认为true,单节点无所谓,集群必须设置为true才能配合ribbon使用负载均衡
    service-url:
      defaultZone: http://localhost:7001/eureka/ # 入驻地址
spring:
  application:
    name: cloud-order-service
在80微服务中加入注解@EnableEurekaClient
@EnableEurekaClient #声明这是一个客户端程序
之后启动这三个微服务进行信息的测试
Eureka集群原理说明
上面的是实现是单机版的Eureka的使用步骤,为了满足企业开发过程中的高可用。需要设置eureka的集群操作。
服务发现:从注册中心上获取服务信息。
搭建Eureka注册中心集群,实现负载均衡+故障容错。
步骤:
-
先启动eureka注册中心
-
启动服务提供者payment支付服务
-
支付服务启动后,会把自身信息注册到eureka
-
消费者order服务在需要调用接口时,使用服务别名去注册中心获取实际的远程调用地址
-
消费者获得调用地址后,底层实际是调用httpclient技术实现远程调用
-
消费者获得服务地址后会缓存在本地jvm中,默认每30秒更新异常服务调用地址
核心思想:互相注册,相互守望
在7001中注册7002,同时在7002中注册7001
Eureka Server集群环境的搭建步骤
- 参考cloud-eureka-server7001新建cloud-eureka-server-7002
- 修改pom文件
- 修改映射配置
- 写Yaml(以前是单机)
- 主启动
实现将支付服务8001和订单微服务80发布到上面两台eureka集群的配置中去。然后进行测试。
在7001的微服务中注册进去7002的注册中心
server:
  port: 7001

eureka:
  instance:
    hostname: 127.0.0.1  #eureka服务端的实例名名称
  client:
    #false表示不向注册中心注册自己
    register-with-eureka: false
    #false表示自己的端是注册中心不需要去在检索服务。
    fetch-registry: false
    service-url:
    #设置有eureka serever交互的地址查询服务和注册服务都需要依赖这个地址。
      defaultZone: http://localhost:7002/eureka/
在7002的微服务中注册进去7001的注册中心
server:
  port: 7002

eureka:
  instance:
    hostname: 127.0.0.1  #eureka服务端的实例名名称
  client:
    #false表示不向注册中心注册自己
    register-with-eureka: false
    #false表示自己的端是注册中心不需要去在检索服务。
    fetch-registry: false
    service-url:
      #设置有eureka serever交互的地址查询服务和注册服务都需要依赖这个地址。
      defaultZone: http://localhost:7001/eureka/
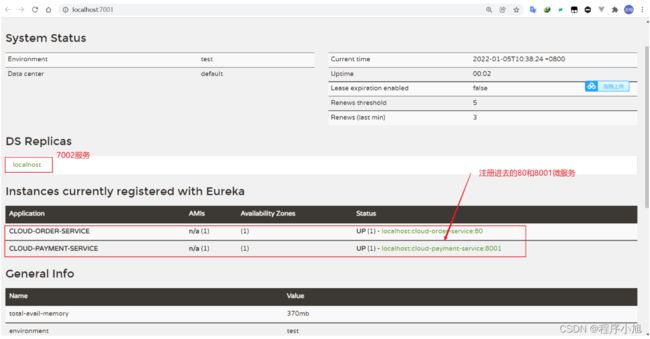
启动7001和7002两个微服务(注意的是搭建集群环境的时候由于是在自己的本地的电脑上hostname需要写为127.0.0.1不能是localhost否则会注册失败)
订单支付两个微服务注册进Eureka集群环境中去
在原来的单机的状态下,将两个服务入驻Eureka server中是通过注解加上配置文件的方式来实现的。
eureka:
  client:
    register-with-eureka: true #表示向注册中心注册自己 默认为true
    fetch-registry: true #是否从EurekaServer抓取已有的注册信息,默认为true,单节点无所谓,集群必须设置为true才能配合ribbon使用负载均衡
    service-url:
      defaultZone: http://localhost:7001/eureka/ # 入驻地址
现在使用集群的方式来完成操作,只需要修改配置文件中的信息将入驻的地址改为集群的形式即可完成对应的操作
eureka:
  client:
    register-with-eureka: true #表示向注册中心注册自己 默认为true
    fetch-registry: true #是否从EurekaServer抓取已有的注册信息,默认为true,单节点无所谓,集群必须设置为true才能配合ribbon使用负载均衡
    service-url:
      defaultZone: http://localhost:7001/eureka/,http://localhost:7001/eureka/ # 入驻地址
采用同样的方式举一反三,将80的服务同样的注册进入Eureka集群环境中。
server:
  port: 80

eureka:
  client:
    register-with-eureka: true #表示向注册中心注册自己 默认为true
    fetch-registry: true #是否从EurekaServer抓取已有的注册信息,默认为true,单节点无所谓,集群必须设置为true才能配合ribbon使用负载均衡
    service-url:
      defaultZone: http://localhost:7001/eureka/,http://localhost:7002/eureka/ # 入驻地址
spring:
  application:
    name: cloud-order-service
测试步骤
在测试的时候需要注意的是先启动Eureka Server 7001 7002两个微服务的信息。
在启动服务提供者8001(加载时需要找7001和7002这些服务)
最后在启动80消费者微服务。
按照先后顺序以此进行启动。
不按照顺序启动的报错
com.sun.jersey.api.client.ClientHandlerException: java.net.ConnectException: Connection refused: connect
at com.sun.jersey.client.apache4.ApacheHttpClient4Handler.handle(ApacheHttpClient4Handler.java:187) ~[jersey-apache-client4-1.19.1.jar:1.19.1]
at com.sun.jersey.api.client.filter.GZIPContentEncodingFilter.handle(GZIPContentEncodingFilter.java:123) ~[jersey-client-1.19.1.jar:1.19.1]
at com.netflix.discovery.EurekaIdentityHeaderFilter.handle(EurekaIdentityHeaderFilter.java:27) ~[eureka-client-1.9.13.jar:1.9.13]
at com.sun.jersey.api.client.Client.handle(Client.java:652) ~[jersey-client-1.19.1.jar:1.19.1]
at com.sun.jersey.api.client.WebResource.handle(WebResource.java:682) ~[jersey-client-1.19.1.jar:1.19.1]
at com.sun.jersey.api.client.WebResource.access 200 ( W e b R e s o u r c e . j a v a : 74 ) [ j e r s e y − c l i e n t − 1.19.1. j a r : 1.19.1 ] a t c o m . s u n . j e r s e y . a p i . c l i e n t . W e b R e s o u r c e 200(WebResource.java:74) ~[jersey-client-1.19.1.jar:1.19.1] at com.sun.jersey.api.client.WebResource 200(WebResource.java:74) [jersey−client−1.19.1.jar:1.19.1]atcom.sun.jersey.api.client.WebResourceBuilder.get(WebResource.java:509) ~[jersey-client-1.19.1.jar:1.19.1]
at com.netflix.discovery.shared.transport.jersey.AbstractJerseyEurekaHttpClient.getApplicationsInternal(AbstractJerseyEurekaHttpClient.java:194) ~[eureka-client-1.9.13.jar:1.9.13]
at com.netflix.discovery.shared.transport.jersey.AbstractJerseyEurekaHttpClient.getApplications(AbstractJerseyEurekaHttpClient.java:165) ~[eureka-client-1.9.13.jar:1.9.13]
at com.netflix.discovery.shared.transport.decorator.EurekaHttpClientDecorator$6.execute(EurekaHttpClientDecorator.java:137) [eureka-client-1.9.13.jar:1.9.13]
at com.netflix.discovery.shared.transport.decorator.MetricsCollectingEurekaHttpClient.execute(MetricsCollectingEurekaHttpClient.java:73) ~[eureka-client-1.9.13.jar:1.9.13]
at com.netflix.discovery.shared.transport.decorator.EurekaHttpClientDecorator.getApplications(EurekaHttpClientDecorator.java:134) [eureka-client-1.9.13.jar:1.9.13]
at com.netflix.discovery.shared.transport.decorator.EurekaHttpClientDecorator$6.execute(EurekaHttpClientDecorator.java:137) [eureka-client-1.9.13.jar:1.9.13]
at com.netflix.discovery.shared.transport.decorator.RedirectingEurekaHttpClient.executeOnNewServer(RedirectingEurekaHttpClient.java:118) ~[eureka-client-1.9.13.jar:1.9.13]
at com.netflix.discovery.shared.transport.decorator.RedirectingEurekaHttpClient.execute(RedirectingEurekaHttpClient.java:79) ~[eureka-client-1.9.13.jar:1.9.13]
at com.netflix.discovery.shared.transport.decorator.EurekaHttpClientDecorator.getApplications(EurekaHttpClientDecorator.java:134) [eureka-client-1.9.13.jar:1.9.13]
at com.netflix.discovery.shared.transport.decorator.EurekaHttpClientDecorator$6.execute(EurekaHttpClientDecorator.java:137) [eureka-client-1.9.13.jar:1.9.13]
at com.netflix.discovery.shared.transport.decorator.RetryableEurekaHttpClient.execute(RetryableEurekaHttpClient.java:120) [eureka-client-1.9.13.jar:1.9.13]
at com.netflix.discovery.shared.transport.decorator.EurekaHttpClientDecorator.getApplications(EurekaHttpClientDecorator.java:134) [eureka-client-1.9.13.jar:1.9.13]
at com.netflix.discovery.shared.transport.decorator.EurekaHttpClientDecorator 6. e x e c u t e ( E u r e k a H t t p C l i e n t D e c o r a t o r . j a v a : 137 ) [ e u r e k a − c l i e n t − 1.9.13. j a r : 1.9.13 ] a t c o m . n e t f l i x . d i s c o v e r y . s h a r e d . t r a n s p o r t . d e c o r a t o r . S e s s i o n e d E u r e k a H t t p C l i e n t . e x e c u t e ( S e s s i o n e d E u r e k a H t t p C l i e n t . j a v a : 77 ) [ e u r e k a − c l i e n t − 1.9.13. j a r : 1.9.13 ] a t c o m . n e t f l i x . d i s c o v e r y . s h a r e d . t r a n s p o r t . d e c o r a t o r . E u r e k a H t t p C l i e n t D e c o r a t o r . g e t A p p l i c a t i o n s ( E u r e k a H t t p C l i e n t D e c o r a t o r . j a v a : 134 ) [ e u r e k a − c l i e n t − 1.9.13. j a r : 1.9.13 ] a t c o m . n e t f l i x . d i s c o v e r y . D i s c o v e r y C l i e n t . g e t A n d S t o r e F u l l R e g i s t r y ( D i s c o v e r y C l i e n t . j a v a : 1069 ) [ e u r e k a − c l i e n t − 1.9.13. j a r : 1.9.13 ] a t c o m . n e t f l i x . d i s c o v e r y . D i s c o v e r y C l i e n t . f e t c h R e g i s t r y ( D i s c o v e r y C l i e n t . j a v a : 983 ) [ e u r e k a − c l i e n t − 1.9.13. j a r : 1.9.13 ] a t c o m . n e t f l i x . d i s c o v e r y . D i s c o v e r y C l i e n t . < i n i t > ( D i s c o v e r y C l i e n t . j a v a : 430 ) [ e u r e k a − c l i e n t − 1.9.13. j a r : 1.9.13 ] a t c o m . n e t f l i x . d i s c o v e r y . D i s c o v e r y C l i e n t . < i n i t > ( D i s c o v e r y C l i e n t . j a v a : 276 ) [ e u r e k a − c l i e n t − 1.9.13. j a r : 1.9.13 ] a t c o m . n e t f l i x . d i s c o v e r y . D i s c o v e r y C l i e n t . < i n i t > ( D i s c o v e r y C l i e n t . j a v a : 272 ) [ e u r e k a − c l i e n t − 1.9.13. j a r : 1.9.13 ] a t o r g . s p r i n g f r a m e w o r k . c l o u d . n e t f l i x . e u r e k a . C l o u d E u r e k a C l i e n t . < i n i t > ( C l o u d E u r e k a C l i e n t . j a v a : 67 ) [ s p r i n g − c l o u d − n e t f l i x − e u r e k a − c l i e n t − 2.2.1. R E L E A S E . j a r : 2.2.1. R E L E A S E ] a t o r g . s p r i n g f r a m e w o r k . c l o u d . n e t f l i x . e u r e k a . E u r e k a C l i e n t A u t o C o n f i g u r a t i o n 6.execute(EurekaHttpClientDecorator.java:137) [eureka-client-1.9.13.jar:1.9.13] at com.netflix.discovery.shared.transport.decorator.SessionedEurekaHttpClient.execute(SessionedEurekaHttpClient.java:77) [eureka-client-1.9.13.jar:1.9.13] at com.netflix.discovery.shared.transport.decorator.EurekaHttpClientDecorator.getApplications(EurekaHttpClientDecorator.java:134) [eureka-client-1.9.13.jar:1.9.13] at com.netflix.discovery.DiscoveryClient.getAndStoreFullRegistry(DiscoveryClient.java:1069) [eureka-client-1.9.13.jar:1.9.13] at com.netflix.discovery.DiscoveryClient.fetchRegistry(DiscoveryClient.java:983) [eureka-client-1.9.13.jar:1.9.13] at com.netflix.discovery.DiscoveryClient.(DiscoveryClient.java:430) [eureka-client-1.9.13.jar:1.9.13] at com.netflix.discovery.DiscoveryClient. 6.execute(EurekaHttpClientDecorator.java:137)[eureka−client−1.9.13.jar:1.9.13]atcom.netflix.discovery.shared.transport.decorator.SessionedEurekaHttpClient.execute(SessionedEurekaHttpClient.java:77)[eureka−client−1.9.13.jar:1.9.13]atcom.netflix.discovery.shared.transport.decorator.EurekaHttpClientDecorator.getApplications(EurekaHttpClientDecorator.java:134)[eureka−client−1.9.13.jar:1.9.13]atcom.netflix.discovery.DiscoveryClient.getAndStoreFullRegistry(DiscoveryClient.java:1069)[eureka−client−1.9.13.jar:1.9.13]atcom.netflix.discovery.DiscoveryClient.fetchRegistry(DiscoveryClient.java:983)[eureka−client−1.9.13.jar:1.9.13]atcom.netflix.discovery.DiscoveryClient.<init>(DiscoveryClient.java:430)[eureka−client−1.9.13.jar:1.9.13]atcom.netflix.discovery.DiscoveryClient.<init>(DiscoveryClient.java:276)[eureka−client−1.9.13.jar:1.9.13]atcom.netflix.discovery.DiscoveryClient.<init>(DiscoveryClient.java:272)[eureka−client−1.9.13.jar:1.9.13]atorg.springframework.cloud.netflix.eureka.CloudEurekaClient.<init>(CloudEurekaClient.java:67)[spring−cloud−netflix−eureka−client−2.2.1.RELEASE.jar:2.2.1.RELEASE]atorg.springframework.cloud.netflix.eureka.EurekaClientAutoConfigurationRefreshableEurekaClientConfiguration.eurekaClient(EurekaClientAutoConfiguration.java:324) [spring-cloud-netflix-eureka-client-2.2.1.RELEASE.jar:2.2.1.RELEASE](DiscoveryClient.java:276) [eureka-client-1.9.13.jar:1.9.13] at com.netflix.discovery.DiscoveryClient. (DiscoveryClient.java:272) [eureka-client-1.9.13.jar:1.9.13] at org.springframework.cloud.netflix.eureka.CloudEurekaClient. (CloudEurekaClient.java:67) [spring-cloud-netflix-eureka-client-2.2.1.RELEASE.jar:2.2.1.RELEASE] at org.springframework.cloud.netflix.eureka.EurekaClientAutoConfiguration
at sun.reflect.NativeMethodAccessorImpl.invoke0(Native Method) ~[na:1.8.0_152]
at sun.reflect.NativeMethodAccessorImpl.invoke(NativeMethodAccessorImpl.java:62) ~[na:1.8.0_152]
at sun.reflect.DelegatingMethodAccessorImpl.invoke(DelegatingMethodAccessorImpl.java:43) ~[na:1.8.0_152]
at java.lang.reflect.Method.invoke(Method.java:498) ~[na:1.8.0_152]
at org.springframework.beans.factory.support.SimpleInstantiationStrategy.instantiate(SimpleInstantiationStrategy.java:154) [spring-beans-5.2.2.RELEASE.jar:5.2.2.RELEASE]
at org.springframework.beans.factory.support.ConstructorResolver.instantiate(ConstructorResolver.java:651) [spring-beans-5.2.2.RELEASE.jar:5.2.2.RELEASE]
at org.springframework.beans.factory.support.ConstructorResolver.instantiateUsingFactoryMethod(ConstructorResolver.java:636) [spring-beans-5.2.2.RELEASE.jar:5.2.2.RELEASE]
at org.springframework.beans.factory.support.AbstractAutowireCapableBeanFactory.instantiateUsingFactoryMethod(AbstractAutowireCapableBeanFactory.java:1338) [spring-beans-5.2.2.RELEASE.jar:5.2.2.RELEASE]
at org.springframework.beans.factory.support.AbstractAutowireCapableBeanFactory.createBeanInstance(AbstractAutowireCapableBeanFactory.java:1177) [spring-beans-5.2.2.RELEASE.jar:5.2.2.RELEASE]
at org.springframework.beans.factory.support.AbstractAutowireCapableBeanFactory.doCreateBean(AbstractAutowireCapableBeanFactory.java:557) [spring-beans-5.2.2.RELEASE.jar:5.2.2.RELEASE]
at org.springframework.beans.factory.support.AbstractAutowireCapableBeanFactory.createBean(AbstractAutowireCapableBeanFactory.java:517) [spring-beans-5.2.2.RELEASE.jar:5.2.2.RELEASE]
at org.springframework.beans.factory.support.AbstractBeanFactory.lambda$doGetBean 1 ( A b s t r a c t B e a n F a c t o r y . j a v a : 359 ) [ s p r i n g − b e a n s − 5.2.2. R E L E A S E . j a r : 5.2.2. R E L E A S E ] a t o r g . s p r i n g f r a m e w o r k . c l o u d . c o n t e x t . s c o p e . G e n e r i c S c o p e 1(AbstractBeanFactory.java:359) [spring-beans-5.2.2.RELEASE.jar:5.2.2.RELEASE] at org.springframework.cloud.context.scope.GenericScope 1(AbstractBeanFactory.java:359)[spring−beans−5.2.2.RELEASE.jar:5.2.2.RELEASE]atorg.springframework.cloud.context.scope.GenericScopeBeanLifecycleWrapper.getBean(GenericScope.java:389) ~[spring-cloud-context-2.2.1.RELEASE.jar:2.2.1.RELEASE]
at org.springframework.cloud.context.scope.GenericScope.get(GenericScope.java:186) ~[spring-cloud-context-2.2.1.RELEASE.jar:2.2.1.RELEASE]
at org.springframework.beans.factory.support.AbstractBeanFactory.doGetBean(AbstractBeanFactory.java:356) [spring-beans-5.2.2.RELEASE.jar:5.2.2.RELEASE]
at org.springframework.beans.factory.support.AbstractBeanFactory.getBean(AbstractBeanFactory.java:202) [spring-beans-5.2.2.RELEASE.jar:5.2.2.RELEASE]
at org.springframework.aop.target.SimpleBeanTargetSource.getTarget(SimpleBeanTargetSource.java:35) ~[spring-aop-5.2.2.RELEASE.jar:5.2.2.RELEASE]
at org.springframework.cloud.netflix.eureka.serviceregistry.EurekaRegistration.getTargetObject(EurekaRegistration.java:129) ~[spring-cloud-netflix-eureka-client-2.2.1.RELEASE.jar:2.2.1.RELEASE]
at org.springframework.cloud.netflix.eureka.serviceregistry.EurekaRegistration.getEurekaClient(EurekaRegistration.java:117) ~[spring-cloud-netflix-eureka-client-2.2.1.RELEASE.jar:2.2.1.RELEASE]
at sun.reflect.NativeMethodAccessorImpl.invoke0(Native Method) ~[na:1.8.0_152]
at sun.reflect.NativeMethodAccessorImpl.invoke(NativeMethodAccessorImpl.java:62) ~[na:1.8.0_152]
at sun.reflect.DelegatingMethodAccessorImpl.invoke(DelegatingMethodAccessorImpl.java:43) ~[na:1.8.0_152]
at java.lang.reflect.Method.invoke(Method.java:498) ~[na:1.8.0_152]
at org.springframework.util.ReflectionUtils.invokeMethod(ReflectionUtils.java:282) ~[spring-core-5.2.2.RELEASE.jar:5.2.2.RELEASE]
at org.springframework.cloud.context.scope.GenericScope L o c k e d S c o p e d P r o x y F a c t o r y B e a n . i n v o k e ( G e n e r i c S c o p e . j a v a : 499 ) [ s p r i n g − c l o u d − c o n t e x t − 2.2.1. R E L E A S E . j a r : 2.2.1. R E L E A S E ] a t o r g . s p r i n g f r a m e w o r k . a o p . f r a m e w o r k . R e f l e c t i v e M e t h o d I n v o c a t i o n . p r o c e e d ( R e f l e c t i v e M e t h o d I n v o c a t i o n . j a v a : 186 ) [ s p r i n g − a o p − 5.2.2. R E L E A S E . j a r : 5.2.2. R E L E A S E ] a t o r g . s p r i n g f r a m e w o r k . a o p . f r a m e w o r k . C g l i b A o p P r o x y LockedScopedProxyFactoryBean.invoke(GenericScope.java:499) ~[spring-cloud-context-2.2.1.RELEASE.jar:2.2.1.RELEASE] at org.springframework.aop.framework.ReflectiveMethodInvocation.proceed(ReflectiveMethodInvocation.java:186) ~[spring-aop-5.2.2.RELEASE.jar:5.2.2.RELEASE] at org.springframework.aop.framework.CglibAopProxy LockedScopedProxyFactoryBean.invoke(GenericScope.java:499) [spring−cloud−context−2.2.1.RELEASE.jar:2.2.1.RELEASE]atorg.springframework.aop.framework.ReflectiveMethodInvocation.proceed(ReflectiveMethodInvocation.java:186) [spring−aop−5.2.2.RELEASE.jar:5.2.2.RELEASE]atorg.springframework.aop.framework.CglibAopProxyCglibMethodInvocation.proceed(CglibAopProxy.java:747) ~[spring-aop-5.2.2.RELEASE.jar:5.2.2.RELEASE]
at org.springframework.aop.framework.CglibAopProxy D y n a m i c A d v i s e d I n t e r c e p t o r . i n t e r c e p t ( C g l i b A o p P r o x y . j a v a : 689 ) [ s p r i n g − a o p − 5.2.2. R E L E A S E . j a r : 5.2.2. R E L E A S E ] a t o r g . s p r i n g f r a m e w o r k . c l o u d . n e t f l i x . e u r e k a . s e r v i c e r e g i s t r y . E u r e k a R e g i s t r a t i o n DynamicAdvisedInterceptor.intercept(CglibAopProxy.java:689) ~[spring-aop-5.2.2.RELEASE.jar:5.2.2.RELEASE] at org.springframework.cloud.netflix.eureka.serviceregistry.EurekaRegistration DynamicAdvisedInterceptor.intercept(CglibAopProxy.java:689) [spring−aop−5.2.2.RELEASE.jar:5.2.2.RELEASE]atorg.springframework.cloud.netflix.eureka.serviceregistry.EurekaRegistration E n h a n c e r B y S p r i n g C G L I B EnhancerBySpringCGLIB EnhancerBySpringCGLIB$a1c0324a.getEurekaClient() ~[spring-cloud-netflix-eureka-client-2.2.1.RELEASE.jar:2.2.1.RELEASE]
at org.springframework.cloud.netflix.eureka.serviceregistry.EurekaServiceRegistry.maybeInitializeClient(EurekaServiceRegistry.java:57) ~[spring-cloud-netflix-eureka-client-2.2.1.RELEASE.jar:2.2.1.RELEASE]
at org.springframework.cloud.netflix.eureka.serviceregistry.EurekaServiceRegistry.register(EurekaServiceRegistry.java:38) ~[spring-cloud-netflix-eureka-client-2.2.1.RELEASE.jar:2.2.1.RELEASE]
at org.springframework.cloud.netflix.eureka.serviceregistry.EurekaAutoServiceRegistration.start(EurekaAutoServiceRegistration.java:83) ~[spring-cloud-netflix-eureka-client-2.2.1.RELEASE.jar:2.2.1.RELEASE]
at org.springframework.context.support.DefaultLifecycleProcessor.doStart(DefaultLifecycleProcessor.java:182) ~[spring-context-5.2.2.RELEASE.jar:5.2.2.RELEASE]
at org.springframework.context.support.DefaultLifecycleProcessor.access 200 ( D e f a u l t L i f e c y c l e P r o c e s s o r . j a v a : 53 ) [ s p r i n g − c o n t e x t − 5.2.2. R E L E A S E . j a r : 5.2.2. R E L E A S E ] a t o r g . s p r i n g f r a m e w o r k . c o n t e x t . s u p p o r t . D e f a u l t L i f e c y c l e P r o c e s s o r 200(DefaultLifecycleProcessor.java:53) ~[spring-context-5.2.2.RELEASE.jar:5.2.2.RELEASE] at org.springframework.context.support.DefaultLifecycleProcessor 200(DefaultLifecycleProcessor.java:53) [spring−context−5.2.2.RELEASE.jar:5.2.2.RELEASE]atorg.springframework.context.support.DefaultLifecycleProcessorLifecycleGroup.start(DefaultLifecycleProcessor.java:360) ~[spring-context-5.2.2.RELEASE.jar:5.2.2.RELEASE]
at org.springframework.context.support.DefaultLifecycleProcessor.startBeans(DefaultLifecycleProcessor.java:158) ~[spring-context-5.2.2.RELEASE.jar:5.2.2.RELEASE]
at org.springframework.context.support.DefaultLifecycleProcessor.onRefresh(DefaultLifecycleProcessor.java:122) ~[spring-context-5.2.2.RELEASE.jar:5.2.2.RELEASE]
at org.springframework.context.support.AbstractApplicationContext.finishRefresh(AbstractApplicationContext.java:894) ~[spring-context-5.2.2.RELEASE.jar:5.2.2.RELEASE]
at org.springframework.boot.web.servlet.context.ServletWebServerApplicationContext.finishRefresh(ServletWebServerApplicationContext.java:162) ~[spring-boot-2.2.2.RELEASE.jar:2.2.2.RELEASE]
at org.springframework.context.support.AbstractApplicationContext.refresh(AbstractApplicationContext.java:553) ~[spring-context-5.2.2.RELEASE.jar:5.2.2.RELEASE]
at org.springframework.boot.web.servlet.context.ServletWebServerApplicationContext.refresh(ServletWebServerApplicationContext.java:141) ~[spring-boot-2.2.2.RELEASE.jar:2.2.2.RELEASE]
at org.springframework.boot.SpringApplication.refresh(SpringApplication.java:747) ~[spring-boot-2.2.2.RELEASE.jar:2.2.2.RELEASE]
at org.springframework.boot.SpringApplication.refreshContext(SpringApplication.java:397) ~[spring-boot-2.2.2.RELEASE.jar:2.2.2.RELEASE]
at org.springframework.boot.SpringApplication.run(SpringApplication.java:315) ~[spring-boot-2.2.2.RELEASE.jar:2.2.2.RELEASE]
at org.springframework.boot.SpringApplication.run(SpringApplication.java:1226) ~[spring-boot-2.2.2.RELEASE.jar:2.2.2.RELEASE]
at org.springframework.boot.SpringApplication.run(SpringApplication.java:1215) ~[spring-boot-2.2.2.RELEASE.jar:2.2.2.RELEASE]
at com.dzu.springcloud.PaymentMain8001.main(PaymentMain8001.java:16) ~[classes/:na]
at sun.reflect.NativeMethodAccessorImpl.invoke0(Native Method) ~[na:1.8.0_152]
at sun.reflect.NativeMethodAccessorImpl.invoke(NativeMethodAccessorImpl.java:62) ~[na:1.8.0_152]
at sun.reflect.DelegatingMethodAccessorImpl.invoke(DelegatingMethodAccessorImpl.java:43) ~[na:1.8.0_152]
at java.lang.reflect.Method.invoke(Method.java:498) ~[na:1.8.0_152]
at org.springframework.boot.devtools.restart.RestartLauncher.run(RestartLauncher.java:49) ~[spring-boot-devtools-2.2.2.RELEASE.jar:2.2.2.RELEASE]
Caused by: java.net.ConnectException: Connection refused: connect
at java.net.DualStackPlainSocketImpl.waitForConnect(Native Method) ~[na:1.8.0_152]
at java.net.DualStackPlainSocketImpl.socketConnect(DualStackPlainSocketImpl.java:85) ~[na:1.8.0_152]
at java.net.AbstractPlainSocketImpl.doConnect(AbstractPlainSocketImpl.java:350) ~[na:1.8.0_152]
at java.net.AbstractPlainSocketImpl.connectToAddress(AbstractPlainSocketImpl.java:206) ~[na:1.8.0_152]
at java.net.AbstractPlainSocketImpl.connect(AbstractPlainSocketImpl.java:188) ~[na:1.8.0_152]
at java.net.PlainSocketImpl.connect(PlainSocketImpl.java:172) ~[na:1.8.0_152]
at java.net.SocksSocketImpl.connect(SocksSocketImpl.java:392) ~[na:1.8.0_152]
at java.net.Socket.connect(Socket.java:589) ~[na:1.8.0_152]
at org.apache.http.conn.scheme.PlainSocketFactory.connectSocket(PlainSocketFactory.java:121) ~[httpclient-4.5.10.jar:4.5.10]
at org.apache.http.impl.conn.DefaultClientConnectionOperator.openConnection(DefaultClientConnectionOperator.java:180) ~[httpclient-4.5.10.jar:4.5.10]
at org.apache.http.impl.conn.AbstractPoolEntry.open(AbstractPoolEntry.java:144) ~[httpclient-4.5.10.jar:4.5.10]
at org.apache.http.impl.conn.AbstractPooledConnAdapter.open(AbstractPooledConnAdapter.java:134) ~[httpclient-4.5.10.jar:4.5.10]
at org.apache.http.impl.client.DefaultRequestDirector.tryConnect(DefaultRequestDirector.java:605) ~[httpclient-4.5.10.jar:4.5.10]
at org.apache.http.impl.client.DefaultRequestDirector.execute(DefaultRequestDirector.java:440) ~[httpclient-4.5.10.jar:4.5.10]
at org.apache.http.impl.client.AbstractHttpClient.doExecute(AbstractHttpClient.java:835) ~[httpclient-4.5.10.jar:4.5.10]
at org.apache.http.impl.client.CloseableHttpClient.execute(CloseableHttpClient.java:118) ~[httpclient-4.5.10.jar:4.5.10]
at org.apache.http.impl.client.CloseableHttpClient.execute(CloseableHttpClient.java:56) ~[httpclient-4.5.10.jar:4.5.10]
at com.sun.jersey.client.apache4.ApacheHttpClient4Handler.handle(ApacheHttpClient4Handler.java:173) ~[jersey-apache-client4-1.19.1.jar:1.19.1]
… 80 common frames omitted
按照先后顺序启动这四个微服务,在服务注册中心进行测试
支付微服务集群配置
现在完成Eureka Server的集群配置信息,下面需要完成server provider的集群环境搭建。即对8001支付微服务进行集群环境的搭建和部署。(8001 8002 8003)
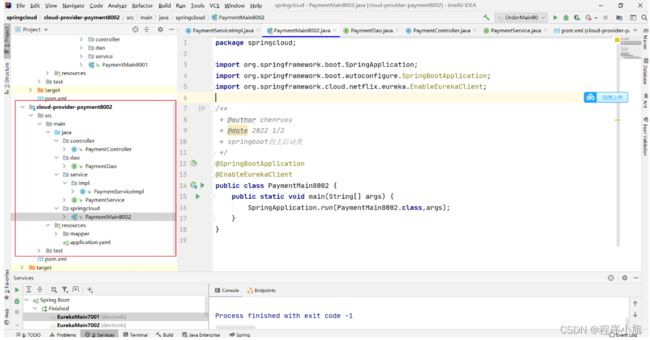
按照和8001相同的步骤创建8002这个支付微服务,
pom文件 配置文件(修改端口号) 和业务类于其他的结构于8001相同完成这个微服务的基础创建过程。
erver:
  port: 8002 #服务端口
spring:
  application:
    name: cloud-payment-service #服务名
  datasource:
    type: com.alibaba.druid.pool.DruidDataSource  #当前数据源操作类型
    driver-class-name: com.mysql.jdbc.Driver #数据库驱动包
    url: jdbc:mysql://localhost:3306/cloud?characterEncoding=utf8&useSSL=false
    password: 123456
    username: root
创建与8001相同结构和服务名字的8002,然后需要我们修改controller。之后修改消费者微服务,之间完成负载均衡得到处理操作。
之后修改两个controller可以看出端口号判断是哪一个微服务向客户端提供的服务
package com.dzu.springcloud.controller;

import com.dzu.springcloud.entities.CommonResult;
import com.dzu.springcloud.entities.Payment;
import com.dzu.springcloud.service.PaymentService;
import lombok.extern.slf4j.Slf4j;
import org.springframework.beans.factory.annotation.Autowired;
import org.springframework.beans.factory.annotation.Value;
import org.springframework.stereotype.Controller;
import org.springframework.web.bind.annotation.PathVariable;
import org.springframework.web.bind.annotation.RequestBody;
import org.springframework.web.bind.annotation.RequestMapping;
import org.springframework.web.bind.annotation.ResponseBody;


@Controller
@Slf4j
public class PaymentController {
    @Autowired
    private PaymentService paymentService;
    @Value("${server.port}")
    private String serverPort;


    @RequestMapping(value = "/payment/create")
    @ResponseBody
    public CommonResult create(@RequestBody Payment payment){
        int result = paymentService.create(payment);
        log.info("--->插入结果",result);
        if (result>0){
            return new CommonResult(200,"插入数据库成功,serverport"+serverPort,result);
        }else {
            return new CommonResult(400, "插入数据库失败,serverport"+serverPort);
        }
    }

    @ResponseBody
    @RequestMapping(value = "/payment/get/{id}")
    public CommonResult getPaymentbyid(@PathVariable("id")Long id){
        Payment payment = paymentService.getPaymentbyid(id);
        log.info("--->查询结果",payment);
        if (payment!=null){
            return new CommonResult(200,"查询成功",payment);
        }else {
            return new CommonResult(400,"没有记录",null);
        }
    }
}
之后启动按照顺序启动我们所有的服务信息,访问两个微服务进行查询信息的测试。
两个支付微服务搭建的集群环境全部进入了注册中心当中。
负载均衡
因为客户端在调用服务提供者进程的时候将服务的名称已经写死了为8001,需要进行一定得到修改满足负载均衡或使用默认的轮询算法。
private static final String PAYMENT_URL = "http://localhost:8001";
解决方式:从图片中也可以看出两个不同端口的微服务对应了一个相同的微服务名称。将单机版的写法放弃掉,使用服务名称的写法来进行调用即可
完成之后就可以实现服务消费者访问服务提供者的时候完成负载均衡的操作
private static final String PAYMENT_URL = "http://CLOUD-PAYMENT-SERVICE";
通过使用@LoadBalanced注解赋予RestTemplate负载均衡的能力
package com.dzu.springcloud.config;

import org.springframework.cloud.client.loadbalancer.LoadBalanced;
import org.springframework.context.annotation.Bean;
import org.springframework.context.annotation.Configuration;
import org.springframework.web.client.RestTemplate;

/**
 * @author chenruxu
 * RestTemplate的配置类
 */
@Configuration
public class ApplicationContextConfig {
    @Bean
    @LoadBalanced
    public RestTemplate getRestTemplate(){
        return new RestTemplate();
    }
}
完成之后重新启动消费者的微服务进程。进行负载均衡(轮询方式的测试)
actuator 微服务信息完善部分
包括了两个部分都是需要在yaml配置文件中进行修改和使用的。
-
主机名称:服务名称的修改
instance-id:xxxx
-
访问信息:访问信息可以有ip的显示。
prefer-ip-address: true
instance:
    instance-id: payment8001
    prefer-ip-address: true
上面的图便是actuator微服务信息完善之后的效果实例图
服务发现(Discover)
服务发现: 对于注册进eureka里面的微服务,可以通过服务发现来获得该服务的信息
-
修改8001的controller
-
8001的主启动类
-
自测
@Resource
private DiscoveryClient discoveryClient;
主启动类上加入@EnableDiscoveryClient注解
修改之后的controller
package com.dzu.springcloud.controller;

import com.dzu.springcloud.entities.CommonResult;
import com.dzu.springcloud.entities.Payment;
import com.dzu.springcloud.service.PaymentService;
import lombok.extern.slf4j.Slf4j;
import org.springframework.beans.factory.annotation.Autowired;
import org.springframework.beans.factory.annotation.Value;
import org.springframework.cloud.client.ServiceInstance;
import org.springframework.cloud.client.discovery.DiscoveryClient;
import org.springframework.stereotype.Controller;
import org.springframework.web.bind.annotation.PathVariable;
import org.springframework.web.bind.annotation.RequestBody;
import org.springframework.web.bind.annotation.RequestMapping;
import org.springframework.web.bind.annotation.ResponseBody;

import javax.annotation.Resource;
import java.util.List;


@Controller
@Slf4j
public class PaymentController {
    @Autowired
    private PaymentService paymentService;
    @Value("${server.port}")
    private String serverPort;

    @Resource
    private DiscoveryClient discoveryClient;


    @RequestMapping(value = "/payment/create")
    @ResponseBody
    public CommonResult create(@RequestBody Payment payment){
        int result = paymentService.create(payment);
        log.info("--->插入结果",result);
        if (result>0){
            return new CommonResult(200,"插入数据库成功,serverport"+serverPort,result);
        }else {
            return new CommonResult(400, "插入数据库失败,serverport"+serverPort);
        }
    }

    @ResponseBody
    @RequestMapping(value = "/payment/get/{id}")
    public CommonResult getPaymentbyid(@PathVariable("id")Long id){
        Payment payment = paymentService.getPaymentbyid(id);
        log.info("--->查询结果",payment);
        if (payment!=null){
            return new CommonResult(200,"查询成功 serverport"+serverPort,payment);
        }else {
            return new CommonResult(400,"没有记录",null);
        }
    }

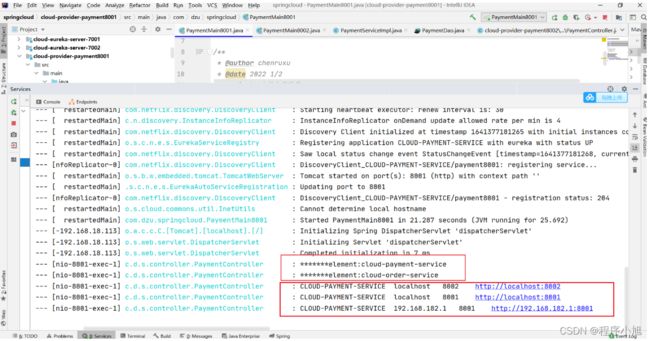
    @ResponseBody
    @RequestMapping(value = "/payment/discover")
    public Object discover(){
        List<String> services = discoveryClient.getServices();
        for (String element:services) {
            log.info("*******element:"+element);
        }
        List<ServiceInstance> instances = discoveryClient.getInstances("CLOUD-PAYMENT-SERVICE");
        for (ServiceInstance instance: instances) {
            log.info(instance.getServiceId()+"\t"+instance.getHost()+"\t"+instance.getPort()+"\t"+instance.getUri());
        }
        return this.discoveryClient;
    }
}
package com.dzu.springcloud;

import org.springframework.boot.SpringApplication;
import org.springframework.boot.autoconfigure.SpringBootApplication;
import org.springframework.cloud.client.discovery.EnableDiscoveryClient;
import org.springframework.cloud.netflix.eureka.EnableEurekaClient;

/**
 * @author chenruxu
 * @date 2022 1/2
 * springboot的主启动类
 */
@SpringBootApplication
@EnableEurekaClient
@EnableDiscoveryClient
public class PaymentMain8001 {
    public static void main(String[] args) {
        SpringApplication.run(PaymentMain8001.class,args);
    }
}
Eureka自我保护模式
CAP理论中的AP理论是一种高可用的设计方案
如果 Eureka 服务器检测到超过预期数量的注册客户端以一种不优雅的方式终止了连接,并且同时正在等待被驱逐,那么它们将进入自我保护模式。这样做是为了确保灾难性网络事件不会擦除eureka注册表数据,并将其向下传播到所有客户端。
任何客户端,如果连续3次心跳更新失败,那么它将被视为非正常终止,病句将被剔除。当超过当前注册实例15%的客户端都处于这种状态,那么自我保护将被开启。
当自我保护开启以后,eureka服务器将停止剔除所有实例,直到:
它看到的心跳续借的数量回到了预期的阈值之上,或者
自我保护被禁用
默认情况下,自我保护是启用的,并且,默认的阈值是要大于当前注册数量的15%
Eureka停更说明
Eureka2.0之后不在进行更新了,停更不停用
服务注册中心还有很多例如zookeeper nacos consul等,因此个人认为通过学习微服务架构的思想和服务治理,掌握服务注册与发现的思想对今后的开发来说更加的重要。


