【pytorch学习】hook打印中间特征图、计算网络算力等
点击“机器学习与生成对抗网络”,关注星标
获取有趣、好玩的前沿干货!
作者:知乎—涩醉
地址:https://www.zhihu.com/people/se-zui
01
背景
在神经网络的反向传播当中个,流程只保存叶子节点的梯度,对于中间变量的梯度没有进行保存。
import torchx = torch.tensor([1,2],dtype=torch.float32,requires_grad=True)y = x+2z = torch.mean(torch.pow(y, 2))lr = 1e-3z.backward()x.data -= lr*x.grad.dataprint(y.grad)
此时输出就是:None,这个时候hook的作用就派上,hook可以通过自定义一些函数,从而完成中间变量的输出,比如中间特征图、中间层梯度修正等。
在pytorch docs搜索hook,可以发现有四个hook相关的函数,分别为register_hook,register_backward_hook,register_forward_hook,register_forward_pre_hook。其中register_hook属于tensor类,而后面三个属于moudule类。
register_hook函数属于torch.tensor类,函数在tensor梯度计算的时候就会执行,这个函数主要处理梯度相关的数据,表现形式 .
import torchx = torch.tensor([1,2],dtype=torch.float32,requires_grad=True)y = x * 2y.register_hook(print)z = torch.mean(y)z.backward()tensor([ 0.5000, 0.5000])
Register_backward_hook等三个属于torch.nn,属于moudule中的方法。
hook(module, grad_input, grad_output) -> Tensor or None
写个demo,参考(https://oldpan.me/archives/pytorch-autograd-hook):
下面的计算为
import torchimport torch.nn as nndevice = torch.device("cuda:0" if torch.cuda.is_available() else "cpu")
def print_hook(grad):    print ("register hook:", grad)    return grad
class TestNet(nn.Module):    def __init__(self):        super(TestNet, self).__init__()        self.f1 = nn.Linear(4, 1, bias=True)        self.weights_init()
    def weights_init(self):        self.f1.weight.data.fill_(4)        self.f1.bias.data.fill_(0.1)
    def forward(self, input):        self.input = input        out = input * 0.75        out = self.f1(out)        out = out / 4        return out
    def back_hook(self, moudle, grad_input, grad_output):        print ("back hook in:", grad_input)        print ("back hook out:", grad_output)        # 修改梯度        # grad_input = list(grad_input)        # grad_input[0] = grad_input[0] * 100        # print (grad_input)        return tuple(grad_input)

if __name__ == '__main__':    input = torch.tensor([1, 2, 3, 4], dtype=torch.float32, requires_grad=True).to(device)    net = TestNet()    net.to(device)    net.register_backward_hook(net.back_hook)    ret = net(input)    print ("result", ret)    ret.backward()    print('input.grad:', input.grad)    for param in net.parameters():        print('{}:grad->{}'.format(param, param.grad))
输出:
result tensor([7.5250], grad_fn=)back hook in: (tensor([0.2500]), None)back hook out: (tensor([1.]),)input.grad: tensor([0.7500, 0.7500, 0.7500, 0.7500])Parameter containing:tensor([[4., 4., 4., 4.]], requires_grad=True):grad->tensor([[0.1875, 0.3750, 0.5625, 0.7500]])Parameter containing:tensor([0.1000], requires_grad=True):grad->tensor([0.2500])
输出结果以及梯度都很明显,简单分析一下w权重的梯度,
另外,hook中有个bug,假设我们bug,假设我们注释掉out = out / 4这行,可以发现输出变成back hook in: (tensor([1.]), tensor([1.]))。这种情况就不符合上面我们的梯度计算公式,是因为这个时候:
则此时的偏导只是对 和 进行计算,所以都是1,1。这是pytorch的设计缺陷

register_forward_hook跟Register_backward_hook差不多,就不过多复述。
register_forward_pre_hook,可以发现其输入只有
hook(module, input) -> None
其主要是针对推理时的hook.
02
应用
2.1 特征图打印
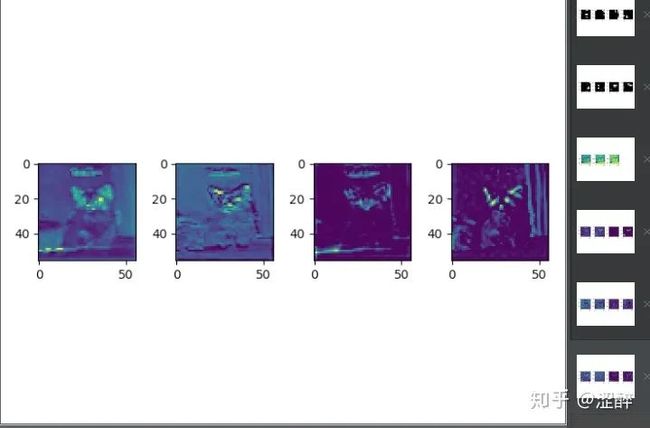
直接利用pytorch已有的resnet18进行特征图打印,只打印卷积层的特征图,
import torchfrom torchvision.models import resnet18import torch.nn as nnfrom torchvision import transforms
import matplotlib.pyplot as plt
def viz(module, input):    x = input[0][0]    #最多显示4张图    min_num = np.minimum(4, x.size()[0])    for i in range(min_num):        plt.subplot(1, 4, i+1)        plt.imshow(x[i].cpu())    plt.show()

import cv2import numpy as npdef main():    t = transforms.Compose([transforms.ToPILImage(),                            transforms.Resize((224, 224)),                            transforms.ToTensor(),                            transforms.Normalize(mean=[0.485, 0.456, 0.406],                                                 std=[0.229, 0.224, 0.225])                            ])
    device = torch.device("cuda:0" if torch.cuda.is_available() else "cpu")
    model = resnet18(pretrained=True).to(device)    for name, m in model.named_modules():        # if not isinstance(m, torch.nn.ModuleList) and \        #         not isinstance(m, torch.nn.Sequential) and \        #         type(m) in torch.nn.__dict__.values():        # 这里只对卷积层的feature map进行显示        if isinstance(m, torch.nn.Conv2d):            m.register_forward_pre_hook(viz)    img = cv2.imread('./cat.jpeg')    img = t(img).unsqueeze(0).to(device)    with torch.no_grad():        model(img)
if __name__ == '__main__':    main()
直接放几张中间层的图

图1 第一层卷积层输入

图2 第四层卷积层的输入
2.2 模型大小,算力计算
同样的用法,可以直接参考pytorch-summary(https://github.com/sksq96/pytorch-summary)这个项目。
03
参考
https://oldpan.me/archives/pytorch-autograd-hook
https://pytorch.org/docs/stable/search.html?q=hook&check_keywords=yes&area=default
https://github.com/pytorch/pytorch/issues/598
https://github.com/sksq96/pytorch-summary
https://github.com/allensll/test/blob/591c7ce3671dbd9687b3e84e1628492f24116dd9/net_analysis/viz_lenet.py
本文目的在于学术交流,并不代表本公众号赞同其观点或对其内容真实性负责,版权归原作者所有,如有侵权请告知删除。
猜您喜欢:
超100篇!CVPR 2020最全GAN论文梳理汇总!
拆解组新的GAN:解耦表征MixNMatch
StarGAN第2版:多域多样性图像生成
附下载 | 《可解释的机器学习》中文版
附下载 |《TensorFlow 2.0 深度学习算法实战》
附下载 |《计算机视觉中的数学方法》分享
《基于深度学习的表面缺陷检测方法综述》
《零样本图像分类综述: 十年进展》
《基于深度神经网络的少样本学习综述》
