NNDL 实验五 前馈神经网络(1)二分类任务 神经元与基于前馈神经网络的二分类任务
pytorch实现
4.1 神经元
4.1.1 净活性值
使用pytorch计算一组输入的净活性值z
净活性值z经过一个非线性函数f(·)后,得到神经元的活性值a
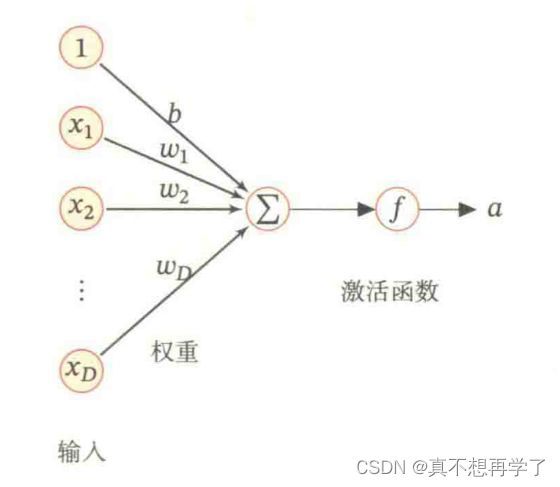
使用pytorch计算一组输入的净活性值,代码参考paddle例题:
import paddle

# 2个特征数为5的样本
X = paddle.rand(shape=[2, 5])

# 含有5个参数的权重向量
w = paddle.rand(shape=[5, 1])
# 偏置项
b = paddle.rand(shape=[1, 1])

# 使用'paddle.matmul'实现矩阵相乘
z = paddle.matmul(X, w) + b
print("input X:", X)
print("weight w:", w, "\nbias b:", b)
print("output z:", z)
torch
# coding:utf-8
import torch
X=torch.rand(1,5)
w=torch.rand(5,1)
b=torch.rand(1,1)
z=torch.mul(X,w)+b
print("input X:", X)
print("weight w:", w, "\nbias b:", b)
print("output z:", z)
运行结果:
input X: tensor([[0.4815, 0.9213, 0.1646, 0.5270, 0.3404]])
weight w: tensor([[0.1197],
[0.2219],
[0.7890],
[0.7074],
[0.0379]])
bias b: tensor([[0.2716]])
output z: tensor([[0.3292, 0.3819, 0.2913, 0.3347, 0.3123],
[0.3784, 0.4760, 0.3081, 0.3885, 0.3471],
[0.6515, 0.9985, 0.4014, 0.6874, 0.5402],
[0.6122, 0.9233, 0.3880, 0.6443, 0.5124],
[0.2899, 0.3065, 0.2778, 0.2916, 0.2845]])
在飞桨中,可以使用nn.Linear完成输入张量的上述变换。
在pytorch中学习相应函数torch.nn.Linear(features_in, features_out, bias=False)。
实现上面的例子,完成代码,进一步深入研究torch.nn.Linear()的使用。
在本例中输入通道数为5,输出通道数为1,同时传入参数。
torchvision 0.11.2下
# coding:utf-8

import torch
X=torch.rand([1,5])
w=torch.rand([5,1])
b=torch.rand([1,1])
z=torch.matmul(X,w)+b
print("output z:", z)
LN=torch.nn.Linear(5,1,weight=w,bias=False)
z=LN(X)+b
print("output z:", z)
会报错
Traceback (most recent call last):
File “C:/Users/lenovo/PycharmProjects/pythonProject1/deep_learning/实验五 前馈神经网络/test.py”, line 12, in
LN=torch.nn.Linear(5,1,weight=w,bias=False)
TypeError: init() got an unexpected keyword argument ‘weight’
意思是Linear中没有weight参数,猜测是torch源代码实现的问题,看了一下源代码,果然是。
class Linear(Module):
   ''''''
    def __init__(self, in_features: int, out_features: int, bias: bool = True,
                 device=None, dtype=None) -> None:
        factory_kwargs = {'device': device, 'dtype': dtype}
        super(Linear, self).__init__()
        self.in_features = in_features
        self.out_features = out_features
        self.weight = Parameter(torch.empty((out_features, in_features), **factory_kwargs))
        if bias:
            self.bias = Parameter(torch.empty(out_features, **factory_kwargs))
        else:
            self.register_parameter('bias', None)
        self.reset_parameters()
问题出在这句,Linear随机初始化了权重,只要把这里改一下,应该就可以自己设置权重了,
self.weight = Parameter(torch.empty((out_features, in_features), **factory_kwargs))
观察一下pytorch版本,发现已经是最新版本了。
![]()
那就没办法了。
为了不破坏第三方库,我没有尝试修改库的源代码。其实这个权重的初始化对训练过程没有什么关系,我们自己设置的也w是随机数,他这里也是随机生成参数,也就是说效果一样,改了意义也不大。文章后面会介绍一种修改权重的方法。
【思考题】加权求和与仿射变换之间有什么区别和联系?
加权求和 :
简单来说就是为求和的每一项带上权重再相+
例如:
若
x = x 0 + x 1 + x 2 + x 3 + . . . + x n x=x_{0}+x_{1}+x_{2}+x_{3}+...+x_{n} x=x0+x1+x2+x3+...+xn
b = b 0 + b 1 + b 2 + b 3 + . . . + b n b=b_{0}+b_{1}+b_{2}+b_{3}+...+b_{n} b=b0+b1+b2+b3+...+bn
则
Σ i = 0 n x i ∗ b i = x 0 ∗ b 0 + x 1 ∗ b 1 + x 2 ∗ b 2 + . . . + x n ∗ b n \varSigma_{i=0}^nx_i*b_i=x_{0}*b_0+x_1*b_1+x_2*b_2+...+x_n*b_n Σi=0nxi∗bi=x0∗b0+x1∗b1+x2∗b2+...+xn∗bn
在神经网络中,一个神经层的输入通常作为x,那么经过这个神经层后,会带上参数加权求和,同时有一个偏置,输出会变成 x 0 ∗ w 0 + x 1 ∗ w 1 + x 2 ∗ w 2 + . . . + x n ∗ w n + b = Σ i = 0 n x i ∗ w i + b \\x_{0}*w_0+x_1*w_1+x_2*w_2+...+x_n*w_n+b=\varSigma_{i=0}^nx_i*w_i+b x0∗w0+x1∗w1+x2∗w2+...+xn∗wn+b=Σi=0nxi∗wi+b
仿射变换:
变换后的图像的线段、弧线保持比例不变,在此前提下,允许图像的旋转、拉伸、位移、反转 、缩放操作,也可以是这几种操作的复合操作,但是一定要保持比例不变。
学过图像处理我们知道,一个图像按中心旋转 θ \theta θ后的图像可以这样计算:
i m g = [ c o s ( θ ) − s i n ( θ ) 0 s i n ( θ ) c o s ( θ ) 0 0 0 1 ] i m g img=\begin{bmatrix} cos(\theta) &-sin(\theta)&0\\ sin(\theta) &cos(\theta)&0\\ 0&0&1 \end{bmatrix}img img=⎣ ⎡cos(θ)sin(θ)0−sin(θ)cos(θ)0001⎦ ⎤img
这里的 [ c o s ( θ ) − s i n ( θ ) 0 s i n ( θ ) c o s ( θ ) 0 0 0 1 ] \begin{bmatrix} cos(\theta) &-sin(\theta)&0\\ sin(\theta) &cos(\theta)&0\\ 0&0&1 \end{bmatrix} ⎣ ⎡cos(θ)sin(θ)0−sin(θ)cos(θ)0001⎦ ⎤即是一个变换矩阵。
此外还有
平移变换:
[ 1 0 x 0 1 y 0 0 1 ] \begin{bmatrix} 1 &0&x\\ 0&1&y\\ 0&0&1 \end{bmatrix} ⎣ ⎡100010xy1⎦ ⎤
缩放变换:sx、sy为缩放倍数
[ s x 0 0 0 s y 0 0 0 1 ] \begin{bmatrix} sx &0&0\\ 0&sy&0\\ 0&0&1 \end{bmatrix} ⎣ ⎡sx000sy0001⎦ ⎤
剪切变换:shx、shy为变换尺度
[ 1 s h x 0 s h y 1 0 0 0 1 ] \begin{bmatrix} 1 &shx&0\\ shy &1&0\\ 0&0&1 \end{bmatrix} ⎣ ⎡1shy0shx10001⎦ ⎤
旋转变换:
[ c o s ( θ ) − s i n ( θ ) 0 s i n ( θ ) c o s ( θ ) 0 0 0 1 ] \begin{bmatrix} cos(\theta) &-sin(\theta)&0\\ sin(\theta) &cos(\theta)&0\\ 0&0&1 \end{bmatrix} ⎣ ⎡cos(θ)sin(θ)0−sin(θ)cos(θ)0001⎦ ⎤
加权求和与仿射变换二者关系
我们有一个一维输入x,我们想把它旋转 θ \theta θ后输出,则有
x = [ x 1 x 2 x 3 ] [ c o s ( θ ) − s i n ( θ ) 0 s i n ( θ ) c o s ( θ ) 0 0 0 1 ] = [ c o s ( θ ) ∗ x 1 + s i n ( θ ) ∗ x 1 + 0 − s i n ( θ ) ∗ x 2 + c o s ( θ ) ∗ x 2 + 0 x 3 ] x=\begin{bmatrix} x1\\ x2\\ x3 \end{bmatrix} \begin{bmatrix} cos(\theta) &-sin(\theta)&0\\ sin(\theta) &cos(\theta)&0\\ 0&0&1 \end{bmatrix}= \begin{bmatrix} cos(\theta)*x1+sin(\theta)*x1+0\\ -sin(\theta)*x2+cos(\theta)*x2+0\\ x3 \end{bmatrix} x=⎣ ⎡x1x2x3⎦ ⎤⎣ ⎡cos(θ)sin(θ)0−sin(θ)cos(θ)0001⎦ ⎤=⎣ ⎡cos(θ)∗x1+sin(θ)∗x1+0−sin(θ)∗x2+cos(θ)∗x2+0x3⎦ ⎤
如果把cos( θ \theta θ)和sin( θ \theta θ)看成参数,那么这个计算结果
[ c o s ( θ ) ∗ x 1 + s i n ( θ ) ∗ x 1 + 0 − s i n ( θ ) ∗ x 2 + c o s ( θ ) ∗ x 2 + 0 x 3 ] \begin{bmatrix} cos(\theta)*x1+sin(\theta)*x1+0\\ -sin(\theta)*x2+cos(\theta)*x2+0\\ x3 \end{bmatrix} ⎣ ⎡cos(θ)∗x1+sin(θ)∗x1+0−sin(θ)∗x2+cos(θ)∗x2+0x3⎦ ⎤
中的每一项都可以看作一个加权求和,这也是为什么说神经元的每一层都可以看做是一次仿射变换和一个非线性变换,这里的加权求和是一次仿射变换,非线性变换是指激活函数的部分。关于激活函数参见前几篇文章。
4.1.2 激活函数
激活函数通常为非线性函数,可以增强神经网络的表示能力和学习能力。
常用的激活函数有S型函数和ReLU函数。
4.1.2.1 Sigmoid 型函数
常用的 Sigmoid 型函数有 Logistic 函数和 Tanh 函数。
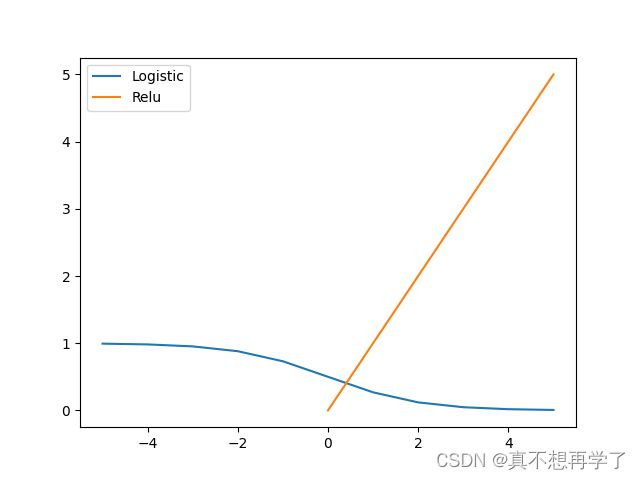
使用python实现并可视化“Logistic函数、Tanh函数”
在飞桨中,可以通过调用paddle.nn.functional.sigmoid和paddle.nn.functional.tanh实现对张量的Logistic和Tanh计算。在pytorch中找到相应函数并测试。
import numpy as np
import math
import matplotlib.pyplot as plt

def Logistic(x):
    return 1/(1+math.e**x)

def Relu(X):
    for i,x in enumerate(X):
        if x<0:
            X[i] =0
        else:
            continue
    return X

if __name__=='__main__':
    x=np.array([-5,-4,-3,-2,-1,0,1,2,3,4,5])
    plt.figure()
    plt.plot(x,Logistic(x),label='Logistic')
    plt.plot(x,Relu(x),label='Relu')
    plt.legend()
    plt.show()
import torch

if __name__=='__main__':
    x=torch.tensor([-5,-4,-3,-2,-1,0,1,2,3,4,5])
    sig=torch.nn.Sigmoid()
    y1=sig(x)
    relu=torch.nn.ReLU()
    y2=relu(x)
    print('input:',x)
    print('Sigmoid output:',y1)
    print('relu output:',y2)
运行结果:
input: tensor([-5, -4, -3, -2, -1, 0, 1, 2, 3, 4, 5])
Sigmoid output: tensor([0.0067, 0.0180, 0.0474, 0.1192, 0.2689, 0.5000, 0.7311, 0.8808, 0.9526,
0.9820, 0.9933])
relu output: tensor([0, 0, 0, 0, 0, 0, 1, 2, 3, 4, 5])
4.1.2.2 ReLU型函数
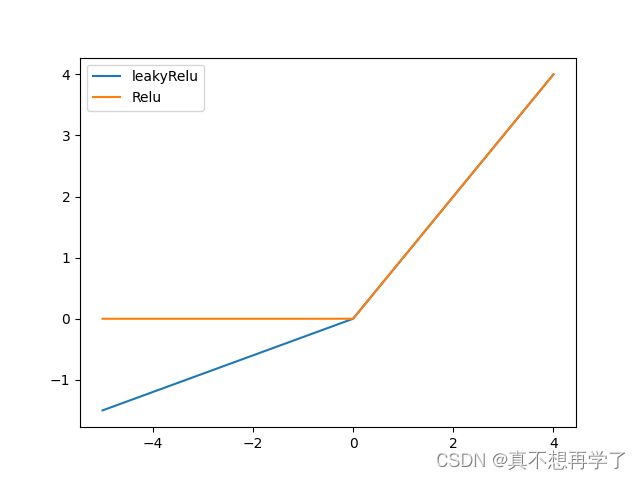
常见的ReLU函数有ReLU和带泄露的ReLU(Leaky ReLU)
使用python实现并可视化可视化“ReLU、带泄露的ReLU的函数”
import numpy as np
import math
import matplotlib.pyplot as plt

def Logistic(x):
    return 1/(1+math.e**x)

def Relu(X):
    n_x = []
    for i in X:
        n_x.append(max(0, i))
    return n_x

def leakyRelu(X,leak=0.3):
    n_x=[]
    for i in X:
        n_x.append(max(0,i)+min(0,i*leak))
    return n_x

if __name__=='__main__':
    x=np.arange(-5,5)
    plt.figure()
    plt.plot(x,leakyRelu(x),label='leakyRelu')
    plt.plot(x,Relu(x),label='Relu')
    plt.legend()
    plt.show()
在飞桨中,可以通过调用paddle.nn.functional.relu和paddle.nn.functional.leaky_relu完成ReLU与带泄露的ReLU的计算。在pytorch中找到相应函数并测试。
import torch

if __name__=='__main__':
    x=torch.randn(5)
    leakyrelu=torch.nn.LeakyReLU(0.3)
    y1=leakyrelu(x)
    relu=torch.nn.ReLU()
    y2=relu(x)
    print('input:',x)
    print('lealkrelu output:',y1)
    print('relu output:',y2)
运行结果:
input: tensor([-0.4764, -0.7552, 2.0017, -0.0035, 0.4680])
lealkrelu output: tensor([-1.4293e-01, -2.2656e-01, 2.0017e+00, -1.0608e-03, 4.6801e-01])
relu output: tensor([0.0000, 0.0000, 2.0017, 0.0000, 0.4680])
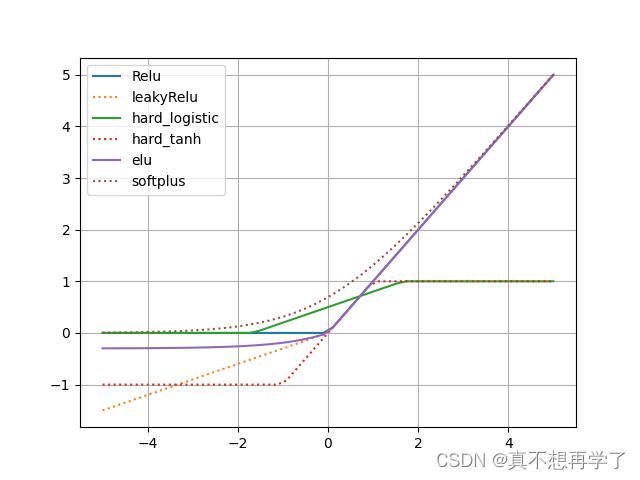
动手实现《神经网络与深度学习》4.1节中提到的其他激活函数:
Hard-Logistic、Hard-Tanh、ELU、Softplus、Swish等。(选做)
import numpy as np
import math
import matplotlib.pyplot as plt

def Logistic(x):
    return 1/(1+math.e**x)

def Relu(X):
    n_x = []
    for i in X:
        n_x.append(max(0, i))
    return n_x

def leakyRelu(X,leak=0.3):
    n_x=[]
    for i in X:
        n_x.append(max(0,i)+min(0,i*leak))
    return n_x

def hard_logistic(X):
    n_x = []
    for i in X:
        n_x.append(max(min(0.3*i+0.5,1),0))
    return n_x

def hard_tanh(X):
    n_x = []
    for i in X:
        n_x.append(max(min(i,1),-1))
    return n_x

def elu(X,r=0.3):
    n_x = []
    for i in X:
        n_x.append(max(0,i)+min(0,r*(math.e**i-1)))
    return n_x

def softplus(X):
    n_x = []
    for i in X:
        n_x.append(math.log(1+math.e**i))
    return n_x

if __name__=='__main__':
    x=np.linspace(-5,5,50)
    plt.figure()
    plt.plot(x, Relu(x),'-', label='Relu')
    plt.plot(x, leakyRelu(x),':', label='leakyRelu')
    plt.plot(x,hard_logistic(x),'-',label='hard_logistic')
    plt.plot(x,hard_tanh(x),':',label='hard_tanh')
    plt.plot(x, elu(x), label='elu')
    plt.plot(x, softplus(x),':', label='softplus')
    plt.grid()
    plt.legend()
    plt.show()
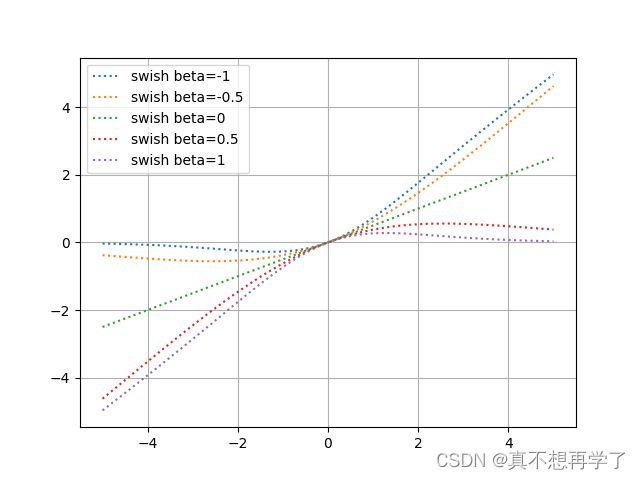
def swish(X,beta=0.5):
    n_x = []
    for i in X:
        n_x.append(i*1/(1+math.e**(beta*i)))
    return n_x

if __name__=='__main__':
    x=np.linspace(-5,5,50)
    plt.figure()
    for i in [-1,-0.5,0,0.5,1]:
        plt.plot(x, swish(x,beta=i),':', label='swish beta={}'.format(i))
    plt.grid()
    plt.legend()
    plt.show()
4.2 基于前馈神经网络的二分类任务
用到了库:(以下过程没有特殊说明都调用了这几个包)
import matplotlib.pyplot as plt
from sklearn.datasets import make_moons
import torch.nn as nn
import torch.optim as optim
import torch
import numpy as np
4.2.1 数据集构建
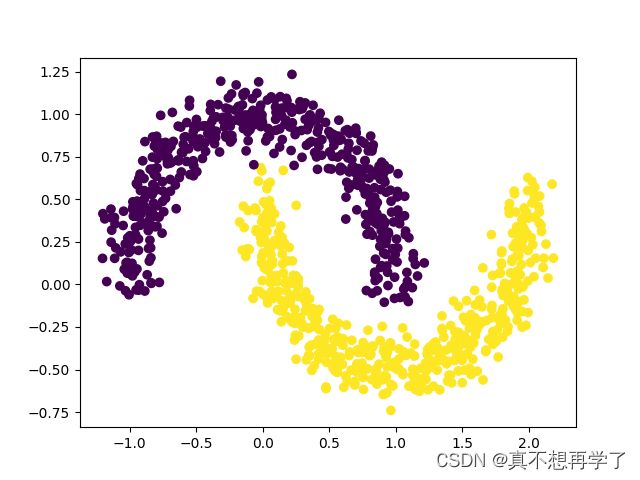
使用第3.1.1节中构建的二分类数据集:Moon1000数据集,其中训练集640条、验证集160条、测试集200条。该数据集的数据是从两个带噪音的弯月形状数据分布中采样得到,每个样本包含2个特征。
和以前一样:
def get_moon_data():
    X, y = make_moons(1000, noise=0.1)
    '''plt.figure()
    plt.scatter(X[:, 0], X[:, 1], c=y)
    plt.show()'''
    X=torch.from_numpy(X.astype(np.float32))
    y=torch.from_numpy(y.astype(np.float32)).reshape(len(y),1)
    '''将1000条样本数据拆分成训练集、验证集和测试集,其中训练集640条、验证集160条、测试集200条。'''
    train_X,verify_X,test_X=torch.split(X,[640,160,200])
    train_y, vertify_y, test_y = torch.split(y, [640, 160, 200])
    return [train_X,train_y],[verify_X,vertify_y],[test_X,test_y]


if __name__=='__main__':
    train_data, verify_data, test_data = get_moon_data()
4.2.2 模型构建
为了更高效的构建前馈神经网络,我们先定义每一层的算子,然后再通过算子组合构建整个前馈神经网络。
4.2.2.1 线性层算子
        self.linear=torch.nn.Linear(5,1)
        self.hide=torch.nn.Linear(10,1)
4.2.2.2 Logistic算子(激活函数)
self.sigmoid=torch.nn.Sigmoid()
4.2.2.3 层的串行组合
实现一个两层的用于二分类任务的前馈神经网络,选用Logistic作为激活函数,可以利用上面实现的线性层和激活函数算子来组装
    def forward(self,x):
        x1=self.linear(x)
        x2=self.hide(x1)
        pre_y=self.sigmoid(x2)
        return pre_y
实例化一个两层的前馈网络,令其输入层维度为5,隐藏层维度为10,输出层维度为1。
并随机生成一条长度为5的数据输入两层神经网络,观察输出结果。
class BPNet(torch.nn.Module):
    def __init__(self):
        super(BPNet, self).__init__()
        self.linear=torch.nn.Linear(5,10)
        self.hide=torch.nn.Linear(10,1)
        self.sigmoid=torch.nn.Sigmoid()

    def forward(self,x):
        x1=self.linear(x)
        x2=self.hide(x1)
        pre_y=self.sigmoid(x2)
        return pre_y


if __name__=='__main__':
    #train_data, verify_data, test_data = get_moon_data()
    x=torch.randn(5)
    net=BPNet()
    y=net(x)
    print('input:',x)
    print('output:',y.item())
运行结果:
input: tensor([-0.5336, 0.2618, -0.6228, 0.4544, -0.2390])
output: 0.5595706701278687
4.2.3 损失函数
二分类交叉熵损失函数见第三章
和以前一样:
loss = nn.BCELoss()
4.2.4 模型优化
神经网络的层数通常比较深,其梯度计算和上一章中的线性分类模型的不同的点在于:
线性模型通常比较简单可以直接计算梯度,而神经网络相当于一个复合函数,需要利用链式法则进行反向传播来计算梯度。
关于反向传播算法之前写过,是基于pandas和numpy的,不过pandas只帮助了我数据分类,甚至复杂化了代码编写过程。pytorch作为专业的神经网络库,里面肯定可以更方便的进行反向传播过程,那么现在的问题是找到反向传播算法与pytorch的关系。
torch里面自带了梯度计算算法,那就是backward(),他的用法就是实现梯度的自动计算。那么实际上在之前的几次实验中都使用了反向传播法。为了更加深入的理解,在文章末尾会单独对这部分过程细化分析一下。
4.2.4.1 反向传播算法
第1步是前向计算,可以利用算子的forward()方法来实现;
第2步是反向计算梯度,可以利用算子的backward()方法来实现;
第3步中的计算参数梯度也放到backward()中实现,更新参数放到另外的优化器中专门进行。
4.2.4.2 损失函数
二分类交叉熵损失函数
实现损失函数的backward()
4.2.4.3 Logistic算子
为Logistic算子增加反向函数
4.2.4.4 线性层
线性层输入的梯度
计算线性层参数的梯度
4.2.4.5 整个网络
实现完整的两层神经网络的前向和反向计算
import matplotlib.pyplot as plt
from sklearn.datasets import make_moons
import torch.nn as nn
import torch.optim as optim
import torch
import numpy as np

def get_moon_data():
    X, y = make_moons(1000, noise=0.1)
    '''plt.figure()
    plt.scatter(X[:, 0], X[:, 1], c=y)
    plt.show()'''
    X=torch.from_numpy(X.astype(np.float32))
    y=torch.from_numpy(y.astype(np.float32)).reshape(len(y),1)
    '''将1000条样本数据拆分成训练集、验证集和测试集,其中训练集640条、验证集160条、测试集200条。'''
    train_X,verify_X,test_X=torch.split(X,[640,160,200])
    train_y, vertify_y, test_y = torch.split(y, [640, 160, 200])
    return [train_X,train_y],[verify_X,vertify_y],[test_X,test_y]

class BPNet(torch.nn.Module):
    def __init__(self):
        super(BPNet, self).__init__()
        self.linear=torch.nn.Linear(2,5)
        self.hide=torch.nn.Linear(5,1)
        self.sigmoid=torch.nn.Sigmoid()

    def forward(self,x):
        x1=self.linear(x)
        x2=self.hide(x1)
        pre_y=self.sigmoid(x2)
        return pre_y

    def save_model(self, save_path):
        torch.save(self, save_path)

    def read_model(self, path):
        torch.load(path)

def acc(model, X, y):
    '''最大项的为预测的类别'''
    ct=0
    for i in range(len(y)):
        pre_y = model(X[i])
        if pre_y>=0.5:
            pre_y=1
        else:pre_y=0
        if pre_y==y[i]:
            ct+=1
    return ct/y.shape[0]

if __name__=='__main__':
    train_data, verify_data, test_data = get_moon_data()
    net=BPNet()
    X = train_data[0];
    y = train_data[1]
    epoches = 2000
    for i in range(epoches):
        loss = nn.BCELoss()
        optimizer = optim.SGD(net.parameters(), lr=0.01, momentum=0.9)
        pre_y = net(X)
        l = loss(pre_y, y)
        optimizer.zero_grad()  # 梯度清零
        l.backward()
        optimizer.step()
        if i % 50 == 0:
            print('epoch %d, loss: %f' % (i, l.item()))
            net.save_model('LNet.pt')
            print('Current acc in verify data:', acc(net, verify_data[0], verify_data[1]) * 100, '%')
    print('acc in test data :', acc(net, test_data[0], test_data[1]) * 100, '%')
4.2.4.6 优化器
optimizer = optim.SGD(net.parameters(), lr=0.01, momentum=0.9)#定义优化器
在计算好神经网络参数的梯度之后,我们将梯度下降法中参数的更新过程实现在优化器中。
与第3章中实现的梯度下降优化器SimpleBatchGD不同的是,此处的优化器需要遍历每层,对每层的参数分别做更新。
4.2.5 完善Runner类:RunnerV2_1
支持自定义算子的梯度计算,在训练过程中调用self.loss_fn.backward()从损失函数开始反向计算梯度;
每层的模型保存和加载,将每一层的参数分别进行保存和加载。
4.2.6 模型训练
使用训练集和验证集进行模型训练,共训练2000个epoch。评价指标为accuracy。
4.2.7 性能评价
使用测试集对训练中的最优模型进行评价,观察模型的评价指标。
函数如下:
def acc(model, X, y):
    '''最大项的为预测的类别'''
    ct=0
    for i in range(len(y)):
        pre_y = model(X[i])
        if pre_y>=0.5:
            pre_y=1
        else:pre_y=0
        if pre_y==y[i]:
            ct+=1
    return ct/y.shape[0]
过程思路与分析:
假如没有反向传播:把反向传播相关的代码注释掉。
if __name__=='__main__':
    train_data, verify_data, test_data = get_moon_data()
    net=BPNet()
    X = train_data[0];
    y = train_data[1]
    epoches = 250
    for i in range(epoches):
        loss = nn.BCELoss()
        #optimizer = optim.SGD(net.parameters(), lr=0.01, momentum=0.9)
        pre_y = net(X)
        l = loss(pre_y, y)
        #optimizer.zero_grad()  # 梯度清零
        #l.backward()
        #optimizer.step()
        if i % 50 == 0:
            print('epoch %d, loss: %f' % (i, l.item()))
            net.save_model('LNet.pt')
            print('Current acc in verify data:', acc(net, verify_data[0], verify_data[1]) * 100, '%')
    print('acc in test data :', acc(net, test_data[0], test_data[1]) * 100, '%')
epoch 0, loss: 0.783069
Current acc in verify data: 25.0 %
epoch 50, loss: 0.783069
Current acc in verify data: 25.0 %
epoch 100, loss: 0.783069
Current acc in verify data: 25.0 %
epoch 150, loss: 0.783069
Current acc in verify data: 25.0 %
epoch 200, loss: 0.783069
Current acc in verify data: 25.0 %
acc in test data : 23.5 %
发现参数不会自动更新,说明反向传播实际上是进行了参数更新的过程。如果只进行前向传播,那么最终结果只由初始化的参数w和b所决定,与训练次数无关,不信我们再运行一次:
epoch 0, loss: 0.560529
Current acc in verify data: 69.375 %
epoch 50, loss: 0.560529
Current acc in verify data: 69.375 %
epoch 100, loss: 0.560529
Current acc in verify data: 69.375 %
epoch 150, loss: 0.560529
Current acc in verify data: 69.375 %
epoch 200, loss: 0.560529
Current acc in verify data: 69.375 %
acc in test data : 72.5 %
发现结果虽然改变,但是正确率也并没有提高,此时迭代多少次的结果都是一样的。也就是说前向传播本身并不能够更新参数,只有反向传播过程才计算了损失的梯度,根据步长一步步向前更新参数。再换句话说,前向传播只是一个计算过程,反向传播是参数更新过程。
经过以上分析我们得出,torch中的反向传播过程是根据以下这些代码实现的。
		loss = nn.BCELoss()#定义损失函数
		optimizer = optim.SGD(net.parameters(), lr=0.01, momentum=0.9)#定义优化器
        pre_y = net(X)#计算预测值(正向传播)
        l = loss(pre_y, y)#计算损失
        optimizer.zero_grad()  # 梯度清零
        l.backward()#反向传播(误差逆传播)
        optimizer.step()# 相当于确认操作,没有这句不能反向传播
他的参数优化过程设计在了optimizer之中。下面我们不用他这个代码,用自己的函数取代这个过程,并在进行过程中打印参数进行观察。
首先我们想在每一次迭代中更新模型的参数w和b,这个过程可以用save_model和load_model来实现,即在进行完前馈计算后,根据损失函数计算出损失,由损失函数反向传播,逐步更新每一层的参数,即链式求导法则。
查阅相关资料得知,torch有一个函数是专门存储参数的,我们可以调用net.state_dict()来查看此时网络的参数。
print(net.state_dict())
调用一下试试:
OrderedDict([(‘linear.weight’, tensor([[-0.1062, 0.6874],
[-0.2676, -0.6546],
[ 1.0538, -0.0674]])), (‘linear.bias’, tensor([-0.3523, 0.1579, 0.0534])), (‘hide.weight’, tensor([[-0.3229, 0.4994, 0.8082]])), (‘hide.bias’, tensor([-0.2757]))])
这是一个有序字典,在这里它含有四个部分,
(‘linear.weight’, tensor([[-0.1062, 0.6874], [-0.2676, -0.6546], [ 1.0538, -0.0674]])),
(‘linear.bias’, tensor([-0.3523, 0.1579, 0.0534])),
(‘hide.weight’, tensor([[-0.3229, 0.4994, 0.8082]])),
(‘hide.bias’, tensor([-0.2757]))
分别对应线性层的权重和偏置、隐藏层的权重和偏置。
那么,我们对这个字典的值进行修改,是不是就完成了参数的更新了呢?
答案是否定的。
这里的字典实际上是一个‘’复制品‘’,我们对它进行修改的话并不能直接改变原来的值,所以我们对它进行修改后需要再读取一下,问题就解决了。
for example:
还是使用上边的双月数据集模拟logistic二分类任务
为了便于观察,我简化了网络,现在它只有一个线性层
我想每次迭代将权重每一项都加一,偏置都减一,那么代码如下啊
class testNet(nn.Module):
    def __init__(self):
        super(testNet, self).__init__()
        self.linear = nn.Linear(2, 1)
        self.sigmoid = nn.Sigmoid()

    def forward(self, x):
        x1 = self.linear(x)
        pre_y = self.sigmoid(x1)
        return pre_y

    def save_model(self, save_path):
        torch.save(self, save_path)

    def read_model(self, path):
        torch.load(path)

if __name__ == '__main__':
    net = testNet()
    train_data, verify_data, test_data=get_moon_data()
    X=train_data[0];y=train_data[1]
    epoches=10
    for i in range(epoches):
        loss = nn.BCELoss()
        #optimizer = optim.SGD(net.parameters(), lr=0.01, momentum=0.9)
        #optimizer.zero_grad()  # 梯度清零
        pre_y = net(X)
        l = loss(pre_y, y)
        #l.backward()
        #optimizer.step()
        dct=net.state_dict()
        dct['linear.weight']+=1
        dct['linear.bias'] -= 1
        net.load_state_dict(dct)
        print(net.state_dict())
OrderedDict([(‘linear.weight’, tensor([[0.8995, 0.4396]])), (‘linear.bias’, tensor([-0.7948]))])
OrderedDict([(‘linear.weight’, tensor([[1.8995, 1.4396]])), (‘linear.bias’, tensor([-1.7948]))])
OrderedDict([(‘linear.weight’, tensor([[2.8995, 2.4396]])), (‘linear.bias’, tensor([-2.7948]))])
OrderedDict([(‘linear.weight’, tensor([[3.8995, 3.4396]])), (‘linear.bias’, tensor([-3.7948]))])
OrderedDict([(‘linear.weight’, tensor([[4.8995, 4.4396]])), (‘linear.bias’, tensor([-4.7948]))])
OrderedDict([(‘linear.weight’, tensor([[5.8995, 5.4396]])), (‘linear.bias’, tensor([-5.7948]))])
OrderedDict([(‘linear.weight’, tensor([[6.8995, 6.4396]])), (‘linear.bias’, tensor([-6.7948]))])
OrderedDict([(‘linear.weight’, tensor([[7.8995, 7.4396]])), (‘linear.bias’, tensor([-7.7948]))])
OrderedDict([(‘linear.weight’, tensor([[8.8995, 8.4396]])), (‘linear.bias’, tensor([-8.7948]))])
OrderedDict([(‘linear.weight’, tensor([[9.8995, 9.4396]])), (‘linear.bias’, tensor([-9.7948]))])
结果说明了两点,
第一:参数更新过程确实是由注释掉的那几行代码实现的
第二:使用net.state_dict()和net.load_state_dict()来进行参数更新是可行的
接下来就到了最复杂的计算环节,我们需要计算出损失函数对每一个参数的导数,用这个导数乘以学习率lr再加到原参数上就完成了参数更新的过程。
还是刚才这个例子,
输入x1、x2,
激活函数为Sigmoid函数。
y = s i g m o i d ( x 1 ∗ w 1 + x 2 ∗ w 2 + b ) y=sigmoid(x1*w1+x2*w2+b) y=sigmoid(x1∗w1+x2∗w2+b)
l o s s = 1 / 2 ( y − y ′ ) 2 = 1 / 2 ( s i g m o i d ( x 1 ∗ w 1 + x 2 ∗ w 2 + b ) − y ′ ) 2 loss=1/2(y-y')^2=1/2(sigmoid(x1*w1+x2*w2+b)-y')^2 loss=1/2(y−y′)2=1/2(sigmoid(x1∗w1+x2∗w2+b)−y′)2
其中y’是实际值
我们要更新的参数有w1,w2和b
∂ l o s s ∂ w 1 = ∂ l o s s ∂ y ∗ ∂ y ∂ w 1 \frac{\partial loss}{\partial w_1}=\frac{\partial loss}{\partial y}*\frac{\partial y}{\partial w_1} ∂w1∂loss=∂y∂loss∗∂w1∂y
∂ l o s s ∂ w 2 = ∂ l o s s ∂ y ∗ ∂ y ∂ w 2 \frac{\partial loss}{\partial w_2}=\frac{\partial loss}{\partial y}*\frac{\partial y}{\partial w_2} ∂w2∂loss=∂y∂loss∗∂w2∂y
∂ l o s s ∂ b = ∂ l o s s ∂ y ∗ ∂ y ∂ b \frac{\partial loss}{\partial b}=\frac{\partial loss}{\partial y}*\frac{\partial y}{\partial b} ∂b∂loss=∂y∂loss∗∂b∂y
或者写全了:
∂ l o s s ∂ w 1 = ∂ l o s s ∂ s i g m o i d ( x 1 ∗ w 1 + x 2 ∗ w 2 + b ) ∗ ∂ s i g m o i d ( x 1 ∗ w 1 + x 2 ∗ w 2 + b ) ∂ w 1 \frac{\partial loss}{\partial w_1}=\frac{\partial loss}{\partial sigmoid(x1*w1+x2*w2+b)}*\frac{\partial sigmoid(x1*w1+x2*w2+b)}{\partial w_1} ∂w1∂loss=∂sigmoid(x1∗w1+x2∗w2+b)∂loss∗∂w1∂sigmoid(x1∗w1+x2∗w2+b)
∂ l o s s ∂ w 2 = ∂ l o s s ∂ s i g m o i d ( x 1 ∗ w 1 + x 2 ∗ w 2 + b ) ∗ ∂ s i g m o i d ( x 1 ∗ w 1 + x 2 ∗ w 2 + b ) ∂ w 2 \frac{\partial loss}{\partial w_2}=\frac{\partial loss}{\partial sigmoid(x1*w1+x2*w2+b)}*\frac{\partial sigmoid(x1*w1+x2*w2+b)}{\partial w_2} ∂w2∂loss=∂sigmoid(x1∗w1+x2∗w2+b)∂loss∗∂w2∂sigmoid(x1∗w1+x2∗w2+b)
∂ l o s s ∂ b = ∂ l o s s ∂ s i g m o i d ( x 1 ∗ w 1 + x 2 ∗ w 2 + b ) ∗ ∂ s i g m o i d ( x 1 ∗ w 1 + x 2 ∗ w 2 + b ) ∂ b \frac{\partial loss}{\partial b}=\frac{\partial loss}{\partial sigmoid(x1*w1+x2*w2+b)}*\frac{\partial sigmoid(x1*w1+x2*w2+b)}{\partial b} ∂b∂loss=∂sigmoid(x1∗w1+x2∗w2+b)∂loss∗∂b∂sigmoid(x1∗w1+x2∗w2+b)
这里要注意到sigmoid也是一个函数,它也要求一次导
计算出来
∂ l o s s ∂ w 1 = ( y − y ′ ) ∗ y ∗ ( 1 − y ) ∗ x 1 \frac{\partial loss}{\partial w_1}=(y-y')*y*(1-y)*x_1 ∂w1∂loss=(y−y′)∗y∗(1−y)∗x1
∂ l o s s ∂ w 2 = ( y − y ′ ) ∗ y ∗ ( 1 − y ) ∗ x 2 \frac{\partial loss}{\partial w_2}=(y-y')*y*(1-y)*x_2 ∂w2∂loss=(y−y′)∗y∗(1−y)∗x2
用这几个结果乘上lr加到原参数上即可实现参数更新。
代码实现:
import matplotlib.pyplot as plt
from sklearn.datasets import make_moons
import torch.nn as nn
import torch.optim as optim
import torch
import numpy as np

def get_moon_data():
    X, y = make_moons(1000, noise=0.1)
    '''plt.figure()
    plt.scatter(X[:, 0], X[:, 1], c=y)
    plt.show()'''
    X=torch.from_numpy(X.astype(np.float32))
    y=torch.from_numpy(y.astype(np.float32)).reshape(len(y),1)
    '''将1000条样本数据拆分成训练集、验证集和测试集,其中训练集640条、验证集160条、测试集200条。'''
    train_X,verify_X,test_X=torch.split(X,[640,160,200])
    train_y, vertify_y, test_y = torch.split(y, [640, 160, 200])
    return [train_X,train_y],[verify_X,vertify_y],[test_X,test_y]
def acc(model, X, y):
    '''最大项的为预测的类别'''
    ct=0
    for i in range(len(y)):
        pre_y = model(X[i])
        if pre_y>=0.5:
            pre_y=1
        else:pre_y=0
        if pre_y==y[i]:
            ct+=1
    return ct/y.shape[0]

class testNet(nn.Module):
    def __init__(self):
        super(testNet, self).__init__()
        self.linear = nn.Linear(2, 1)
        self.sigmoid = nn.Sigmoid()

    def forward(self, x):
        x1 = self.linear(x)
        pre_y = self.sigmoid(x1)
        return pre_y

    def save_model(self, save_path):
        torch.save(self, save_path)

    def read_model(self, path):
        torch.load(path)

def loss(prey,y):
    return abs(y-prey)

if __name__ == '__main__':
    net = testNet()
    train_data, verify_data, test_data=get_moon_data()
    #optimizer = optim.SGD(net.parameters(), lr=0.01, momentum=0.9)
    #optimizer.zero_grad()  # 梯度清零
    epoches=10
    for i in range(epoches):
        X = train_data[0];
        y = train_data[1]
        for x,y in zip(X,y):
            pre_y = net(x)
            #l = loss(pre_y, y)
            #l.backward()
            #optimizer.step()
            lr=0.1
            dct = net.state_dict()
            #参数更新
            dct['linear.weight']-=torch.tensor([[(pre_y-y)*pre_y * (1 - pre_y) * x[0],(pre_y-y)*pre_y * (1 - pre_y) * x[1]]])*lr
            net.load_state_dict(dct)
            print(net.state_dict())
            print('Current acc in train data:',acc(net,train_data[0],train_data[1])*100,'%')
可以预见的是训练速度会是非常慢的,因为这里是一个个训练的。
不过也是可以观察到参数在不断的更新。
一部分运行过程:
Current acc in train data: 44.375 %
OrderedDict([(‘linear.weight’, tensor([[25.9497, 25.9600]])), (‘linear.bias’, tensor([-15.7486]))])
Current acc in train data: 44.375 %
OrderedDict([(‘linear.weight’, tensor([[25.8815, 25.8917]])), (‘linear.bias’, tensor([-15.9691]))])
Current acc in train data: 44.53125 %
OrderedDict([(‘linear.weight’, tensor([[25.8744, 25.8846]])), (‘linear.bias’, tensor([-16.0578]))])
Current acc in train data: 44.6875 %
OrderedDict([(‘linear.weight’, tensor([[25.8744, 25.8846]])), (‘linear.bias’, tensor([-16.0578]))])
Current acc in train data: 44.6875 %
OrderedDict([(‘linear.weight’, tensor([[25.8744, 25.8846]])), (‘linear.bias’, tensor([-16.0578]))])
Current acc in train data: 44.6875 %
那如果加一层隐函数呢?
输入x1、x2,
隐含层h1 、h2、h3 ,激活函数为Sigmoid函数。
h 1 = s i g m o i d ( x 1 ∗ w 1 + x 2 ∗ w 2 + b 1 ) h1=sigmoid(x1*w1+x2*w2+b1) h1=sigmoid(x1∗w1+x2∗w2+b1)
h 2 = s i g m o i d ( x 1 ∗ w 3 + x 2 ∗ w 4 + b 2 ) h2=sigmoid(x1*w3+x2*w4+b2) h2=sigmoid(x1∗w3+x2∗w4+b2)
h 3 = s i g m o i d ( x 1 ∗ w 5 + x 2 ∗ w 6 + b 3 ) h3=sigmoid(x1*w5+x2*w6+b3) h3=sigmoid(x1∗w5+x2∗w6+b3)
那么:
y = s i g m o i d ( h 1 ∗ w 7 + h 2 ∗ w 8 + h 3 ∗ w 9 + b 4 ) y=sigmoid(h1*w7+h2*w8+h3*w9+b4) y=sigmoid(h1∗w7+h2∗w8+h3∗w9+b4)
= s i g m o i d ( s i g m o i d ( x 1 ∗ w 1 + x 2 ∗ w 2 + b 1 ) ∗ w 7 + s i g m o i d ( x 1 ∗ w 3 + x 2 ∗ w 4 + b 2 ) ∗ w 8 + s i g m o i d ( x 1 ∗ w 5 + x 2 ∗ w 6 + b 3 ) ∗ w 9 + b 4 ) =sigmoid(sigmoid(x1*w1+x2*w2+b1)*w7+sigmoid(x1*w3+x2*w4+b2)*w8+sigmoid(x1*w5+x2*w6+b3)*w9+b4) =sigmoid(sigmoid(x1∗w1+x2∗w2+b1)∗w7+sigmoid(x1∗w3+x2∗w4+b2)∗w8+sigmoid(x1∗w5+x2∗w6+b3)∗w9+b4)
则:
l o s s = 1 / 2 ( y − y ′ ) 2 = 1 / 2 ( s i g m o i d ( s i g m o i d ( x 1 ∗ w 1 + x 2 ∗ w 2 + b 1 ) ∗ w 7 + s i g m o i d ( x 1 ∗ w 3 + x 2 ∗ w 4 + b 2 ) ∗ w 8 + s i g m o i d ( x 1 ∗ w 5 + x 2 ∗ w 6 + b 3 ) ∗ w 9 + b 4 ) ) − y ′ ) 2 loss=1/2(y-y')^2=1/2(sigmoid(sigmoid(x1*w1+x2*w2+b1)*w7+sigmoid(x1*w3+x2*w4+b2)*w8+sigmoid(x1*w5+x2*w6+b3)*w9+b4))-y')^2 loss=1/2(y−y′)2=1/2(sigmoid(sigmoid(x1∗w1+x2∗w2+b1)∗w7+sigmoid(x1∗w3+x2∗w4+b2)∗w8+sigmoid(x1∗w5+x2∗w6+b3)∗w9+b4))−y′)2
虽然式子很长,但是也是有迹可循的,只不过是求导的过程多了几步,越靠近输入层的参数计算越复杂。
例如:
我们想更新w7、w8、w9、b4
∂ l o s s ∂ w 7 = ∂ l o s s ∂ y ∗ ∂ y ∂ w 7 = ( y − y ′ ) ∗ y ∗ ( 1 − y ) ∗ h 1 \frac{\partial loss}{\partial w_7}=\frac{\partial loss}{\partial y}*\frac{\partial y}{\partial w_7}=(y-y')*y*(1-y)*h_1 ∂w7∂loss=∂y∂loss∗∂w7∂y=(y−y′)∗y∗(1−y)∗h1
∂ l o s s ∂ w 8 = ∂ l o s s ∂ y ∗ ∂ y ∂ w 8 = ( y − y ′ ) ∗ y ∗ ( 1 − y ) ∗ h 2 \frac{\partial loss}{\partial w_8}=\frac{\partial loss}{\partial y}*\frac{\partial y}{\partial w_8}=(y-y')*y*(1-y)*h_2 ∂w8∂loss=∂y∂loss∗∂w8∂y=(y−y′)∗y∗(1−y)∗h2
∂ l o s s ∂ w 9 = ∂ l o s s ∂ y ∗ ∂ y ∂ w 9 = ( y − y ′ ) ∗ y ∗ ( 1 − y ) ∗ h 3 \frac{\partial loss}{\partial w_9}=\frac{\partial loss}{\partial y}*\frac{\partial y}{\partial w_9}=(y-y')*y*(1-y)*h_3 ∂w9∂loss=∂y∂loss∗∂w9∂y=(y−y′)∗y∗(1−y)∗h3
∂ l o s s ∂ b 4 = ∂ l o s s ∂ y ∗ ∂ y ∂ b 4 = ( y − y ′ ) ∗ y ∗ ( 1 − y ) ∗ 1 \frac{\partial loss}{\partial b_4}=\frac{\partial loss}{\partial y}*\frac{\partial y}{\partial b_4}=(y-y')*y*(1-y)*1 ∂b4∂loss=∂y∂loss∗∂b4∂y=(y−y′)∗y∗(1−y)∗1
我们想更新w1、w2、b1
∂ l o s s ∂ w 1 = ∂ l o s s ∂ y ∗ ∂ y ∂ h 1 ∗ ∂ h 1 ∂ w 1 = ( y − y ′ ) ∗ y ∗ ( 1 − y ) ∗ w 7 ∗ h 1 ∗ ( 1 − h 1 ) ∗ x 1 \frac{\partial loss}{\partial w_1}=\frac{\partial loss}{\partial y}*\frac{\partial y}{\partial h_1}*\frac{\partial h_1}{\partial w_1}=(y-y')*y*(1-y)*w_7*h_1*(1-h_1)*x_1 ∂w1∂loss=∂y∂loss∗∂h1∂y∗∂w1∂h1=(y−y′)∗y∗(1−y)∗w7∗h1∗(1−h1)∗x1
∂ l o s s ∂ w 2 = ∂ l o s s ∂ y ∗ ∂ y ∂ h 1 ∗ ∂ h 1 ∂ w 2 = ( y − y ′ ) ∗ y ∗ ( 1 − y ) ∗ w 7 ∗ h 1 ∗ ( 1 − h 1 ) ∗ x 2 \frac{\partial loss}{\partial w_2}=\frac{\partial loss}{\partial y}*\frac{\partial y}{\partial h_1}*\frac{\partial h_1}{\partial w_2}=(y-y')*y*(1-y)*w_7*h_1*(1-h_1)*x_2 ∂w2∂loss=∂y∂loss∗∂h1∂y∗∂w2∂h1=(y−y′)∗y∗(1−y)∗w7∗h1∗(1−h1)∗x2
∂ l o s s ∂ b 1 = ∂ l o s s ∂ y ∗ ∂ y ∂ h 1 ∗ ∂ h 1 ∂ b 1 = ( y − y ′ ) ∗ y ∗ ( 1 − y ) ∗ w 7 ∗ h 1 ∗ ( 1 − h 1 ) ∗ 1 \frac{\partial loss}{\partial b_1}=\frac{\partial loss}{\partial y}*\frac{\partial y}{\partial h_1}*\frac{\partial h_1}{\partial b_1}=(y-y')*y*(1-y)*w_7*h_1*(1-h_1)*1 ∂b1∂loss=∂y∂loss∗∂h1∂y∗∂b1∂h1=(y−y′)∗y∗(1−y)∗w7∗h1∗(1−h1)∗1
我们想更新w3、w4、b2
∂ l o s s ∂ w 3 = ∂ l o s s ∂ y ∗ ∂ y ∂ h 2 ∗ ∂ h 2 ∂ w 3 = ( y − y ′ ) ∗ y ∗ ( 1 − y ) ∗ w 8 ∗ h 2 ∗ ( 1 − h 2 ) ∗ x 1 \frac{\partial loss}{\partial w_3}=\frac{\partial loss}{\partial y}*\frac{\partial y}{\partial h_2}*\frac{\partial h_2}{\partial w_3}=(y-y')*y*(1-y)*w_8*h_2*(1-h_2)*x_1 ∂w3∂loss=∂y∂loss∗∂h2∂y∗∂w3∂h2=(y−y′)∗y∗(1−y)∗w8∗h2∗(1−h2)∗x1
∂ l o s s ∂ w 4 = ∂ l o s s ∂ y ∗ ∂ y ∂ h 2 ∗ ∂ h 2 ∂ w 4 = ( y − y ′ ) ∗ y ∗ ( 1 − y ) ∗ w 8 ∗ h 2 ∗ ( 1 − h 2 ) ∗ x 2 \frac{\partial loss}{\partial w_4}=\frac{\partial loss}{\partial y}*\frac{\partial y}{\partial h_2}*\frac{\partial h_2}{\partial w_4}=(y-y')*y*(1-y)*w_8*h_2*(1-h_2)*x_2 ∂w4∂loss=∂y∂loss∗∂h2∂y∗∂w4∂h2=(y−y′)∗y∗(1−y)∗w8∗h2∗(1−h2)∗x2
∂ l o s s ∂ w 4 = ∂ l o s s ∂ y ∗ ∂ y ∂ h 2 ∗ ∂ b 2 ∂ w 4 = ( y − y ′ ) ∗ y ∗ ( 1 − y ) ∗ w 8 ∗ h 2 ∗ ( 1 − h 2 ) ∗ 1 \frac{\partial loss}{\partial w_4}=\frac{\partial loss}{\partial y}*\frac{\partial y}{\partial h_2}*\frac{\partial b_2}{\partial w_4}=(y-y')*y*(1-y)*w_8*h_2*(1-h_2)*1 ∂w4∂loss=∂y∂loss∗∂h2∂y∗∂w4∂b2=(y−y′)∗y∗(1−y)∗w8∗h2∗(1−h2)∗1
我们想更新w5、w6、b3
∂ l o s s ∂ w 5 = ∂ l o s s ∂ y ∗ ∂ y ∂ h 3 ∗ ∂ h 3 ∂ w 5 = ( y − y ′ ) ∗ y ∗ ( 1 − y ) ∗ w 9 ∗ h 3 ∗ ( 1 − h 3 ) ∗ x 1 \frac{\partial loss}{\partial w_5}=\frac{\partial loss}{\partial y}*\frac{\partial y}{\partial h_3}*\frac{\partial h_3}{\partial w_5}=(y-y')*y*(1-y)*w_9*h_3*(1-h_3)*x_1 ∂w5∂loss=∂y∂loss∗∂h3∂y∗∂w5∂h3=(y−y′)∗y∗(1−y)∗w9∗h3∗(1−h3)∗x1
∂ l o s s ∂ w 6 = ∂ l o s s ∂ y ∗ ∂ y ∂ h 3 ∗ ∂ h 3 ∂ w 6 = ( y − y ′ ) ∗ y ∗ ( 1 − y ) ∗ w 9 ∗ h 3 ∗ ( 1 − h 3 ) ∗ x 2 \frac{\partial loss}{\partial w_6}=\frac{\partial loss}{\partial y}*\frac{\partial y}{\partial h_3}*\frac{\partial h_3}{\partial w_6}=(y-y')*y*(1-y)*w_9*h_3*(1-h_3)*x_2 ∂w6∂loss=∂y∂loss∗∂h3∂y∗∂w6∂h3=(y−y′)∗y∗(1−y)∗w9∗h3∗(1−h3)∗x2
∂ l o s s ∂ w 5 = ∂ l o s s ∂ y ∗ ∂ y ∂ h 3 ∗ ∂ h 3 ∂ b 3 = ( y − y ′ ) ∗ y ∗ ( 1 − y ) ∗ w 9 ∗ h 3 ∗ ( 1 − h 3 ) ∗ 1 \frac{\partial loss}{\partial w_5}=\frac{\partial loss}{\partial y}*\frac{\partial y}{\partial h_3}*\frac{\partial h_3}{\partial b_3}=(y-y')*y*(1-y)*w_9*h_3*(1-h_3)*1 ∂w5∂loss=∂y∂loss∗∂h3∂y∗∂b3∂h3=(y−y′)∗y∗(1−y)∗w9∗h3∗(1−h3)∗1
其他神经网络也可以像这样计算。
【思考题】对比
3.1 基于Logistic回归的二分类任务 4.2 基于前馈神经网络的二分类任务
谈谈自己的看法
对于不同的损失函数应该设计有不同的梯度计算法,因为不同损失函数的导数是不一样的。
总结:加权和是神经网络的常用名词而仿射变换是理解神经网络的一个方法,作者花了大部分时间编辑公式,编辑公式更流畅了,但这时候对于反向传播的理解还没有更多深入,对于torch的底层实现还不是很透彻,因此需要更多的学习。同时在补充总结的过程中发现了文章中很多纰漏,着重修改了一下。
补充:已补全损失对所有参数的偏导数。部分内容修缮。
ref:
何为仿射变换(Affine Transformation)
激活函数Relu 及 leakyRelu
sigmoid函数求导-只要四步

