keepalived + nginx + springboot搭建主从分发和负载均衡服务集群
keepalived + nginx + springboot搭建主从分发和负载均衡服务集群
- 1 背景
-
- 1.1 实现目标
- 1.2 服务器
- 2 开始搭建
-
- 2.1 配置后端(springboot)服务器
-
- 2.1.1 使用maven打包项目
- 2.1.2 将构建完成的工程文件上传到服务器
- 2.1.3 启动项目
- 2.1.4 测试
- 2.2 配置nginx及前端项目
-
- 2.2.1 安装nginx
- 2.2.2 将前端工程上传到服务器
- 2.2.3 修改nginx配置文件
- 2.2.5 测试
- 2.3 配置keepalived
-
- 2.3.1 安装keepalived
- 2.3.2 修改keepalived配置文件
- 2.3.3 测试
- 3. 后记
1 背景
1.1 实现目标
硬件运维团队提供了一个vip(虚拟ip),需要使用keepalived实现基于这个vip的两台分发器(nginx)的主备切换,以实现高可用。通过nginx实现后端服务的负载均衡,分摊压力。
1.2 服务器
| ip | 说明 |
|---|---|
| 10.50.1.300 | 后端服务(springboot)服务器 |
| 10.50.1.301 | 后端服务(springboot)服务器 |
| 10.50.1.302 | nginx & 前端(H5)服务器 |
| 10.50.1.303 | nginx & 前端(H5)服务器 |
2 开始搭建
2.1 配置后端(springboot)服务器
2.1.1 使用maven打包项目
虽然springboot提供了一个默认的maven打包工具,但默认的工具会将资源文件、引用jar包都打到同一个jar包中,为了分开打包,使用了apache的打包工具。
具体maven构建部分配置如下:
<build>
        <plugins>

            <plugin>
                <groupId>org.apache.maven.pluginsgroupId>
                <artifactId>maven-jar-pluginartifactId>
                <configuration>

                    <excludes>
                        <exclude>*.**exclude>
                        <exclude>*/*.xmlexclude>
                    excludes>
                    <archive>
                        <manifest>
                            <addClasspath>trueaddClasspath>

                            <classpathPrefix>lib/classpathPrefix>

                            <useUniqueVersions>falseuseUniqueVersions>

                            <mainClass>com.xincheng.bma.BmaApplicationmainClass>
                        manifest>
                        <manifestEntries>

                            <Class-Path>./resources/Class-Path>
                        manifestEntries>
                    archive>
                    <outputDirectory>${project.build.directory}outputDirectory>
                configuration>
            plugin>


            <plugin>
                <groupId>org.apache.maven.pluginsgroupId>
                <artifactId>maven-dependency-pluginartifactId>
                <executions>
                    <execution>
                        <id>copy-dependenciesid>
                        <phase>packagephase>
                        <goals>
                            <goal>copy-dependenciesgoal>
                        goals>
                        <configuration>
                            <outputDirectory>
                                ${project.build.directory}/lib/
                            outputDirectory>
                        configuration>
                    execution>
                executions>
            plugin>


            <plugin>
                <artifactId>maven-resources-pluginartifactId>
                <executions>
                    <execution>
                        <id>copy-resourcesid>
                        <phase>packagephase>
                        <goals>
                            <goal>copy-resourcesgoal>
                        goals>
                        <configuration>
                            <resources>
                                <resource>
                                    <directory>src/main/resourcesdirectory>
                                resource>
                            resources>
                            <outputDirectory>${project.build.directory}/resourcesoutputDirectory>
                        configuration>
                    execution>
                executions>
            plugin>


            <plugin>
                <groupId>org.springframework.bootgroupId>
                <artifactId>spring-boot-maven-pluginartifactId>
                <configuration>

                    <includes>
                        <include>
                            <groupId>nullgroupId>
                            <artifactId>nullartifactId>
                        include>
                    includes>
                    <layout>ZIPlayout>

                    <addResources>trueaddResources>
                    <outputDirectory>${project.build.directory}outputDirectory>
                configuration>
                <executions>
                    <execution>
                        <goals>
                            <goal>repackagegoal>
                        goals>
                        <configuration>


                            <classifier>runclassifier>
                        configuration>
                    execution>
                executions>
            plugin>
        plugins>
    build>
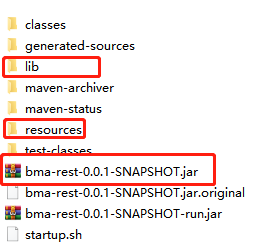
build完成生成文件如下,别的不要看,有用的是红圈的文件:

为了方便项目启动,编写一个startup.sh,内容如下
nohup java -jar ./bma-rest-0.0.1-SNAPSHOT.jar &
2.1.2 将构建完成的工程文件上传到服务器
2.1.3 启动项目
直接执行sh startup.sh启动项目

项目如果需要重启的话,先使用ps -ef|grep java查看java进程,然后直接用kill -9 id把进程杀掉,然后再启动就可以了。

2.1.4 测试
测试通过后将另外一台后端服务的机子也按如上步骤部署测试一遍即可
2.2 配置nginx及前端项目
2.2.1 安装nginx
由于服务器是不能直接连外网的,所以这次nginx采用的是离线安装。
去http://nginx.org/packages/centos/7/x86_64/RPMS/这个网站下载需要的nginx版本。

然后将下载的rpm包,上传到服务器,执行
rpm -ivs 安装包名.rpm
安装过程中可能会遇到依赖不存的错误,这时需要根据提示信息,依次下载安装对应的插件
这里推荐一个网站,可以下载到几乎所有的rpm包
http://www.rpmfind.net/linux/RPM/index.html

2.2.2 将前端工程上传到服务器
前端项目不是我这边部署的,我通过上传一个index文件,用来测试nginx


<html>
<head>
<title>Welcome to nginx!title>
<style>
    body {
        width: 35em;
        margin: 0 auto;
        font-family: Tahoma, Verdana, Arial, sans-serif;
    }
style>
head>
<body>
<h1>Welcome to nginx!h1>
<p>If you see this page, the nginx web server is successfully installed and
working. Further configuration is required.p>
<p>I'm here!!!!!p>
<p>For online documentation and support please refer to
<a href="http://nginx.org/">nginx.orga>.<br/>
Commercial support is available at
<a href="http://nginx.com/">nginx.coma>.p>

<p><em>Thank you for using nginx.em>p>
body>
html>
2.2.3 修改nginx配置文件
我的配置如下:
#user  nginx;
worker_processes  auto;

#error_log  /var/log/nginx/error.log notice;
#pid        /var/run/nginx.pid;


events {
    worker_connections  1024;
}


http {
    include       /etc/nginx/mime.types;
    default_type  application/octet-stream;

    #log_format  main  '$remote_addr - $remote_user [$time_local] "$request" '
    #                  '$status $body_bytes_sent "$http_referer" '
    #                  '"$http_user_agent" "$http_x_forwarded_for"';

    #access_log  /var/log/nginx/access.log  main;

    sendfile        on;
    #tcp_nopush     on;

    keepalive_timeout  65;

    #gzip  on;

    #include /etc/nginx/conf.d/*.conf;

    upstream backendserver{
      server 10.50.1.300:8080 weight=10;
      server 10.50.1.301:8080 weight=10;
    }

    server {
      listen 5018;
      server_name 10.50.1.306;
      error_page 500 502 503 504 /50x.html;

      location = /50x.html {
        root html;
      }

      location / {
        root html;
        index index.html index.htm;
      }

      location /h5/sap/asset/ {
        alias   /home/appuser/sap-mobile-h5/sap-asset/;
        index  index.html;
      }

      location /backend {
        proxy_pass http://backendserver/bma;
      }
    }
}
配置负载均衡,采用的是权重模式:

监听vip,配置前后端代理转发:

修改完配置文件之后,重新加载一下配置
nginx -s reload
2.2.5 测试
访问nginx主页,能够看到index.html的内容代表部署成功

配置中通过/backend进行了后台服务转发,使用nigix调用之前测试后端服务的api测试

为了验证负载均衡是否有效,可以交替关闭后端服务,访问nginx接口,测试是否能访问成功
另外一台nginx机器按照如上步骤配置测试即可。
2.3 配置keepalived
2.3.1 安装keepalived
安装方法和安装nginx一样都是采用离线安装的方法,上面提到的可以下载rpm包的网站可以下载到keepalived。
这个依赖可能会比较多,可以参照其他人写的教程,如:
https://www.cnblogs.com/sanluorenjian/p/13196692.html
2.3.2 修改keepalived配置文件
配置如下:
global_defs {
  notification_email {
    [email protected]
  }
  notification_email_from [email protected]
  #smtp_server XXX.smtp.com
  #smtp_connect_timeout 30
  router_id LVS_DEVEL
}

vrrp_instance VI_1 {
  state MASTER
  interface ens160
  virtual_router_id 51
  priority 100
  advert_int 1
  authentication {
    auth_type PASS
        auth_pass 8888
  }
  virtual_ipaddress {
    10.50.1.306
  }
}
global_defs {
  notification_email {
    [email protected]
  }
  notification_email_from [email protected]
  #smtp_server XXX.smtp.com
  #smtp_connect_timeout 30
  router_id LVS_DEVEL
}

vrrp_instance VI_1 {
  state BACDUP
  interface ens160
  virtual_router_id 51
  priority 99
  advert_int 1
  authentication {
    auth_type PASS
        auth_pass 8888
  }
  virtual_ipaddress {
    10.50.1.306
  }
}
配置修改时候重新加载一下配置
service keepalived reload
2.3.3 测试
采用vip访问nginx测试接口:

关闭主机的keepalived服务,等待一段时间再次访问接口,如果访问成功,说明keepalived主从配置成功。
3. 后记
之前一直是做java开发的,nginx之前听说过,也看过一些配置,不太慌,但keepalived是第一次做,做之前心里还是很忐忑的,怕要搞个几天才能配好。但实际配置和查看各位大佬的教程之后,没想到一下午就搞定了。
看来事情只要认真无畏的去做,其实是没有什么难做的事情。
就这样吧,希望这篇教程能够给各位一些帮助,祝好。
路漫漫其修远兮,吾将上下而求索。


