使用docker配置nginx的高可用集群(主从模式)
本文参考了这篇博客:https://blog.csdn.net/maxinfan/article/details/80661705
搭建nginx的高可用集群按理应该需要至少两台服务器才可以,但如果有docker,则可以只使用一台服务器搭建。
本文所用的设备只有一台centos7.6的云服务器。
文章目录
- 1. 安装docker
- 2. 下载centos镜像
- 3. 运行并进入centos镜像
- 4. 安装nginx和keepalived
- 5. 修改keepalived配置文件
- 6. 编写检测nginx状态的脚本
- 7. 修改BACKUP节点的配置
- 8.测试是否可用
- 9. 小结
1. 安装docker
如果不会安装docker, 请自行百度~
2. 下载centos镜像
利用docker下载最新的centos镜像。这里我下的是最新的centos镜像。
docker pull centos
3. 运行并进入centos镜像
# 5d0da3dc9764是centos镜像ID
docker run --privileged -tid --name centos01 5d0da3dc9764 /usr/sbin/init

# 若没有进入到该容器中,则执行以下命令
docker exec -it centos01 /bin/bash
4. 安装nginx和keepalived
- nginx的安装按正常步骤安装即可,不会的自行百度~
- 编译安装keepalived
cd /usr/local/src
# 下载keepalived安装包
wget https://www.keepalived.org/software/keepalived-2.2.3.tar.gz
tar zxvf keepalived-2.2.3.tar.gz
cd keepalived-2.2.3
./configure --prefix=/usr/local/keepalived
make && make install
上述本人使用的是离线安装包安装,不太清楚是否可以直接使用yum install keepalived -y命令安装。想尝试的可以尝试下~。若使用yum命令安装,则下面第3小步就不用做了
- 将keepalived路径配置好
#复制默认配置文件到默认路径
mkdir /etc/keepalived
cp /usr/local/keepalived/etc/keepalived/keepalived.conf /etc/keepalived/
#复制 keepalived 服务脚本到默认的地址
cp /usr/local/keepalived/etc/rc.d/init.d/keepalived /etc/init.d/
cp /usr/local/keepalived/etc/sysconfig/keepalived /etc/sysconfig/
ln -s /usr/local/sbin/keepalived /usr/sbin/
ln -s /usr/local/keepalived/sbin/keepalived /sbin/
- 设置keepalived服务开机启动.
chkconfig keepalived on
5. 修改keepalived配置文件
不太清楚配置文件在哪的,可以使用命令whereis keepalived找到
! Configuration File for keepalived

global_defs {
   notification_email {
     [email protected]
     [email protected]
     [email protected]
   }
   notification_email_from [email protected]
   smtp_server 192.168.200.1
   smtp_connect_timeout 30
   router_id LVS_DEVEL
}

vrrp_script chk_nginx {
   script "/etc/keepalived/nginx_check.sh" # 脚本路径
   interval 2
   weight -5
   fall 3
   rise 2
}

vrrp_instance VI_1 {
    state MASTER	# 标识该节点是master还是backup
    interface eth0	# 该处必须是ifconfig之后得到的网卡名称
    mcast_src_ip 172.17.0.2	# 当前节点ip
    virtual_router_id 2 # 虚拟节点id, master与backup需要保持一致
    priority 101	# 优先级,设置master的优先级值大于backup
    advert_int 2
    authentication {
        auth_type PASS
        auth_pass 1111
    }
    virtual_ipaddress {
	172.17.0.210	# 虚拟节点ip,需要配置
    }
    track_script {
	chk_nginx	# 调用执行脚本的函数
    }
}
keepalived配置文件,只需要修改加了注释的那几行即可。
6. 编写检测nginx状态的脚本
由于第5步中设置脚本路径为/etc/keepalived/nginx_check.sh,所以脚本在该路径下创建
cd /etc/keepalived/
vim nginx_check.sh
# 脚本内容如下:
!/bin/bash
A=`ps -C nginx -no-header | wc -l`
if [ $A -eq 0 ];then
    /usr/local/nginx/sbin/nginx
    sleep 2
    if [ `ps -C nginx --no-header | wc -l` -eq 0 ];then
        killall keepalived
    fi

fi
然后,再赋予该脚本执行权限:
chmod +x /etc/keepalived/nginx_check.sh
7. 修改BACKUP节点的配置
由于有docker,则创建一个BACKUP节点非常方便。
- 将运行的centos01commit到镜像
docker commit 6a95ceb38f3d hugh98/centos_nginx_keepalived:3.0
- 再run该镜像,就能生成一个BACKUP节点容器
docker run --privileged -tid --name centos02 ffef7b84373f /usr/sbin/init
- 进入centos02中
docker exec -ti centos02 /bin/bash
- 进入到keepalived的配置文件中,修改该配置文件为BACKUP配置文件
! Configuration File for keepalived

global_defs {
   notification_email {
     [email protected]
     [email protected]
     [email protected]
   }
   notification_email_from [email protected]
   smtp_server 192.168.200.1
   smtp_connect_timeout 30
   router_id LVS_DEVEL
}

vrrp_script chk_nginx {
   script "/etc/keepalived/nginx_check.sh"
   interval 2
   weight -5
   fall 3
   rise 2
}

vrrp_instance VI_1 {
    state BACKUP	# state 修改为 BACKUP
    interface eth0
    mcast_src_ip 172.17.0.3	# 此处修改成BACKUP节点的ip地址
    virtual_router_id 2
    priority 100	# 优先级数值修改成比MASTER的小
    advert_int 2
    authentication {
        auth_type PASS
        auth_pass 1111
    }
    virtual_ipaddress {
	172.17.0.210
    }
    track_script {
	chk_nginx
    }
}
8.测试是否可用
- 测试前确保两个容器中的nginx和keepalived都已开启
# 检查nginx是否开启
ps -ef | grep nginx
# 检查keepalived是否开启
ps -ef | grep keepalived

# 若没有开启,则开启
# 开启nginx
./usr/local/nginx/sbin/nginx
# 开启keepalived
./usr/local/keepalived/sbin/keepalived
- 为了区分访问到的nginx页面是centos01的还是centos02的,这里分别修改了nginx的默认访问页面index.html
# nginx默认访问页面地址
cd /usr/local/nginx/html

# 修改以下的index.html。这里自己随意修改就行,只要能区分访问的是哪个节点的网页就行!
vim index.html
- 在云服务器上测试
注意:这里是在云服务器上操作,不是在docker容器中操作
# 这里访问的是VIP
curl 172.17.0.210
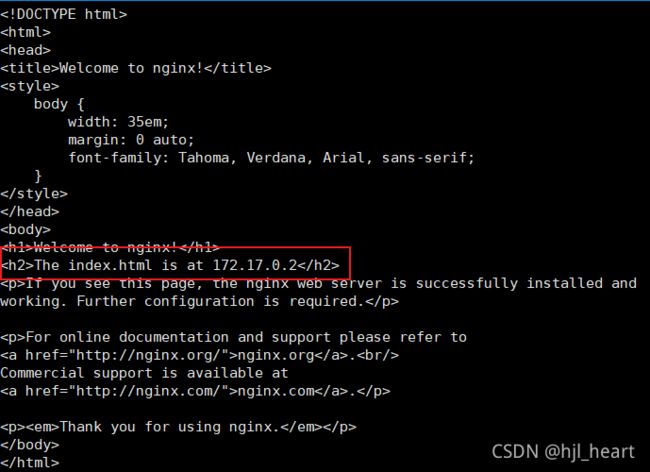
访问的是MASTER上的nginx默认页面
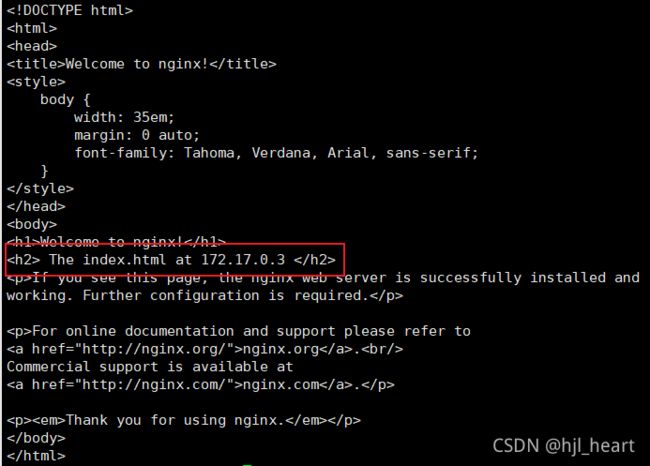
将centos01容器停掉,模拟MASTER宕机, 然后再访问VIP:
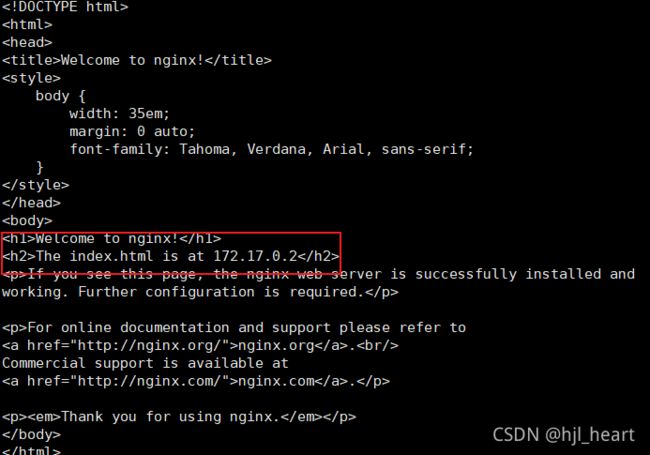
再次重新运行centos01容器后(注意:由于本人nginx没设置开机自启动,所以需要进入容器中重新开启nginx和keepalived),再访问VIP:
发现访问VIP时,还是访问的是centos01中的页面。
9. 小结
在这里我把自己创建出的镜像文件push到docker-hub上了,如果有人需要,可以使用以下命令下载:
docker push hugh98/centos_nginx_keepalived:3.0
这里我把自己的结构图放到这:


