【Docker】Docker入门
【Docker】Docker入门
一、本地安装docker
ubutun安装
这里以阿里云ECS(ubutun)下安装docker为例。命令行安装:
sudo apt install docker.io但是有的用户会有问题(使用工控机安装)
因为版本过老等原因需要查看可安装的版本,这个可以自行百度,当出现错误信息时复制粘贴即可
验证:
docker info也可以通过大佬的链接进行https://blog.csdn.net/submarineas/article/details/92642851
dock安装
docker安装是很简单的,只要跟着官网的步骤,一般不会出现问题,下面我以ubuntu为例,虽然工作中用的是CentOS,但安装过程基本是一致的,官网网址为:https://docs.docker.com/install/linux/docker-ce/ubuntu/
开头有介绍过docker自17.03版本之后就分出了社区版CE,和企业版EE,一般用社区版是已经够用了,而如果是Ubuntu安装,最好满足版本是16.04以上,然后Xenial 16.04(LTS),下面是步骤:
设置存储库:
# 1. 更新apt包索引
sudo apt-get update
# 2. 安装包以允许apt通过HTTPS使用存储库
sudo apt-get install \
apt-transport-https \
ca-certificates \
curl \
gnupg-agent \
software-properties-common
# 3. 添加Docker的官方GPG密钥:
curl -fsSL https://download.docker.com/linux/ubuntu/gpg | sudo apt-key add -
# 4. 9DC8 5822 9FC7 DD38 854A E2D8 8D81 803C 0EBF CD88通过搜索指纹的最后8个字符,验证您现在拥有带指纹的密钥 。一般都是一样的秘钥
sudo apt-key fingerprint 0EBFCD88
"""
pub rsa4096 2017-02-22 [SCEA]
9DC8 5822 9FC7 DD38 854A E2D8 8D81 803C 0EBF CD88
uid [ unknown] Docker Release (CE deb)
sub rsa4096 2017-02-22 [S]
"""
# 5. 设置稳定存储库
sudo add-apt-repository \
"deb [arch=amd64] https://download.docker.com/linux/ubuntu \
$(lsb_release -cs) \
stable"
12345678910111213141516171819202122232425262728 安装DOCKER CE:
# 1. 更新apt包索引
sudo apt-get update
# 2. 安装最新版本的Docker CE和containerd,或者转到下一步安装特定版本
sudo apt-get install docker-ce docker-ce-cli containerd.io
# 3. 列出当前仓库可用版本
apt-cache madison docker-ce
# 4. 根据显示的版本选择其中一个进行安装,比如目前我写这篇最新的为5:18.09.1~3-0~ubuntu-xenial
sudo apt-get install docker-ce=5:18.09.1~3-0~ubuntu-xenial docker-ce-cli=5:18.09.1~3-0~ubuntu-xenial containerd.io
1234567891011当安装成功后,我们可以利用docker -version进行查看当前情况:
$ docker -version
unknown shorthand flag: 'e' in -ersion
See 'docker --help'.
Usage: docker [OPTIONS] COMMAND
A self-sufficient runtime for containers
Options:
--config string Location of client config files (default "/root/.docker")
-D, --debug Enable debug mode
-H, --host list Daemon socket(s) to connect to
-l, --log-level string Set the logging level ("debug"|"info"|"warn"|"error"|"fatal")
(default "info")
--tls Use TLS; implied by --tlsverify
--tlscacert string Trust certs signed only by this CA (default
"/root/.docker/ca.pem")
--tlscert string Path to TLS certificate file (default "/root/.docker/cert.pem")
--tlskey string Path to TLS key file (default "/root/.docker/key.pem")
--tlsverify Use TLS and verify the remote
-v, --version Print version information and quit
Management Commands:
builder Manage builds
checkpoint Manage checkpoints
config Manage Docker configs
container Manage containers
engine Manage the docker engine
image Manage images
manifest Manage Docker image manifests and manifest lists
network Manage networks
node Manage Swarm nodes
plugin Manage plugins
secret Manage Docker secrets
service Manage services
stack Manage Docker stacks
swarm Manage Swarm
system Manage Docker
trust Manage trust on Docker images
volume Manage volumes
Commands:
attach Attach local standard input, output, and error streams to a running container
build Build an image from a Dockerfile
commit Create a new image from a container's changes
cp Copy files/folders between a container and the local filesystem
create Create a new container
deploy Deploy a new stack or update an existing stack
diff Inspect changes to files or directories on a container's filesystem
events Get real time events from the server
exec Run a command in a running container
export Export a container's filesystem as a tar archive
history Show the history of an image
images List images
import Import the contents from a tarball to create a filesystem image
info Display system-wide information
inspect Return low-level information on Docker objects
kill Kill one or more running containers
load Load an image from a tar archive or STDIN
login Log in to a Docker registry
logout Log out from a Docker registry
logs Fetch the logs of a container
pause Pause all processes within one or more containers
port List port mappings or a specific mapping for the container
ps List containers
pull Pull an image or a repository from a registry
push Push an image or a repository to a registry
rename Rename a container
restart Restart one or more containers
rm Remove one or more containers
rmi Remove one or more images
run Run a command in a new container
save Save one or more images to a tar archive (streamed to STDOUT by default)
search Search the Docker Hub for images
start Start one or more stopped containers
stats Display a live stream of container(s) resource usage statistics
stop Stop one or more running containers
tag Create a tag TARGET_IMAGE that refers to SOURCE_IMAGE
top Display the running processes of a container
unpause Unpause all processes within one or more containers
update Update configuration of one or more containers
version Show the Docker version information
wait Block until one or more containers stop, then print their exit codes
Run 'docker COMMAND --help' for more information on a command.
1234567891011121314151617181920212223242526272829303132333435363738394041424344454647484950515253545556575859606162636465666768697071727374757677787980818283848586
二、创建镜像仓库
这里以申请阿里云容器镜像服务(免费),并创建仓库为例,其他仓库如dockerhub、谷歌、亚马逊、腾讯等详见对应产品说明书。
阿里云容器服务地址为:https://cr.console.aliyun.com
注册开通后产品页面如下 
1. 创建命名空间
第一步切换标签页到命名空间,创建地址唯一的命名空间 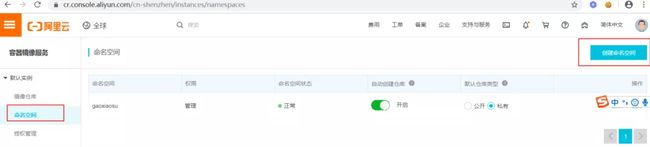
2. 创建镜像仓库
根据大赛要求选择对应的地域,其他的按照自己需求选择或填写 
下一步,选择本地仓库,不建议其他选项,完成创建。 
点击管理,可查看详情。 
3. 完成本地登录
按照页面的指令在本地完成登陆: 
登录命令如下,注意更改成自己的信息:
# your_registry_url E.g registry.cn-shanghai.aliyuncs.com/xxxx/xxxx
sudo docker login --username your_username --password your_password your_registry_urlP.S:如果登录成功,则跳过当前环节;
如果提示如下错误:
Cannot connect to the Docker daemon at unix:///var/run/docker.sock. Is the docker daemon running?
# 说明docker程序没有启动
可通过以下方式启动docker:
# 方法一:直接在应用程序中点击Docker图标启动程序(启动需要几秒钟)
# 方法二:通过命令行启动
open /Applications/Docker.app
# 命令行查看docker服务状态
launchctl list|grep docker
# 输出如下:
# - 0 com.docker.helper
# 23217 0 application.com.docker.docker.27923258.27923746
# 命令行关闭docker程序
launchctl stop application.com.docker.docker.27923258.27923746
三、准备文件上传
-
新建
submit文件夹,拷贝baseline方案中的code文件夹和user_data文件夹,run.sh和requirements.txt这些文件到目标文件夹submit中。
-
在
submit下,新建Dockerfile。输入以下内容:
# Base Images
 FROM registry.cn-shanghai.aliyuncs.com/tcc-public/python:3

# Add files to Image
 ADD . /

 RUN python -m pip install -i https://mirrors.aliyun.com/pypi/simple  -r requirements.txt
   ## 指定默认工作目录为根目录
 WORKDIR /

 ## 镜像启动后统一执行 sh run.sh
CMD [sh, run.sh]-
参考官方教程的第二部分,创建深圳的镜像仓库,并新建一个镜像。
记录下这几个信息:
用户名,密码(docker login需要);
镜像仓库的公网地址(push,pull和提交分数时用到)
-
在
submit文件夹上一级新建脚本build.sh,输入以下内容:
#!/bin/bash
export REPOBASE=registry.cn-shenzhen.aliyuncs.com
export REPO=registry.cn-shenzhen.aliyuncs.com/xxxx/yyyy
export USRNAME=zzzz
export VER=1.0
sudo docker login --username=$USRNAME $REPOBASE
sudo docker build -t $REPO:$VER .
sudo docker push $REPO:$VER特别注意别漏了docker build后面的.,表示基于当前目前构建。其他比较关键的就是export这几个变量:
REPOBASE:比赛中推荐使用深圳的镜像,REPOBASE这里的地址就是对应了阿里云容器服务里的深圳的仓库地址。
REPO就是咱们实际使用的镜像地址,对应容器服务里面的公网地址
VER表示的是版本号
USRNAME是咱们阿里云容器的账户名。
-
修改
submit文件夹下的requirements.txt里面的tensorflow==2.2.0为tensorflow-gpu==2.2.0。
因为官方容器运行环境包含GPU,所以改为GPU版本会让预测速度更快。顺便说下,
tensorflow在pypi(pip在线下载软件包的网站) 上默认的编译版本是CPU版本,而pytorch默认就是GPU版本的cuda编译,注意下这种区别。在GPU环境下运行CPU版本不会错,但反过来CPU环境下运行GPU版本,会因为找不到cuda相关库文件而报错。
-
位于
submit文件夹下,先确保脚本有可执行权限chmod 755 ../build.sh, 然后运行脚本../build.sh,进行镜像的构建和推送。
另外注意,此时如果很久没有运行
sudo命令,第一次输入密码是自己Linux系统的账户密码,第二次才是容器服务的账户密码,特别注意命令行提示登录成功才可以。
-
正常情况下,这时候就可以去比赛网址去提交自己的镜像跑分数了。
最后补一个分数