【Windows逆向】【Qt】资源解析
▒ 目录 ▒
-
- 导读
-
- 需求
- 开发环境
- 1️⃣ 分析思路
-
- 思路
- 获取资源路径的方法
- 2️⃣ c++正向编码
-
- 编码
- 使用流程
- 不使用Qt方式获取思路
- 3️⃣ frida方式获取Origin平台资源
-
- win32 - 定位目标资源
- win32 - 查找API含义
- win32 - 查找《符号》构造frida本地函数
- win32 - 全部代码
- win64 - TODO
- 文章小结
- 参考资料
导读
需求
Qt是一个1991年由Qt Company开发的跨平台C++图形用户界面应用程序开发框架。
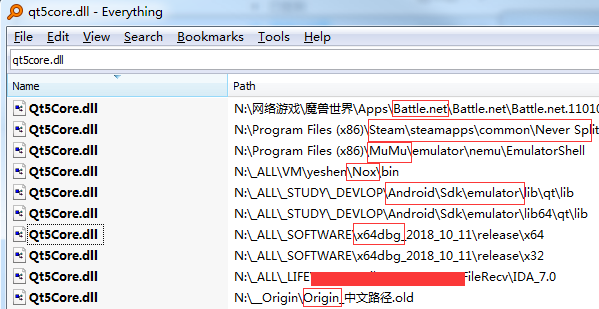
Qt使用还是很广泛的,为了大家有一个直观的概念,我用Everything搜索了下我电脑上的qt5core.dll,部分结果如下图所示:
从图中可以看到,android模拟器、魔兽战网平台、Origin游戏平台、x64dbg都使用了qt框架,除此之外还有很多应用使用了Qt,市面上对Qt的逆向也很多,在这里我们将分析如何导出Qt中的图片资源,其他资源暂时未找到方法,有大神知道的不吝赐教。
开发环境
| 版本号 | 描述 | |
|---|---|---|
| 文章日期 | 2022-12-08 | |
1️⃣ 分析思路
思路
通过Qt官网文档可以知道,项目中的res.qrc文件,会被编译为qrc_res.cpp。我们通过Hex Workshop查看文件二进制内容;通过python查看文件大小;通过Qt Creator打开qrc_res.cpp。我们先看下下面截图内容:
- 在文件qrc_res.cpp中的注释,我们可以知道,qt_resource_data数组保存了logo.ico文件内容;
- 查看文件大小为67,646 字节,通过python查看文件大小为0x1083e;0x1083e也的确被保存在了qt_resource_data数组中,内容为0x0,0x1,0x8,0x3e,;
- 比对Hex Workshop文件内容和qt_resource_data数组,可以发现内容是不一样的,显然内容被压缩了。
分析到这里,可以确定文件不是简单的被保存的PE文件的资源段中的,而且有可能被压缩处理了。那就换个思路,通过调用资源文件的方式将文件调用到内存中。
Qt中加载文件是通过路径“:/new/prefix1/logo.ico”加载的,直接构造对象QPixmap,即可加载图片资源,调用QPixmap的save函数即可将文件保存起来,那么我们写个dll,直接执行这些函数是不是就可以了呢。
获取资源路径的方法
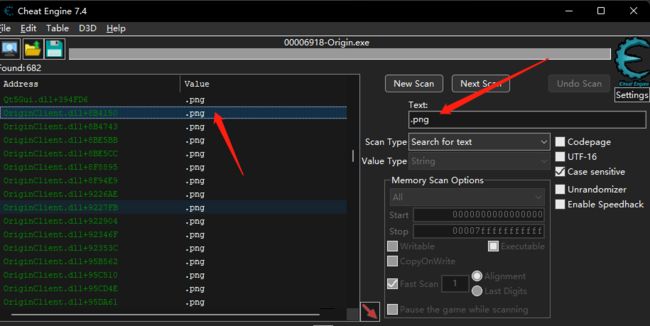
- CE搜索字符串
:/- OD、IDA字符串删选
:/- 关注资源,对应的构造函数,下断点或者IDA查找一下,都能定位资源路径
2️⃣ c++正向编码
编码
由于我使用的MingW的工程写的Demo,我们这里也使用MingW的编译器创建工程mydll,工程为dll工程。内容很简单,创建一个类Mydll,并创建个全局对象Mydll g_dll;,在构造函数中调用保存文件的逻辑,具体代码如下:
Mydll g_dll;

Mydll::Mydll()
{
    char *res = ":/new/prefix1/logo.ico";
    QString localname = QString("D") + res;
    QPixmap icon(res);
    icon.save(localname);
    return;
}
使用流程
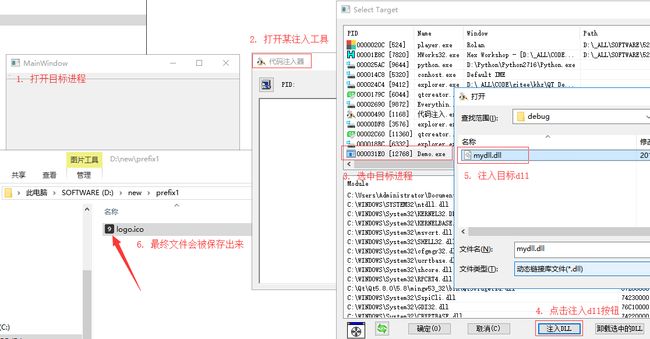
按照下图方式操作即可,需要使用
代码注入器.exe,代码注入CSDN下载地址 https://download.csdn.net/download/kinghzking/87254853
不使用Qt方式获取思路
如果只有vs,不使用qt,需要构造相关的数据结构,比如QString等;或者直接调用Qt5Core.dll导出函数构造相关的数据结构。简单的包含一此头文件,编译会失败的。
3️⃣ frida方式获取Origin平台资源
frida作为脚本工具,方便调试和试错,一直是一个不错的选择,下面我们讲解怎么使用frida实现图片保存。
其实也就是把《C++正向编码》通过frida实现一遍,其中一些细节需要处理一下。
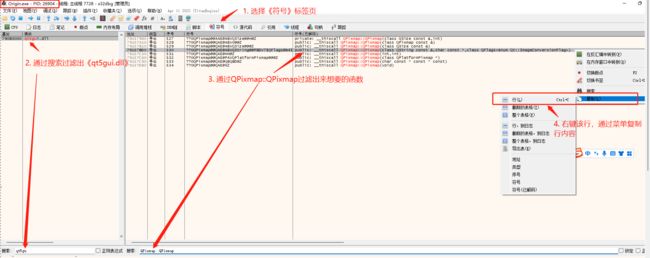
win32 - 定位目标资源
win32 - 查找API含义
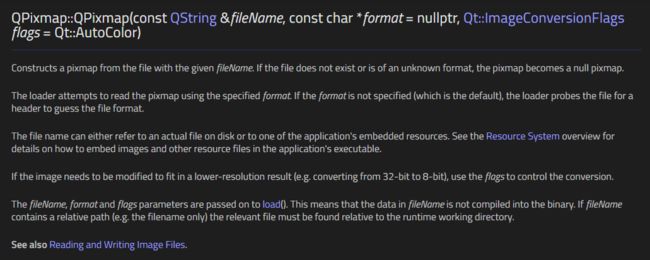
C++编码中,调用函数有默认值,参数可以忽略不传。但是frida中必须
了解所有函数参数,所以我们需要根据官网文档了解函数含义。
从上面文章分析,我们知道,我们需要用到QPixmap的下面两个函数,通过官网文档https://doc.qt.io/Qt-5/qpixmap.html,查看其接口含义
构造函数
QPixmap(const QString &fileName, const char *format = nullptr, Qt::ImageConversionFlags flags = Qt::AutoColor)
bool save(const QString &fileName, const char *format = nullptr, int quality = -1) const
win32 - 查找《符号》构造frida本地函数
参考frida官网文档 https://frida.re/docs/javascript-api/#nativefunction,编写
NativeFunction
// 地址=79157BD0
// 类型=导出
// 序号=530
// 符号=??0QPixmap@@QAE@ABVQString@@PBDV?$QFlags@W4ImageConversionFlag@Qt@@@@@Z
// 符号(已解码)=public: __thiscall QPixmap::QPixmap(class QString const &,char const *,class QFlags)
var fnQPixmap_QPixmap2 = new NativeFunction(
  Module.findExportByName('qt5gui.dll', '??0QPixmap@@QAE@ABVQString@@PBDV?$QFlags@W4ImageConversionFlag@Qt@@@@@Z'),
  'pointer',
  ['pointer', 'pointer', 'pointer', 'int'],
  'thiscall'
);

// 参数含义解析:
// oQPixmap:this指针,作为第一个参数传递进去
// qStrPointer:自己封装的函数,构造一个QString对象,具体看后面的全部代码
// ptr(0): 传递一个值为0的指针
// 0:枚举类型Qt::AutoColor对应的值,frida中直接用整数就行了。
var oQPixmap = Memory.alloc(400);
var qStrPointer = ez_fnQString_fromUtf8(':/origin.png')
fnQPixmap_QPixmap2(oQPixmap, qStrPointer, ptr(0), 0)
win32 - 全部代码
var fnQString_fromUtf8 = new NativeFunction(
  Module.findExportByName('Qt5Core.dll', '?fromUtf8@QString@@SA?AV1@PBDH@Z'),
  'void',
  ['pointer','pointer', 'int'],
  'mscdecl'
);
function ez_fnQString_fromUtf8(jsStr){
  var retQString = Memory.alloc(Process.pointerSize);
  var cStrPointer = Memory.allocUtf8String(jsStr);
  fnQString_fromUtf8(retQString, cStrPointer, -1);
  return retQString;
}

// 地址=79157C90
// 类型=导出
// 序号=533
// 符号=??0QPixmap@@QAE@QBQBD@Z
// 符号(已解码)=public: __thiscall QPixmap::QPixmap(char const * const * const)
var fnQPixmap_QPixmap = new NativeFunction(
  Module.findExportByName('qt5gui.dll', '??0QPixmap@@QAE@QBQBD@Z'),
  'pointer',
  ['pointer', 'pointer'],
  'thiscall'
);
// 地址=79157BD0
// 类型=导出
// 序号=530
// 符号=??0QPixmap@@QAE@ABVQString@@PBDV?$QFlags@W4ImageConversionFlag@Qt@@@@@Z
// 符号(已解码)=public: __thiscall QPixmap::QPixmap(class QString const &,char const *,class QFlags)
var fnQPixmap_QPixmap2 = new NativeFunction(
  Module.findExportByName('qt5gui.dll', '??0QPixmap@@QAE@ABVQString@@PBDV?$QFlags@W4ImageConversionFlag@Qt@@@@@Z'),
  'pointer',
  ['pointer', 'pointer', 'pointer', 'int'],
  'thiscall'
);


// 地址=7A0A2E68
// 类型=导入
// 符号=qt5gui.?save@QPixmap@@QBE_NABVQString@@PBDH@Z
// 符号(已解码)=public: bool __thiscall QPixmap::save(class QString const &,char const *,int)const
// bool	save(const QString &fileName, const char *format = nullptr, int quality = -1) const
var fnQPixmap_save = new NativeFunction(
  Module.findExportByName('qt5gui.dll', '?save@QPixmap@@QBE_NABVQString@@PBDH@Z'),
  'void',
  ['pointer', 'pointer', 'pointer', 'int'],
  'thiscall'
);


function ezSave(uri) {
  // 构造QPixmap
  var oQPixmap = Memory.alloc(400);
  var qStrPointer = ez_fnQString_fromUtf8(':/origin.png')
  console.log('1111111111111111')
  fnQPixmap_QPixmap2(oQPixmap, qStrPointer, ptr(0), 0)
  console.log('2222222222')

  // 保存图片
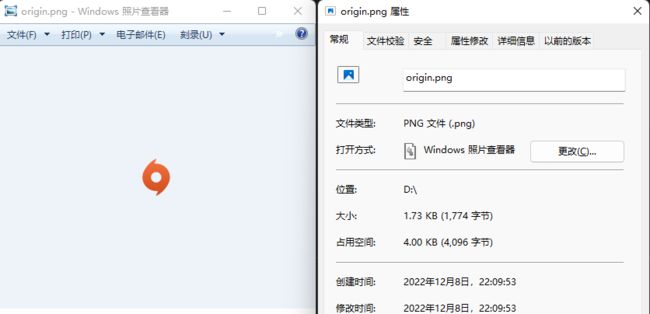
  var savePath = ez_fnQString_fromUtf8('D:\\origin.png')
  console.log('33333333')
  fnQPixmap_save(oQPixmap, savePath, ptr(0), -1)
  console.log('444444444444')
}

ezSave(':/origin.png')
win64 - TODO
win64和win32调用有差异,需要特殊处理的,以后有需要再写。
文章小结
- 不要用中文路径,可能编译失败。
- debug和release调用的qt库是不一样的,需要特别注意。
- MingW的工程和VS的工程也是不一样的,需要特别注意。
- 测试下一个Qt5.6的某exe,使用Qt5.8的dll,依然可以将文件导出。
参考资料
- github源码 https://github.com/ninecents/MyOpen
- [Qt] 00_Qt资源解析 https://bbs.pediy.com/thread-250691.htm
- 代码注入下载地址 https://download.csdn.net/download/kinghzking/87254853
- Qt官网文档 https://doc.qt.io/Qt-5/qpixmap.html
- frida官网文档 https://frida.re/docs/javascript-api/#nativefunction
**ps:**文章中内容仅用于技术交流,请勿用于违规违法行为。
