JPEG编码原理与解码分析
JPEG编码原理
JPEG(Joint Photographic Experts Group)是JPEG标准的产物,该标准由国际标准化组织(ISO)制订,是面向连续色调静止图像的一种压缩标准。JPEG格式是最常用的图像文件格式,后缀名为.jpg或.jpeg。
JPEG标准中,规定了四种模式,以满足不同的需要:
- 基于DPCM的无损编码模式:压缩比可达2:1
- 基于DCT的有损顺序编码模式:压缩比可达10:1以上
- 基于DCT的递增编码模式
- 基于DCT的分层编码模式
基本的JPEG编码原理可以用图如下的流程图表示:
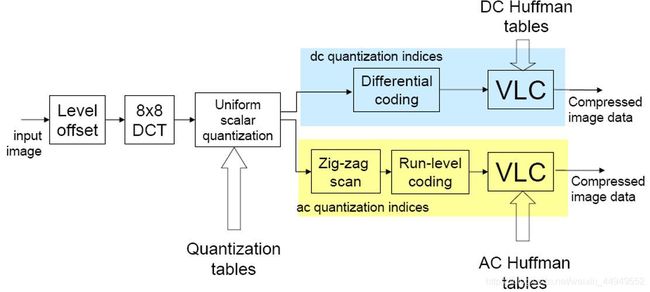
对于输入的图像,JPEG编码要经过以下的步骤:
1、零偏置
JPEG编码将图像分为8x8的块作为数据处理的最小单位,对于灰度级为 2 n 2^n 2n 的像素,通过减去 2 n − 1 2^{n-1} 2n−1 ,将无符号数变成有符号数。以灰度级n=8的图像为例,将原来图像的灰度范围 [ 0 − 255 ] [0-255] [0−255] 减去 128 128 128 后,范围变成了 [ − 128 − 127 ] [-128-127] [−128−127] 。
经过零偏置后,像素灰度的绝对值被控制在较小的范围内,便于后续的编码。
2、DCT变换
对零偏置后的图像进行DCT(Discrete Cosine Transform,离散余弦变换)变换,以进行能量集中和去相关,去除图像的空间冗余。变换后的图像能量集中在右上角。
DCT变换同样以8x8的块为单位,具体公式如下:
F ( u , v ) = 1 4 C ( u ) C ( v [ ∑ i = 0 7 ∑ j = 0 7 f ( x , y ) c o s ( 2 i + 1 ) u π 16 c o s ( 2 j + 1 ) u π 16 ] ) F(u,v)=\frac{1}{4}C(u)C\bigg(v \bigg[\sum_{i=0}^{7}\sum_{j=0}^{7}f(x,y)cos \frac{(2i+1)u\pi}{16}cos \frac{(2j+1)u\pi}{16} \bigg] \bigg) F(u,v)=41C(u)C(v[i=0∑7j=0∑7f(x,y)cos16(2i+1)uπcos16(2j+1)uπ])
其中 C C C 为DCT变换矩阵:
C ( u ) , C ( v ) = 1 2 u , v = 0 C ( u ) , C ( v ) = 1 o t h e r w i s e C(u),C(v)=\frac{1}{2}\quad u,v=0\\C(u),C(v)=1\quad otherwise C(u),C(v)=21u,v=0C(u),C(v)=1otherwise
f ( x , y ) f(x,y) f(x,y)为原始图像。DCT变换是一种无损变换,在变换过程中没有精度损失。
3、量化
根据人眼的视觉特性,人眼对高频信息的不敏感,在JPEG中采用低频细量化,高频粗量化,以降低视觉冗余。同时由于人眼对色度信号的敏感度低于亮度信号,故对于亮度和色度信号有不同的量化系数 Q ( u , v ) Q(u,v) Q(u,v)
量化结果可表示为:
L ( u , v ) = [ F ( u , v ) Q ( u , v ) + 0.5 ] L(u,v)=\bigg[\frac{F(u,v)}{Q(u,v)}+0.5\bigg] L(u,v)=[Q(u,v)F(u,v)+0.5]
根据不同质量的要求,可以建立不同的量化系数表。
4、DC系数的差分编码
8×8图像块经过DCT变换之后得到的DC直流系数有两个特点
-
系数的数值比较大
-
相邻8×8图像块的DC系数值变化不大:冗余
根据这个特点,JPEG算法使用了差分脉冲调制编码 (DPCM)技术,对相邻图像块之间量化DC系数的差值DIFF 进行编码:
D I F F = D C k − D C k − 1 DIFF=DC_k-DC_{k-1} DIFF=DCk−DCk−1
采用熵编码(huffman编码)的方式,亮度信号与色度信号的DC系数采用不同的Huffman编码表
5、AC系数的Zig-zag扫描与游程编码
由于经DCT变换后,系数大多数集中在左上角,即低频分量区,因此采用Z字形(Zig-zag)扫描按频率的高低顺序读出,可以出现很多连零的机会,以便使用RLE游程编码。
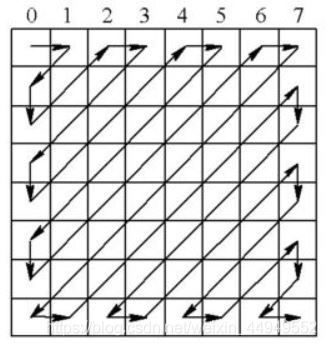
尤其在最后, 如果都是零,给出EOB (End of Block)即可。
在JPEG中的游程编码规定为:(run,level)
- 表示连续run个0,后面跟值为level的系数
- 如: −3 0 −3 −2 −6 2 −4 1 −4 1 1 5 1 2 −1 1 −1 2 0 0 0 0 0 −1 −1 EOB
- 表示为(0,-3) ; (1,-3) ; (0,-2) ; (0,-6) ; (0,2) ; (0,-4) ; (0,1) ;
(0,-4) ; (0,1) (0,1) ; (0,5) ; (0,1); (0,2) ; (0,-1) ; (0,1) ; (0,-1)
; (0,2) ; (5,-1) ; (0,-1) ; EOB
编码:
-
Run: 最多15个,用4位表示Z
-
Level:类似DC ,分成16个类别,用4位表示表示类别号C
-
对(Z, C)联合用Huffman编码
-
对类内索引用定长码编码
同DC系数一样,亮度信号和色度信号的AC系数也有不同的huffman编码表
JPEG解码
JPEG解码为编码的逆过程,做简单的流程介绍:
- 解码Huffman数据
- 解码DC差值
- 重构量化后的系数
- DCT逆变换
- 丢弃填充的行/列
- 反0偏置
- 对丢失的CbCr分量差值(下采样的逆过程)
- YCbCr → RGB
JPEG文件解析
JPEG文件以segment为数据流的组织形式,定义了一系列的标记(Marker)放在每一个segment的开头。
Marker均以0xFF开始,后跟1字节的标记标识符和2字节的标记长度以及该标记所对应的payload。标记长度部分高位在前,低位在后,不包含该标记的头 两个字节 。
常见的Maker如下表所示:
| Name | Bytes | Payload | Comments |
|---|---|---|---|
| SOI (Start of Image) | 0xFFD8 | none | 文件开头 |
| SOF0 (Start of Image Baseline DCT) | 0xFFC0 | variable size | Baseline DCT所用的开头 |
| SOF2(Start of Image Progressive DCT) | 0xFFC2 | variable size | Progressive DCT所用的开头 |
| DHT(Define Huffman Table) | 0xFFC4 | variable size | 指定Huffman表 |
| DQT(Define Quantization Table) | 0xFFDB | variable size | 指定量化表 |
| DRI (Define Restart Interval) | 0xFFDD | 2 bytes | RST中的marker |
| SOS(Start of Scan) | 0xFFDA | variable size | 扫描的开头 |
| RSTn(Restart) | 0xFFDn | variable size | 插入r个块到DRImarker中 |
| APPn (Application Specific) | 0xFFEn | variable size | Exif JPEG使用APP1,JFIF JPEG使用APP0 |
| COM (Comment) | 0xFFFE | variable size | 注释 |
| EOI(End of Image) | 0xFFD9 | none | 文件结束 |
其中要注意的有:
- 熵编码部分的数据在0xFF后由编码器插入0x00,解码器 解码时跳过此字节不予处理
- SOI( Start Of Image)和EOI( End Of Image)标记没有 payload
JPEG解码器C++程序分析
程序整体框架
main
int main(int argc, char *argv[])
{
  int output_format = TINYJPEG_FMT_YUV420P;
  char *output_filename, *input_filename;
  clock_t start_time, finish_time;
  unsigned int duration;
  int current_argument;
  int benchmark_mode = 0;
#if TRACE
  p_trace=fopen(TRACEFILE,"w");
  if (p_trace==NULL)
  {
	  printf("trace file open error!");
  }
#endif
  if (argc < 3)
    usage();

  current_argument = 1;
  while (1)
   {
     if (strcmp(argv[current_argument], "--benchmark")==0)
       benchmark_mode = 1;
     else
       break;
     current_argument++;
   }

  if (argc < current_argument+2)
    usage();

  input_filename = argv[current_argument];
  if (strcmp(argv[current_argument+1],"yuv420p")==0)
    output_format = TINYJPEG_FMT_YUV420P;
  else if (strcmp(argv[current_argument+1],"rgb24")==0)
    output_format = TINYJPEG_FMT_RGB24;
  else if (strcmp(argv[current_argument+1],"bgr24")==0)
    output_format = TINYJPEG_FMT_BGR24;
  else if (strcmp(argv[current_argument+1],"grey")==0)
    output_format = TINYJPEG_FMT_GREY;
  else
    exitmessage("Bad format: need to be one of yuv420p, rgb24, bgr24, grey\n");
  output_filename = argv[current_argument+2];

  start_time = clock();

  if (benchmark_mode)
    load_multiple_times(input_filename, output_filename, output_format);
  else
    convert_one_image(input_filename, output_filename, output_format);

  finish_time = clock();
  duration = finish_time - start_time;
  snprintf(error_string, sizeof(error_string),"Decoding finished in %u ticks\n", duration);
#if TRACE
  fclose(p_trace);
#endif
  return 0;
}
在主程序中,通过benchmark的设置进行了对解码函数的选择,若参数设置了benchmark,则调用load_multiple_times函数,若未设置,则调用convert_one_image函数。同时通过参数设置进行了图像格式的选择,主程序中的默认格式为YUV420P。
本次实验中未设置参数benchmark。
convert_one_image
int convert_one_image(const char *infilename, const char *outfilename, int output_format)
{
  FILE *fp;
  unsigned int length_of_file;
  unsigned int width, height;
  unsigned char *buf;
  struct jdec_private *jdec;
  unsigned char *components[3];

  /* Load the Jpeg into memory */
  fp = fopen(infilename, "rb");
  if (fp == NULL)
    exitmessage("Cannot open filename\n");
  length_of_file = filesize(fp);
  buf = (unsigned char *)malloc(length_of_file + 4);
  if (buf == NULL)
    exitmessage("Not enough memory for loading file\n");
  fread(buf, length_of_file, 1, fp);
  fclose(fp);

  /* Decompress it */
  jdec = tinyjpeg_init();
  if (jdec == NULL)
    exitmessage("Not enough memory to alloc the structure need for decompressing\n");

  if (tinyjpeg_parse_header(jdec, buf, length_of_file)<0)
    exitmessage(tinyjpeg_get_errorstring(jdec));

  /* Get the size of the image */
  tinyjpeg_get_size(jdec, &width, &height);

  snprintf(error_string, sizeof(error_string),"Decoding JPEG image...\n");
  if (tinyjpeg_decode(jdec, output_format) < 0)
    exitmessage(tinyjpeg_get_errorstring(jdec));

  /*
   * Get address for each plane (not only max 3 planes is supported), and
   * depending of the output mode, only some components will be filled
   * RGB: 1 plane, YUV420P: 3 planes, GREY: 1 plane
   */
  tinyjpeg_get_components(jdec, components);

  /* Save it */
  switch (output_format)
   {
    case TINYJPEG_FMT_RGB24:
    case TINYJPEG_FMT_BGR24:
      write_tga(outfilename, output_format, width, height, components);
      break;
    case TINYJPEG_FMT_YUV420P:
      write_yuv(outfilename, width, height, components);
      break;
    case TINYJPEG_FMT_GREY:
      write_pgm(outfilename, width, height, components);
      break;
   }

  /* Only called this if the buffers were allocated by tinyjpeg_decode() */
  tinyjpeg_free(jdec);
  /* else called just free(jdec); */

  free(buf);
  return 0;
}
对一个JPEG文件进行解码,读取数据存放在buf中,调用的三个函数:
tinyjpeg_parse_header:获取marker信息,得到解码所需要的数据
tinyjpeg_get_size:得到数据长度信息
tinyjpeg_decode:对JPEG数据流进行解码,结果存放在结构体变量jdec中
再根据output_format的格式选择进行相应的数据输出
tinyjpeg_decode
int tinyjpeg_decode(struct jdec_private *priv, int pixfmt)
{
  unsigned int x, y, xstride_by_mcu, ystride_by_mcu;
  unsigned int bytes_per_blocklines[3], bytes_per_mcu[3];
  decode_MCU_fct decode_MCU;
  const decode_MCU_fct *decode_mcu_table;
  const convert_colorspace_fct *colorspace_array_conv;
  convert_colorspace_fct convert_to_pixfmt;

  if (setjmp(priv->jump_state))
    return -1;

  /* To keep gcc happy initialize some array */
  bytes_per_mcu[1] = 0;
  bytes_per_mcu[2] = 0;
  bytes_per_blocklines[1] = 0;
  bytes_per_blocklines[2] = 0;

  decode_mcu_table = decode_mcu_3comp_table;
  switch (pixfmt) {
     case TINYJPEG_FMT_YUV420P:
       colorspace_array_conv = convert_colorspace_yuv420p;
       if (priv->components[0] == NULL)
	 priv->components[0] = (uint8_t *)malloc(priv->width * priv->height);
       if (priv->components[1] == NULL)
	 priv->components[1] = (uint8_t *)malloc(priv->width * priv->height/4);
       if (priv->components[2] == NULL)
	 priv->components[2] = (uint8_t *)malloc(priv->width * priv->height/4);
       bytes_per_blocklines[0] = priv->width;
       bytes_per_blocklines[1] = priv->width/4;
       bytes_per_blocklines[2] = priv->width/4;
       bytes_per_mcu[0] = 8;
       bytes_per_mcu[1] = 4;
       bytes_per_mcu[2] = 4;
       break;

     case TINYJPEG_FMT_RGB24:
       colorspace_array_conv = convert_colorspace_rgb24;
       if (priv->components[0] == NULL)
	 priv->components[0] = (uint8_t *)malloc(priv->width * priv->height * 3);
       bytes_per_blocklines[0] = priv->width * 3;
       bytes_per_mcu[0] = 3*8;
       break;

     case TINYJPEG_FMT_BGR24:
       colorspace_array_conv = convert_colorspace_bgr24;
       if (priv->components[0] == NULL)
	 priv->components[0] = (uint8_t *)malloc(priv->width * priv->height * 3);
       bytes_per_blocklines[0] = priv->width * 3;
       bytes_per_mcu[0] = 3*8;
       break;

     case TINYJPEG_FMT_GREY:
       decode_mcu_table = decode_mcu_1comp_table;
       colorspace_array_conv = convert_colorspace_grey;
       if (priv->components[0] == NULL)
	 priv->components[0] = (uint8_t *)malloc(priv->width * priv->height);
       bytes_per_blocklines[0] = priv->width;
       bytes_per_mcu[0] = 8;
       break;

     default:
#if TRACE
		 fprintf(p_trace,"Bad pixel format\n");
		 fflush(p_trace);
#endif
       return -1;
  }

  xstride_by_mcu = ystride_by_mcu = 8;
  if ((priv->component_infos[cY].Hfactor | priv->component_infos[cY].Vfactor) == 1) {
     decode_MCU = decode_mcu_table[0];
     convert_to_pixfmt = colorspace_array_conv[0];
#if TRACE
     fprintf(p_trace,"Use decode 1x1 sampling\n");
	 fflush(p_trace);
#endif
  } else if (priv->component_infos[cY].Hfactor == 1) {
     decode_MCU = decode_mcu_table[1];
     convert_to_pixfmt = colorspace_array_conv[1];
     ystride_by_mcu = 16;
#if TRACE
     fprintf(p_trace,"Use decode 1x2 sampling (not supported)\n");
	 fflush(p_trace);
#endif
  } else if (priv->component_infos[cY].Vfactor == 2) {
     decode_MCU = decode_mcu_table[3];
     convert_to_pixfmt = colorspace_array_conv[3];
     xstride_by_mcu = 16;
     ystride_by_mcu = 16;
#if TRACE
	 fprintf(p_trace,"Use decode 2x2 sampling\n");
	 fflush(p_trace);
#endif
  } else {
     decode_MCU = decode_mcu_table[2];
     convert_to_pixfmt = colorspace_array_conv[2];
     xstride_by_mcu = 16;
#if TRACE
     fprintf(p_trace,"Use decode 2x1 sampling\n");
	 fflush(p_trace);
#endif
  }

  resync(priv);

  /* Don't forget to that block can be either 8 or 16 lines */
  bytes_per_blocklines[0] *= ystride_by_mcu;
  bytes_per_blocklines[1] *= ystride_by_mcu;
  bytes_per_blocklines[2] *= ystride_by_mcu;

  bytes_per_mcu[0] *= xstride_by_mcu/8;
  bytes_per_mcu[1] *= xstride_by_mcu/8;
  bytes_per_mcu[2] *= xstride_by_mcu/8;

  /* Just the decode the image by macroblock (size is 8x8, 8x16, or 16x16) */
  for (y=0; y < priv->height/ystride_by_mcu; y++)
   {
     //trace("Decoding row %d\n", y);
     priv->plane[0] = priv->components[0] + (y * bytes_per_blocklines[0]);
     priv->plane[1] = priv->components[1] + (y * bytes_per_blocklines[1]);
     priv->plane[2] = priv->components[2] + (y * bytes_per_blocklines[2]);
     for (x=0; x < priv->width; x+=xstride_by_mcu)
      {
	decode_MCU(priv);
	convert_to_pixfmt(priv);
	priv->plane[0] += bytes_per_mcu[0];
	priv->plane[1] += bytes_per_mcu[1];
	priv->plane[2] += bytes_per_mcu[2];
	if (priv->restarts_to_go>0)
	 {
	   priv->restarts_to_go--;
	   if (priv->restarts_to_go == 0)
	    {
	      priv->stream -= (priv->nbits_in_reservoir/8);
	      resync(priv);
	      if (find_next_rst_marker(priv) < 0)
		return -1;
	    }
	 }
      }
   }
#if TRACE
  fprintf(p_trace,"Input file size: %d\n", priv->stream_length+2);
  fprintf(p_trace,"Input bytes actually read: %d\n", priv->stream - priv->stream_begin + 2);
  fflush(p_trace);
#endif

  return 0;
}
得到头部信息后可以用此函数对JPEG数据流进行解码
程序的三个结构体设计
1、huffman_table
struct huffman_table
{
  /* Fast look up table, using HUFFMAN_HASH_NBITS bits we can have directly the symbol,
   * if the symbol is <0, then we need to look into the tree table */
  short int lookup[HUFFMAN_HASH_SIZE];
  /* code size: give the number of bits of a symbol is encoded */
  unsigned char code_size[HUFFMAN_HASH_SIZE];
  /* some place to store value that is not encoded in the lookup table
   * FIXME: Calculate if 256 value is enough to store all values
   */
  uint16_t slowtable[16-HUFFMAN_HASH_NBITS][256];
};
建立Huffman码表,其中lookup为快速查找表,在程序进行huffman解码时能够提高解码效率
2、component
struct component
{
  unsigned int Hfactor;
  unsigned int Vfactor;
  float *Q_table;		/* Pointer to the quantisation table to use */
  struct huffman_table *AC_table;
  struct huffman_table *DC_table;
  short int previous_DC;	/* Previous DC coefficient */
  short int DCT[64];		/* DCT coef */
#if SANITY_CHECK
  unsigned int cid;
#endif
};
结构体存放8x8宏块的信息,定义了水平采样因子,垂直采样因子,量化表指针,AC系数、DC系数的Huffman码表的指针,前一个DC系数等。
与此同时,结构体中嵌套了huffman_table结构体。
3、jdec_private
struct jdec_private
{
  /* Public variables */
  uint8_t *components[COMPONENTS];
  unsigned int width, height;	/* Size of the image */
  unsigned int flags;

  /* Private variables */
  const unsigned char *stream_begin, *stream_end;
  unsigned int stream_length;

  const unsigned char *stream;	/* Pointer to the current stream */
  unsigned int reservoir, nbits_in_reservoir;

  struct component component_infos[COMPONENTS];
  float Q_tables[COMPONENTS][64];		/* quantization tables */
  struct huffman_table HTDC[HUFFMAN_TABLES];	/* DC huffman tables   */
  struct huffman_table HTAC[HUFFMAN_TABLES];	/* AC huffman tables   */
  int default_huffman_table_initialized;
  int restart_interval;
  int restarts_to_go;				/* MCUs left in this restart interval */
  int last_rst_marker_seen;			/* Rst marker is incremented each time */

  /* Temp space used after the IDCT to store each components */
  uint8_t Y[64*4], Cr[64], Cb[64];

  jmp_buf jump_state;
  /* Internal Pointer use for colorspace conversion, do not modify it !!! */
  uint8_t *plane[COMPONENTS];

};
JPEG数据流结构体,存放了关于JPEG图像的宽、高,量化表,Huffman编码表,数据流起始、结束指针等通用信息。
与此同时,结构体中嵌套了component结构体与huffman_table结构体。
实验结果
1、调试JPEG解码器程序。将输入的JPG文件进行解码,将输出文件保存为可供YUVViewer观看的YUV文件。
程序设置输出Y\U\V三个分量,要输出完整的YUV文件,需要在write_yuv函数中添加代码:
snprintf(temp, 1024, "%s.YUV", filename);
    F = fopen(temp, "wb");
    fwrite(components[0], width, height, F);
    fwrite(components[1], width * height / 4, 1, F);
    fwrite(components[2], width * height / 4, 1, F);
    fclose(F);
同时在命令行中添加参数:
- test.jpg yuv420p test
运行程序得到yuv文件,用yuvviewer打开:

2、Trace调试
程序中的许多地方都加入了trace模块:
#if TRACE
 /*、、、*/
#endif
trace的目的是记录程序运行中中间变量的变化和解析Huffman码表、marker等信息,以便观察解码过程中某一环节是否有错误产生。
打开trace的方法是在tinyjpeg.h文件中:
#define TRACE 1//add by nxn
#define TRACEFILE "trace_jpeg.txt"//add by nxn
将#define TRACE 1改为#define TRACE 0即可关闭trace。在#define TRACEFILE "trace_jpeg.txt"中可以修改输出的文件名。
在main函数中,trace记录输出为txt文件:

3.以txt文件输出所有的量化矩阵和所有的HUFFMAN码表。
为了实现量化矩阵和HUFFMAN码表的输出,需要在程序中添加输出文件的相关代码:
//tinyjpeg.h中添加
FILE *Qfile;
FILE *Hfile;
//main函数中添加
Qfile = fopen("q_matrix.txt","w");
Hfile = fopen("h_table.txt", "w");
fclose(Hfile);
fclose(Qfile);
//parse_DQT函数的循环中添加,输出量化表的id
 fprintf(Qfile, "Quantization_table [%d]:\n", qi);
 fflush(Qfile);
 // parse_DHT函数中添加,输出Huffman表的类型与id
 fprintf(Hfile, "Huffman table %s[%d] length=%d\n", (index & 0xf0) ? "AC" : "DC", index & 0xf, count)
fflush(Hfile);
//build_huffman_table函数中添加,输出Huffman码表
fprintf(Hfile, "val=%2.2x code=%8.8x codesize=%2.2d\n", val, code, code_size);
fflush(Hfile);
//build_quantization_table函数的循环中添加,输出量化表
 for (i=0; i<8; i++) {
     for (j=0; j<8; j++) {
		 fprintf(Qfile, "%d\t", ref_table[*zz]);
		 fflush(Qfile);
		 if (j == 7)
		 {
			 fprintf(Qfile, "\n");
			 fflush(Qfile);
		 }

       *qtable++ = ref_table[*zz++] * aanscalefactor[i] * aanscalefactor[j];
     }
   }
重新调试程序后,得到txt文件:


4. 输出DC图像并统计其概率分布;输出某一个AC值图像并统计其概率分布。
在得到的DCT数组中存储了图像DCT变换后的数据,将这些数据输出即可,其中DCT[0]为图像的直流分量,其余为交流分量,实验中取DCT[1]作为输出的AC分量值。
对于8x8的宏块,取每一个宏块DCT变换后左上角的第一个值为DC分量,输出图像的大小为128x128(原图像为1024x1024)。
为了便于观察,将DC分量的值(范围-512~512)调整到 0~255。AC分量的值较小,+128处理。
在程序中添加输出AC,DC图像的代码:
//在main函数中添加:
FILE *DCfile;
FILE *ACfile;
DCfile = fopen("dc.yuv","w");
ACfile = fopen("ac.yuv", "w");
........
fclose(DCfile);
fclose(ACfile);
//在tinyjpeg_decode函数中添加:
unsigned char *DCbuf, *ACbuf;

unsigned char *uvbuf = 128;
int count=0;
....
decode_MCU(priv);

	DCbuf= (unsigned char)((priv->component_infos->DCT[0] + 512.0) / 4 + 0.5);
	ACbuf= (unsigned char)(priv->component_infos->DCT[1] + 128);
	fwrite(&DCbuf, 1, 1,DCfile);
	fwrite(&ACbuf, 1, 1,ACfile);
	count++;

.....
 for (int j = 0; j < count *0.25 * 2; j++)
  {
	  fwrite(&uvbuf, sizeof(unsigned char), 1, DCfile);
	  fwrite(&uvbuf, sizeof(unsigned char), 1, ACfile);
  }

  return 0;
输出图像如下:

最后对图像进行概率分布统计,调用如下的程序:
#include得到的概率分布图如下:
