Spring Security Hello World Example--reference
In this tutorial, we will see how we can use Spring security to protect specific resources. This Hello World tutorial will give you a quick start to Spring Security.We will use Spring’s Java Config ( Annotation based approach) to configure the properties instead of XML configuration.
Technologies used
- Spring 4.0.3 Release
- Spring Security 3.2.3 Release
- Tomcat 7
- Java 1.6
We are going to develop a simple web application using Spring MVC. All the configurations will be done using Java Classes and there won’t be any XML configurations. Let us first start with the project structure.
Project Structure

Maven Dependencies
|
1
2
3
4
5
6
7
8
9
10
11
12
13
14
15
16
17
18
19
20
21
22
23
24
25
26
27
28
29
30
31
32
33
34
35
36
37
38
39
40
41
42
43
44
45
46
47
48
49
50
51
52
53
54
55
56
57
58
59
60
61
62
63
64
65
66
67
68
69
|
<
project
xmlns
=
"http://maven.apache.org/POM/4.0.0"
xmlns:xsi
=
"http://www.w3.org/2001/XMLSchema-instance"
<
modelVersion
>4.0.0</
modelVersion
>
<
groupId
>com.javahash.springsecurity</
groupId
>
<
artifactId
>springsecurity</
artifactId
>
<
packaging
>war</
packaging
>
<
version
>0.0.1-SNAPSHOT</
version
>
<
name
>springsecurity Maven Webapp</
name
>
<
properties
>
<
jdk.version
>1.6</
jdk.version
>
<
spring.version
>4.0.3.RELEASE</
spring.version
>
<
spring.security.version
>3.2.3.RELEASE</
spring.security.version
>
<
jstl.version
>1.2</
jstl.version
>
</
properties
>
<
dependencies
>
<
dependency
>
<
groupId
>javax.servlet</
groupId
>
<
artifactId
>servlet-api</
artifactId
>
<
version
>2.5</
version
>
</
dependency
>
<!-- Spring 4 dependencies -->
<
dependency
>
<
groupId
>org.springframework</
groupId
>
<
artifactId
>spring-core</
artifactId
>
<
version
>${spring.version}</
version
>
</
dependency
>
<
dependency
>
<
groupId
>org.springframework</
groupId
>
<
artifactId
>spring-web</
artifactId
>
<
version
>${spring.version}</
version
>
</
dependency
>
<
dependency
>
<
groupId
>org.springframework</
groupId
>
<
artifactId
>spring-webmvc</
artifactId
>
<
version
>${spring.version}</
version
>
</
dependency
>
<!-- Spring Security -->
<
dependency
>
<
groupId
>org.springframework.security</
groupId
>
<
artifactId
>spring-security-web</
artifactId
>
<
version
>${spring.security.version}</
version
>
</
dependency
>
<
dependency
>
<
groupId
>org.springframework.security</
groupId
>
<
artifactId
>spring-security-config</
artifactId
>
<
version
>${spring.security.version}</
version
>
</
dependency
>
<!-- jstl for jsp page -->
<
dependency
>
<
groupId
>jstl</
groupId
>
<
artifactId
>jstl</
artifactId
>
<
version
>${jstl.version}</
version
>
</
dependency
>
</
dependencies
>
<
build
>
<
finalName
>springsecurity</
finalName
>
</
build
>
</
project
>
|
Controller
The controller will be having an unprotected URL and two URL path’s that are restricted to admin and super admin roles.
|
1
2
3
4
5
6
7
8
9
10
11
12
13
14
15
16
17
18
19
20
21
22
23
24
25
26
27
28
29
30
31
32
33
34
35
36
37
38
39
40
41
42
43
44
45
|
package
com.javahash.controller;
import
org.springframework.stereotype.Controller;
import
org.springframework.web.bind.annotation.RequestMapping;
import
org.springframework.web.bind.annotation.RequestMethod;
import
org.springframework.web.servlet.ModelAndView;
@Controller
public
class
AppController {
@RequestMapping
(value = {
"/"
,
"/helloworld**"
}, method = RequestMethod.GET)
public
ModelAndView welcomePage() {
ModelAndView model =
new
ModelAndView();
model.addObject(
"title"
,
"Spring Security 3.2.3 Hello World Application"
);
model.addObject(
"message"
,
"Welcome Page !"
);
model.setViewName(
"helloworld"
);
return
model;
}
@RequestMapping
(value =
"/protected**"
, method = RequestMethod.GET)
public
ModelAndView protectedPage() {
ModelAndView model =
new
ModelAndView();
model.addObject(
"title"
,
"Spring Security 3.2.3 Hello World"
);
model.addObject(
"message"
,
"This is protected page - Only for Administrators !"
);
model.setViewName(
"protected"
);
return
model;
}
@RequestMapping
(value =
"/confidential**"
, method = RequestMethod.GET)
public
ModelAndView superAdminPage() {
ModelAndView model =
new
ModelAndView();
model.addObject(
"title"
,
"Spring Security 3.2.3 Hello World"
);
model.addObject(
"message"
,
"This is confidential page - Need Super Admin Role !"
);
model.setViewName(
"protected"
);
return
model;
}
}
|
- /helloworld path is public access and there is no security constraint set on that.
- /protected is a restricted area and only user’s having admin role can access that
- /confidential is restricted and only user’s having superadmin role is able to access it
Inside each method , we create a Model ( ModelAndView instance) and return it. The view name is also set in the model. How the view name is mapped to a concrete view file ( in this case a JSP file) is the simple. We need to provide a Class having the configuration information. This is explained in the next section
Configuring the Spring MVC ( View + Security)
We need to tell Spring where to find view and how it is mapped. How do we handle security and the configuration for the same also needs to be set in Spring. All these can be accomplished using a Java Class annotated with @Configuration annotation
|
1
2
3
4
5
6
7
8
9
10
11
12
13
14
15
16
17
18
19
20
21
22
23
24
25
26
|
package
com.javahash.config;
import
org.springframework.context.annotation.Bean;
import
org.springframework.context.annotation.ComponentScan;
import
org.springframework.context.annotation.Configuration;
import
org.springframework.context.annotation.Import;
import
org.springframework.web.servlet.config.annotation.EnableWebMvc;
import
org.springframework.web.servlet.view.InternalResourceViewResolver;
import
org.springframework.web.servlet.view.JstlView;
@EnableWebMvc
@Configuration
@ComponentScan
({
"com.javahash.*"
})
@Import
({ AppSecurityConfig.
class
})
public
class
ViewConfig {
@Bean
public
InternalResourceViewResolver viewResolver() {
InternalResourceViewResolver viewResolver
=
new
InternalResourceViewResolver();
viewResolver.setViewClass(JstlView.
class
);
viewResolver.setPrefix(
"/WEB-INF/views/"
);
viewResolver.setSuffix(
".jsp"
);
return
viewResolver;
}
}
|
Above class does the following
- Declares this class as Configuration ( @Configuration)
- Instructs Spring to Scan for Components inside com.javahash.* package
- Maps a view name to /WEB-INF/views/ folder
- Sets the Suffix to be .jsp
- Imports another class that holds the security related configuration (@Import({ AppSecurityConfig.class }) )
Let us see how we configure the security part.
Security Configuration
|
1
2
3
4
5
6
7
8
9
10
11
12
13
14
15
16
17
18
19
20
21
22
23
24
25
26
27
28
29
30
31
|
package
com.javahash.config;
import
org.springframework.beans.factory.annotation.Autowired;
import
org.springframework.context.annotation.Configuration;
import
org.springframework.security.config.annotation.authentication.builders.AuthenticationManagerBuilder;
import
org.springframework.security.config.annotation.web.builders.HttpSecurity;
import
org.springframework.security.config.annotation.web.configuration.EnableWebSecurity;
import
org.springframework.security.config.annotation.web.configuration.WebSecurityConfigurerAdapter;
@Configuration
@EnableWebSecurity
public
class
AppSecurityConfig
extends
WebSecurityConfigurerAdapter {
@Autowired
public
void
configureGlobal(AuthenticationManagerBuilder auth)
throws
Exception {
auth.inMemoryAuthentication().withUser(
"tom"
).password(
"123456"
).roles(
"USER"
);
auth.inMemoryAuthentication().withUser(
"bill"
).password(
"123456"
).roles(
"ADMIN"
);
auth.inMemoryAuthentication().withUser(
"james"
).password(
"123456"
).roles(
"SUPERADMIN"
);
}
@Override
protected
void
configure(HttpSecurity http)
throws
Exception {
http.authorizeRequests()
.antMatchers(
"/protected/**"
).access(
"hasRole('ROLE_ADMIN')"
)
.antMatchers(
"/confidential/**"
).access(
"hasRole('ROLE_SUPERADMIN')"
)
.and().formLogin();
}
}
|
The most important thing to note is that this class is annotated with
- @Configuration
- @EnableWebSecurity
and it extends WebSecurityConfigurerAdapter class. The @EnableWebSecurity annotation andWebSecurityConfigurerAdapter work together to provide web based security. Spring security is configured to enable HTTP Basic and Form based authentication. Spring Security will automatically render a login page and logout success page for you. The rest of the code is self explanatory. It just configures the URLs that are restricted to authorized roles and sets the roles for the users. In this example the users and their passwords are hard coded. You can change this to grab the information from database , if required.
We now have the security configuration in AppSecurityConfig.java and the MVC configuration in ViewConfig.java. We need to make sure that the root application context includes our Security configuration. For this, the practice is to create a class that extends AbstractAnnotationConfigDispatcherServletInitializer and override a few methods. What we require is to configure particular URL patterns to pass through our security layer. Traditional approach is to configure a servlet filter and in the filter we check for the security credentials. With the introduction of Servlet 3.x we are no longer required to declare the filter in web.xml and we can manage the entire configuration via Java classes. The AbstractAnnotationConfigDispatcherServletInitializer helps with this.
|
1
2
3
4
5
6
|
package
com.javahash.config;
import
org.springframework.security.web.context.AbstractSecurityWebApplicationInitializer;
public
class
SecurityInit
extends
AbstractSecurityWebApplicationInitializer {
}
|
The above code is equivalent to
|
1
2
3
4
5
6
7
8
9
10
11
12
13
|
<filter>
<filter-name>springSecurityFilterChain</filter-name>
<filter-class>
org.springframework.web.filter.DelegatingFilterProxy
</filter-class>
</filter>
<filter-mapping>
<filter-name>springSecurityFilterChain</filter-name>
<url-pattern>/*</url-pattern>
<dispatcher>ERROR</dispatcher>
<dispatcher>REQUEST</dispatcher>
</filter-mapping>
|
We have now configured security and other MVC configuration. What is left is to configure the DispatcherSerlvet that is used to initialize the Spring MVC framework and map the URL patterns for Dispatcher Servlet. Tradional approach was to declare the DispatcherServlet in the web.xml and provide URL mappings for it. We can do away with web.xml configuration and instead use a Java Class to do this Job. This is our next step
Configuring the Dispatcher Servlet
|
1
2
3
4
5
6
7
8
9
10
11
12
13
14
15
16
17
18
19
20
21
22
|
package
com.javahash.config;
import
org.springframework.web.servlet.support.AbstractAnnotationConfigDispatcherServletInitializer;
public
class
MVCInitializer
extends
AbstractAnnotationConfigDispatcherServletInitializer {
@Override
protected
Class<?>[] getRootConfigClasses() {
return
new
Class[] { ViewConfig.
class
};
}
@Override
protected
Class<?>[] getServletConfigClasses() {
return
null
;
}
@Override
protected
String[] getServletMappings() {
return
new
String[] {
"/"
};
}
}
|
Here we have configured the servlet mapping as “/” and so all requests will be intercepted by the Spring Dispatcher Servlet.
Things to Note:
Our class extends AbstractAnnotationConfigDispatcherServletInitializer
getRootConfigClasses method returns our Configuration class ( ViewConfig.class)
The only activity left is to develop the views and test the application.
Developing the View (JSP)
The views are very simple – it just prints the message and the title returned in the model. We use JSTL in the views to print the data.
helloworld.jsp
|
1
2
3
4
5
6
7
8
9
10
11
12
13
14
|
<%@ page language="java" contentType="text/html; charset=ISO-8859-1"
pageEncoding="ISO-8859-1"%>
<!DOCTYPE html PUBLIC "-//W3C//DTD HTML 4.01 Transitional//EN" "http://www.w3.org/TR/html4/loose.dtd">
<html>
<head>
<meta http-equiv="Content-Type" content="text/html; charset=ISO-8859-1">
<title>Hello World</title>
</head>
<body>
<h1>Title : ${title}</h1>
<h1>Message : ${message}</h1>
</body>
</html>
|
protected.jsp
|
1
2
3
4
5
6
7
8
9
10
11
12
13
14
15
16
17
18
19
20
21
|
<%@ page isELIgnored="false" %>
<%@ page language="java" contentType="text/html; charset=ISO-8859-1"
pageEncoding="ISO-8859-1"%>
<%@taglib prefix="c" uri="http://java.sun.com/jsp/jstl/core"%>
<!DOCTYPE html PUBLIC "-//W3C//DTD HTML 4.01 Transitional//EN" "http://www.w3.org/TR/html4/loose.dtd">
<html>
<head>
<meta http-equiv="Content-Type" content="text/html; charset=ISO-8859-1">
<title>Protected page</title>
</head>
<body>
<h1>Title : ${title}</h1>
<h1>Message : ${message}</h1>
<c:if test="${pageContext.request.userPrincipal.name != null}">
<h2>Welcome : ${pageContext.request.userPrincipal.name}
| <a href="<c:url value="/logout" />" > Logout</a></h2>
</c:if>
</body>
</html>
|
Demonstration
http://localhost:8080/springsecurity-0.0.1-SNAPSHOT/helloworld/
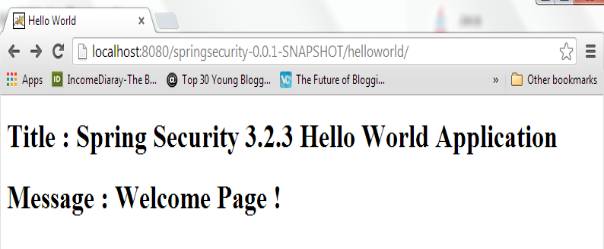
No security for helloworld.
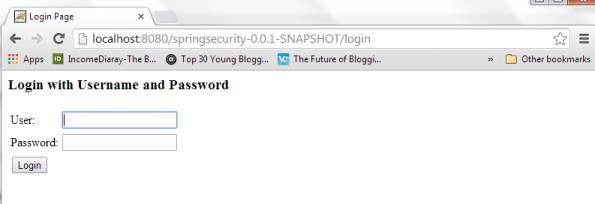
When you change the URL to http://localhost:8080/springsecurity-0.0.1-SNAPSHOT/protected/ Spring Security kicks in and redirect to /login, and a default login form is displayed. If username and password supplied is incorrect, error messages will be displayed, and Spring will redirect to the URL /login?error.
For unauthorized user, Spring will display the 403 access denied page
Recap – Configurations
- Declare the Security Configuration (AppSecurityConfig.java)
- Declare the View Configuration ( ViewConfig.java)
- Declare the Security Filter Configuration (SecurityInit.java)
- Declare the Spring Dispatcher Servlet Configuration (MVCInitializer.java)
Download Source Code
Download - Spring Security Source Code ( 7.37 KB)
reference from:http://javahash.com/spring-security-hello-world-example/