服务器环境安装步骤
查看nvidia版本
root@pod-dev-1400:/# nvidia-smi
Mon Apr 11 07:52:59 2022
+-----------------------------------------------------------------------------+
| NVIDIA-SMI 455.23.05    Driver Version: 455.23.05    CUDA Version: 11.1     |
|-------------------------------+----------------------+----------------------+
| GPU  Name        Persistence-M| Bus-Id        Disp.A | Volatile Uncorr. ECC |
| Fan  Temp  Perf  Pwr:Usage/Cap|         Memory-Usage | GPU-Util  Compute M. |
|                               |                      |               MIG M. |
|===============================+======================+======================|
|   0  GeForce RTX 3080    On   | 00000000:3B:00.0 Off |                  N/A |
| 30%   33C    P8    16W / 320W |      5MiB / 10018MiB |      0%      Default |
|                               |                      |                  N/A |
+-------------------------------+----------------------+----------------------+

+-----------------------------------------------------------------------------+
| Processes:                                                                  |
|  GPU   GI   CI        PID   Type   Process name                  GPU Memory |
|        ID   ID                                                   Usage      |
|=============================================================================|
+-----------------------------------------------------------------------------+
root@pod-dev-1400:/#
1.下载anaconda安装包
anaconda清华源下载地址Index of /anaconda/archive/ | 清华大学开源软件镜像站 | Tsinghua Open Source Mirror
如:Anaconda3-5.3.1-Linux-x86_64.sh
root@pod-dev-1400:/tf/notebooks# bash Anaconda3-5.3.1-Linux-x86_64.shPlease answer 'yes' or 'no':'
>>> yes
Do you wish the installer to initialize Anaconda3
in your /root/.bashrc ? [yes|no]
[no] >>> yesvscode根据自己需求
Do you wish to proceed with the installation of Microsoft VSCode? [yes|no]
>>> no
2.进行版本查看
root@pod-dev-1400:/# anaconda -V
bash: anaconda: command not found
未找到,输入路径,再查询,就可以找到
root@pod-dev-1400:/# export PATH=~/anaconda3/bin:$PATH
root@pod-dev-1400:/# anaconda -V
anaconda Command line client (version 1.7.2)
3.路径配置
由于我的环境每次打开都找不打,都需要输入路径,所以就在文件里配置了路径(可选择跳过)
安装vim
root@pod-dev-1400:/etc# apt install vim

Do you want to continue? [Y/n] Y
安装vim的时候,有时候会报错
E: Unable to fetch some archives, maybe run apt-get update or try with --fix-missing?解决办法是更新
root@pod-dev-1400:/etc# apt-get update配置路径
(py37) root@pod-dev-1400:~# cd /
(py37) root@pod-dev-1400:/# cd etc
(py37) root@pod-dev-1400:/etc# ls
X11                     debian_version  host.conf     legal          network        protocols    rmt        subuid
adduser.conf            default         hostname      libaudit.conf  networks       python3      rpc        sysctl.conf
alternatives            deluser.conf    hosts         logcheck       nsswitch.conf  python3.6    securetty  sysctl.d
apt                     dpkg            init.d        login.defs     opt            rc0.d        security   systemd
bash.bashrc             environment     inputrc       logrotate.d    os-release     rc1.d        selinux    terminfo
bash_completion.d       fstab           issue         lsb-release    pam.conf       rc2.d        services   update-motd.d
bindresvport.blacklist  gai.conf        issue.net     machine-id     pam.d          rc3.d        shadow     vim
ca-certificates         group           kernel        mailcap        passwd         rc4.d        shadow-    wgetrc
ca-certificates.conf    group-          ld.so.cache   mailcap.order  passwd-        rc5.d        shells
cron.daily              gshadow         ld.so.conf    mime.types     perl           rc6.d        skel
dbus-1                  gshadow-        ld.so.conf.d  mke2fs.conf    profile        rcS.d        ssl
debconf.conf            gss             ldap          mtab           profile.d      resolv.conf  subgid

(py37) root@pod-dev-1400:/etc# vim  profile
路径插入在了第三行
# /etc/profile: system-wide .profile file for the Bourne shell (sh(1))
# and Bourne compatible shells (bash(1), ksh(1), ash(1), ...).

export PATH="$PATH:~/anaconda3/bin"

if [ "${PS1-}" ]; then
  if [ "${BASH-}" ] && [ "$BASH" != "/bin/sh" ]; then
    # The file bash.bashrc already sets the default PS1.
    # PS1='\h:\w\$ '
    if [ -f /etc/bash.bashrc ]; then
      . /etc/bash.bashrc
    fi
  else
    if [ "`id -u`" -eq 0 ]; then
      PS1='# '
    else
      PS1='$ '
    fi
  fi
fi

if [ -d /etc/profile.d ]; then
  for i in /etc/profile.d/*.sh; do
    if [ -r $i ]; then
      . $i
    fi
  done
  unset i
fi
修改.bashrc文件
(py37) root@pod-dev-1400:/etc# cd ~
(py37) root@pod-dev-1400:~# ls -all
total 72
drwx------  1 root root 4096 Apr 11 08:55 .
drwxr-xr-x  1 root root 4096 Mar 25 18:33 ..
-rw-r--r--  1 root root 3654 Apr 11 07:42 .bashrc
-rw-r--r--  1 root root 3106 Apr 11 07:42 .bashrc-anaconda3.bak
drwxr-xr-x  1 root root 4096 Jul 27  2021 .cache
drwxr-xr-x  3 root root 4096 Apr 11 08:33 .conda
-rw-r--r--  1 root root  169 Apr 11 08:56 .condarc
drwxr-xr-x  5 root root 4096 Apr 11 03:49 .ipython
drwxr-xr-x  2 root root 4096 Jan 22  2021 .jupyter
drwx------  1 root root 4096 Jul 27  2021 .local
-rw-r--r--  1 root root  148 Aug 17  2015 .profile
-rw-------  1 root root    7 Apr 11 08:41 .python_history
-rw-------  1 root root  760 Apr 11 08:30 .viminfo
-rw-r--r--  1 root root  180 Jan 22  2021 .wget-hsts
drwxr-xr-x 23 root root 4096 Apr 11 07:42 anaconda3
(py37) root@pod-dev-1400:~# vim .bashrc
路径插入在了第四行
# ~/.bashrc: executed by bash(1) for non-login shells.
# see /usr/share/doc/bash/examples/startup-files (in the package bash-doc)
# for examples
export PATH="$PATH:~/anaconda3/bin"
# If not running interactively, don't do anything
[ -z "$PS1" ] && return

# don't put duplicate lines in the history. See bash(1) for more options
# ... or force ignoredups and ignorespace
HISTCONTROL=ignoredups:ignorespace

# append to the history file, don't overwrite it
shopt -s histappend

# for setting history length see HISTSIZE and HISTFILESIZE in bash(1)
HISTSIZE=1000
HISTFILESIZE=2000

# check the window size after each command and, if necessary,
# update the values of LINES and COLUMNS.
shopt -s checkwinsize

# make less more friendly for non-text input files, see lesspipe(1)
[ -x /usr/bin/lesspipe ] && eval "$(SHELL=/bin/sh lesspipe)"

# set variable identifying the chroot you work in (used in the prompt below)
if [ -z "$debian_chroot" ] && [ -r /etc/debian_chroot ]; then
    debian_chroot=$(cat /etc/debian_chroot)
fi

# set a fancy prompt (non-color, unless we know we "want" color)
case "$TERM" in
    xterm-color) color_prompt=yes;;
cuda安装
nvcc -Vbash: nvcc: command not found
nvidia-smi查看支持安装的版本,显示的是支持的最高版本
+-----------------------------------------------------------------------------+
| NVIDIA-SMI 455.23.05    Driver Version: 455.23.05    CUDA Version: 11.1     |
|-------------------------------+----------------------+----------------------+
| GPU  Name        Persistence-M| Bus-Id        Disp.A | Volatile Uncorr. ECC |
| Fan  Temp  Perf  Pwr:Usage/Cap|         Memory-Usage | GPU-Util  Compute M. |
|                               |                      |               MIG M. |
|===============================+======================+======================|
|   0  GeForce RTX 3080    Off  | 00000000:3B:00.0 Off |                  N/A |
| 30%   27C    P8    15W / 320W |      0MiB / 10018MiB |      0%      Default |
|                               |                      |                  N/A |
+-------------------------------+----------------------+----------------------+

+-----------------------------------------------------------------------------+
| Processes:                                                                  |
|  GPU   GI   CI        PID   Type   Process name                  GPU Memory |
|        ID   ID                                                   Usage      |
|=============================================================================|
|  No running processes found                                                 |
+-----------------------------------------------------------------------------+
下载安装cuda
wget http://developer.download.nvidia.com/compute/cuda/11.0.2/local_installers/cuda_11.0.2_450.51.05_linux.run“wget: unable to resolve host address …”
wget:无法解析主机地址。这就能看出是DNS解析的问题
:/$  sudo vim /etc/resolv.conf


#加上
nameserver 8.8.8.8 #google域名服务器
nameserver 8.8.4.4 #google域名服务器
$ sudo bash cuda_11.0.2_450.51.05_linux.run --override┌──────────────────────────────────────────────────────────────────────────────┐
│ CUDA Installer │
│ - [ ] Driver │
│ [ ] 450.51.05 │
│ + [X] CUDA Toolkit 11.0 │
│ [X] CUDA Samples 11.0 │
│ [X] CUDA Demo Suite 11.0 │
│ [X] CUDA Documentation 11.0 │
│ Options │
│ Install │
│ │
│ 选中Driver 那一行,按回车
选install,回车
安装完成打印如下信息,里面PATH和LD_LIBRARY_PATH包含了CUDA的安装路径
安装完后
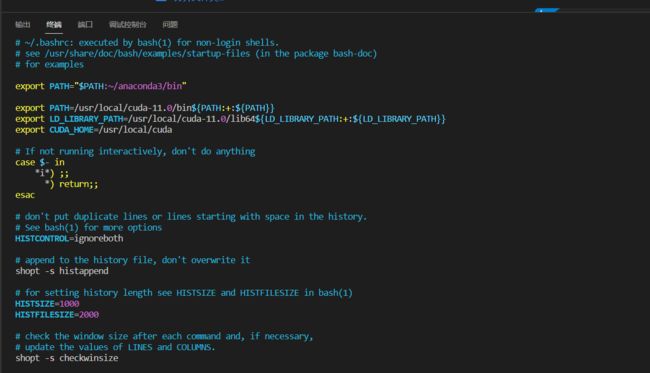
sudo vim ~/.bashrc加上路径:
export PATH=/usr/local/cuda-11.0/bin${PATH:+:${PATH}}
export LD_LIBRARY_PATH=/usr/local/cuda-11.0/lib64${LD_LIBRARY_PATH:+:${LD_LIBRARY_PATH}}
export CUDA_HOME=/usr/local/cuda
然后:
source ~/.bashrc
再输入:nvcc -V
测试Cuda
cd /usr/local/cuda/samples/1_Utilities/deviceQuery

sudo make
cudnn安装
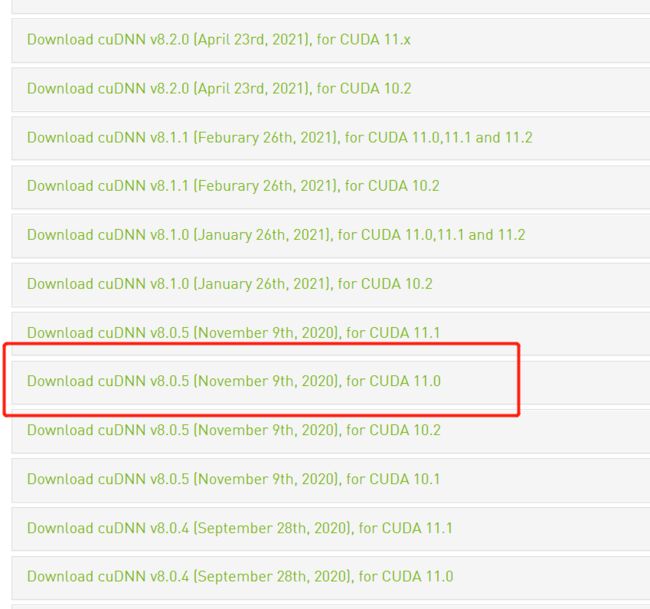
下载链接https://developer.nvidia.com/rdp/cudnn-archive
依次执行以下语句进行安装:


sudo dpkg -i libcudnn8_8.0.5.39-1+cuda11.0_amd64.deb
sudo dpkg -i libcudnn8-dev_8.0.5.39-1+cuda11.0_amd64.deb
sudo dpkg -i libcudnn8-samples_8.0.5.39-1+cuda11.0_amd64.deb


测试CUDNN:

cp -r /usr/src/cudnn_samples_v8/ $HOME
cd  ~/cudnn_samples_v8/mnistCUDNN
sudo make clean
sudo make
sudo ./mnistCUDNN

出现Test passe则表明cuDNN已通过程序测试,完成安装!
4.创建环境
root@pod-dev-1400:~# conda create -n py37激活环境
root@pod-dev-1400:~# source activate py37安装pytorch库
安装requests时报错
(py37) root@pod-dev-1400:~# pip install requests -i https://pypi.tuna.tsinghua.edu.cn/simple

ERROR:
twisted 18.7.0 requires PyHamcrest>=1.9.0, which is not installed.
You are using pip version 10.0.1, however version 22.0.4 is available.
You should consider upgrading via the 'pip install --upgrade pip' command.
安装缺少的包和更新pip
(py37) root@pod-dev-1400:~# pip install PyHamcrest(py37) root@pod-dev-1400:~# pip install --uograde pip安装pytorch,torchvision,torchaudio
(py37) root@pod-dev-1400:~# pip install torch torchvision torchaudio -i https://pypi.tuna.tsinghua.edu.cn/simple进入python环境,测试一下
(py37) root@pod-dev-1400:~# ipython
Python 3.7.0 (default, Jun 28 2018, 13:15:42)
Type 'copyright', 'credits' or 'license' for more information
IPython 6.5.0 -- An enhanced Interactive Python. Type '?' for help.

In [1]: import torch

In [2]: torch.cuda.is_available()
Out[2]: True


