机器学习苹果识别——python+opencv实现物体特征提取
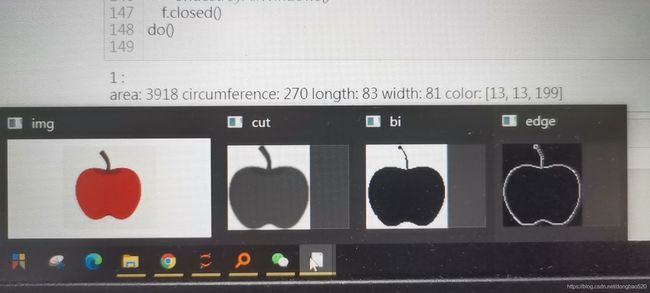
以水果为例。要用机器学习来实现水果识别,无论是训练还是识别阶段都需要提取图片中水果的特征值。本篇将讲述如何提取水果的周长、面积、颜色、长度、宽度7个特征值。
cv.findContours
cv.findContours将图片中识别到的轮廓返回给contours变量,contours是一个list类型数据,里面存放了识别到的所有轮廓。有时候并不能很好的将目标轮廓完整的识别出来或者有没有去除掉的噪点的干扰所以不能简单粗暴的将获取到的轮廓全部运用。
轮廓可以通过cv2.contourArea和cv2.arcLength(cnt,True)分别获取面积和周长,但是因为轮廓是错误的,面积和周长求出来是不正确的。但是通过画出来的矩形框可以明显看出第二种方法是优于第一种方法的,所以我们要另找方法来获得周长和面积等。
# https://blog.csdn.net/lovebyz/article/details/83276435   openCV获取图像特征点的方法NBNBN
#!usr/env/bin python3
# 本文链接:https://blog.csdn.net/qq_36699423/article/details/84728238

from math import *
import cv2 as cv
import numpy as np

file = 'S:\\AdobeppPS\\SKOO\\cc202.jpg'
# p=file+'data.txt'
f = open("S:\\AdobeppPS\\ceshi03.txt",'w+')
#f = open(p, 'a')

def myCut(img, x, y, w, h):
    cut = img[y:y + h, x:x + w]
    cv.imshow("cut", cut)
    return cut

def GetColor(img, point_height, point_width):
    R = 0
    G = 0
    B = 0
    count = 0
    color = []
    for i in range(0, len(point_height), 1):
        count += 1
        R += img[point_height[i], point_width[i]][0]
        G += img[point_height[i], point_width[i]][1]
        B += img[point_height[i], point_width[i]][2]
    R = int(R / count)
    G = int(G / count)
    B = int(B / count)
    color.append(R)
    color.append(G)
    color.append(B)
    return color

# 返回面积
def GetArea(img):
    count = 0
    point_height = []
    point_width = []
    height, width = img.shape
    for h in range(0, height, 1):
        for w in range(0, width, 1):
            if (img[h, w] == 0):
                count += 1
                point_height.append(h)
                point_width.append(w)
    return count, point_width, point_height

# 返回周长
def GetCircumference(img):
    count = 0
    height, width = img.shape
    for h in range(0, height, 1):
        for w in range(0, width, 1):
            if (img[h, w] == 255):
                count += 1
    return count

def edge(img):
    # 灰度图像
    gray = cv.cvtColor(img, cv.COLOR_BGR2GRAY)
    # 高斯模糊,降低噪声
    blurred = cv.GaussianBlur(gray, (3, 3), 0)
    # 图像梯度
    xgrad = cv.Sobel(blurred, cv.CV_16SC1, 1, 0)
    ygrad = cv.Sobel(blurred, cv.CV_16SC1, 0, 1)
    # 计算边缘
    # 50和150参数必须符合1:3或者1:2
    edge_output = cv.Canny(xgrad, ygrad, 50, 150)

    contours, heriachy = cv.findContours(edge_output, cv.RETR_EXTERNAL, cv.CHAIN_APPROX_SIMPLE)
    # max = 0
    # maxA = 0
    num = []
    for i, contour in enumerate(contours):
        x, y, w, h = cv.boundingRect(contour)
        # if (w * h > maxA):
        #     max = i
        #     maxA = w * h

        if w < 50 or h < 50:
            continue
        num.append(i)

    for i in num:
        # cv.drawContours(img, contours, i, (0, 0, 255), 2)
        # x, y, w, h = cv.boundingRect(contours[i])
        # img = cv.rectangle(img, (x, y), (x + w, y + h), (0, 255, 0), 2)
        if i == 0:
            continue
        contours[0] = np.concatenate((contours[i], contours[0]))

    cv.imshow('img', img)
    x, y, w, h = cv.boundingRect(contours[0])

    cut_img = myCut(img, x, y, w, h)
    cut_blurred = myCut(blurred, x, y, w, h)
    cv.imshow('cut', cut_blurred)

    ret, binary = cv.threshold(cut_blurred, 70, 255, cv.THRESH_BINARY)
    cv.imshow("bi", binary)  # 求面积

    edge = cv.Canny(binary, 40, 100)
    cv.imshow("edge", edge)  # 求周长

    longth = 0
    width = 0
    if w > h:
        longth = w
        width = h
    else:
        longth = h
        width = w
    area, point_width, point_height = GetArea(binary)
    circumference = GetCircumference(edge)
    color = GetColor(cut_img, point_height, point_width)

    print('area:', area, 'circumference:', circumference, 'longth:', longth, 'width:', width, 'color:', color)
    # f.write(str(area))
    # f.write(' ')
    # f.write(str(circumference))
    # f.write(' ')
    # f.write(str(longth))
    # f.write(' ')
    # f.write(str(width))
    # f.write(' ')
    # for i in range(3):
    #     f.write(str(color[i]))
    #     f.write(' ')
    # f.write('\n')
def do():
    for i in range(1, 8, 1):
        print(i, ':')
#         path = file + str(i) + '.jpg'

#         src1 = cv.imread(path)
        src1 = cv.imread(file)
            # 图三(原图)
        size = src1.shape
        src = cv.resize(src1, ((int)(size[1] / 5), (int)(size[0] / 5)), cv.INTER_LINEAR)
        edge(src)
        cv.waitKey(0)
#     cv.destroyAllWindows()
    f.closed()
do()
版权声明:本文为博主原创文章,遵循 CC 4.0 BY-SA 版权协议,转载请附上原文出处链接和本声明。
本文链接:https://blog.csdn.net/qq_36699423/article/details/84728238
————————————————
版权声明:本文为CSDN博主「qq_36699423」的原创文章,遵循CC 4.0 BY-SA版权协议,转载请附上原文出处链接及本声明。
原文链接:https://blog.csdn.net/qq_36699423/article/details/84728238

