RGB-D转换为点云图
目录
前言
一、图像数据的采集
二、相机的位姿估计
1.位姿估计的方法
2.RGB-D转点云拼接
总结
前言
这两天要做一个RGB-D转点云并进行拼接的小实验,这里面包含了几个小步骤分别是图像数据的采集、位姿的估计、RGB-D转点云、点云的拼接。同样是在师兄的帮助下完成的,所以再感谢一下师兄。
一、图像数据的采集
关于图像数据的采集,我使用的是Percipio 深度相机,该相机输出的图像有未去畸变的彩色图、去畸变的彩色图以及彩色到深度的转换图。
第一次采集图像数据的时候,我使用的是例程中自动输出的深度图,但是在之后所拼接的点云会和实际的环境有着很大的差异,不可以使用。于是在师兄的帮助下,对代码进行了解读找到了正确的深度图并予以输出,可以从下文中看出得到的效果较之前要好很多,但还是有缺陷。
由于实验室的灯光对数据的采集也有一定的影响,故我是在关闭灯光之后进行的数据的采集,其中深度图的效果要比开着灯光采集的效果好。
二、相机的位姿估计
1.位姿估计的方法
相机的位姿估计的方法有很多种,包括PnP、EPnP等,这里就不做过多的解释了,我采用的是2dto2d的一种位姿估计的方式。以下是相关的代码,是在高博教授的《Slam十四讲》中摘取的。
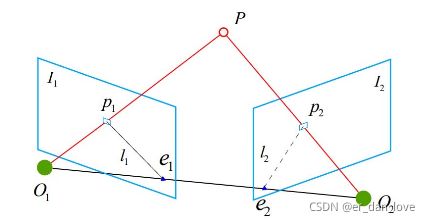
那么下面先介绍2D-2D:对极几何的原理
从这两张图像中,我们可以得到若干对匹配好的特征点。现在我们利用一对已经匹配好的特征点以及该点二维图像上的点的对应关系,来求解出相机的运动也就是  和 t 。
和 t 。
设两个相机的中心分别为 、
、 。现
。现  中有特征点
中有特征点  对应着
对应着  中的
中的  。其中
。其中  点为三维空间中的点,此时、、 三点确定了一个平面,称为极平面。
  、
、  称为极点。
称为极点。![]() 称为基线。
称为基线。 、
、 称为极线。空间点 的像素点可能会出现在射线
 ![]() 上任意位置。如果点的位置是未知的,那么 点在 当中可能出现的位置就会处在 上。而 的像素位置是可以预测的,我们通过特征点匹配,可以在 中找到同 中 相匹配的像素点 。
上任意位置。如果点的位置是未知的,那么 点在 当中可能出现的位置就会处在 上。而 的像素位置是可以预测的,我们通过特征点匹配,可以在 中找到同 中 相匹配的像素点 。
假设在第一帧图像的坐标系下 点的空间位置坐标为
![]()
则这两个像素点的位置分别为
![]()
![]()
有的时候,我们使用齐次坐标来表示像素点的位置。在使用齐次坐标的时候,一个向量将等于他自身乘上任意的非零常数。这通常用于表达一个投影关系。例如,![]() 和成投影关系,它们在齐次坐标的意义下是相等的。我们称这种相等关系为尺度意义下相等,记作:
和成投影关系,它们在齐次坐标的意义下是相等的。我们称这种相等关系为尺度意义下相等,记作:
![]()
故上述两个投影关系可以写为
![]()
![]()
假设
![]()
![]()
代入上式可得
![]()
两侧同时左乘 可得
可得
![]()
两侧同时左乘![]() 可得
可得
![]()
将![]() ,代入上式可得
,代入上式可得
![]()
该式称为对极约束,其几何意义为 、、三点共面。由于我们已知两像素点的位置坐标以及相机的内参矩阵,故可以求得相机的运动。以上就是该法的大概原理,对于![]() 的求解,我会在下一篇文章中加以阐述。
的求解,我会在下一篇文章中加以阐述。
#include
#include
#include
#include
#include
#include
#include
#include
#include

// #include "extra.h" // 如果使用的是OpenCV2,则使用该行代码
using namespace std;
using namespace cv;

void find_feature_matches (
    const Mat& img_1, const Mat& img_2,
    std::vector& keypoints_1,
    std::vector& keypoints_2,
    std::vector< DMatch >& matches );
//函数声明,该函数的作用是寻找特征点并进行匹配
//输入 img_1 img_2

void pose_estimation_2d2d (
    std::vector keypoints_1,
    std::vector keypoints_2,
    std::vector< DMatch > matches,
    Mat& R, Mat& t );
//函数声明,该函数的作用是估计相机的位姿变化
//输入 keypoints_1 keypoints_2 matches
//输出 相机的旋转矩阵 R  相机的平移矩阵 t

// 像素坐标转相机归一化坐标
Point2d pixel2cam ( const Point2d& p, const Mat& K );

int main ( int argc, char** argv )
{
    if ( argc != 3 )
    {
        cout<<"usage: pose_estimation_2d2d img1 img2"< keypoints_1, keypoints_2; //定义两个KeyPoint数据类型的变量
    vector matches; //定义DMatch数据类型的变量
    find_feature_matches ( img_1, img_2, keypoints_1, keypoints_2, matches ); //调用OpenCV函数,输入是 img_1,img_2 输出是 keypoints_1,keypoints_2,matches
    cout<<"一共找到了"< ( 3,3 ) <<
                0,                      -t.at ( 2,0 ),     t.at ( 1,0 ),
                t.at ( 2,0 ),      0,                      -t.at ( 0,0 ),
                -t.at ( 1,0 ),     t.at ( 0,0 ),      0 );

    cout<<"t^R="< ( 3,3 ) << 520.9, 0, 325.1, 0, 521.0, 249.7, 0, 0, 1 );
    for ( DMatch m: matches )
    {
        Point2d pt1 = pixel2cam ( keypoints_1[ m.queryIdx ].pt, K );
        Mat y1 = ( Mat_ ( 3,1 ) << pt1.x, pt1.y, 1 );
        Point2d pt2 = pixel2cam ( keypoints_2[ m.trainIdx ].pt, K );
        Mat y2 = ( Mat_ ( 3,1 ) << pt2.x, pt2.y, 1 );
        Mat d = y2.t() * t_x * R * y1;
        cout << "epipolar constraint = " << d << endl;
    }*/
    return 0;
}

void find_feature_matches ( const Mat& img_1, const Mat& img_2,
                            std::vector& keypoints_1,
                            std::vector& keypoints_2,
                            std::vector< DMatch >& matches )
{
    //-- 初始化
    Mat descriptors_1, descriptors_2; //初始化两个描述子矩阵变量
    // 我用的是opencv3所以可以用这两行代码
    Ptr detector = ORB::create();
    Ptr descriptor = ORB::create();
    // 如果安装的是opencv2要采用下面这两行代码
    // Ptr detector = FeatureDetector::create ( "ORB" );
    // Ptr descriptor = DescriptorExtractor::create ( "ORB" );
    Ptr matcher  = DescriptorMatcher::create ( "BruteForce-Hamming" ); //创建匹配,通过汉明距离来判断匹配结果的好坏
    //-- 第一步:检测 Oriented FAST 角点位置
    detector->detect ( img_1,keypoints_1 );
    detector->detect ( img_2,keypoints_2 );

    //-- 第二步:根据角点位置计算 BRIEF 描述子
    descriptor->compute ( img_1, keypoints_1, descriptors_1 );
    descriptor->compute ( img_2, keypoints_2, descriptors_2 );

    //-- 第三步:对两幅图像中的BRIEF描述子进行匹配,使用 Hamming 距离
    vector match;
    //BFMatcher matcher ( NORM_HAMMING );
    matcher->match ( descriptors_1, descriptors_2, match );

    //-- 第四步:匹配点对筛选
    double min_dist=10000, max_dist=0;

    //找出所有匹配之间的最小距离和最大距离, 即是最相似的和最不相似的两组点之间的距离
    for ( int i = 0; i < descriptors_1.rows; i++ )
    {
        double dist = match[i].distance;
        if ( dist < min_dist ) min_dist = dist;
        if ( dist > max_dist ) max_dist = dist;
    }

    printf ( "-- Max dist : %f \n", max_dist );
    printf ( "-- Min dist : %f \n", min_dist );

    //当描述子之间的距离大于两倍的最小距离时,即认为匹配有误.但有时候最小距离会非常小,设置一个经验值30作为下限.
    for ( int i = 0; i < descriptors_1.rows; i++ )
    {
        if ( match[i].distance <= max ( 2*min_dist, 30.0 ) )
        {
            matches.push_back ( match[i] );
        }
    }
}


Point2d pixel2cam ( const Point2d& p, const Mat& K )
{
    return Point2d
           (
               ( p.x - K.at ( 0,2 ) ) / K.at ( 0,0 ),
               ( p.y - K.at ( 1,2 ) ) / K.at ( 1,1 )
           );
}


void pose_estimation_2d2d ( std::vector keypoints_1,
                            std::vector keypoints_2,
                            std::vector< DMatch > matches,
                            Mat& R, Mat& t )
{
    // 相机内参,TUM Freiburg2
    //Mat K = ( Mat_ ( 3,3 ) << 520.9, 0, 325.1, 0, 521.0, 249.7, 0, 0, 1 );
    //相机内参,我使用的相机和这个不一样,所以是自己标定的内参
    Mat K = ( Mat_ ( 3,3 ) << 886.2391758072229, 0, 639.496654129007, 0, 884.5569261594919, 338.8017291870644, 0, 0, 1 );

    //-- 把匹配点转换为vector的形式
    vector points1;
    vector points2;

    for ( int i = 0; i < ( int ) matches.size(); i++ )
    {
        points1.push_back ( keypoints_1[matches[i].queryIdx].pt );
        points2.push_back ( keypoints_2[matches[i].trainIdx].pt );
    }

    //-- 计算基础矩阵
    Mat fundamental_matrix;
    fundamental_matrix = findFundamentalMat ( points1, points2, CV_FM_8POINT );
    cout<<"fundamental_matrix is "<
2.RGB-D转点云拼接
代码如下(示例):
若该段代码中深度图转世界坐标部分看不懂的话可以下方评论我会及时反馈的。
#include
#include
using namespace std;
#include
#include
#include
#include
#include
#include
#include

int main( int argc, char** argv )
{
    vector colorImgs, depthImgs;    // 彩色图和深度图
    vector> poses;         // 相机位姿

    ifstream fin("/home/joey/joinpcl/pose.txt");
    if (!fin)
    {
        cerr<<"请在有pose.txt的目录下运行此程序"<>d;
        Eigen::Quaterniond q( data[6], data[3], data[4], data[5] );
        Eigen::Isometry3d T(q);
        T.pretranslate( Eigen::Vector3d( data[0], data[1], data[2] ));
        poses.push_back( T );
    }

    // 计算点云并拼接
    // 相机内参
    double cx = 639.5;
    double cy = 338.8;
    double fx = 886.2;
    double fy = 884.6;
    double depthScale = 1000.0;

    cout<<"正在将图像转换为点云..."< PointCloud;

    // 新建一个点云
    PointCloud::Ptr pointCloud( new PointCloud );
    for ( int i=0; i<5; i++ )
    {
        cout<<"转换图像中: "< ( v )[u]; // 深度值
                if ( d==0 ) continue; // 为0表示没有测量到
                Eigen::Vector3d point;
                point[2] = double(d)/depthScale;
                point[0] = (u-cx)*point[2]/fx;
                point[1] = (v-cy)*point[2]/fy;
                Eigen::Vector3d pointWorld = T*point;

                PointT p ;
                p.x = pointWorld[0];
                p.y = pointWorld[1];
                p.z = pointWorld[2];
                p.b = color.data[ v*color.step+u*color.channels() ];
                p.g = color.data[ v*color.step+u*color.channels()+1 ];
                p.r = color.data[ v*color.step+u*color.channels()+2 ];
                pointCloud->points.push_back( p );
            }
    }

    pointCloud->is_dense = false;
    cout<<"点云共有"<size()<<"个点."<
cmake_minimum_required( VERSION 2.8 )
project( vo1 )

set( CMAKE_BUILD_TYPE "Release" )
set( CMAKE_CXX_FLAGS "-std=c++11 -O3" )

# 添加cmake模块以使用g2o
list( APPEND CMAKE_MODULE_PATH ${PROJECT_SOURCE_DIR}/cmake_modules )

find_package(OpenCV REQUIRED)
include_directories(${OpenCV_INCLUDE_DIRS})
include_directories("/usr/include/eigen3/")

find_package(PCL REQUIRED COMPONENT common io)
include_directories(${PCL_INCLUDE_DIRS})
add_definitions(${PCL_DEFINITIONS})

find_package( OpenCV 3.1 REQUIRED )
# find_package( OpenCV REQUIRED ) # use this if in OpenCV2
find_package( G2O REQUIRED )
find_package( CSparse REQUIRED )

include_directories(
    ${OpenCV_INCLUDE_DIRS}
    ${G2O_INCLUDE_DIRS}
    ${CSPARSE_INCLUDE_DIR}
    "/usr/include/eigen3/"
)

add_executable( pose_estimation_2d2d pose_estimation_2d2d.cpp )
target_link_libraries( pose_estimation_2d2d ${OpenCV_LIBS} )

add_executable(joinMap joinMap.cpp)
target_link_libraries(joinMap ${OpenCV_LIBS} ${PCL_LIBRARIES})
该文章参考高翔博士的《视觉SLAM十四讲》。
总结
如果有什么错误的地方希望大家指出!如果大家有什么疑问也可以留言,互相讨论共同进步!