使用JDBC连接MySQL数据库
目录
1.MySQL驱动配置和使用
2.通过JDBC连接数据库
3.解决JDBC连接数据库时存在的SQL注入问题
4.使用封装工具类实现JDBC连接数据库
使用JDBC连接数据库
1.MySQL驱动配置和使用
下载驱动
JDBC 指 Java 数据库连接,是一种标准Java应用编程接口( JAVA API),用来连接 Java 编程语言和广泛的数据库。
主要用于执行 SQL 查询,并查看查询的记录。
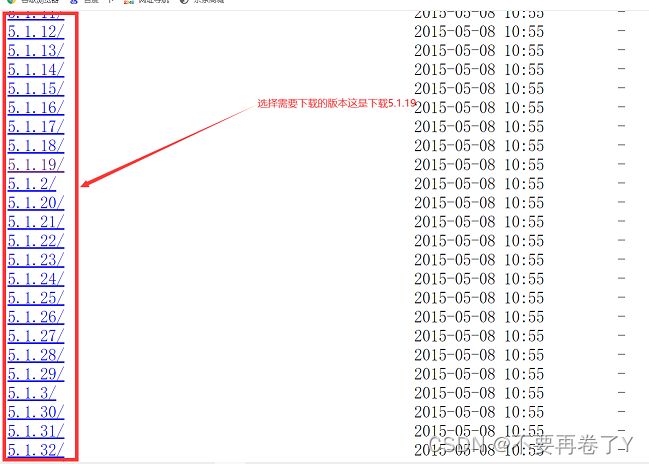
使用 JDBC 需要先下载驱动。mysql8需要设置时区,有cj目录,mysql5没有,这里以mysql5.7版本为例
驱动下载地址
进入到以下页面:
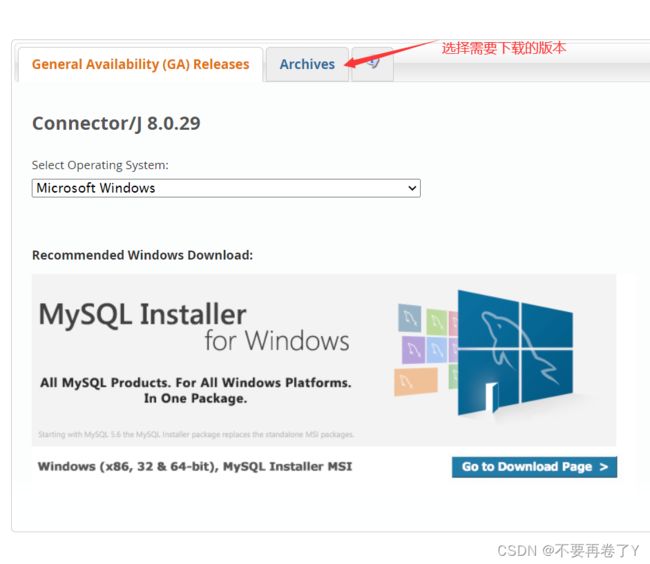
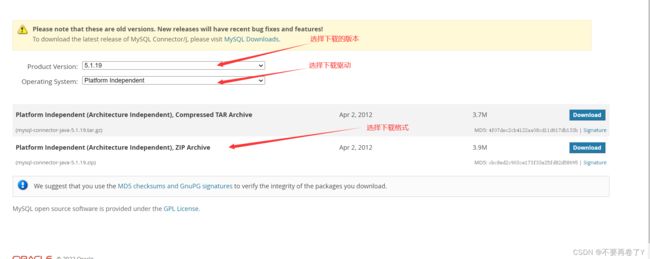
从官网下载
驱动下载地址(官网)
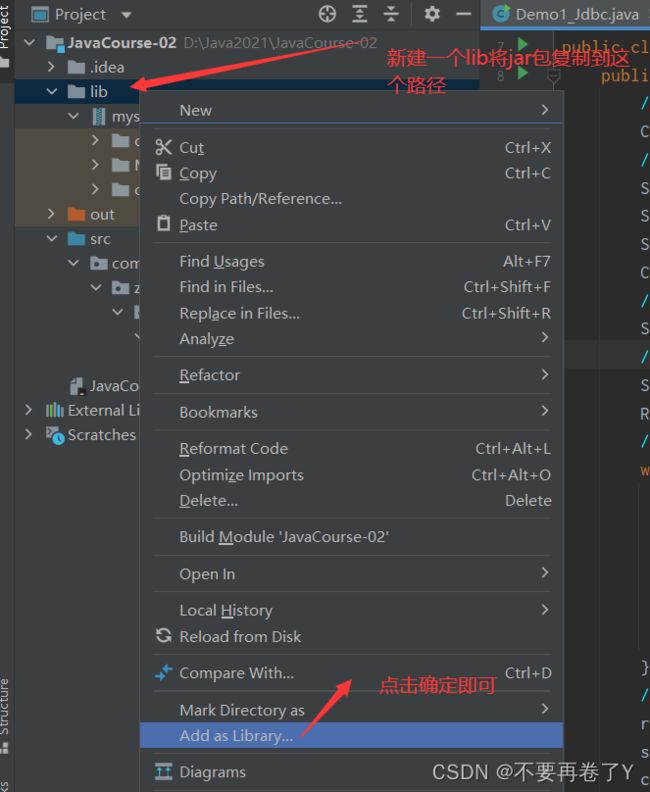
复制下载的jar包
将jar包导入到项目
这样基本的驱动配置环节就结束了!
2.通过JDBC连接数据库
jdbc操作数据库一般分为以下几个步骤
一、加载数据库驱动
//1.加载驱动
Class.forName("com.mysql.jdbc.Driver");
//mysql8需要加上cj
//Class.forName("com.mysql.cj.jdbc.Driver");
二、获取数据库连接对象
//2.获取数据库连接对象(这里使用的数据库是jdbcstudy)
String username="root";
String password="123456";
String url="jdbc:mysql://localhost:3306/jdbcstudy?useUnicode=true&characterEncoding=utf8&useSSL=true";
Connection conn= DriverManager.getConnection(url,username,password);
//mysql8需要加上时区
Connection connection = DriverManager.getConnection(jdbc:mysql://localhost:3306/jdbcstudy?serverTimezone=Asia/Shanghai&useSSL=true);
三、获取SQL语句的执行对象
//3.获取SQL执行对象
Statement st = conn.createStatement();
四、执行sql将结果返回给结果集对象
//4.执行sql将结果返回给结果集对象
String sql="select * from users where id=01";
ResultSet rs = st.executeQuery(sql);
//executeQuery()方法执行查询,返回结果集对象
//executeUpdate()方法执行增删改操作,返回受影响的行数
五、处理结果集
//5.处理结果集,通过next()方法遍历集合
while (rs.next()){
    System.out.println("====================================");
    System.out.println("id: "+rs.getInt("id"));
    System.out.println("name: "+rs.getString("name"));
    System.out.println("password: "+rs.getString("password"));
    System.out.println("email: "+rs.getString("email"));
    System.out.println("birthday: "+rs.getDate("birthday"));
}
六、关闭资源
//6.关闭流对象
rs.close();
st.close();
conn.close();
3.解决JDBC连接数据库时存在的SQL注入问题
我们在使用上述方法连接数据库通常是不安全的,会存在SQL注入问题,什么是SQL注入在这里不做过多介绍,因此上述方法需要进一步优化
详解PreparedStatement对象
防止SQL注入本质:
把传递进来的参数当做字符,如果其中存在转义字符,“会被直接转义
与Statement对象的区别:
//3.创建SQL执行对象
String sql ="select id,name from users where id=?";
//预编译sql
PreparedStatement pst = conn.prepareStatement(sql);
//设置id的值
pst.setInt(1,1);
//执行查询
ResultSet rs = pst.executeQuery();
使用PreparedStatement对象时,sql语句的关键信息采用"?"代替,先通过PreparedStatement对象进行预编译之后再给“?”赋值达到·防止SQL注入。
4.使用封装工具类实现JDBC连接数据库
通过上面的方法连接数据库时会发现一个问题,每当你要连接数据库时都要写很多相同的代码,为了提高代码的复用性可以将一些重复使用的代码块封装到一个工具类中方便随时调用。步骤如下
一、创建配置文件,将文件放在项目的src目录下,这里文件名为:jdbc.properties(后缀一定为.properties)
driver=com.mysql.jdbc.Driver
url=jdbc:mysql://localhost:3306/jdbcstudy?useUnicode=true&characterEncoding=utf8&useSSL=true
name=root
password=123456
注意:一定要放在src目录下否则会找不到该文件
二、封装工具类
i、创建工具类JdbcUtil
2、通过反射获取配置文件
static {
    //获取配置文件
    InputStream in = JdbcUtil.class.getClassLoader().getResourceAsStream("jdbc.properties");
    Properties properties = new Properties();
    try {
        properties.load(in);
    } catch (IOException e) {
        e.printStackTrace();
        System.out.println("获取路径异常");
    }
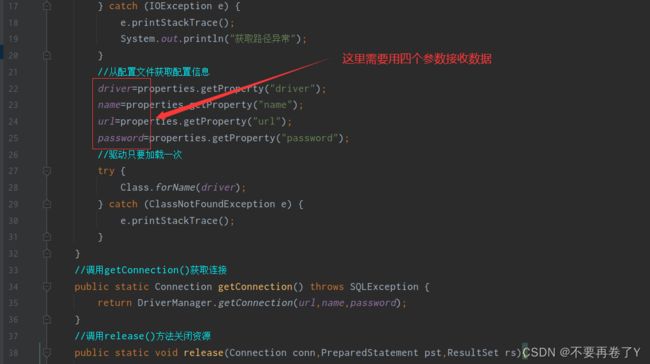
3、获取配置文件里的数据
//从配置文件获取配置信息
driver=properties.getProperty("driver");
name=properties.getProperty("name");
url=properties.getProperty("url");
password=properties.getProperty("password");
4、加载驱动
//驱动只要加载一次
try {
     Class.forName(driver);
} catch (ClassNotFoundException e) {
     e.printStackTrace();
  }
5、获取数据库连接
//调用getConnection()获取连接
public static Connection getConnection() throws SQLException {
    return DriverManager.getConnection(url,name,password);
}
6、关闭资源
//调用release()方法关闭资源
public static void release(Connection conn,PreparedStatement pst,ResultSet rs){
    if(conn!=null){
        try {
            conn.close();
        } catch (SQLException e) {
            e.printStackTrace();
        }
    }
    if (pst!=null){
        try {
            pst.close();
        } catch (SQLException e) {
            e.printStackTrace();
        }
    }
    if (rs!=null){
        try {
            rs.close();
        } catch (SQLException e) {
            e.printStackTrace();
        }
    }
}
附上完整的工具类代码
package com.zhu.jdbc.utils;
import java.io.IOException;
import java.io.InputStream;
import java.sql.*;
import java.util.Properties;
public class JdbcUtil {
private static String driver=null;
private static String name=null;
private static String url=null;
private static String password=null;
static {
//获取配置文件
InputStream in = JdbcUtil.class.getClassLoader().getResourceAsStream("jdbc.properties");
Properties properties = new Properties();
try {
properties.load(in);
} catch (IOException e) {
e.printStackTrace();
System.out.println("获取路径异常");
}
//从配置文件获取配置信息
driver=properties.getProperty("driver");
name=properties.getProperty("name");
url=properties.getProperty("url");
password=properties.getProperty("password");
//驱动只要加载一次
try {
Class.forName(driver);
} catch (ClassNotFoundException e) {
e.printStackTrace();
}
}
//调用getConnection()获取连接
public static Connection getConnection() throws SQLException {
return DriverManager.getConnection(url,name,password);
}
//调用release()方法关闭资源
public static void release(Connection conn,PreparedStatement pst,ResultSet rs){
if(conn!=null){
try {
conn.close();
} catch (SQLException e) {
e.printStackTrace();
}
}
if (pst!=null){
try {
pst.close();
} catch (SQLException e) {
e.printStackTrace();
}
}
if (rs!=null){
try {
rs.close();
} catch (SQLException e) {
e.printStackTrace();
}
}
}
}
三、使用JDBC连接数据库
1、获取数据库连接
//创建数据库连接对象,直接调用JdbcUtil工具类中的getConnection()方法获取连接
conn=JdbcUtil.getConnection();
//注意要使用import将工具类导入到当前类
2、书写要执行的SQL语句
//写sql语句
String sql="select id,name,password from users where id=?";
3、获取SQL执行对象并进行预编译
//获取SQL执行对象并进行预编译
pst=conn.prepareStatement(sql);
4、设置id参数值
//设置id参数值
pst.setInt(1,2);//设置第一个“?”的值为2
5、执行查询并返回结果集对象
//执行查询并返回结果集对象
rs = pst.executeQuery();
6、输出结果集
//输出结果集
while (rs.next()){
    System.out.println("id :"+rs.getInt("id"));
    System.out.println("name :"+rs.getString("name"));
    System.out.println("password :"+rs.getString("password"));
}
7、调用工具类中的release()方法关闭资源
//调用工具类中的release()方法关闭资源
JdbcUtil.release(conn,pst,rs);
最后附上源代码
package com.zhu.jdbc;
import com.zhu.jdbc.utils.JdbcUtil;
import java.sql.Connection;
import java.sql.PreparedStatement;
import java.sql.ResultSet;
import java.sql.SQLException;
public class PropertyJdbc2 {
public static void main(String[] args) {
Connection conn=null;
PreparedStatement pst=null;
ResultSet rs=null;
try {
//创建连接对象
conn=JdbcUtil.getConnection();
//写sql语句
String sql="select id,name,password from users where id=?";
//获取SQL执行对象并进行预编译
pst=conn.prepareStatement(sql);
//设置id参数值
pst.setInt(1,2);//设置第一个“?”的值为2
//执行查询并返回结果集对象
rs = pst.executeQuery();
//输出结果集
while (rs.next()){
System.out.println("id :"+rs.getInt("id"));
System.out.println("name :"+rs.getString("name"));
System.out.println("password :"+rs.getString("password"));
}
} catch (SQLException e) {
e.printStackTrace();
}finally {
JdbcUtil.release(conn,pst,rs);
}
}
}
运行结果:
谈谈小编踩过的坑:
小编第一次学习时忘记使用4个参数接收数据导致直接报错,报错如下:
只需要将4个参数补全即可
