Triton部署YOLOV5笔记(一)
直达链接
Triton部署YOLOV5笔记(一)
Triton部署YOLOV5笔记(二)
triton部署yolov5笔记(三)
triton部署yolov5笔记(四)
安装docker
Docker Desktop 官方下载地址: https://hub.docker.com/editions/community/docker-ce-desktop-windows
简单设置一下。点击设置,点击Docker Engine。
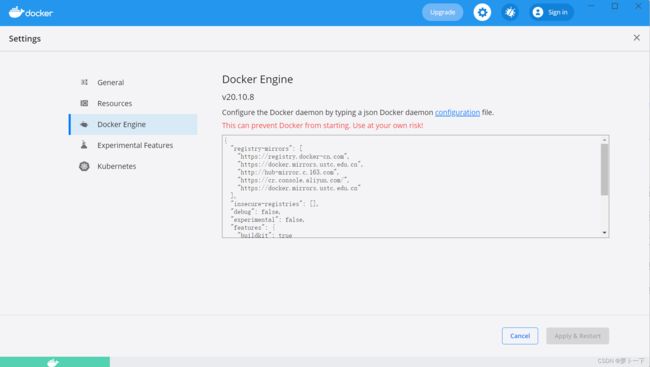
添加以下内容
{
  "registry-mirrors": [
    "https://registry.docker-cn.com",
    "https://docker.mirrors.ustc.edu.cn",
    "http://hub-mirror.c.163.com",
    "https://cr.console.aliyun.com/",
    "https://docker.mirrors.ustc.edu.cn"
  ],
  "insecure-registries": [],
  "debug": false,
  "experimental": false,
  "features": {
    "buildkit": true
  },
  "builder": {
    "gc": {
      "enabled": true,
      "defaultKeepStorage": "20GB"
    }
  }
}
拉取triton镜像
docker pull nvcr.io/nvidia/tritonserver:22.04-py3
你也可以选择拉取其他版本的triton。镜像大概有几个G,需耐心等待,这个镜像不区分gpu和cpu,是通用的。
构建模型容器
执行命令mkdir -p /home/triton/model_repository/fc_model_pt/1。
其中/home/triton/model_repository就是你的模型仓库,所有的模型都在这个模型目录中。启动容器时会将其映射到容器中的/model文件夹上,fc_model_pt可以理解为是某一个模型的存放目录,比如一个用于情感分类的模型,名字则没有要求,最好见名知义,1代表版本是1
模型仓库的目录结构如下:
  <model-repository-path>/# 模型仓库目录
    <model-name>/ # 模型名字
      [config.pbtxt] # 模型配置文件
      [<output-labels-file> ...] # 标签文件,可以没有
      <version>/ # 该版本下的模型
        <model-definition-file>
      <version>/
        <model-definition-file>
      ...
    <model-name>/
      [config.pbtxt]
      [<output-labels-file> ...]
      <version>/
        <model-definition-file>
      <version>/
        <model-definition-file>
      ...
    ...
Windows下直接在D盘创建triton_test文件夹,在triton_test文件夹下创建server文件夹,server文件夹的目录结构如下:
server/
└── hat_model           		# 模型名字,需要和 config.txt 中的名字对上
    ├── 1                       # 模型版本号
    │   └── model.onnx          # 这个是你自己训练好保存的模型
    ├── config.pbtxt            # 模型配置文件
    ├── client.py        		# 客户端脚本,可以不放在这里
将训练好的模型转化为onnx格式
先给出官方代码链接,yolov5。这里不对yolov5原理做介绍,直接从训练的pt文件开始。当我们训练好模型以后,在官方给的yolov5代码结构中,runs目录下会生成train目录,找到最终训练的exp,在weights目录下会生成best.pt和last.pt,我们选择best.pt,指定输入输出路径,输入以下命令
python export.py --weights yolov5s.pt --include torchscript onnx
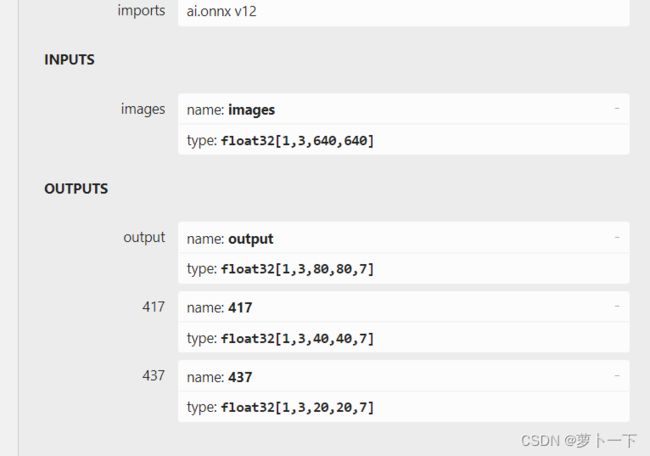
在有的情况下输出模型结构需要进行调整,修改fucs网络层,输出节点进行拼接等。这里不需要对模型的输入输出节点进行修改。输出网络结构如图所示。
修改onnx输出字节的名称
将417,437,output输出节点改为output0,output1,output2
大佬提供的代码
工具
- ONNX模型shape推理
有时遇到拿到的ONNX模型缺少中间节点的shape信息,可以使用onnx_infer_shape来进行shape推理,此脚本源于onnxruntime,使用方式如下
python onnx_infer_shape.py --input model.onnx --output new_model.onnx
- 裁剪ONNX模型
在部分场景下,我们可能只需要整个模型的一部分,那么可以使用prune_onnx_model.py来裁剪模型,如我们只需要模型中的输出x和y及其之前的节点即可,那么可使用如下方式处理模型
python prune_onnx_model.py --model model.onnx --output_names x y --save_file new_model.onnx
其中output_names用于指定最终模型的输出tensor,可以指定多个
- 修改模型中间节点命名(包含输入、输出重命名)
python rename_onnx_model.py --model model.onnx --origin_names x y z --new_names x1 y1 z1 --save_file new_model.onnx
其中origin_names和new_names,前者表示原模型中各个命名(可指定多个),后者表示新命名,两个参数指定的命名个数需要相同
编写client客户端代码
首先给出模型的配置信息config.pbtxt。模型的输入是,[1,3,640,640]的图片,输出是[1,3,80,80,7][1,3,40,40,7][1,3,20,20,7]的output0,output1,output2(这里的output名称必须与你onnx输出节点的名称对应)预测结果信息,并指定了文件名。
name: "hat_model"
platform: "onnxruntime_onnx"
max_batch_size : 0
input [
  {
    name: "images"
    data_type: TYPE_FP32
    dims: [1,3, 640, 640 ]
   reshape: { shape: [1,3,640, 640] }
  }
]
output [
  {
    name: "output0"
    data_type: TYPE_FP32
    dims: [1,3,80,80,7 ]
  },
  {
    name: "output1"
    data_type: TYPE_FP32
    dims: [1,3,40,40,7 ]
  },
  {
    name: "output2"
    data_type: TYPE_FP32
    dims: [1,3,20,20,7 ]
  }
]
进行图片的前处理操作和后处理操作,并在客户端调用模型,代码如下
import numpy as np
import tritonclient.http as httpclient
import torch
from PIL import Image
import cv2
import time
import torchvision
import random


def clip_coords(boxes, img_shape):
    '''查看是否越界'''
    # Clip bounding xyxy bounding boxes to image shape (height, width)
    boxes[:, 0].clamp_(0, img_shape[1])  # x1
    boxes[:, 1].clamp_(0, img_shape[0])  # y1
    boxes[:, 2].clamp_(0, img_shape[1])  # x2
    boxes[:, 3].clamp_(0, img_shape[0])  # y2

def scale_coords(img1_shape, coords, img0_shape, ratio_pad=None):
    '''
    坐标对应到原始图像上,反操作:减去pad,除以最小缩放比例
    :param img1_shape: 输入尺寸
    :param coords: 输入坐标
    :param img0_shape: 映射的尺寸
    :param ratio_pad:
    :return:
    '''

    # Rescale coords (xyxy) from img1_shape to img0_shape
    if ratio_pad is None:  # calculate from img0_shape
        gain = min(img1_shape[0] / img0_shape[0], img1_shape[1] / img0_shape[1])  # gain  = old / new,计算缩放比率
        pad = (img1_shape[1] - img0_shape[1] * gain) / 2, (
                        img1_shape[0] - img0_shape[0] * gain) / 2  # wh padding ,计算扩充的尺寸
    else:
        gain = ratio_pad[0][0]
        pad = ratio_pad[1]

    coords[:, [0, 2]] -= pad[0]  # x padding,减去x方向上的扩充
    coords[:, [1, 3]] -= pad[1]  # y padding,减去y方向上的扩充
    coords[:, :4] /= gain  # 将box坐标对应到原始图像上
    clip_coords(coords, img0_shape)  # 边界检查
    return coords

def letterbox(img, new_shape=(640, 640), color=(114, 114, 114), auto=False, scaleFill=False, scaleup=True,
                  stride=32):

    '''图片归一化'''
    # Resize and pad image while meeting stride-multiple constraints
    shape = img.shape[:2]  # current shape [height, width]
    if isinstance(new_shape, int):
        new_shape = (new_shape, new_shape)

    # Scale ratio (new / old)
    r = min(new_shape[0] / shape[0], new_shape[1] / shape[1])
    if not scaleup:  # only scale down, do not scale up (for better test mAP)
        r = min(r, 1.0)

    # Compute padding
    ratio = r, r  # width, height ratios

    new_unpad = int(round(shape[1] * r)), int(round(shape[0] * r))
    dw, dh = new_shape[1] - new_unpad[0], new_shape[0] - new_unpad[1]  # wh padding

    if auto:  # minimum rectangle
        dw, dh = np.mod(dw, stride), np.mod(dh, stride)  # wh padding
    elif scaleFill:  # stretch
        dw, dh = 0.0, 0.0
        new_unpad = (new_shape[1], new_shape[0])
        ratio = new_shape[1] / shape[1], new_shape[0] / shape[0]  # width, height ratios

    dw /= 2  # divide padding into 2 sides
    dh /= 2

    if shape[::-1] != new_unpad:  # resize
        img = cv2.resize(img, new_unpad, interpolation=cv2.INTER_LINEAR)

    top, bottom = int(round(dh - 0.1)), int(round(dh + 0.1))
    left, right = int(round(dw - 0.1)), int(round(dw + 0.1))

    img = cv2.copyMakeBorder(img, top, bottom, left, right, cv2.BORDER_CONSTANT, value=color)  # add border
    return img, ratio, (dw, dh)

def sigmoid(x):
    return 1 / (1 + np.exp(-x))

def xywh2xyxy(x):
    # Convert nx4 boxes from [x, y, w, h] to [x1, y1, x2, y2] where xy1=top-left, xy2=bottom-right
    y = np.copy(x)

    y[:, 0] = x[:, 0] - x[:, 2] / 2  # top left x
    y[:, 1] = x[:, 1] - x[:, 3] / 2  # top left y
    y[:, 2] = x[:, 0] + x[:, 2] / 2  # bottom right x
    y[:, 3] = x[:, 1] + x[:, 3] / 2  # bottom right y

    return y

def nms(prediction, conf_thres=0.1, iou_thres=0.6, agnostic=False):
    if prediction.dtype is torch.float16:
        prediction = prediction.float()  # to FP32
    xc = prediction[..., 4] > conf_thres  # candidates
    min_wh, max_wh = 2, 4096  # (pixels) minimum and maximum box width and height
    max_det = 300  # maximum number of detections per image
    output = [None] * prediction.shape[0]
    for xi, x in enumerate(prediction):  # image index, image inference
        x = x[xc[xi]]  # confidence
        if not x.shape[0]:
            continue

        x[:, 5:] *= x[:, 4:5]  # conf = obj_conf * cls_conf
        box = xywh2xyxy(x[:, :4])

        conf, j = x[:, 5:].max(1, keepdim=True)
        x = torch.cat((torch.tensor(box), conf, j.float()), 1)[conf.view(-1) > conf_thres]
        n = x.shape[0]  # number of boxes
        if not n:
            continue
        c = x[:, 5:6] * (0 if agnostic else max_wh)  # classes
        boxes, scores = x[:, :4] + c, x[:, 4]  # boxes (offset by class), scores
        i = torchvision.ops.boxes.nms(boxes, scores, iou_thres)
        if i.shape[0] > max_det:  # limit detections
            i = i[:max_det]
        output[xi] = x[i]
    return output


def infer(img_path):
    """执行前向操作作预测输出"""
    # 超参数设置
    img_size=(640,640) #图片缩放大小
    conf_thres=0.25 #置信度阈值
    iou_thres=0.45 #iou阈值
    class_num=2 #类别数

    stride=[8,16,32]

    anchor_list= [[10,13, 16,30, 33,23],[30,61, 62,45, 59,119], [116,90, 156,198, 373,326]]
    anchor = np.array(anchor_list).astype(np.float).reshape(3,-1,2)

    area = img_size[0] * img_size[1]
    size = [int(area / stride[0] ** 2), int(area / stride[1] ** 2), int(area / stride[2] ** 2)]
    feature = [[int(j / stride[i]) for j in img_size] for i in range(3)]


    # 读取图片
    src_img=cv2.imread(img_path)
    src_size=src_img.shape[:2]

    # 图片填充并归一化
    img=letterbox(src_img,img_size,stride=32)[0]

    # Convert
    img = img[:, :, ::-1].transpose(2, 0, 1)  # BGR to RGB, to 3x416x416
    img = np.ascontiguousarray(img)


    # 归一化
    img=img.astype(dtype=np.float32)
    img/=255.0

    # # BGR to RGB
    # img = img[:, :, ::-1].transpose(2, 0, 1)
    # img = np.ascontiguousarray(img)

    # 维度扩张
    img=np.expand_dims(img,axis=0)

    start=time.time()

    inputs = []
    inputs.append(httpclient.InferInput('images', img.shape, "FP32"))
    inputs[0].set_data_from_numpy(img, binary_data=False)
    # 输出结果矩阵
    outputs = []
    outputs.append(httpclient.InferRequestedOutput('output0', binary_data=False))  # 获取 1000 维的向量
    outputs.append(httpclient.InferRequestedOutput('output1', binary_data=False))
    outputs.append(httpclient.InferRequestedOutput('output2', binary_data=False))

    results = triton_client.infer('custom_model', inputs=inputs, outputs=outputs)
    output_data0 = results.as_numpy('output0')
    output_data1 = results.as_numpy('output1')
    output_data2 = results.as_numpy('output2')

    # print(output_data0.shape)
    # print(output_data0)

    #提取出特征
    y = []
    y.append(torch.tensor(output_data0.reshape(-1,size[0]*3,5+class_num)).sigmoid())
    y.append(torch.tensor(output_data1.reshape(-1,size[1]*3,5+class_num)).sigmoid())
    y.append(torch.tensor(output_data2.reshape(-1,size[2]*3,5+class_num)).sigmoid())

    grid = []
    for k, f in enumerate(feature):
        grid.append([[i, j] for j in range(f[0]) for i in range(f[1])])

    z = []
    for i in range(3):
        src = y[i]

        xy = src[..., 0:2] * 2. - 0.5
        wh = (src[..., 2:4] * 2) ** 2
        dst_xy = []
        dst_wh = []
        for j in range(3):
            dst_xy.append((xy[:, j * size[i]:(j + 1) * size[i], :] + torch.tensor(grid[i])) * stride[i])
            dst_wh.append(wh[:, j * size[i]:(j + 1) * size[i], :] * anchor[i][j])
        src[..., 0:2] = torch.from_numpy(np.concatenate((dst_xy[0], dst_xy[1], dst_xy[2]), axis=1))
        src[..., 2:4] = torch.from_numpy(np.concatenate((dst_wh[0], dst_wh[1], dst_wh[2]), axis=1))
        z.append(src.view(1, -1, 5+class_num))

    results = torch.cat(z, 1)
    results = nms(results, conf_thres, iou_thres)
    cast=time.time()-start
    # print("cast time:{}".format(cast))

    #映射到原始图像
    img_shape=img.shape[2:]
    # print(img_size)
    for det in results:  # detections per image
        if det is not None and len(det):
            det[:, :4] = scale_coords(img_shape, det[:, :4],src_size).round()

    if det is not None and len(det):
        draw(src_img, det)

def plot_one_box(x, img, color=None, label=None, line_thickness=None):
    # Plots one bounding box on image img
    tl = line_thickness or round(0.002 * (img.shape[0] + img.shape[1]) / 2) + 1  # line/font thickness
    color = color or [random.randint(0, 255) for _ in range(3)]
    c1, c2 = (int(x[0]), int(x[1])), (int(x[2]), int(x[3]))
    cv2.rectangle(img, c1, c2, color, thickness=tl, lineType=cv2.LINE_AA)
    if label:
        tf = max(tl - 1, 1)  # font thickness
        t_size = cv2.getTextSize(label, 0, fontScale=tl / 3, thickness=tf)[0]
        c2 = c1[0] + t_size[0], c1[1] - t_size[1] - 3
        cv2.rectangle(img, c1, c2, color, -1, cv2.LINE_AA)  # filled
        cv2.putText(img, label, (c1[0], c1[1] - 2), 0, tl / 3, [225, 255, 255], thickness=tf, lineType=cv2.LINE_AA)

def draw(img, boxinfo):
    colors = [[0, 0, 255],[0,255,0]]
    class_id =['hat','no_hat']
    for *xyxy, conf, cls in boxinfo:
        label = '%s %.2f' % (class_id[int(cls)], conf)
        # print('xyxy: ', xyxy)
        plot_one_box(xyxy, img, label=label, color=colors[int(cls)], line_thickness=1)

    cv2.namedWindow("dst",0)
    cv2.imshow("dst", img)
    cv2.imwrite("data/res1.jpg",img)
    cv2.waitKey(0)
    # cv2.imencode('.jpg', img)[1].tofile(os.path.join(dst, id + ".jpg"))
    return 0


if __name__ == '__main__':
    triton_client = httpclient.InferenceServerClient(url='127.0.0.1:8000')
    imgpath = './0.jpg'
    infer(imgpath)
启动服务
启动服务的方法有两种,docker 启动并执行命令
docker run -d --name my_triton -p8000:8000 -p8001:8001 --ipc=host -p8002:8002 -v /d/test_triton/hat_server:/models nvcr.io/nvidia/tritonserver:22.04-py3 tritonserver --model-repository=/models
运行client.py可以进行测试。
后续更新python backend服务端代码编写
参考文献
跑通triton
我不会triton系列(python backend)
官方githubtriton-inference-server
2022.7.21新增内容
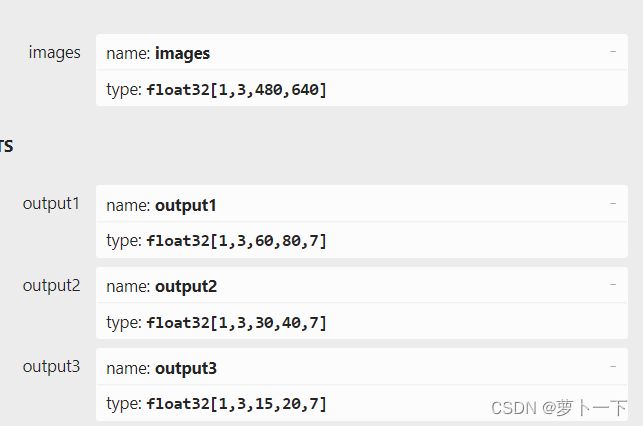
如果需要修改输入图片维度,将export.py文件的默认的img-size[640,640]改为[480,640],必须是32的整数倍,官方代码中输入图片的维度为[480,640],输出维度为[18900,7]

这时模型的输入输出维度为
这种情况需要将服务端的model.py中letterbox函数的参数auto改为False,同时修改model.py中超参数img_size=(480,640) #图片缩放大小,当然模型配置文件也需要进行修改