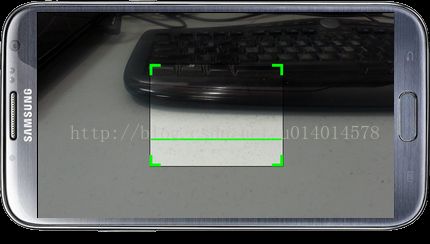
利用开源ZXing项目实现条形码和二维码扫描识别 —— Android端
前言
首先使用ZXing项目前我们需要对其进行简化,因为开源的ZXing项目中Android实现里面有太多多余的东西了,得对其进行简化,并且原始的ZXing项目扫描框并不美观所以也要对其进行自定义美化。
简化
在开始前大致介绍一下简化ZXing需要用到各个包 、类的职责。
- CaptureActivity。这个是启动Activity 也就是扫描器(如果是第一安装,它还会跳转到帮助界面)。
- CaptureActivityHandler 解码处理类,负责调用另外的线程进行解码。
- DecodeThread 解码的线程。
- com.google.zxing.client.android.camera 包,摄像头控制包。
- ViewfinderView 自定义的View,就是我们看见的拍摄时中间的框框了。
详细简化过程参考博文“http://www.cnblogs.com/keyindex/archive/2011/06/08/2074900.html”
自定义扫描框
自定义扫描框需要修改ViewfinderView自定义的View类。绘制窗体方法在onDraw(Canvas canvas)方法中。
@Override
	public void onDraw(Canvas canvas) {
		Rect frame = CameraManager.get().getFramingRect();
		if (frame == null) {
			return;
		}

		// 初始化中间线滑动的最上边和最下边
		if (!isFirst) {
			isFirst = true;
			slideTop = frame.top;
			slideBottom = frame.bottom;
		}

		int width = canvas.getWidth();
		int height = canvas.getHeight();

		// Draw the exterior (i.e. outside the framing rect) darkened
		paint.setColor(resultBitmap != null ? resultColor : maskColor);
		canvas.drawRect(0, 0, width, frame.top, paint);
		canvas.drawRect(0, frame.top, frame.left, frame.bottom + 1, paint);
		canvas.drawRect(frame.right + 1, frame.top, width, frame.bottom + 1,
				paint);
		canvas.drawRect(0, frame.bottom + 1, width, height, paint);

		if (resultBitmap != null) {
			// Draw the opaque result bitmap over the scanning rectangle
			paint.setAlpha(OPAQUE);
			canvas.drawBitmap(resultBitmap, frame.left, frame.top, paint);
		} else {

			// 画扫描框
			paint.setColor(frameColor);
			canvas.drawRect(frame.left, frame.top, frame.right + 1,
					frame.top + 2, paint);
			canvas.drawRect(frame.left, frame.top + 2, frame.left + 2,
					frame.bottom - 1, paint);
			canvas.drawRect(frame.right - 1, frame.top, frame.right + 1,
					frame.bottom - 1, paint);
			canvas.drawRect(frame.left, frame.bottom - 1, frame.right + 1,
					frame.bottom + 1, paint);

			paint.setColor(laserColor);

			//画扫描框边上的角,总共8个部分
			canvas.drawRect(frame.left, frame.top, frame.left + ScreenRate,
					frame.top + CORNER_WIDTH, paint);
			canvas.drawRect(frame.left, frame.top, frame.left + CORNER_WIDTH, frame.top
					+ ScreenRate, paint);
			canvas.drawRect(frame.right - ScreenRate, frame.top, frame.right,
					frame.top + CORNER_WIDTH, paint);
			canvas.drawRect(frame.right - CORNER_WIDTH, frame.top, frame.right, frame.top
					+ ScreenRate, paint);
			canvas.drawRect(frame.left, frame.bottom - CORNER_WIDTH, frame.left
					+ ScreenRate, frame.bottom, paint);
			canvas.drawRect(frame.left, frame.bottom - ScreenRate,
					frame.left + CORNER_WIDTH, frame.bottom, paint);
			canvas.drawRect(frame.right - ScreenRate, frame.bottom - CORNER_WIDTH,
					frame.right, frame.bottom, paint);
			canvas.drawRect(frame.right - CORNER_WIDTH, frame.bottom - ScreenRate,
					frame.right, frame.bottom, paint);


			paint.setAlpha(SCANNER_ALPHA[scannerAlpha]);
			scannerAlpha = (scannerAlpha + 1) % SCANNER_ALPHA.length;

			//绘制中间的线,每次刷新界面,中间的线往下移动SPEEN_DISTANCE
			slideTop += SPEEN_DISTANCE;
			if(slideTop >= frame.bottom){
				slideTop = frame.top;
			}
			canvas.drawRect(frame.left + MIDDLE_LINE_PADDING, slideTop - MIDDLE_LINE_WIDTH/2, frame.right - MIDDLE_LINE_PADDING,slideTop + MIDDLE_LINE_WIDTH/2, paint);


			Collection currentPossible = possibleResultPoints;
			Collection currentLast = lastPossibleResultPoints;
			if (currentPossible.isEmpty()) {
				lastPossibleResultPoints = null;
			} else {
				possibleResultPoints = new HashSet(5);
				lastPossibleResultPoints = currentPossible;
				paint.setAlpha(OPAQUE);
				paint.setColor(resultPointColor);
				for (ResultPoint point : currentPossible) {
					canvas.drawCircle(frame.left + point.getX(), frame.top
							+ point.getY(), 6.0f, paint);
				}
			}
			if (currentLast != null) {
				paint.setAlpha(OPAQUE / 2);
				paint.setColor(resultPointColor);
				for (ResultPoint point : currentLast) {
					canvas.drawCircle(frame.left + point.getX(), frame.top
							+ point.getY(), 3.0f, paint);
				}
			}

			postInvalidateDelayed(ANIMATION_DELAY, frame.left, frame.top,
					frame.right, frame.bottom);
		}
	}
以上就能够绘制出顶部图片中的扫描窗口了。
项目源码
